Zero to Witness: Part 9: Generating witness keys

Today, we stand at the foot of the ladder to the final, highest diving board. Let's climb up!
Make a new Steem account for the witness
Our Witness Node is going to need a private key in order to witness blocks. It would work fine if I used my regular @rexthetech Active Key, and some witnesses do use their main Steem account as their witness account, but instead we're going to make a separate account just for the witness.
That's reasonably common amongst other witnesses, and I do like knowing that my main account's active key isn't going to be on the server.
The usual Steem account sign-up process is a little out of context here; our witness node doesn't have its own email address or phone number for validation! Instead, a few weeks ago I used @steemchiller's excellent account creation tool to create the account @steemwow, which is what I'll be using as the witness account.
Creating an account there is a 2-step process, but it's very quick and easy. First purchase a Claim Account Ticket, which you can buy for Resource Credits if you have enough, or for 3 STEEM.
Having done that, you can use the Create New Account form. For Key Generation, I selected Use Master Password.
Once the account is created, sign into Steemit with it so that you get the New Account dialogue, and download the PDF of Steem keys as usual.
Configure Steem node for witness mode
Go ahead and log into the server over SSH. Let's stop the Steem node while we fiddle with its config:
./stopsteem.sh
Open the Steem config file in nano:
nano /steemdata/config.ini
The second line is what is currently making us a Seed Node. We're going to comment it out, so that other Steem nodes can't use us as a block source. Note: This doesn't prevent us from connecting to the rest of the Steem network, it just prevents incoming connections.
Add a # at the start of the line, like so:
#p2p-endpoint = 0.0.0.0:2001
Now we're going to remove the # from a line a little further down:
webserver-ws-endpoint = 0.0.0.0:8090
That one tells Steem to enable its API so that we can connect to it using the cli_wallet. Note that even though the IP address "0.0.0.0" tells it to bind to all available IP addresses, this doesn't expose the API to the internet, thanks to our firewall.
We'll be back in this config file later, but for now save with Ctrl-O then Enter, and quit nano with Ctrl-X.
Restart Steem:
./startsteem.sh
Create a wallet and signing key
The very observant may have noticed this red warning when the Steem node starts up:
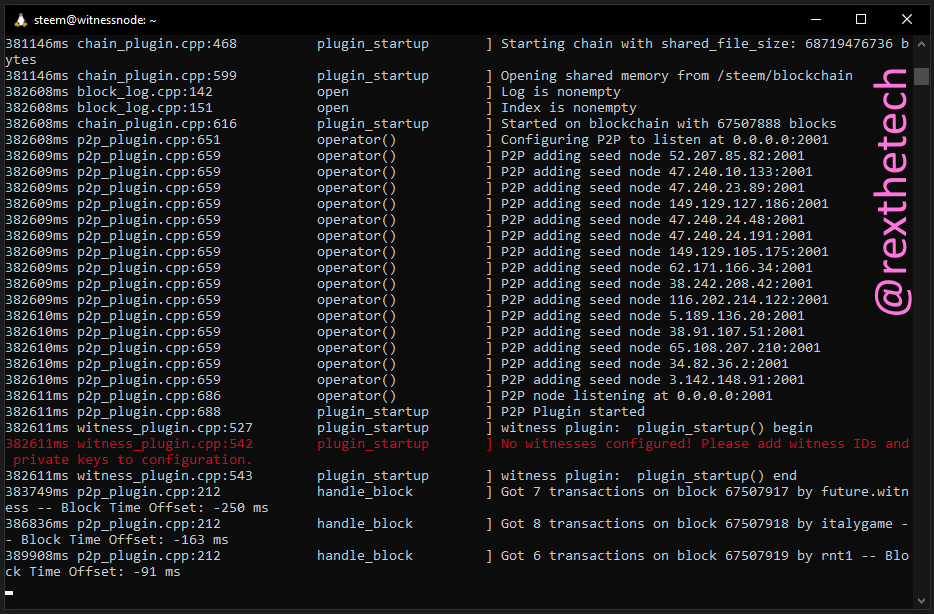
We'll rectify that by providing the Witness ID and private key that it's asking for.
First, let's make a little script to allow us to easily interact with the cli_wallet inside the Docker container. cli_wallet is a command-line application that lets us interact with the local Steem daemon to do things like generate new keys, import private keys, send transactions, and so on.
nano wallet.sh
In nano, paste:
docker exec -it witness cli_wallet
This instructs docker to run the cli_wallet command inside the container named witness, and to connect us interactively to cli_wallet so that we can type commands here. Putting this in a script just saves us from having to type it out every time we want to use the wallet.
As in Part 7, we also need to make the script executable:
chmod +x ./wallet.sh
Now we'll run the script, to connect to cli_wallet running inside the container:
./wallet.sh
You'll see a >>> prompt, which means we're in the cli_wallet environment and ready to issue commands. The first thing we need to do is create a strong wallet password:
set_password "YOUR-PASSWORD"
This will make cli_wallet immediately lock itself. Unlock it with:
unlock "YOUR-PASSWORD"
Now we need to generate a new keypair which will be used to sign blocks that we witness. Still inside cli_wallet, do:
suggest_brain_key
This will return some output in a format like this:
suggest_brain_key
{
  "brain_priv_key": "A BUNCH OF WORDS FROM WHICH THE KEYPAIR IS GENERATED",
  "wif_priv_key": "5xxxxxxxxxxxxxxxxxxxxxxxxxxxxxxxxxxxxxxxxxxxxxxxxxxxx",
  "pub_key": "STMxxxxxxxxxxxxxxxxxxxxxxxxxxxxxxxxxxxxxxxxxxxxxxxxxxx"
}
Copy those lines into a text file to keep them safe and handy. When you've done that, Ctrl-D will get you out of cli_wallet and back to your normal SSH session.
Finish configuring the Steem node
Stop the Steem node again, and re-open its config in nano:
./stopsteem.sh
nano /steemdata/config.ini
Scroll down through the file with Page Up / Page Down until you find the following section:

(Pro tip: nano has a powerful built-in search. Do Ctrl-W to enter search mode, type name of and hit Enter - you should end up right at where you need to be)
We're going to edit this section to fill in our witness account name and the wif_priv_key field from the keypair we just generated. We need to uncomment those two lines as well, by removing the # at the start of the line.
When we're done it should look like this, except with your own witness name and key:

Then save and quit nano.
Just to be super clear: This private key is the one we just generated above. It's not one of the keys from the PDF you grabbed from Steemit.
Restart the node:
./startsteem.sh
Using our log viewer, we should see a "Launching block production" message as the node starts up:
./steemlogs.sh

Import your witness account key
We need to go back to cli_wallet for this, so start it again:
./wallet.sh
It'll start locked, so unlock it:
unlock "YOUR-PASSWORD"
Now we need the witness's steem account's Private Active Key, so go and copy the Private Active Key from the PDF you grabbed from Steemit, and substitute it in the command below:
import_key "5xxxxxxxxxxxxxxxxxxxxxxxxxxxxxxxxxxxxxxxxxxxxxxxx"
We could have done this step at the same time as we created the signing keypair above; however, with all these keys flying around, I didn't want your Private Active Key in your clipboard just in case it ended up in the Steem config by accident.
The view from here
What a beautiful world it is here at the top of the ladder, as you step out onto the diving board. Sea birds whirl lazily in the hazy sky. You think you hear a musician on a distant beach.
Our Steem node is happily in witness mode -- but we're not quite yet a witness.
Next time, we'll jump off the diving board and issue the final command required to become a witness!
Series Index
Part 1: We need a big computer!
Part 2: Connecting to the server
Part 3: Securing the server (see also Passwords: A Rant)
Part 4: Enabling certificate authentication
Part 5: Downloading the blockchain
Part 6: Unpacking the blockchain and configuring Steem
Part 7: Starting and syncing Steem
Part 8: Witness responsibilities