Zero to Witness: Part 4: Enabling certificate authentication
Today is the last episode of prep work before we actually install the Steem software, and is again potentially useful even if you're not building a Witness Node and have other plans for a fresh server.
Strictly speaking, this step is optional, but highly recommended as it will level up our server security.
So far, every time we log in, we've been entering our password. Let's switch to certificate-based authentication instead, as suggested by @moecki.
This will dramatically increase system security, as well as potentially making our login experience slicker; if we don't put a passphrase on the key, we won't need to enter a password. Pros and cons of that are discussed below.
The idea is that we generate a key-pair on our own PC, leave the private key there, and copy the public key to the server. When we log in, the server will issue a certificate challenge that SSH will complete automatically, so long as we have the private key.
On Windows
If you're using WSL2 for SSH, skip straight to the Mac, Linux or WSL2 instructions below.
Otherwise, if you're using PuTTY, let's proceed. When you installed PuTTY, a key generator utility called PuTTYgen will have been installed too.
Find PuTTYgen in your start menu, and fire it up. Then take the steps in the image below:

After a bit of mouse wiggling, a key pair will be generated, and PuTTYgen will look like this:
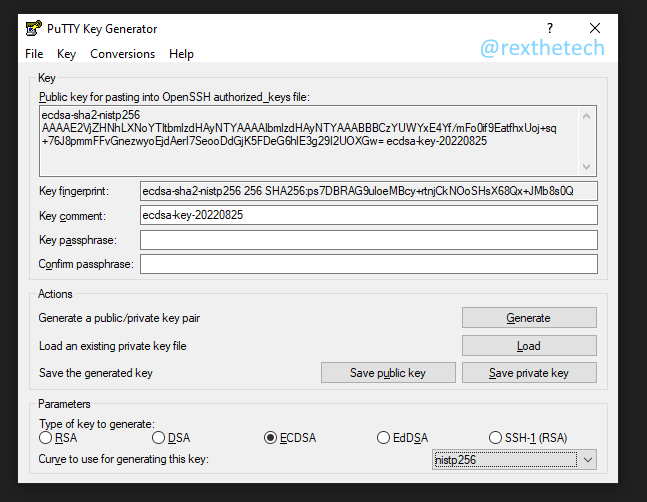
(don't worry, that's not my real key!)
You don't need to put a passphrase on the key, but it does mean that even if your PC is hacked and your private key stolen, the thief wouldn't be able to use it to access your server. If you do want to add a passphrase, enter it in the "Key passphrase" and "Confirm passphrase" boxes now.
Next, click Save Private Key, and save it somewhere you can easily find it. For this example, I saved the key to C:\Users\Rex\Keys\witnessnode.ppk.
Leave the PuTTYgen window open, start PuTTY, and log into the server with your password as normal.
On the server, we need to first make a directory called ".ssh" in our home directory, so type this:
mkdir ~/.ssh
chmod 700 ~/.ssh
Note that in Linux, ~ is a shortcut meaning the current user's home directory.
Since SSH is quite particular about the file permissions on the .ssh directory, and on files inside it, we need to make sure this directory can't be read by anyone other than the current user. We won't go into exactly how the permission numbers work right now, but that's what the second line above does.
Now let's create a file in that directory called authorized_keys, and set its permissions too:
touch ~/.ssh/authorized_keys
chmod 600 ~/.ssh/authorized_keys
We'll now open the file in the nano text editor on the server:
nano ~/.ssh/authorized_keys
Next, we need to paste the public key from PuTTYgen (the bit in the large textbox) into the authorized_keys file. Highlight the entire of the public key and copy it with Ctrl-C.
Switch back to your PuTTY window where nano is open, and right-click to paste the public key. It's important that the entire key is on one line.
To save the file in nano, do Ctrl-O and then Enter. Then, exit nano with Ctrl-X.
You can now close the SSH session, and close PuTTYgen.
All we need to do now is tell PuTTY to use our new private key. Start PuTTY, single-click on the "My Witness Node" profile, and click Load (not Open!).
Navigate to the "Data" page in the left-hand tree and fill in the username "steem" as shown:

Next, navigate to the "Auth" page, click the Browse button, and select the private key file that you saved from PuTTYgen:

Finally, navigate back to the Session page and click Save:

OK! Now you can open an SSH session as normal, and you should be automatically logged into the server, though you'll still have to give your key passphrase if you set one.
Now skip ahead to "Disable Password Authentication" below.
On Mac, Linux, or WSL2
This is much quicker and easier than using PuTTY :)
Fire up a terminal on your local machine, and run:
ssh-keygen -t ed25519 -f ~/.ssh/id_witnessnode
It will ask you for a passphrase for the key. You don't need to put one, but if you do even if your PC is hacked and your private key stolen, the thief wouldn't be able to use it to access your server.
Now we need to copy the public key to the server. Again, much simpler than PuTTY; just run this command, again on your local machine:
ssh-copy-id -i ~/.ssh/id_witnessnode.pub steem@witnessnode
That command actually connects to the server using SSH, and installs the public key there for you. You'll need to give it the password for the steem user.
Next we'll tell ssh which key to use when connecting to our server. Do:
nano ~/.ssh/config
Paste these two lines at the bottom of any existing lines in the file:
Host witnessnode
    IdentityFile ~/.ssh/id_witnessnode
Ctrl-O then Enter to save, and Ctrl-X to exit.
Finally, try to SSH to the server as normal (ssh steem@witnessnode). It shouldn't ask you for a password, but you'll need to provide the private key passphrase if you set one.
On all platforms: Disable Password Authentication
Now that we have certificate-based authentication tested and working, let's disable password-based access entirely and thwart any pesky bots who might be trying to brute-force our logins. We can use sed again for that:
sudo sed -i 's/#PasswordAuthentication yes/PasswordAuthentication no/g' /etc/ssh/sshd_config
sudo systemctl restart ssh
The view from here
If you've made it this far, you have a pretty nicely secured server and a good starting point for any application load. If it's the first time you've built a server or used Linux, very well done.
From here on out, the series is Steem-specific as we build our Witness Node. Next episode we will finally start installing the Steem platform.
See you next time, and please do drop a comment if you have any queries, run into any problems, or notice anything I could have done better.
Now I have finally changed my login according to your instructions. I was able to set up everything. Thank you!
In addition, I would like to point out one small thing:
PuTTY gave me the following error when I tried to log in:
Unable to load key file "pathto\sshkey.ppk" (PuTTY key format too new)The solution to the problem is to change the version for the private key file as follows:
PPK file version 2 must be selected here before the private key is saved.
Oh, sehr schön! Bist du auch dabei, das "Ding" zum Laufen zu kriegen? Meiner ist jetzt mit wget beschäftigt... Bin schon gespannt wie lange der anschließende Sync dann braucht, vorausgesetzt ich komm soweit ;-)
Aktuell eher nicht. Aber ich behalte es im Hinterkopf. Habe aber dadurch meinen Page-Server so einrichten können, dass ich ihn jetzt nur noch durch die Zertifikatstür betrete. Die Anleitung oben war deutlich besser als die Anleitung meines Providers :-)... dabei ist es so easy.
Ein eigener Knoten wäre interessant, wenn man Steem-Anfragen aus Performance-Gründen nicht an den API-Knoten von Steemit richten möchte...
Ich würde viel lieber am Code der Blockchain arbeiten... :-) ich muss man suchen, ob es da schon Posts mit einer Anleitung gab, wie man die zum Laufen bekommt... 🧐
Stimmt, wenn man es weiß ;-)
Meinst du das Frontend? Hatte das schon mal in GitPod laufen, schneller ist das dann auch nicht - aber Änderungen lassen sich so testen und (soweit du bei Steem als Dev drin bist) kannst auch gleich Merge-Requests senden. Schätze aber, du willst das auf deinem Rechner haben. Zum Einstieg könnte GitPod trotzdem nützlich sein, da siehst du gleich was alles installiert wird ohne (vorerst) deinen PC vollzumüllen.
Um einen Workspace bei GitPod zu erstellen, einfach vor einer github/gitlab-Adresse:
https://gitpod.io/#einfügen.
Ach ja - ich hab da was im Hinterkopf, irgendwer hat geschrieben, sein Merge wäre erst Monate später bestätigt worden. Also, ich kenn die Gepflogenheiten hier nicht, weißt du wie der Ablauf wäre? Nicht das du dich reinhängst und keiner da ist, der die Änderungen einspielt.
Brilliant! Good catch, thank you for sharing the solution :)
Thank you very much for your explanation.
I will definitely try it out! It will take a few more days, but I'll let you know if it works ... or not ;-)
It's nice that you're getting the attention you need in the meantime. For my personal liking, you can also take a few days between the parts so that I can keep up with it to some extent. Unfortunately, I don't have the opportunity to deal with my servers in detail every day...
Great :) Do let me know if you run into any issues.
Really great guide! I look forward to the next one
Thank you! I'm going to try and keep the posting pace up
Loving this series.
The super clear step-by-stepping is making a Tech Simpleton like me believe I could have a go 😀
I'm really hoping a self-proclaimed Tech Simpleton will try it, so I can recognise the parts I'm still not explaining deeply enough :D
This post has been featured in the latest edition of Steem News...
NOTE: This episode would be much more correctly titled "Enabling public key authentication", as we're not actually using certificates here. My bad on that one.
Google is paying $27485 to $29658 consistently for taking a shot at the web from home. I joined this action 2 months back and I have earned $31547 in my first month from this action. I can say my life has improved completely! Take a gander at what I do....http://MaxYourWealth.gq/