CPU Mining is back! A complete how to guide and profit analysis for Verium mining on a farm of single board computers - Part 2b
Unexpected part 2b...
This article was too long to fit in one post so had to split it down - this is the second half of part 2! https://steemit.com/verium/@birty/cpu-mining-is-back-a-complete-how-to-guide-and-profit-analysis-for-verium-mining-on-a-farm-of-single-board-computers-part-2
Miner Configuration
In these steps the XU4 miner is built, tested and then an image is cloned from the working one to be used to burn to all the rest of them. The final step is to connect each in turn to change its host name so that they can all be logged into easily via SSH and also to allow them to be identified in case one crashes etc.
As per the controller setup steps to get the XU4 miner up and running you will need a XU4, a XU4 power supply, a microSD memory card (8GB), a card reader that can take microSD cards, a computer to write the microSD card, a network cable, a spare port on your router/switch, a USB keyboard and display with a HDMI connection and suitable cable. If you don't have the USB keyboard and HDMI cable then you can use Step 4.6 to remote connect from your computer.
TLDR version of this is that there is an XU4 2GB Miner image available here https://goo.gl/IZYYzb - this image reflects all the steps below and all it needs is burning to a microSD card. Will do the Pi3 image in the near future as well
Step 4.1: Download a copy of 7zip from here http://www.7-zip.org/download.html and install it following the on-screen instructions.
Step 4.2: Download a copy of the latest XU4 Ubuntu OS image from here http://odroid.com/dokuwiki/doku.php?id=en:xu3_release_linux_ubuntu to your computer and note where its put. Once downloaded go to that folder and extract it, by right clicking on it and selecting the 7Zip menu and then “extract to “foldername””, where foldername is automatically generated from the image file name. Once the extraction process completes you should have an image (.img) file in the folder.
Step 4.3: Win32DiskImager should have been installed in Step 3.2, if doing this out of order then install it now as per that step. Insert the microSD card into the card reader, and plug the card reader into the computer. A new drive should show up in windows explorer, make of note of the drive letter. Now switch to Win32DiskImager and select that drive letter in the “Drive” drop down box in the top right of the programme. Now select the folder icon next to it and browse to where you extracted the operating system image to in Step 4.2, select the file and click “open”. Now click “write”, accept the warning and wait for it to finish. Now eject the card reader by clicking the “safely remove hardware” icon in the task tray area, select the card reader and then select “eject”. You now have a micoSD card with the operating system on it. For Linux and Mac - follow the instructions here but using the XU4 image file instead.: https://www.raspberrypi.org/documentation/installation/installing-images/README.md
Step 4.4: Insert the microSD card from Step 4.3 into the XU4, make sure the selector switch (little white switch next to the HDMI port) is set to to microSD rather than eMMC, plug one end of the network cable into the XU4 and the other end into your router/switch, plug in the USB keyboard and connect up the HDMI cable to the display and XU4 (if using), then plug in the power supply to the XU4 and then plug the power supply into the mains supply. All being well you will now have working XU4 - the red LED should be on (good power), the blue LED should be flashing (microSD card activity) and some activity on the wired ethernet port LEDs. If you used an external display then skip Step 4.5.
Step 4.5: Log-in to your router as per Step 3.6. Look for the section that shows the connected devices (under “Attached Devices” on my netgear router) and look for the device named “Odroid” and make a note of its IP address (assumed to be 192.168.123.21 for the rest of this section). Open up PuTTY (see Step 3.4) and type this IP address into the “Host Hame (or IP address)”, make sure “Port” is 22 and then click “Open” to connect. For Linux and Mac open a terminal window and type:
ssh [email protected]For all connections you will now be asked to confirm the identify of the machine with a message something like the following (the key fingerprint will be different for your machine):
The authenticity of host '192.168.0.20' can't be established.

RSA key fingerprint is f9:9b:06:11:75:d4:1f:d1:3c:51:0d:22:4a:13:ff:9f.

Are you sure you want to continue connecting (yes/no)
Type:
yesStep 4.6: If you have connected to an external display you will have a prompt on-screen asking now for a username and then a password, if you have used PuTTY then you will also be asked for a username and then a password, if using SSH from Linux or Mac you have already passed the username in the ssh command so will just be asked for the password. The default username and password for the XU4 are “root” and “odroid” respectively (without the quotes), so enter them as requested and confirm identity as per Step 4.5. You are now logged into your XU4.
Step 4.7: Next is to update the XU4 to the latest versions of everything that is already installed. This works exactly the same as updating the Pi3 in Step 3.8. Type:
apt-get update && apt-get upgrade -y && apt-get dist-upgrade -f -yThe upgrade step for the XU4 may generate additional options that need to be selected. Mine asked to select the character set (go with selected option if not sure), asked which package manager to use (select apt-get) and asked about using a new /etc/apt-fast.conf (select y). The image at the time of writing had issues with the “khubd” process (part of the linux USB core) using ~60% of a processor constantly so this step is important as that processing power is needed for mining!
Reboot the XU4 by typing:
reboot Log back in as per Step 4.6. The other issue that can be experienced with the XU4 is that when the heatsink was touched it caused a spike in CPU load for the “spi1” and “irq/534-ads7846” processes (Serial Peripheral Interface and interrupt requests from the touchscreen controller respectively). Neither are being used in this application so can be disabled if they are a problem. To check type:
topCheck which processes using up CPU time, and then touch the heatsink under the fan, if “spi1” and “irq/534-ads7846” are at the top (potentially ~20% between them) then the ads7846 (touchscreen controller) module needs to be disabled by typing:
modprobe -r ads7846“modprobe” is a linux programme that is used to load and unload modules from the linux kernel, the “-r” here tells it to remove a module and “ads7846” is the module to remove. Run “top” again to check this has worked and solved the CPU loading problem, neither of the processes should be there are the top any more. To make this change persist over reboots then the “ads7846” module needs to be blacklisted (prevents the kernel module from being loaded in the first place) by typing:
tee /etc/modprobe.d/blacklist-ads7846.conf <<< "ads7846"The “tee” command reads standard input and outputs it to standard output and a file simultaneously. Standard input and standard output are names for the data streams going into and out of a computer programme, e.g. this can commonly be thought of as the streams of data where the input one allows text entered on a keyboard being passed to the programme, and output from the programme to be displayed on screen. “/etc/modprobe.d/blacklist-ads7846.conf” is the file to write to, which is created if it doesn't exist, “<<<” passes the string on the right to the standard input of the command on the left and “ads7846” is the string to be passed. So pulling all this together “ads7846” is passed to the standard input of “tee” which displays this on the screen and at the same time writes it to the file “/etc/modprobe.d/blacklist-ads7846.conf”. Any modules named in a file with blacklist in the title will not be automatically loaded by the kernel.
Step 4.8: The next step is to configure and install the verium miner onto the XU4. First up get all the build dependencies installed by typing:
apt-get install git automake autoconf pkg-config libcurl4-openssl-dev libjansson-dev libssl-dev libgmp-devThe source for miner can then be downloaded by typing:
git clone https://github.com/effectsToCause/veriumMinerThe source now needs to be tweaked to get it to run most efficiently on the XU4. The Verium algorithm purposely needs a lot of memory (to make it GPU proof) and so to get 8 threads to run within the XU4 2GB of RAM the scrypt code needs to be changed as below. Change to the source directory by typing:
cd veriumMiner/algoNow open “scrypt.c” for editing by typing:
nano scrypt.cWhen the editor has loaded press “Ctrl-w”, then in the search bar that appears type:
ARM_NEONChange the following lines underneath:
#undef HAVE_SHA256_4WAY

#define SCRYPT_MAX_WAYS 3

#define HAVE_SCRYPT_3WAY 1

#define scrypt_best_throughput() 3

void scrypt_core_3way(uint32_t *X, uint32_t *V, int N);
To be:
#undef HAVE_SHA256_4WAY

#define SCRYPT_MAX_WAYS 1

//#define HAVE_SCRYPT_3WAY 1

#define scrypt_best_throughput() 1

void scrypt_core(uint32_t *X, uint32_t *V, int N);
Save and exit the file by pressing ctrl-x, then pressing y and then pressing return. Now support for the NEON extensions (which are the ARM equivalent of SSE extensions) needs to be added to ensure max performance. So go up one directory level by typing:
cd..Then edit the build script to add the support by typing:
nano build.shThen find the following line:
./configure --with-crypto --with-curl CFLAGS="-O2 $extracflags -DUSE_ASM -pg"And change it to:
./configure --with-crypto --with-curl CFLAGS="-O2 $extracflags -DUSE_ASM -mfpu=neon -pg”Save and exit the file by pressing ctrl-x, then pressing y and then pressing return. Now the miner can be built by typing:
./build.shAll being well there should be no build errors and the miner file should be in the directory now, check for it by typing:
ls Check for “cpuminer” in the directory listing.
Step 4.9: Now the XU4 can be setup to automatically start the miner on boot. First up the “screen” programme needs to be installed.This is used to create sessions that can be connected and disconnected from without halting the programmes running inside them. A “screen” session will be used to run the miner in from boot so that it can be connected to after SSH’ing into the miner to allow the output to be viewed. This is installed by typing:
apt-get install screenNow “screen” and the miner can be used together to make sure both are working. Make sure the RPi3 controller is still up and connected to the network and then type:
screenThen hit return to get past the introduction message. Now the miner can be started in this session by typing:
./cpuminer -o 192.168.123.20:33987 -O veriumuser:secretReplace the IP address with your setup as appropriate, and “veriumuser:secret” is the rpcuser:rpcpassword combination that was set in the configuration file on the controller in Step 3.13. This should launch the miner and it should start hashing away at ~380 H/m. Success!! The screen session can be disconnected from by pressing “ctrl-a” the “ctrl-d”, which will take you back to the original window. Typing the following command will re-connect to the session and give the same screen view as before showing the miner hashing away:
screen -rTo ensure the miner autostarts at boot edit the rc.local file by typing:
nano /etc/rc.localIn this file just above the line that says “exit 0” add the following line:
screen -dmS cgm sudo /root/veriumMiner/cpuminer -o 192.168.123.20:33987 -O veriumuser:secretChange the miner parameters as required above then save and exit the file by pressing ctrl-x, then pressing y and then pressing return. Now test to make sure this works by rebooting the XU4 by typing:
rebootWhen the XU4 has rebooted log-in / SSH back into it and then reconnect to the screen session that should have been started on boot by typing:
screen -rIf all is working then its time to clone the XU4 miner image and then burn it to 39 more microSD cards so shut down the XU4 by typing:
shutdown nowOnce the XU4 has shut down remove the microSD card from it and put it back in the card reader and re-attach that to the computer. Load up Win32DiskImager again, select the drive letter for the card reader and then browse to and / or type in the location and filename for where you want to store the image and click “write”. When that completes there will be an XU4 image all ready to write to as many microSD cards as you want. Take the original microSD card out and put it back in the XU4.
Step 4.10:This step is optional, and is used to shrink the image file from 8GB down to something smaller so it takes less time to burn the cloned images to the microSD cards. I had success getting down to a 2GB image - which made burning the microSD cards much faster. However it requires a linux OS and a bit of linux knowledge. The process can be found at the link below, and is not going to be repeated / explained here. Make a copy of your image before you start!.http://raspberrypi.stackexchange.com/questions/36456/how-to-shrink-an-image-file-after-allocating-full-space/36608#36608
Step 4.11: This step needs to be repeated for as many XU4’s as you have in your system and can be quite time consuming depending on how many you have, but is fairly straightforward. It is recommended to continuously burn the microSD cards rather than complete this step each time, i.e. as soon as one finishes stick the next in and burn the image. Will save lots of time!
Insert a blank microSD card into the card reader and write the image as per Step 4.3, but this time use the image you just created rather than the stock image. Once it’s finished writing take it out of the card reader (eject the card reader safely first as per the method for your OS). Put this microSD card into a new XU4 as per Step 4.4, then log-in as per Step 4.5 and 4.6. During these steps you may well encounter an error / warning that the ECDSA key is different for the same host. This can be accepted, it’s down to the same IP address being assigned to our clones image which has a different key. On a chromebook this is a bit more tricky to get around, as the old key must be removed before a new key will be accepted - this took a bit of figuring out! To do this in the secure shell window press ctrl-shft-J then type in:
term_.command.removeKnownHostByIndex(index) Where index is replaced by the number that appears in the secure shell error messages e.g. “Offending ECDSA key in /.ssh/known_hosts:10” you would use the number 10.
Once logged on then it’s time to change the hostname (the human readable name that is related to the ip address) so that each XU4 can be uniquely identified. The hostname is controlled by the file “/etc/hostname” so edit it by typing:
nano /etc/hostnameThere is only one line in this file so change this to be the name you want. To aid with debugging it is suggested you name them for the positions they will be in on the board when they are assembled (e.g. miner-1-1, miner-1-2, etc. where the first digit indicates one of the 6 stack positions that the XU4 can be mounted in the baseplate and the second is where in the stack that miner is e.g. 0 at the bottom, 1 above that etc.) but naming them after your pets also works! Save and exit the file by pressing ctrl-x, then pressing y and then pressing return. Reboot the miner, log back in and the host name should now be set. Power the miner down and then stick a sticker on the miner somewhere (that doesn’t stop cooling etc.) with the host name on and write down somewhere all the hostnames as they will be needed in the next section.
Now repeat for all the other miners you want to set up.
System Integration and Testing
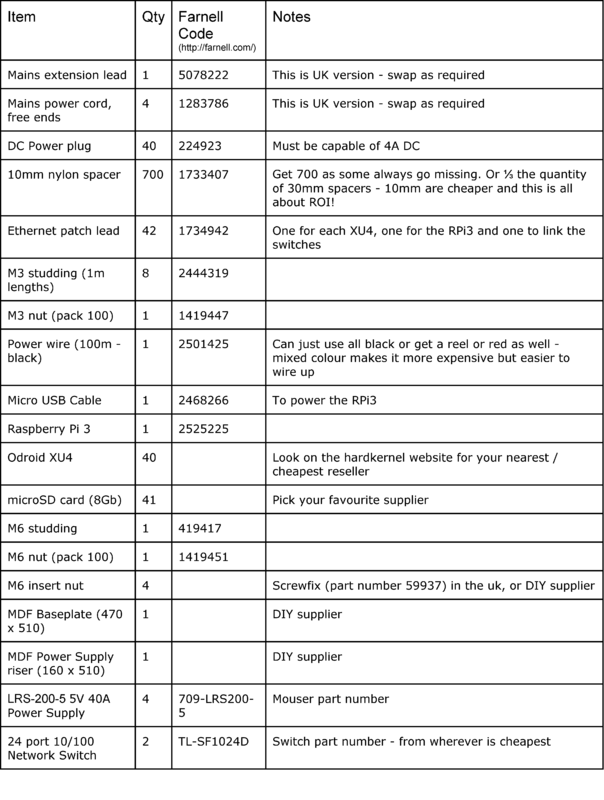
Now all the bits for the miner have been built and setup it’s time to bring it all together to get it hashing away! In addition to the bits that have been built so far you will need all the remaining items from the BoM.
Step 5.1: Onto each of the 3mm bars in the baseplate put a 10mm nylon spacer, these act as the standoffs to stop the miners getting too hot close to the baseplate. For the XU4 supports on the left hand side (looking from the power supply end of the baseplate), i.e. the longer 3mm bars add another three each (to total four on each bar).
Step 5.2: Get the Pi3 and make its mounting holes slightly larger with a 3mm or 3.5mm drill bit. The holes are ~2.75mm currently, there is plenty spare space round the to make them up to 3mm. Take one of the 10mm standoffs and cut it into 4 pieces, using wire cutters or a saw depending on how strong you are! Now put the Pi3 onto its mounting posts (the 40mm bars), put one of the cut standoff pieces on top of each mounting point, secure in place with an M3 nut and then lock that in place with another M3 nut on top of it. Plug in the micro USB cable, leave the other end unconnected but lay towards where the power supplies are mounted. Plug in one of the ethernet patch leads into the Pi3 and the other end into a convenient port on one of the switches.
Step 5.3: Take an ethernet patch lead and put one end in one switch and the other end in the other switch. This links the switches to in effect make a 46 port switch.
Step 5.4: Now it’s time to add the XU4s. Starting with the right hand side (looking from the power supply end of the baseplate) put and XU4 onto each of the 300mm mounting posts (i.e. the shorter ones. Now connect an ethernet patch leads between it and one of the switch ports near it, trying to keep cable layout neat (i.e. cables coiled up the same way).
Now the power leads need to be made up - these can be made up the faster, but wasteful way by measuring out (by laying the cable along the route) 80 of the same lengths of wire that are long enough for the longest cable run, making them up into power leads and cutting to length when they are installed or by measuring each run individually and making up lots of bespoke cables. Whichever method used take two pieces of cable, assemble/solder the DC power plug onto the cables (the backshell will be a tight fit over the two wires), test for shorts and note polarity (easier if red and black cable used!). Now plug the DC jack into the XU4 and lay the cable down towards the power supply. Now add four more 10mm standoffs onto the bar above each XU4.
Cable ties the power leads and or patch leads together to neaten them up and help with airflow.
Repeat this for all the rest of the XU4’s until there are 6 on the middle set of mounting posts and 7 on the outside ones. For the top layer just add one 10mm standoff above each XU4, then add an M3 nut and pushing down gently on each corner of the stack of XU4’s in turn tighten up the nut without undue twisting of any of the boards. These need to be relatively tight or the mounting posts will vibrate against the standoffs and make a rattling noise. Once the first nut is on then add a second to lock it in place.
Now the power leads can be attached to the power supply. Strip the other ends of the cable and distribute evenly over the screw terminals, if using the recommended power supply there are three terminals for each power supply for +5v and three for 0v, so there will be three wires under two terminals and four under the other for each.
The USB cable needs to have the end not connected to the Pi3 cut off, and the positive and negative wires also connected to one of the power supplies. The two data cores can be cut back, making sure they don't short with each other or anything else. The standard colours for USB cables are red for 5v, black for 0v and white and green for data + and data -, however it’s worth using a multimeter to make sure that’s how your cable is connected up.
Step 5.5: The power supply rise board with its two additional power supplies can now be added and fixed in place with M6 nuts. Now repeat Step 5.4 to fix and wire in the remaining 20 XU4’s.
Step 5.6: Everything is now assembled and the next step is to plug everything in and power up. Plug two of the power supplies and one switch into one of the extension leads, then plug that extension lead into the other one along with the other two power supplies and the other network switch. Plug that extension lead into the wall socket and turn on. All being well you should get lots of flashing blue lights on the XU4’s as they boot up and the green LED flashing on the Pi3 as it boots.
Step 5.7: SSH into the RPi3 and check to see if all the XU4’s have got IP addresses by typing:
cat /var/lib/misc/dnsmasq.leasesThis should bring up a list of 40 XU4’s with the host names as per the ones configured in Step 4.11. For any XU4’s not listed (you did use names that let you find physically where the XU4’s were located right…) then restart the XU4 by pressing its power switch to shut down and then again to start. It should now appear in the leases file. All these host names now need to be captured into a hosts file to use with the pssh utility installed in Step 3.18. So create a new file called miner hosts by typing:
nano minerHostsNow copy and paste all the hostnames into this file, one on each line then save and exit by pressing ctrl-x, then pressing y and then pressing return.
Step 5.8: At this stage the fans on the XU4’s should be constantly spinning as the miners should all be up and running hashing away nicely! There is some fine tuning that can be done to use the miners more efficiently. The first of these is a bit counter-intuitive but that is to reduce the clock speed of the larger cores from 2.0GHz to 1.9GHz. This has two effects - reduces the power consumption considerably and also actually increases the average clock rate, and hance hash rate, by stopping thermal limiting occurring on the devices. Thermal limiting can also be prevented by upgrading the heatsinks or adding larger fans etc. but these are unlikely to get a decent ROI from the hash rate increase that can be realised. Some XU4’s seem to perform better than others so you can either check each one in turn by logging in and checking hashrate (screen -r gets you to the miner screen, and ctrl-a, ctrl-d gets you back out again) where ~395h/m is a good rate and ~375-380h/m is bad. Thermal throttling can be checked on each device by using the command cat /sys/devices/10060000.tmu/throttle. This will print out the number of times each throttle level has been hit - lower numbers will be seen here for better hashrates in the miner screen. The best way to do this is to use the pssh so type:
pssh -h minerHosts -l root -A -i “cat /sys/devices/10060000.tmu/throttle”The “-h” option tells pssh to read the hosts from the host file “minerHosts”, “-l root” uses the root user to login/run the command, “-A” prompts for a password to be entered, “-i” outputs the return from each host inline, i.e. host by host and the last bit in quotes is the command to run. This will now prompt for a password - so enter the default, unless you have changed it, which is “odroid”. The output from each command will now be displayed in order for each host that you have.
Depending on your results here then you can either change all the miners or individual ones to use 1.9GHz. The clock rates can be adjusted by installing the cpufrequtils utility that allows clocks to be changed and information to be viewed, to do this on all at once you can use pssh again:
pssh -h minerHosts -l root -A -i “apt-get install cpufrequtils”Once this is installed then the frequency can be adjusted by typing the following:
pssh -h minerHosts -l root -A -i “cpufreq-set -c 7 -u 1.9GHz -r”The command “cpufreq-set” uses the following options “-c 7” sets CPU number 7, “-u 1.9GHz” sets the upper frequency limit to 1.9GHz and “-r” sets this recursively over all the related CPU cores. Only the “big” cores will be updated, the smaller cores run at 1.5GHz max already. Its also worth connecting a power meter before and after this change to see the effect on power usage. Changes using cpufreq-set don't persist over reboots so adjustments will have to be made on boot each time.
That’s the miner up and running and tuned - can make other tweaks to it to get the best out of each individual board depending on their performance, but that is left up to the user.
Tips welcome! BTC:1FG1p8ykDXGwdmKBCsPdBkrGohGXvxXhxU, VRC:VUkL7CMyRuVSQkHm7RUCQJZNsrnCPGFxSu, VRM:VAiN3z98Myo3b4919G2PP7aKAjJnHjuT3d
Bill of Materials
Its nice to see such a detailed post. However, I was curious about the "profitable" part of this, do you have table breaking down the numbers in terms of # coins mined, cost of electricity, profit per day, etc.? I apologize if I didn't see it if you have it written somewhere between parts 1 and 2.
Hi - no didnt include as it changes so fast - there is a manual spreadsheet here to do the calculations on though https://goo.gl/Mq33C7
seems like u expect a big pump of this coin?
I also use a 1800x to mine this coin but i cant bypass the 8 threats. If i do my Pc freezes and shuts down
Congratulations @birty! You have received a personal award!
Click on the badge to view your own Board of Honor on SteemitBoard.
For more information about this award, click here
Quick question: does the port number change for the different miners in the script: "./cpuminer -o 192.168.123.20:33987 -O veriumuser:secret"
I'm looking into Verium mining, and your article is super helpful. Thank you so much! Also, I apologize if the quesetion is elementary, but I only have very basic knowledge of programming.
Congratulations @birty! You have completed some achievement on Steemit and have been rewarded with new badge(s) :
Click on any badge to view your own Board of Honor on SteemitBoard.
For more information about SteemitBoard, click here
If you no longer want to receive notifications, reply to this comment with the word
STOPCongratulations @birty! You have received a personal award!
Click on the badge to view your Board of Honor.
Do not miss the last post from @steemitboard:
Congratulations @birty! You received a personal award!
You can view your badges on your Steem Board and compare to others on the Steem Ranking
Vote for @Steemitboard as a witness to get one more award and increased upvotes!