Building the frontend Food order system with Angularjs Part9
Contribution Repository
Previously on this series, we how to signup nd authenticate users for our application, in the process, we learnt how to use services, form validation and the browser local storage.
In this series, we are going to learn how to manage state changes using observables and in the process, broadcast the state change to the application.
Rating
This tutorial is rated Intermediate.
What Will I Learn?
State management is a concept covered in building any single page application, most JavaScript framework like React and Vuejs. "How do i tell a component that the data available in another component has changed and how do i broadcast that change to the application?". We would be covering the following in this tutorial.
- Using EventEmitters to bubble out Events from a data in a component.
- Moving data from one component into another component and ensuring the state of the data is broadcasted throughout the application. In this case moving data from the item-feed component into the order component.
- Updating the state of one component on another component to reflect the changes in its data.
Requirement.
- Typescript version 2.4.2
- Node version version 8.9.4
- Npm version 5.6.0
- Bootstrap 4.0
- Visual Studio Code IDE
- Voltront front client Repository
Introduction
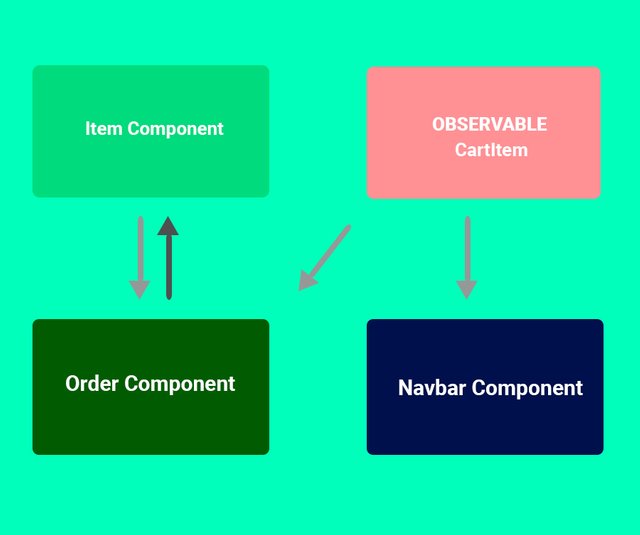
Illustration for the tutorial
Welcome back to our new series on the food App, yeah we have been doing well, below is the last state or structure o our application.
- Voltron
- node_modules/
- src/
- app
- app-navbar/
- item/
- items-feed/
- signup/
- login/
- app-routing.module
- app.component.html
- app.component.sass
- app.component.ts
- app.module.ts
- auth.service.ts
- item.service
- cart.service.ts
- cache.service
- asset/
- environments/
- item.ts
- user.ts
- auth.ts
- app
- .angular-cli.json
- .editorconfig
+.....
Previously, we gain a vast knowledge of how we can signup users and authenticate users for our Angular application.n the process, we made use of services, Http Modules,Routing Module and the formModule. In this series, we are about to ask our self some questions and solve them in the process. "How do we get to store the state of data throughout in an Angular app?", "how we get to monitor the state of a data in the application and broadcast the change to the application?"
These questions as well as state management is very crucial in building single page application (SPA).
In this case , after building the items-feeds that displays all the food items from the database, we need to push items from the feed into an order component. The order component contains items from the item feeds of which the user is ready to pay for or order.
In this program engineering, the problem we are going to face is to update the cart at the navbar that shows the amount of items the user added into the cart. This is where state and state management comes in play, we need to keep track of the cart items and broadcast to the application when the data in the cart has changed. Lets start by explaining two basic concepts
What is State?
State is just like the state of matter "Solid, liquid and gas", matters' state changes with a different thermodynamics, when apply heat to water, it moves from the different state of matter. Enough of my chemistry let talk about state in Angular.
State in Angular is the state of a particular data before mutation at a particular time.
State simply means all data present in the application at a particular point in time. These datum could either be user generated or of third party origin. A good example of data within an application that can be considered as state is the simple boolean switch within a user's settings panel that allows the user choose to either receive notifications or go without.
What is state management?
This is a concept that involve watching a set of data in an application, In this case we would be watching the data in the cart to know when a new item has been added and removed. We would be using observables to manage the state of our application. In complex architectures, Redux and Flux can be used. We would be making uses of Observables.
What are Observables.
Observables are data that has a subscriber that listens for the mutation of data in the observable. Observables are of the Rxjs library, which can emit data mutability events, to understand more on Observables, take a look at this resourceserva
Getting started with Observables,
In the previous tutorial, we already show a feeds of all the items in the database. We are going to create and order component and emit events from the items in the items-feed and pass them along to a new component which is the Order-component. The order-component is going to be a parent of the order-item-component which we have not created yet.
We would start by emitting events on the items' button in the item-feed. In the item.component.ts, we add an output decorator to bubble out new event. firstly we need to update our import to fetch the Output and EventEmitter
import { Component, OnInit, Input, Output, EventEmitter } from '@angular/core';
We create a new EventEmitter object.
@Output() onAddItemToCart = new EventEmitter<object>();
Now that we have the new EventEmitter, lets create a method that when called will bubble out the Event.
addItemToCart (item) {
    return this.onAddItemToCart.emit(item);
  }
We need to add this method to a click event on the add button in the item-feed and pass it the item we want to bubble out or emit. We need to update the button on the item.component.html.
<button class="float-right btn btn-light text-info" (click)="addItemToCart(item)">
        <i class="fa fa-plus"></i>
</button>
We just got button to emit an item when the button is clicked,next up to find a way to send the emitted data in an array where we can monitor the data in the array and broadcast to the application when there is a change in the data.
We are abstract this functionality to a service. Let generate a cart service for our application, this service is responsible for holding the amount of items pushed from the items to the cart.
Building the Cart Service.
Generate the service from the command
ng generate service cart
Find cart.service.ts in `voltron/src/app/cart.service.ts
We need to add two imports below,
import { Subject } from 'rxjs/subject';
import {Item} from '../item';
The first import, "Subject" is of the rxjs library which used to set data an observable, the second import "Item" is the interface we created in the previous tutorial for the food items.
We need to create a cart item array to hold the objects(item) entering the cart.
cartItems: Item[] = []
In creating an observable we need a subject, which is the source and an announcer that tells the application that something has changed in the observable. Other component subscribes or listen or a change or mutation of the data in the source.
private cartAnnouncerSource = new Subject<Object>()
cartAnnouncer$ = this.cartAnnouncerSource.asObservable();
We need a method to announce to the application that an item has been added to the observable.
  announceCartItem (item) {
    return this.cartAnnouncerSource.next(item);
  }
The next() method is actually telling the observable to announce the newly added item to the observable.
Lets head back to the item-feed.component.ts and add a variable called cartItems of which is going to be set to an empty array in the constructor method. Add the method that listens to the click event on the item.component.html.
onAddItemToCart (item) {
    if (!this.cartService.cartItems.includes(item)) {
      this.cartService.cartItems.push(item);
      this.cartService.announceCartItem(item);
      this.cartItems = this.cartService.cartItems;
    }
  }
The onAddItemTocart()method, checks if the cartService.cartItems array has the specific item, don't add the item when its clicked else add the item to the cart service and announce the item added to the observable.
Finally we set the value of cartItem in the component to the one on the service.
Complete item-feed.component.ts
import { Component, OnInit } from '@angular/core';
import { ItemService } from '../item.service';
import { CartService } from '../cart.service';
import {Item} from '../../item';


@Component({
  selector: 'app-items-feed',
  templateUrl: './items-feed.component.html',
  styleUrls: ['./items-feed.component.sass']
})
export class ItemsFeedComponent implements OnInit {
 items: object;
 cartItems:Item[]


  constructor(
    private itemService: ItemService,
    private cartService: CartService
  ) {
    this.cartItems = []
  }
  ngOnInit() {
    this.getItems();
  }


  getItems(): void {
    this.itemService.getItems()
        .subscribe(items => {
          this.items = items['result']
        });
  }

  onAddItemToCart (item) {
    if (!this.cartService.cartItems.includes(item)) {
      this.cartService.cartItems.push(item);
      this.cartService.announceCartItem(item);
      this.cartItems = this.cartService.cartItems;
    }
  }

}
Update a different component with data from an observable.
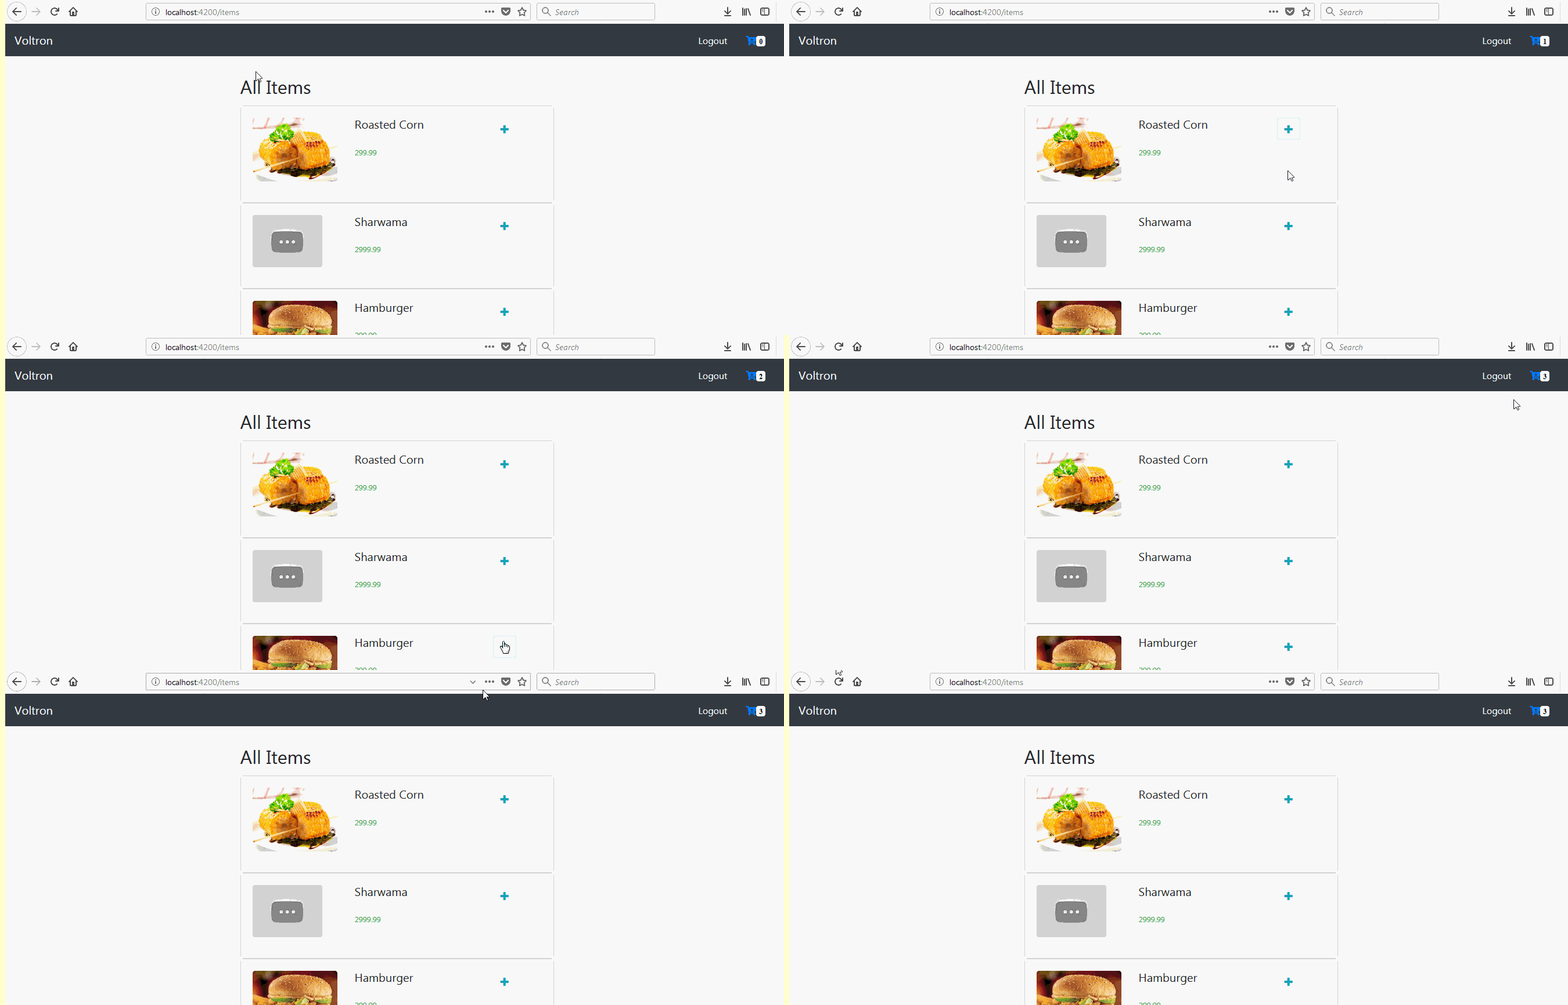
It quite easy, we need to update the navbar component to show the amount of items in the observable once it's clicked.

So in the navbar component, we need to Subscribe to the observable, and check the length property of the array and set it to a counter in the navbar component, lastly we display it using interpolation.
Open the app-navbar component , create a counter variable in the constructor an set it to a default of zero.
this.cartItemsCount = 0
Next we subscribe to the cartService.announer$ in our constructor and set the value gotten to the cartItemsCount
cartService.cartAnnouncer$.subscribe(
      item => {
        this.cartItemsCount = cartService.cartItems.length;
      }
    )
Lastly, lets update the navbar and show the cartItemsCount using interpolation
<a routerLink="/items/order"><i class="fa fa-cart-arrow-down"><span class="badge badge-light">{{ cartItemsCount }}</span></i></a>
Conclusion
Finally, we are done working on adding items to the cart and updating the navbar component to show the amount of items in the observable. In the next tutorial, we are going work sending the items in the items' cart to the order component in a new route and work on removing items from the cart items.
Curriculum
- Building a food order system with MEAN Stack (MongoDB, Express, AngularJs and NodeJs). pt1.
- Building a food order system with MEAN Stack (MongoDB, Express, AngularJs and NodeJs). pt2.
- Building a food order system with MEAN Stack (MongoDB, Express, AngularJs and NodeJs). pt3.
- Pt4 Building a food order system with MEAN Stack (MongoDB, Express, AngularJs and NodeJs).
- Building the frontend Food order system with Angularjs. Part 5
- Building the frontend Food order system with Angularjs. Part 6
- Building the frontend Food order system with Angularjs. Part7
- Building the frontend Food order system with Angularjs (building angular authentication).Part8
Resources
- Angular Docs
- Reactivex Observables
- Bootstrap 4 documentation
- Remember to check out the Repo for this project
- Official documentation on form validation


While I liked the content of your contribution, I would still like to extend few advices for your upcoming contributions:
Looking forward to your upcoming tutorials.
Your contribution has been evaluated according to Utopian policies and guidelines, as well as a predefined set of questions pertaining to the category.
To view those questions and the relevant answers related to your post, click here.
Need help? Write a ticket on https://support.utopian.io/.
Chat with us on Discord.
[utopian-moderator]
Hey @sirfreeman
Thanks for contributing on Utopian.
We’re already looking forward to your next contribution!
Contributing on Utopian
Learn how to contribute on our website or by watching this tutorial on Youtube.
Want to chat? Join us on Discord https://discord.gg/h52nFrV.
Vote for Utopian Witness!