Building the frontend Food order system with Angularjs. Part 6
Contribution Repository
https://github.com/angular/angular
In our last tutorial we had an introduction to Angular, we learnt what angular was and the ideology behind the JavaScript framework, we also got to know how to install an angular application and got a little knowledge about components and how to carryout routing in Angular.
In this series, we are going to learn how to initiate interaction between parent and child component and also learn how to create a service, carryout interpolation and make request to the server through the HTTP client.
Project structure.
- node_modules/
- src/
- app
- app-navbar/
- item/
- items-feed/
- app-routing.module
- app.component.html
- app.component.sass
- app.component.ts
- app.module.ts
- item.service
- asset/
- environments/
- item.ts
- app
- .angular-cli.json
- .editorconfig
+.....
Rating
This tutorial is rated Intermediate.
Requirement.
- Typescript version 2.4.2
- Node version version 8.9.4
- Npm version 5.6.0
- Bootstrap 4.0
- Visual Studio Code IDE
- Voltront front client Repository
What would i learn? / Table of content.
- Recap of the previous tutorial.
- Fetching data from a server to a component.
- Parent and child interaction.
- Service injection and subscribing for data in a component.
- Using interpolation to display data from a component.
Recap of the previous tutorial.
Angular has been fun so right? in the last series we created to two components;
- item component
- item-feed component
The item component was said to be a child component of the item-feed component i.e, it houses the item component. Routing was also implemented for the item-feed component to show up as the default route when the application is lunched.
Fetching data from a server to a component.
How do we get data into a component? it quite has a series of steps, to do this we need to create a service for the purpose of that task. A service is an abstracted class that does things concerning a particular task. Example of services are; authentication service and cache service. A service can be named anything and injected into different component.
In our case we need to make a request to an endpoint to fetch the items in the db. Okay lets write a service to do that for us.

Illustration of data movement
Creating the item service.
Lets start by creating an interface for our item before creating the service.
In the src directory, create a file item.ts add the interface below.
export interface Item {
    id: string;
    title: string;
    type: string;
    desc: string;
    price: Number;
    inStock: Number;
  }

Our item collection contain the above fields with the above types, for example id has a type of string. Now that we have our interface for item ready lets generate a service.
on the command line enter
ng g service item
The service would be created in the src/app directory
lets register the service in the app.module.ts providers' array
open the app.module.ts file, import the ItemService at the top and add the service to the provider array.
import { ItemService } from './item.service';
on the provider array of the app.module.ts add the service
providers: [ItemService]

Lets begin to build our Item service, open the generate item.service.ts and import the following modules
- HttpClient : HttpClient is used for making any form of request to server.
- Observable: An observable is simply used to watch a stream off data and know when it has changed. A representation of any set of values over any amount of time. This is the most basic building block of RxJS.
- of
- Item : The interface we created for the item.
- catchError, map and tap: They are all used for error handling
import { Injectable } from '@angular/core';
import { HttpClient } from '@angular/common/http';
import { Observable } from 'rxjs/Observable';
import { of } from 'rxjs/observable/of';
import { Item } from '../item';
import { catchError, map, tap, } from 'rxjs/operators';
Next up, we need set a variable for the http client and the endpoint we want to send a request to, the instantiate the http client in the constructor method
private http: HttpClient
itemsEndpoint = 'http://localhost:3000/api/items';


  constructor(http: HttpClient) {
    this.http = http;
  }
Let write some methods that are observable of which we can subscribe to in component
The method to handle error
private handleError<T> (operation = 'operation', result?: T) {
    return (error: any): Observable<T> => {

      // TODO: send the error to remote logging infrastructure
      console.error(error); // log to console instead

      // Let the app keep running by returning an empty result.
      return of(result as T);
    };
  }
The method to get items from the server
The getItem method returns a type of observable or array of the type Item (The item interface).
In the method we use the http.get protocol, which returns a type of Item and accepts the endpoint we are sending the request to, in this case the endpoint is localhost:3000/api/items.
Note; The getItem() method returns a set of observable we can subscribe to.
 getItems (): Observable<{} | Item[]> {
    return this.http.get<Item[]>(this.itemsEndpoint)
      .pipe(
        tap(items => console.log(`${items['result'].length} items fetched`)),
        catchError(this.handleError('getItems', []))
      );
  }
The complete item service
//item.service.ts
import { Injectable } from '@angular/core';
import { HttpClient } from '@angular/common/http';
import { Observable } from 'rxjs/Observable';
import { of } from 'rxjs/observable/of';
import { Item } from '../item';
import { catchError, map, tap, } from 'rxjs/operators';


@Injectable()
export class ItemService {
  private http: HttpClient;
  itemsEndpoint = 'http://localhost:3000/api/items';


  constructor(http: HttpClient) {
    this.http = http;
  }

  private handleError<T> (operation = 'operation', result?: T) {
    return (error: any): Observable<T> => {

      // TODO: send the error to remote logging infrastructure
      console.error(error); // log to console instead

      // Let the app keep running by returning an empty result.
      return of(result as T);
    };
  }

  getItems (): Observable<{} | Item[]> {
    return this.http.get<Item[]>(this.itemsEndpoint)
      .pipe(
        tap(items => console.log(`${items['result'].length} items fetched`)),
        catchError(this.handleError('getItems', []))
      );
  }

}
Service injection and subscribing for data in a component
Now that we have our service ready, we need to use the service to fetch items from the API into the item-feed component.
Open item-feed.component.ts import the item interface and the item service.
import { ItemService } from '../item.service';
import {Item} from '../../item';
Inject the item service in the constructor to make it available once the application starts.
constructor(private itemService: ItemService ){ }
We now have to create a method called getItem to subscribe to the observable in the itemService.getItems() method and set the result to an empty of object variable called items
getItems(): void {
    this.itemService.getItems()
        .subscribe(items => {
          this.items = items['result']
        });
  }
finally call the getItems method on the ngOnInit life cycle of the component to call the method when the component is ready
ngOnInit() {
    this.getItems();
  }
Parent and child interaction.
When we talk about interaction it simply making data available between two or more components and making a change on the data in one component to reflect on the other. In this case, we have two components which are the item and the item-feed component. Our goal is to get the data (items) from the server and populate it in the item feeds and pass each item to the item component.
Note; each item in the server is displayed in the item component.
At this point, the items from the server is available in the item-feed component through the item service , to make it available in the item component, we have to iterate through the items and pass it down to the item component.
Iterating and show components on the DOM using a directive
In the last tutorial, we added the item component in the item-feed.component.html using the selector <app-item></app-item>.
We are going to be Iterating using a directive *ngFor,. This directive works like a for loop and uses a data set available in a component, in this case we would be using, *ngFor="let item of items".
Where items is the variable in the item-feeds component.
// item.component,html
<app-item *ngFor="let item of items" ></app-item>
Passing data to child component from a parent
We want to pass the items to the item-component from the item-feed component. To do this, we need to import Input from angular/core and bind the input to the iteration on the item-feeds.component.html
Open the item.component.ts and import Input and call it item with a type of any
import { Component, OnInit, Input, } from '@angular/core';
Add the snippet in the class to set the item as an input
@Input() item: any;
Complete item.component.ts file
import { Component, OnInit, Input} from '@angular/core';

@Component({
  selector: 'app-item',
  templateUrl: './item.component.html',
  styleUrls: ['./item.component.sass']
})
export class ItemComponent implements OnInit {

  @Input() item: any;

  constructor() { }

  ngOnInit() {
  }

}
Finally binding it to the iteration on the items-feed.component.html, we bind the input from the component (item) to the item on the iteration with a property binding
[item]="item"
Complete items-feed.component.html
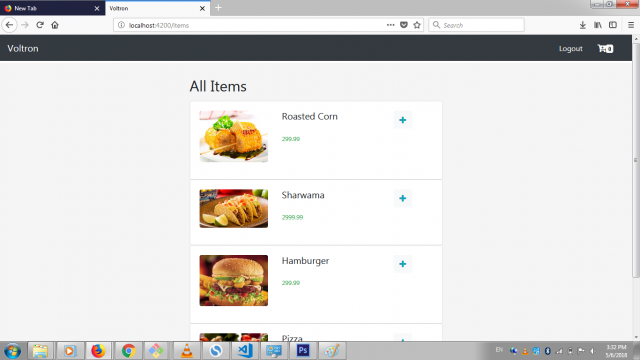
<div class="items-feed__container">
  <section class="container">
    <div class="row align-items-center justify-content-center">
      <section class="col-md-6 offset-md-6">
        <h2 class="mb-3">All Items</h2>

        <app-item [item]="item" *ngFor="let item of items" ></app-item>
      </section>
    </div>
  </section>
</div>
Using interpolation to display data from a component.
Interpolation is a concept of displaying data from a component into the html file of that component using {{}} (curly braces).
We want to change the default values on the items such as the title, price and photo.
For the photo, we would be using attribute binding where we bind the src attribute to the item.photo of the result from the item service which makes it dynamic from the server . The title and price uses interpolation where they are both written in curly braces.
Complete item.component.html
<div class="card">
<div class="card-body">
<div class="media">
<div class="media-body">
<section class="row">
<div class="col-xs-4 col-sm-4 col-md-4">
<img class="mr-3 mb-3 img-fluid rounded img-responsive " [src]="item.photo" alt="Generic placeholder image">
</div>
<div class="col-xs-7 col-sm-7 col-md-7">
<h5 class="mt-0 clearfix">
{{ item.title }}
<button class="float-right btn btn-light text-info" >
<i class="fa fa-plus"></i>
</button>
</h5>
<small class="text-success">{{ item.price }}</small>
</div>
</section>
</div>
</div>
</div>
</div>
Conclusion
Finally, we are done displaying the items in the feeds. We have learnt new concepts such as observable , interpolation and directives. In the next series, we are going to build an authentication system for our application where we are going to work with forms.
Curriculum
- Building a food order system with MEAN Stack (MongoDB, Express, AngularJs and NodeJs). pt1.
- Building a food order system with MEAN Stack (MongoDB, Express, AngularJs and NodeJs). pt2.
- Building a food order system with MEAN Stack (MongoDB, Express, AngularJs and NodeJs). pt3.
- Pt4 Building a food order system with MEAN Stack (MongoDB, Express, AngularJs and NodeJs).
- Building the frontend Food order system with Angularjs. Part 3
Resources
- Angular Docs
- Bootstrap 4 documentation
- Remember to check out the Repo for this project
Thank you for your contribution.
I really liked how you did your tutorial, keep it up!
You have made a print screen that I can't see the code, the next tutorial just put the code zone.
Need help? Write a ticket on https://support.utopian.io/.
Chat with us on Discord.
[utopian-moderator]
Hey @sirfreeman
Thanks for contributing on Utopian.
We're already looking forward to your next contribution!
Contributing on Utopian
Learn how to contribute on our website or by watching this tutorial on Youtube.
Want to chat? Join us on Discord https://discord.gg/h52nFrV.
Vote for Utopian Witness!