Building Node Chart with using Vue.js D3-Network and Materialize CSS
Repository
What Will I Learn?
- You will learn about Virtual DOM.
- You will learn about Two Way Data Binding.
- You will learn about D3.js (D3-Network).
- You will learn how to create node elements with D3-Network.
- You will learn how to add a scaler with Materialize CSS.
- You will learn how to use v-model.
- You will learn about :net-links, :net-nodes and :options. (specific d3network functions.)
- You will learn how to connect multiple node elements together.
- You will learn about Computed Properties.
Timeline
00:00 Intro
00:33 Information About D3-Network
01:13 Information About Virtual DOM (What is the Virtual DOM?)
02:37 Information About Virtual DOM (What are the differences from Real DOM?)
03:10 Information About Two-Way Data Binding (Intro)
03:30 Information About Two-Way Data Binding (How does Two-Way Data Binding work on Vue.js?)
04:15 Focusing D3-Network Concepts (Information About Scaler)
05:04 Information About Script Resources
05:12 Body Codes (For Scaler)
06:28 Using Two-way data binding feature with Input Type
07:34 Information About D3-Network Special Function
08:56 [Script Line] Information About "var D3Network" and "Window VueD3Network"
09:20 Creating new Vue Instance
09:49 Defining Component
09:55 Creating D3Network Data for UtopianNodes elements
11:07 UtopianNode elements connections (Information about sid and tid)
12:36 Defining Default Node Size for node elements
13:00 Information About Computed Properties
13:58 Defining Chart Size and Force Options
14:55 Testing our Work
15:38 Error Control
15:51 Ending
Requirements
- Vue.js version 2.5.16 (Full Library).
- Vue.js D3.js version 4 Minified Library.
- Vue.js D3-Network Library.
- Materialize Minified CSS Package 1.0.0-beta version.
- Microsoft Visual Studio Code. (or another text editor.)
- A browser for testing.
- XAMPP Control Panel Server.
OS Requirement for Running Materialize
- Linux (64-bit)
- Windows 7 / Windows 8 / Windows 8.1 and Windows 10.
- macOS (64-bit)
Difficulty
- Intermediate
Description
A Small Overview
Firstly we talked about D3-Network, Virtual DOM, Two Way Data Binding and Computed Properties. After that we defined our node charts body codes. I gave detailed information about all the codes and functions we have defined. In the script section we learned how to define the data with return function and how to connect it to other data. In the final step of the tutorial, we learned how to set the connection distance, node labels and node size between nodes with using the computed properties feature.
Finally, I gave technical information about all of codes, classes, components, elements, special features, variables and all operations. Vue.js tutorial series will progress from intermediate to advanced. All the programs and scripts described in the video (Vue.js, Materialize CSS, Visual Studio Code, XAMPP Server Control Panel Server) are open source and are all included in the links section of the GitHub repositories (Except XAMPP Control Panel Server). If you wish, you can access the web pages of these programs and download links for Windows from the All of Resources for this Project section.
All of Resources for this Project
- Vue.js Github Repo: https://github.com/vuejs/vue
- Vue.js Installation Page: https://vuejs.org/v2/guide/installation.html
- Vue.js Main Logo: Image
- Vue.js Documentation Guide: https://vuejs.org/v2/guide/index.html
- Visual Studio Code (VSCode) GitHub Repo: https://github.com/Microsoft/vscode
- Materialize Web Site: https://vuejs.org
- Vue.js CDN: https://cdn.jsdelivr.net/npm/[email protected]/dist/vue.js
- Visual Studio Code Web Site: https://code.visualstudio.com/
- Visual Studio Code Download Link for Win x64: https://go.microsoft.com/fwlink/?Linkid=852157
- XAMPP Control Panel Server Web Site: https://www.apachefriends.org/en/
- XAMPP Control Panel Server (For Windows) Download Link: https://www.apachefriends.org/download.html
- D3.js Minified JavaScript Library: https://d3js.org/d3.v4.min.js
- Materialize Minified CSS Library: https://cdnjs.cloudflare.com/ajax/libs/materialize/0.100.2/css/materialize.min.css
- Virtual DOM Image: Image
- D3-Network Image: Image
- Two Way Data Binding Image: Image
Knowledge Resources (Wiki)
- Vue.js Knowledge: https://vuejs.org/v2/guide/index.html
- Vue.js Computed Properties Knowledge for Version 2: https://vuejs.org/v2/guide/computed.html
- CSS Knowledge (wiki): https://www.w3schools.com/w3css/
- Vue.js Render Functions and Virtual DOM: https://vuejs.org/v2/guide/render-function.html#The-Virtual-DOM
- D3.js General Information Wiki: https://github.com/d3/d3/wiki
- D3.js Huge Knowledge Source: https://en.wikipedia.org/wiki/D3.js
- D3-Network Knowledge: http://christophergandrud.github.io/d3Network/
- D3.js Plugin Knowledge: https://github.com/d3/d3/wiki/Plugins
- Vue.js D3-Network Little Information Source: https://github.com/emiliorizzo/vue-d3-network
- Vue.js Two way data binding Knowledge for version 1: https://012.vuejs.org/guide/
- Vue.js Two way data binding Knowledge for version 2: https://vuejs.org/v2/guide/forms.html
Cover Image Source
The source code and project file for this tutorial can be found here.
Summary: Important Points
Creating Body Section for Node Chart

Firstly we defined a main ID as UtopianNode for creating Vue.js scripts.
After that we created an area for node chart with simple menu commands and we also created a heading for node size changer as Change Node Size (a.k.a scaler). We created Node Size Changer with using Materialize CSS Library. After that we used an input type for using Two-Way Data Binding feature. We defined v-model as nodesize with using input type because we want to create a scaler. And also V-model function works only with the Vue.js Two-Way Data Binding special function. After that we defined input type as range because we want a scaler and it needs a range for magnification and reduction movement. Finally we defined ranges minimum value as 1 and maximum value as 1000 this means we can enlarge and reduce the node chart elements between 1 to 1000.
After these commands, we defined options.nodesize with curly brackets. We wrote it because we will define functions for adjust the dimensions of the node chart elements. With the curly brackets, we have defined a type of task ID for the scaler and we will set scaler node size options with functions in the "script" section. I also explained in detail what about the net-links, net-nodes and options functions.
Creating New Vue Instance, Special D3-Network Variable and Defining Components
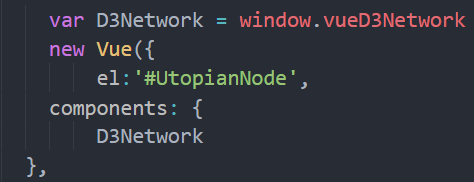
In this section, we specified that D3Network as a variable and D3Network variable will work on window with special VueD3Network.
This function is a special function and it's only using for D3Network.
After that, we wrote ID of the element we want to be affected. We used element id as UtopianNode as you know we defined this ID on the first line of the body part as division ID and here we used this ID as New Vue Instance Element for define the scripts needed for node chart.
We needed to define our component as d3network because we want to write our elements on UtopianNode chart.
Creating Utopian Node Chart Datas and Defining Node Elements (Community Managers And Categories) with Unique ID's.
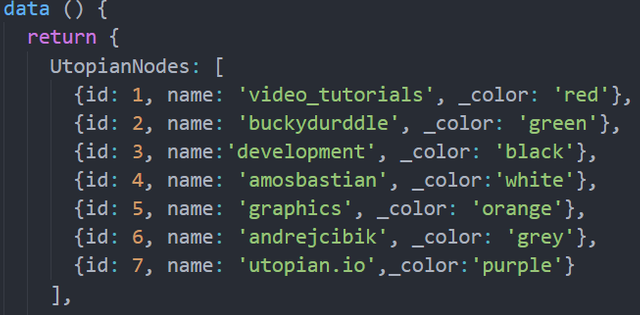
We defined data ID as UtopianNodes, if you remember, we recently defined network nodes as UtopianNodes on the first step. We used data functionality with return to define UtopianNode elements. After that we defined categories and community managers node colors with _color.
We have defined unique ID's for each community manager and their categor. We will use these unique ID's for UtopianConnections on the next step.
Creating Connections Between Community Managers and Their Categories
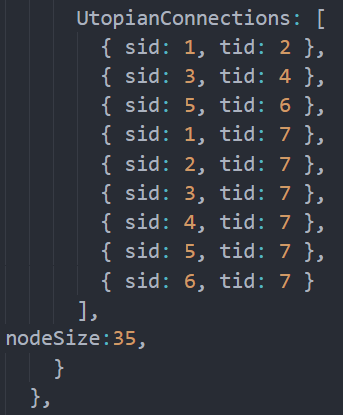
We created connections in this step. Also sid means source id and tid means target id. Our first source id is 1, ID 1 belongs to Video Tutorials, we defined Video Tutorials category as source id and we defined target id as 2. That means Video Tutorials category will connect with the Buckydurddle Community Manager.
After that we have defined other community managers and their categories according to their ID's.
And we connected all community managers and their categories as Source ID to the main node as Utopian.io node. And also We defined Utopian.io as target ID.
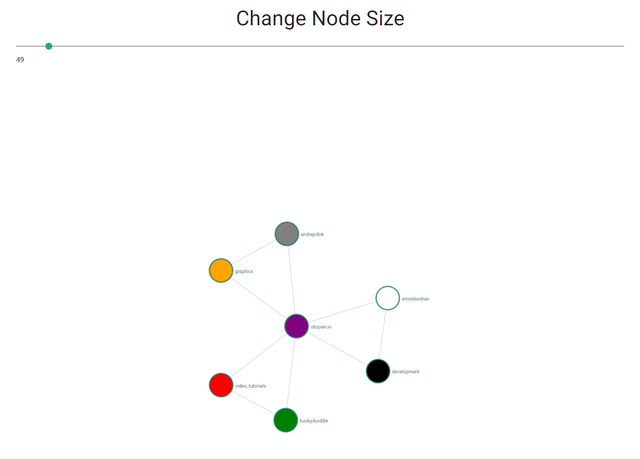
Utopian.io node will appear in the center of the page and all community managers and their categories will turn around the utopian.io node because we have defined Utopian.io Node as Main Node. At the same time community managers and their categories are still connected to each other.
After that we defined default node size as 35 pixel. This means, when we enter the site we will see the node chart dimension as 35.
Using Computed Properties Feature To Make Changes on the Node Chart
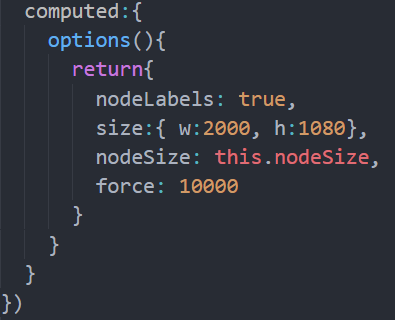
We will change the node chart element size and connection distances with node size changer so we will change the DOM view on the page. With the help of computed properties, we will define our nodes width - height values, approve the default node size and also we will define connection distances between the node chart elements.
We firstly defined nodelabels as true because we want to display the names of community managers and their categories.
And We also defined width and height values so that the node chart appears in the center of the page.
After that we approved nodesize so that the node size changer will work and at the same time we approved default node size here.
We defined force value as 10000, this value for connection distance and you can change this value as you like.
Very nice tutorial. I really love your graphics - well done.
I suggest you consider having headings on the video for the sub-topics you are speaking. This can help learners focus on what is most important at each specific point in the video.
I am looking forward to the next lessons in your series.
Staff Pick
Your contribution has been evaluated according to Utopian policies and guidelines, as well as a predefined set of questions pertaining to the category.
To view those questions and the relevant answers related to your post, click here.
Need help? Write a ticket on https://support.utopian.io/.
Chat with us on Discord.
[utopian-moderator]
Thank you very much for your so valuable comment. I also thank you very much for your compliments. Your comment is really motivated me. I'm very glad that you like my chart. I will work harder to make better quality contributions by considering your valuable suggestions. I will always work harder to be worthy of the Utopian Community and Video Tutorials category. Thank you again very much for your good thoughts and thank you for moderating my contribution.
Hey @sargoon
Thanks for contributing on Utopian.
Congratulations! Your contribution was Staff Picked to receive a maximum vote for the video-tutorials category on Utopian for being of significant value to the project and the open source community.
We’re already looking forward to your next contribution!
Want to chat? Join us on Discord https://discord.gg/h52nFrV.
Vote for Utopian Witness!
upvote for me please? https://steemit.com/news/@bible.com/2sysip
upvote for me please? https://steemit.com/news/@bible.com/2sysip