[IPFS Tutorial #3] - Using the IPFS Command Line Interface

source
What Will I Learn?
- How to Initialize and configure a local IPFS node
- Upload files to your local IPFS node with CLI
- Track files from your local IPFS node with CLI
Requirements
- Laptop or Desktop Computer (Windows, Linux or Mac)
- IPFS CLI
- Several different files to upload (gif, mp4, .png etc.)
Difficulty
- Intermediate
Initialize a Local IPFS Node
Initializing the IPFS daemon is very simple, just download the compatible version of your computer and install it.
After installation is complete, start the daemon with the command line.
ipfs init

Enter the ipfs init command to start the daemon. This will create a local IPFS node on your machine.
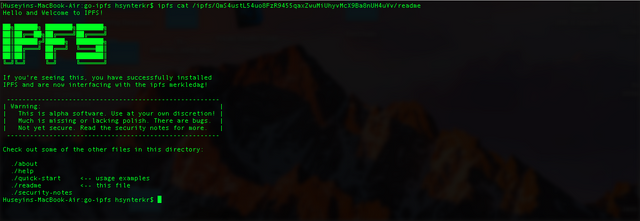
After ipfs is initialized, it will create a readme file. Enter the following command to view the readme file.
ipfs cat /ipfs/QmS4ustL54uo8FzR9455qaxZwuMiUhyvMcX9Ba8nUH4uVv/readme
./readme

You can explore other files(about, help, quick-start, security-notes) in there.
Configure the IPFS Node
The daemon configuration file is kept as a json file. Run the following command to view this configuration.
ipfs config show
To edit the configuration, run the following command. for example, you can change ports for API or Gateway.
"API": "/ip4/127.0.0.1/tcp/5001",
"Gateway": "/ip4/127.0.0.1/tcp/8080"
If you want to allow or deny HTTP POST requests, you can also set this with the config file.
"HTTPHeaders": {
       "Access-Control-Allow-Headers": [
         "X-Requested-With"
         "Range"
       ]
       "Access-Control-Allow-Methods": [
         "GET,POST"
       ]
       "Access-Control-Allow-Origin": [
         "*"
       ]
     }
Upload files to your local IPFS node with CLI
To upload a file to IPFS, run the IPFS daemon with the following command.
ipfs daemon

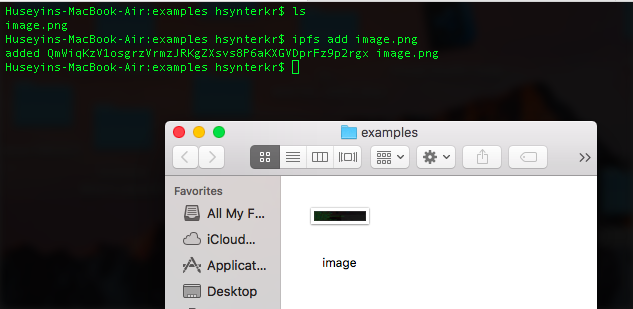
You can create a folder on the desktop for the files you want to upload. I created a folder named 'examples'
I have added a few files to the examples folder to upload them to the IPFS node
To upload a file to the IPFS node, open a command prompt in the directory where the file is located and run the following command in CLI.
$ ipfs add FILE_NAME

# Examples

$ ipfs add image.png
$ ipfs add note.txt

With the HASH returned from the CLI, you can access your file via the local IPFS gateway.
http://localhost:8080/ipfs/ {HASH}
http://localhost:8080/ipfs/QmWiqKzV1osgrzVrmzJRKgZXsvs8P6aKXGVDprFz9p2rgx
Track files from your local IPFS node with CLI
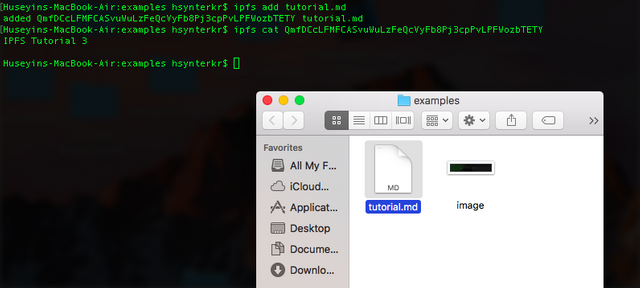
Tracking files from the local IPFS node is very easy with the CLI. To read a file, you only need HASH of that file. You can read the file with ipfs cat FILE_HASH command.
ipfs cat FILE_HASH
ipfs cat QmfDCcLFMFCASvuWuLzFeQcVyFb8Pj3cpPvLPFWozbTETY
An example is shown below. I uploaded a Markdown file to the IPFS node and tried to read it with "ipfs cat" command.

Thanks @hsynterkr, loved your post. Keep up the good work.
Please Stop
In your your last 100 comments you used 62 phrases considered to be spam. You've received 0 flags and you may see more on comments like these. These comments are the reason why your Steem Sincerity API classification scores are Spam: 56.20% and Bot: 2.60%
Please stop making comments like this and read the ways to avoid @pleasestop and earn the support of the community.
Thank you for your contribution, yet it cannot be accepted.
The concepts covered in this tutorial are too basic, and/or covered elsewhere on the web including but not limited to official documentation.
For instance, the basic setup and configuration was already covered in a prior tutorial of yours, but also available here as official documentation https://ipfs.io/docs/getting-started/
Files management and CLI interaction is well documented on the web, but also concepts covered here are too short and do not provide much added value overall.
We hope to see more innovative upcoming tutorials from your side :)
Need help? Write a ticket on https://support.utopian.io.
Chat with us on Discord.
[utopian-moderator]
After your comment, I noticed that it looked like documantation when I looked at my contribution. I will continue to write tutorials on application development such as my previous contributions. Thank you :)