Blinkit v2.7: Arduino integration | OLED Display
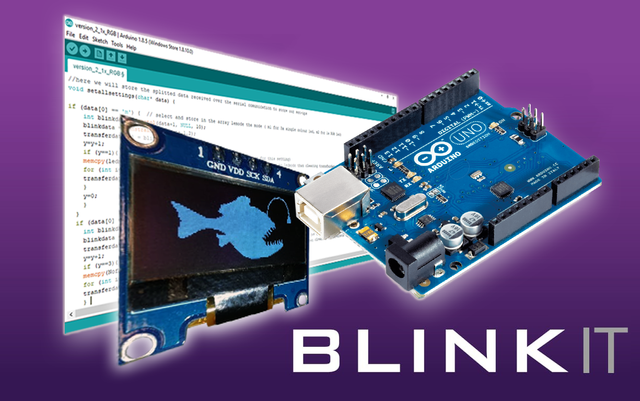
After more than a week of implementations, it is finally there !! Our new implementation that brings a higher user experience with Arduino integration in the Blinkit project.
Now, not only the notifications are received over the blinking of a LED, but now, it is also possible to receive another visual feedback thanks to the new implementation of an OLED display which will display the state of your arduino board (standby state and notification state).
Due to the limited SRAM memory in Arduino boards (in my case Arduino UNO) i had at the beginning a usage of 133% of SRAM which logically would not let me compile and upload the sketch to an Arduino Uno board. I had to work on using my internal memory ("ROM") in order to move some parts of code that are sent to SRAM during compile in order to lower SRAM usage.
After a rework of my code, my SRAM usage dropped from 133% to 76% !!!
Let's dive into the integration and code !!
The following file is updated/added in the Blinkit repository
arduinosketch.ino (updated file)
arduinoreadme (updated file with process of installing the libraries and official licenses of libraries)
Adafruit_SSD1306 (added a Library folder with modified files to suite Blinkit)
Adafruit_GFX (added a Library folder in the repo)
I2C_OLED_wiring_diagram.png (added file)
Files can also be found in my Github repo dedicated to Blinkit integration.
Using a Library for Display Control
With this release our main concern was:
- How to increase user experience with some added features ?
Following the previous release where i had lot of fun in slimming down the code and making it more modular in order to implement new things, we decided that it was time to enhance user experience while using Arduino boards with Blinkit. What could be better than an OLED screen displaying every state of the board ??
So now whether the board is in standby mode waiting for triggers or whether it is receiving notifications, the display will let you know what exactly is happening.
That was made possible thanks to the very famous opensource libraries Adafruit_SSD1306 and Adafruit_GFX which simplifies the interaction with displays and the official Wire.h Arduino Library which handles I2C comunication with the display. Kindly read also all of their licenses before uploading the sketch to your boards:
What is Blinkit?
Blinkit is a notification software that can be used to give to regular and widely available devices a Steem purpose.
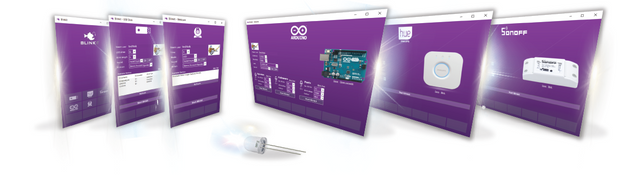
Supported devices:
- USB Sticks (status light)
- Philips HUE lamps
- Sonoff devices
- Arduino Boards or compatible (Genuino, etc...)
- Camera status LED blink
- Take photos on upvote/post/follow
- Logitech RGB/Backlight Keyboards (new)
Blinkit can look for new Steem account Upvotes and Followers, and it can notify on new Posts made by a user.
More devices will be added in the near future.
Blinkit is free and open source, and can be downloaded from the Blinkit Github page:
https://github.com/techtek/Blinkit

COMPATIBILITY
Current release has been tested only on an Arduino UNO board. Other boards like Mega and Nano should be supported (for Nano different PWM pins should be selected, for Mega nothing to change) but have not been tested yet. Users interested in using this new feature with other boards could submit a test contribution and let us know the result of their test.

How is it implemented?
Code structure has not been changed but have inlined the display code to work simultaneously with it and have made major adjustments in the handling of constant data that was initially stored in the SRAM during the compile phase.
- Declaration the variables, the arrays, include libraries, etc
- Initializing the setups (Serial Comunication and Output pins)
- Listen to the COM port for incoming data or activate the standby fading function
- Receive serial data and split it in tokens declaring the functions that will handle such data
- Read splitted data and based on some marker store them in the right setting array
- Wait for triggers (upvote, follower, post) over serial and based on the stored settings call the corresponding function
- Loop the function as per the trigger
Hereafter i will show and explain only the parts of the code where changements have been made.
1) Include Libraries and new data
#include <Wire.h>
#include <Adafruit_GFX.h>
#include <Adafruit_SSD1306.h>

#define OLED_RESET 4
Adafruit_SSD1306 display(OLED_RESET);

#define LCD_HEIGHT 64
After havign installed the Adafruit Libraries in the right place, in order to use them in your code, you must include them in your code at the beginning. Afterwards you should initiate the display reset in order to be able to initialiaze the display later in the setup. For future implementations with other display size i created a variable that is the LCD_HEIGHT since the I2C OLED displays can come with different height (mine is 64px) so for different size (i.e. 32px) just change the value in there and also change the initiated display size in the Library file .h.
// 'Angler fish logo oriented to right', 64x32px
const unsigned char ANGLER_TO_RIGHT [] PROGMEM = {
0x00, 0x00, 0x00, 0x00, 0x00, 0x00, 0x60, 0x00, 0x00, 0x00, 0x00, 0x00, 0x00, 0x03, 0xf8, 0x00,
  0x00, 0x00, 0x00, 0x00, 0x80, 0x06, 0x04, 0x00, 0x00, 0x00, 0x00, 0x07, 0xe0, 0x0c, 0x02, 0x00,
  0x00, 0x00, 0x00, 0x0f, 0xe0, 0x08, 0x02, 0x00, 0x00, 0x00, 0x00, 0x1f, 0xe0, 0x18, 0x01, 0x00,
  0x00, 0x00, 0x00, 0x7f, 0xe0, 0x10, 0x01, 0x00, 0x00, 0x00, 0x01, 0xff, 0xfe, 0x10, 0x01, 0x00,
  0x00, 0x00, 0x03, 0xff, 0xff, 0x10, 0x01, 0x80, 0x03, 0x80, 0x07, 0xff, 0xff, 0xf0, 0x01, 0x80,
  0x03, 0xe0, 0x07, 0xff, 0xff, 0xf0, 0x01, 0x80, 0x01, 0xf8, 0x07, 0xff, 0xff, 0xf8, 0x01, 0xc0,
  0x01, 0xfe, 0x03, 0xff, 0xff, 0xfc, 0x01, 0xc0, 0x00, 0xff, 0x8f, 0xff, 0xff, 0xfe, 0x01, 0xc0,
  0x00, 0xff, 0xff, 0xff, 0xff, 0xff, 0x00, 0x00, 0x00, 0xff, 0xff, 0xff, 0xff, 0xff, 0x00, 0x00,
  0x00, 0xff, 0xff, 0xff, 0xff, 0xff, 0x00, 0x00, 0x00, 0xff, 0xff, 0xff, 0xff, 0xfe, 0x00, 0x00,
  0x00, 0xff, 0x9f, 0xff, 0xff, 0xfc, 0x00, 0x00, 0x00, 0xfc, 0x03, 0xff, 0xff, 0xf8, 0x00, 0x00,
  0x00, 0xf8, 0x0f, 0xff, 0xff, 0xd0, 0x00, 0x00, 0x00, 0xe0, 0x0f, 0xff, 0xff, 0xe0, 0x00, 0x00,
  0x00, 0x00, 0x07, 0xff, 0xff, 0xc0, 0x30, 0x00, 0x00, 0x00, 0x07, 0xff, 0xff, 0xf5, 0x70, 0x00,
  0x00, 0x00, 0x07, 0xbf, 0xff, 0xf7, 0xf8, 0x00, 0x00, 0x00, 0x02, 0x1f, 0xff, 0xff, 0xf8, 0x00,
  0x00, 0x00, 0x00, 0x0f, 0xff, 0xff, 0xf0, 0x00, 0x00, 0x00, 0x00, 0x07, 0xff, 0xff, 0xe0, 0x00,
  0x00, 0x00, 0x00, 0x03, 0xff, 0xff, 0xc0, 0x00, 0x00, 0x00, 0x00, 0x01, 0xff, 0xff, 0x00, 0x00,
  0x00, 0x00, 0x00, 0x00, 0xff, 0xfc, 0x00, 0x00, 0x00, 0x00, 0x00, 0x00, 0x1f, 0x00, 0x00, 0x00
};

// 'Angler fish logo oriented to left', 64x32px
const unsigned char ANGLER_TO_LEFT [] PROGMEM = {
 0x00, 0x06, 0x00, 0x00, 0x00, 0x00, 0x00, 0x00, 0x00, 0x1f, 0xc0, 0x00, 0x00, 0x00, 0x00, 0x00,
 0x00, 0x20, 0x60, 0x01, 0x00, 0x00, 0x00, 0x00, 0x00, 0x40, 0x30, 0x07, 0xe0, 0x00, 0x00, 0x00,
  0x00, 0x40, 0x10, 0x07, 0xf0, 0x00, 0x00, 0x00, 0x00, 0x80, 0x18, 0x07, 0xf8, 0x00, 0x00, 0x00,
  0x00, 0x80, 0x08, 0x07, 0xfe, 0x00, 0x00, 0x00, 0x00, 0x80, 0x08, 0x7f, 0xff, 0x80, 0x00, 0x00,
  0x01, 0x80, 0x08, 0xff, 0xff, 0xc0, 0x00, 0x00, 0x01, 0x80, 0x0f, 0xff, 0xff, 0xe0, 0x01, 0xc0,
  0x01, 0x80, 0x0f, 0xff, 0xff, 0xe0, 0x07, 0xc0, 0x03, 0x80, 0x1f, 0xff, 0xff, 0xe0, 0x1f, 0x80,
  0x03, 0x80, 0x3f, 0xff, 0xff, 0xc0, 0x7f, 0x80, 0x03, 0x80, 0x7f, 0xff, 0xff, 0xf1, 0xff, 0x00,
  0x00, 0x00, 0xff, 0xff, 0xff, 0xff, 0xff, 0x00, 0x00, 0x00, 0xff, 0xff, 0xff, 0xff, 0xff, 0x00,
  0x00, 0x00, 0xff, 0xff, 0xff, 0xff, 0xff, 0x00, 0x00, 0x00, 0x7f, 0xff, 0xff, 0xff, 0xff, 0x00,
  0x00, 0x00, 0x3f, 0xff, 0xff, 0xf9, 0xff, 0x00, 0x00, 0x00, 0x1f, 0xff, 0xff, 0xc0, 0x3f, 0x00,
  0x00, 0x00, 0x0b, 0xff, 0xff, 0xf0, 0x1f, 0x00, 0x00, 0x00, 0x07, 0xff, 0xff, 0xf0, 0x07, 0x00,
  0x00, 0x0c, 0x03, 0xff, 0xff, 0xe0, 0x00, 0x00, 0x00, 0x0e, 0xaf, 0xff, 0xff, 0xe0, 0x00, 0x00,
  0x00, 0x1f, 0xef, 0xff, 0xfd, 0xe0, 0x00, 0x00, 0x00, 0x1f, 0xff, 0xff, 0xf8, 0x40, 0x00, 0x00,
  0x00, 0x0f, 0xff, 0xff, 0xf0, 0x00, 0x00, 0x00, 0x00, 0x07, 0xff, 0xff, 0xe0, 0x00, 0x00, 0x00,
  0x00, 0x03, 0xff, 0xff, 0xc0, 0x00, 0x00, 0x00, 0x00, 0x00, 0xff, 0xff, 0x80, 0x00, 0x00, 0x00,
  0x00, 0x00, 0x3f, 0xff, 0x00, 0x00, 0x00, 0x00, 0x00, 0x00, 0x00, 0xf8, 0x00, 0x00, 0x00, 0x00
};
The above part of code are the Blinkit .bmp logo converted into a byte array in order to be displayed later on the screen. As you can see in order to save SRAM usage and since these bytes are constant (the logo will never change), thus i declared them into the PROGMEM (the internal memory of Arduino) and not into the SRAM.
2) Initialize the setups (initialize the display)
display.begin(SSD1306_SWITCHCAPVCC, 0x3C);
  // init done
  // Show image buffer on the display hardware.
  // Since the buffer has been intialized with an the Blinkit logo splashscreen
  // internally, this will display the splashscreen.
  display.display();
  delay(2000);

  // Clear the buffer.
  display.clearDisplay();
After having declared all the new things, it is time to initialize the display and let it start interacting with Blinkit through Arduino. The initialization part will display the Blinkit splashscreen on the display, during the boot up of Arduino, as the Blinkit logo will fill the buffer during the compiling because it has been inlined in the Library file.

3) Listen to Com Port for new trigger and/or start standby pattern
void loop(){ //collecting the incoming data and filling the buffer with it
       StartTime = millis(); // updating time
  if (Serial.available() > 0) { //if there is any incoming serial data of any sort (any setting or any notification)
       display.setTextSize(2);
       display.setTextColor(WHITE);
       display.setCursor(25,20);
       display.println(F("INCOMING    DATA")); //advise on display that new data is incoming
       display.display();
       int index=0;
       delay(100); // let the buffer fill up
       int numChar = Serial.available();
    if (numChar>22) {
       numChar=22;
       }
     while (numChar--) {
        buffer[index++] = Serial.read(); //read serial data and put them in the buffer
        }
        splitString(buffer);
   }
 if (Serial.available() == NULL){    //
    for (int r=1; r<=10; r++){          // if within 10 seconds
      if (Serial.available() == NULL){  // no serial data is detected
        delay (1000);                    //(thus no settings or no notification) -> activate the function breath
        }
      else{ // if serial data is detected then stop the process
        break;
        }
        }

     standby(); // activate the function called standby (standby fading light pattern and display slide)

     }
}
As you can see the structure of this part has not really changed. We have inlined the code related to the display which will let us know when there is incoming new data.
4) standby pattern function
unsigned int PERIOD= 4000;
       double OMEGA= 2*PI/PERIOD;
       CurrentTime= millis();
       int y=((LCD_HEIGHT/3)+(LCD_HEIGHT/3)*(cos(OMEGA*CurrentTime)));  //use the COS function to let the text oscillate up and down following the sine wave
       int x= i-60;
       display.drawBitmap(x, y, ANGLER_TO_RIGHT, 64, 32, 1);
       display.setTextSize(2); //set text size
       display.setTextColor(WHITE);//set colour of text
       display.setCursor(25,y); //set where to write the text
       display.println(F("BLINKiT")); // display the text
       display.display();
       display.clearDisplay(); //clear display
The structure of this part has not really changed. We have inlined the code related to the display which will display a nice sliding pattern of the Blinkit text and the blinkit logo while doing the fading pattern with the led, as shown in the below gif. above is part of the inlined code.
Loop the function as per the trigger
void fire(int Nblink, int LEDdelay){
             display.stopscroll(); //stop scrolling previous text (just in case)
             display.clearDisplay(); //clear the display
             display.setTextSize(2); //set text size
             display.setTextColor(WHITE); //set text colour
             display.setCursor(30,20); //set where to display text
             display.println(F("FIRE")); // write text
             display.display(); //display the text

 for (int a= 0; a< Nblink; a++){ //repeat the rainbow effect as per the Nofblinks[1] value
     for (int y=0; y<=295; y++){
           if (Serial.available() > 0){ // when data is received
      analogWrite(RedPIN, 0);    //turn off the led
      analogWrite(GreenPIN, 0); //
      analogWrite(BluePIN, 0); //
      display.clearDisplay(); // clear display
      break; //and exit the loop
      }
      display.invertDisplay(true); //invert colours of display
          // fade in till full red brightness
       if(y<=255){
          analogWrite(RedPIN, y);
         }
          // fade to orange-yellow
       if(y>=255){
          analogWrite(GreenPIN, (y-255));
         }
          delay ((LEDdelay/20));
    }
    display.invertDisplay(false); //invert again display colours
    for (int x=295; x>=0; x--){
           if (Serial.available() > 0){ // when data is received
      analogWrite(RedPIN, 0);    //turn off the led
      analogWrite(GreenPIN, 0); //
      analogWrite(BluePIN, 0); //
      display.clearDisplay(); // clear display
      break; //and exit the loop
      }
          // fade back to red
       if(x>=255){
          analogWrite(GreenPIN, (x-255));
         }
          // fade till off
       if(x<=255){
          analogWrite(RedPIN, x);
         }
      delay ((LEDdelay/20));
    }
    display.invertDisplay(true); //invert again display colours
 }
     analogWrite(RedPIN, 0); // turn off the led
     analogWrite(GreenPIN, 0); // (just to make sure)
     display.invertDisplay(false); //bring colours to normality
     display.clearDisplay(); //clear display
}
As per above example, the display will show in a nice way which effect is being triggered.
afterwards, based on the notification received the display will show which notification has been received.

The Wiring Diagram
Wiring diagram for both ledmodes and for the OLED display can be found in Blinkit main repo or in my repo.
Technical Support
Technical support is available, if you may encounter a problem, or if you want to know if your device is supported or will be supported in the near future.
How to contribute?
Do you have a question, or suggestion about the integration of Arduino in Blinkit ? Feel free to contact me on Discord (electronicsworld#0829) or leave a comment below.

Hello, electronicsworld, upvoted and resteemed! Reply with "STOP" to end this madness.
Notice:
Starting next week @artturtle will be upvoting only those posts that contain one of the following tags: art, music, fashion, video, book(s), artopium, handmade, originalworks, artzone, photography, painting(s), utopian-io, openmic.
Want @ArtTurtle to follow you too and upvote and resteem your art, music, fashion, video and books? Find out how by visitng @artturtle and reading the latest report.
حصلت على تصويت من
@arabsteem curation trail !
و تم اختيار مقالتك ضمن مقالات يومية مختارة للنشر في مقالنا اليومي
يمكنك الحصول على تصويت اضافي عبر ارسال مبلغ اقله
0.05
ستيم او اسبيدي الى حساب التصويت الالي
@arabpromo
مع رابط المقال في حقل المذكرة (memo)
مما يتيح لك الحصول على تصويت مربح بحوالي 2.5 اضعاف :)
Thank you @arabsteem !! much appreciated !!
Greetings @electronicsworld! Your post was chosen at random and was resteemed because you are one of our followers. Enjoy your free resteem!
Shareables - We resteem anything we find shareable. Always strive for quality content. Go on express and harness your blogging potential!
God bless from us @Shareables!
Thank you for your contribution, a great update to the project.
Your contribution has been evaluated according to Utopian policies and guidelines, as well as a predefined set of questions pertaining to the category.
To view those questions and the relevant answers related to your post, click here.
Need help? Write a ticket on https://support.utopian.io/.
Chat with us on Discord.
[utopian-moderator]
@codingdefined Thank you for moderating my post!! Appreciate your comment :)
Join our Discord Channel to connect with us and nominate your own or somebody else's posts in our review channel.
Help us to reward you for making it ! Join our voting trail or delegate steem power to the community account.
Your post is also presented on the community website www.steemmakers.com where you can find other selected content.
If you like our work, please consider upvoting this comment to support the growth of our community. Thank you.
Thank you !! :)
Hey @electronicsworld
Thanks for contributing on Utopian.
We’re already looking forward to your next contribution!
Want to chat? Join us on Discord https://discord.gg/h52nFrV.
Vote for Utopian Witness!
Great! This is why we always need to move forward :)
Don't Let Yesterday Take Up Too Much Of Today.
Well done @electronicsworld! You successfully guessed the match result.
Click on the badge to view your Board of Honor.
Do not miss the last post from @steemitboard!
Do you like the SteemitBoard World Cup Contest?
Vote for @steemitboard as a witness and get one more award!
Well done @electronicsworld! You successfully guessed the match result.
Click on the badge to view your Board of Honor.
Do you want to know your current ranking? Read this post
Do not miss the last post from @steemitboard!
Do you like the SteemitBoard World Cup Contest?
Vote for @steemitboard as a witness and get one more award!