Create a forum application using django #8: Display forum data and Create and implement List view
Repository
What Will I Learn?
- Display forum data
- Create and implement List view
Requirements
- Basic Python
- Install Python 3
- Install Django
Resources
- Python - https://www.python.org/
- Django- https://www.djangoproject.com/
- Bootstrap 4 - https://getbootstrap.com/docs/4.0/getting-started/introduction/
Difficulty
Basic
Tutorial Content
Hi everyone, this tutorial. We will continue the previous tutorial. In the previous tutorial, we have made settings on the admin page for modules in our forum application. This tutorial will discuss new features. we have made module settings, now it is our job to display the data in the forum into our forum application. For that, we just start this tutorial.
Display forums
Previously, we discussed how to set the module in the admin. Now we will learn how to make displaying forum data in the application that we have created. We will do first is to make a path for the home page of the module forums. Because the module we are going to use is the model forums, we will make the URL in forums/urls.py. We have created urls.py in the previous tutorial. For more details, We can see the code below:
forums/urls.py
from django.urls import path
from .views import ForumCreate, ForumListView // import the class

urlpatterns = [
    path(' ', ForumListView.as_view(), name='forum-list'), // define path
    path('add/', ForumCreate.as_view(), name='forum-add')
]
Noted: because we will use the forums module, our URL will start at '/ forums'
Because we will display the forum data on the main page of the forums we will add the path
' '. So when we access the path/forums, we can write it like thispath(' ', ForumListView.as_view(), name='forum-list').As we have done before we define the class from the view that will be rendered in the path we are going to in the following
ForumListView.as_view(). The class name we will use is ForumListView.To use the ForumListView class, we must import it first. We can import it through
from .views import ForumListViewand we can name the alias like thisname='forum-list'.
Create List View
We have used and imported the class. But we have not defined and made it in forums/views.py. We will make the class like the code below:
forums/views.py.
from django.shortcuts import render
from django.views.generic import CreateView, ListView // import the generic view
from .models import Forum
from django.contrib.auth.decorators import login_required
from django.utils.decorators import method_decorator

@method_decorator(login_required, name='dispatch')

class ForumListView(ListView): // Define the class
    model = Forum

class ForumCreate(CreateView):
    model = Forum
    fields = ['title','desc']

    def form_valid(self, form):
        form.instance.user = self.request.user
        return super().form_valid(form)
We will use the generic view provided by Django. we can import it like this
from django.views.generic import CreateView, ListView. In the previous tutorial, we created a CreateView reference to use in the ForumCreate(CreateView) class.Then for the ForumListView class we can use the new reference, namely ListView and pass it as a parameter in the
class ForumCreate(CreateView).And for the model we use we can define it like this
model = Forum. Make sure we have imported the Forumfrom .models import Forum.
If what we do is successful then we can see a warning because there is a template that we haven't created. like the picture below:
We can see in the picture above, our system expects a template forum/forum_list.html. This is one of the conveniences of using ListView, all the logic and views have been provided and made. we only need to make the template file.
- Create a list view template
We have defined List view. Now we will create a template to render the data that will be used. We will still use the base layout that we have made in the previous tutorial. For more details, we can see the template as below:
{% extends "base.html" %}

{% block title %} List Forum{% endblock %}

{% block content %}
<div class="jumbotron">
  <h1>Forums</h1>
    <ul>
        {% for forum in object_list %} // Looping object
            <li>{{forum.title}}</li>
        {% endfor %}
    </ul>
</div>
{% endblock%}
to render the data we can use for
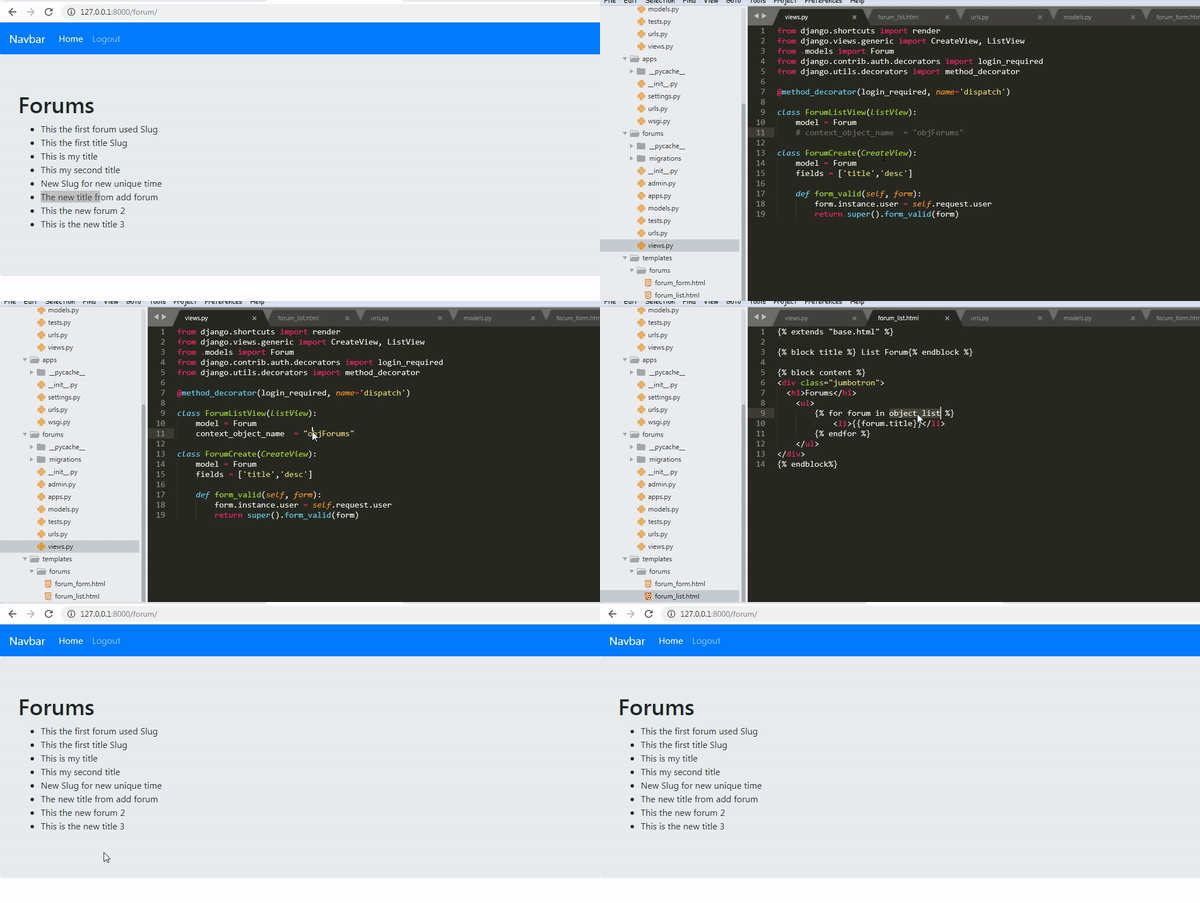
{% for forum in object_list %}. We can use the default variable as an alias of objects in the ListView. The default name we use isobject_list.If there is no error then we can see the results as follows:
We can see in the picture above we succeeded to render the data in our database. this means the list view function that we created has been successful.
- Change the default object
object_list: If you want to change the name of the default object, you can replace it like the example below:
class ForumListView(ListView):
    model = Forum
    context_object_name  = "objForums"
Make sure there are no errors when the object name is changed
- Connected CreateView and ListView
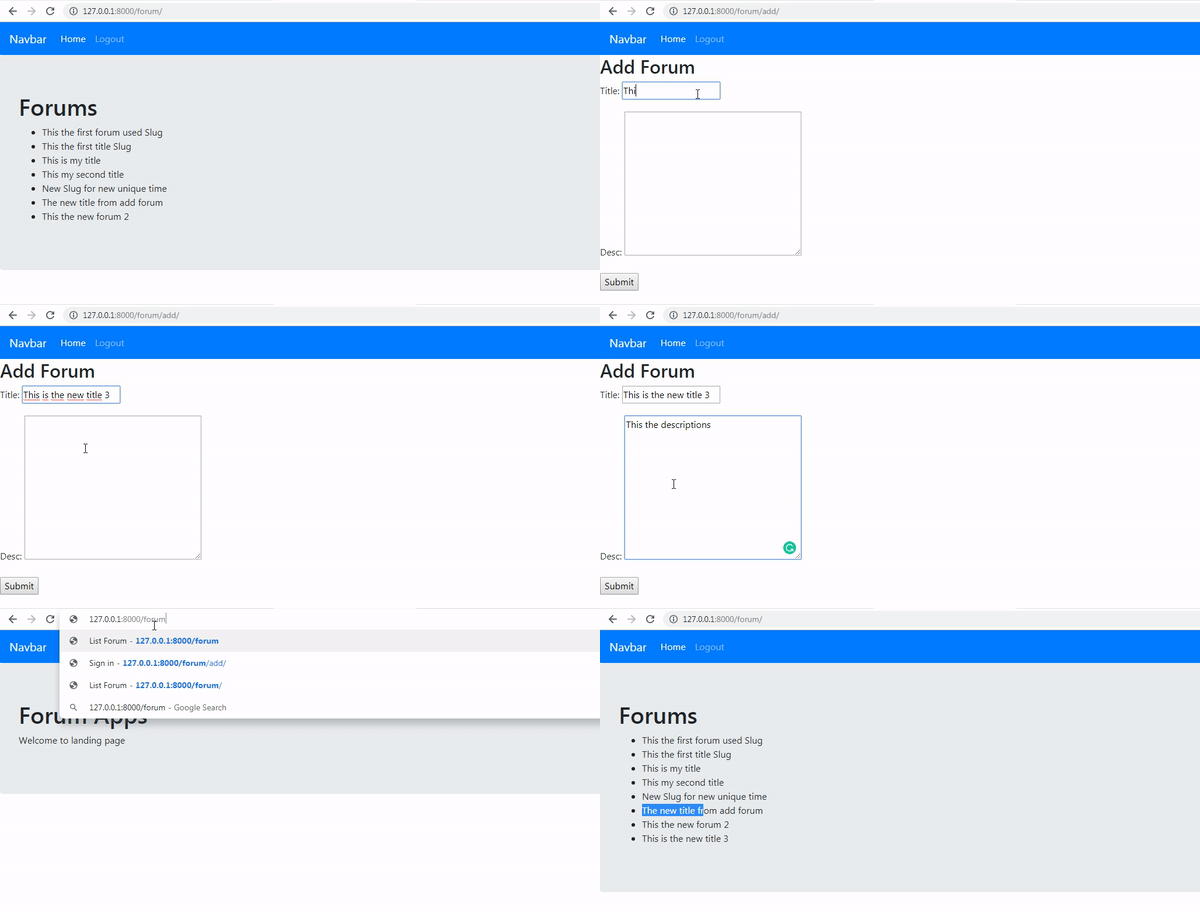
Now we will test whether the create forum function is successfully connected to the list view, to test it we can see the demonstration below:
Now we have successfully added a new forum and connected it in the list view.
- Query Set
We can manage the data that appears on the page, like when we use queries in MySQL, we certainly know orderby, groupby limit and others. In the List View class we actually also use the query set function, but by default the query set is set like the code below:
class ForumListView(ListView):
    model = Forum
    context_object_name  = "objForums"
    queryset = Forum.objects.all() // default queryset
by default we retrieve data with the
all()method, we can replace it withorder_by()to sort thefilter()data to do a filter andlimit()to limit the data.We not only can render titles. we also render other data as follows:
{% extends "base.html" %}

{% block title %} List Forum{% endblock %}

{% block content %}
<div class="jumbotron">
  <h1>Forums</h1>
    <ul>
        {% for forum in objForums %}
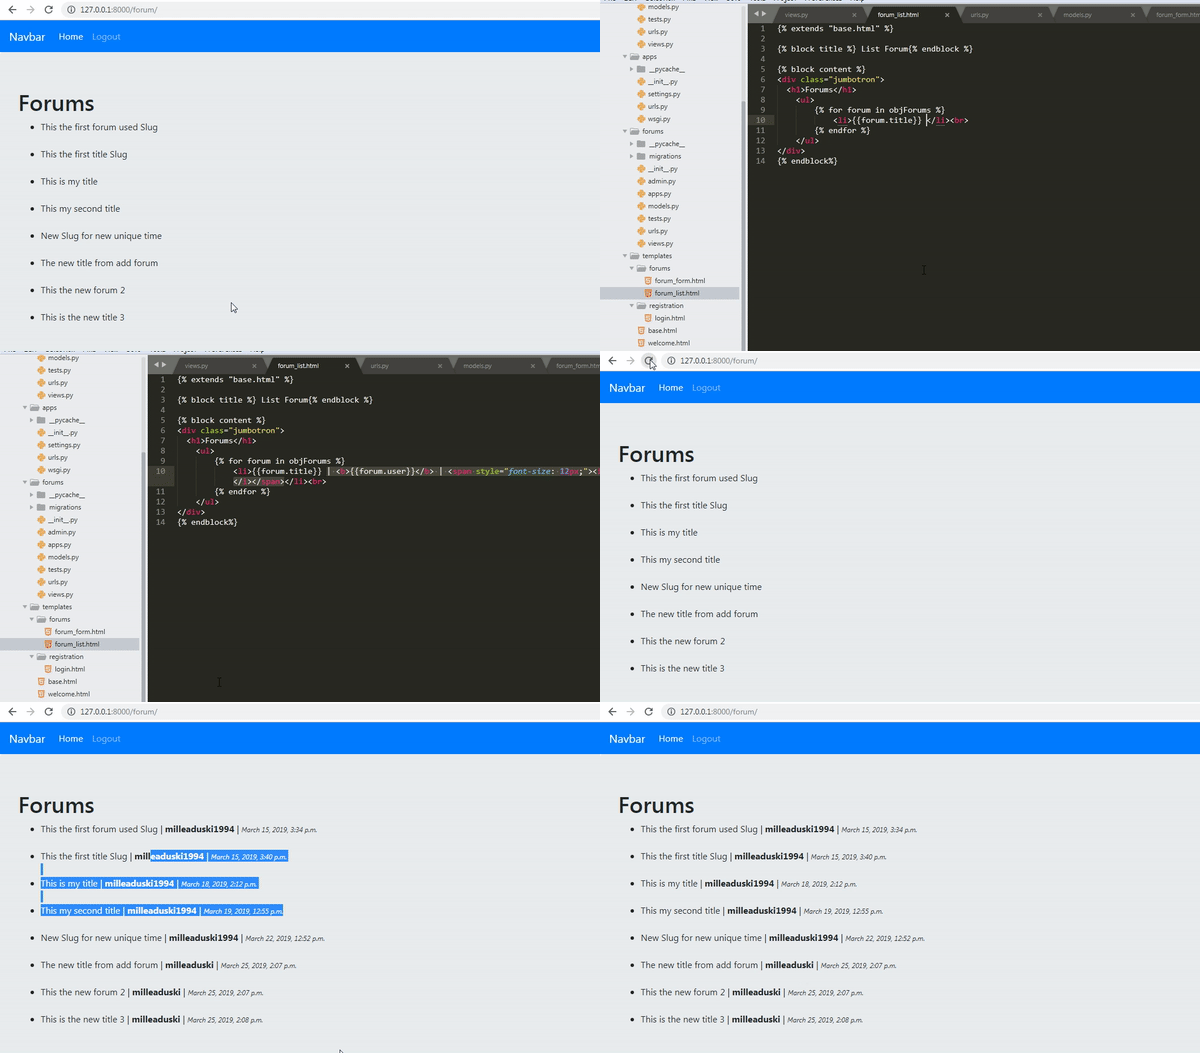
            <li>{{forum.title}} | <b>{{forum.user}}</b> | <span style="font-size: 12px;"><i>{{forum.created_at}}</i></span></li><br>
        {% endfor %}
    </ul>
</div>
{% endblock%}
We can see in the picture above we have succeeded display of our data more detailed. for the query set section, we will discuss the implementation more in the next tutorial. thank you
Curriculum
- Class-based views
Tutorial Django - Class based view #2 : Use Class based view method and Get and Post method
- Forum app
Create a forum application using django #1 : Init projects and dependencies and Database schema
Create a forum application using django #2: Template system and Class-based view implementation
Create a forum application using django #3: Base template, Login and Register system
Create a forum application using django #4: Admin dashboard ang setting redirect

.gif)
.gif)
.gif)
Thank you for your contribution @duski.harahap.
After analyzing your tutorial we suggest the following points below:
Nice work on the explanations of your code, although adding a bit more comments to the code can be helpful as well.
Using GIFs to show results is definitely better than standard still images. Good Job!
Again be careful how you write the tutorial.
Thank you for your work in developing this tutorial.
Looking forward to your upcoming tutorials.
Your contribution has been evaluated according to Utopian policies and guidelines, as well as a predefined set of questions pertaining to the category.
To view those questions and the relevant answers related to your post, click here.
Need help? Chat with us on Discord.
[utopian-moderator]
Thank you for your review, @portugalcoin! Keep up the good work!
Hi @duski.harahap!
Your post was upvoted by @steem-ua, new Steem dApp, using UserAuthority for algorithmic post curation!
Your post is eligible for our upvote, thanks to our collaboration with @utopian-io!
Feel free to join our @steem-ua Discord server
Hey, @duski.harahap!
Thanks for contributing on Utopian.
We’re already looking forward to your next contribution!
Get higher incentives and support Utopian.io!
Simply set @utopian.pay as a 5% (or higher) payout beneficiary on your contribution post (via SteemPlus or Steeditor).
Want to chat? Join us on Discord https://discord.gg/h52nFrV.
Vote for Utopian Witness!