Create a forum application using django #7: Unique slug and Manage Modules in admin dashboard
Repository
What Will I Learn?
- Make unique slug
- Manage modules in admin dashboard
Requirements
- Basic Python
- Install Python 3
- Install Django
Resources
- Python - https://www.python.org/
- Django- https://www.djangoproject.com/
- Bootstrap 4 - https://getbootstrap.com/docs/4.0/getting-started/introduction/
Difficulty
Basic
Tutorial Content
This tutorial is a continuation of the previous tutorial, in the previous tutorial we made some features. Well, in this tutorial we will discuss a lot about admin features in the forum application. of course in this forum application, we will create an admin feature that will function to manage the content that is on our application. So later the content that will appear on the application will be dynamic. we will start from now.
Make a unique slug
Before we enter the admin feature. we will discuss some of the things we must improve. We have agreed to use the Slug concept on our application. Using the slug concept means we have given something unique to the slug to replace the unique ID function. In the tutorial before we have generated slug from tittle but now the question is how if there is the same title ?.
how if there is the same title ?
Of course, we don't require a user to create a unique title, because the user doesn't care about that. so we have to make our own tricks to make the slug unique. So the idea is to make the slug unique. We will add unixtime when generating a slug. This trick is often used one of them on the steemit blog, as we can see in the picture below:
Now we will implement it on our forum application using Django. For more details, we can see our previous code in forums/models.py.
from django.db import models
from django.conf import settings
from django.utils.text import slugify
from django.urls import reverse

import time // import module time

class Forum(models.Model):
    user = models.ForeignKey(settings.AUTH_USER_MODEL, on_delete=models.CASCADE)
    title = models.CharField(max_length=100)
    slug = models.SlugField(unique=True)
    desc = models.TextField()
    created_at = models.DateTimeField(auto_now_add=True)

    def save(self, *args, **kwargs):
        self.slug = slugify(self.title) + '-' + time.strftime("%Y%m%d%H%M%S") // Add slug with time
        super(Forum, self).save(*args, **kwargs)

    def get_absolute_url(self):
        return reverse('home')
- To make it dynamic we will add time in the timestamp. We need to import module time
import time. So we can use time. - After importing we will add it to our slug, like the following
slugify(self.title) + '-' + time.strftime("%Y%m%d%H%M%S"). In python to set the time format, we can use a format like thistime.strftime("%Y%m%d%H%M%S". (Year month day Hour Minutes Second). For more details, we can see demonstrations like the one below:
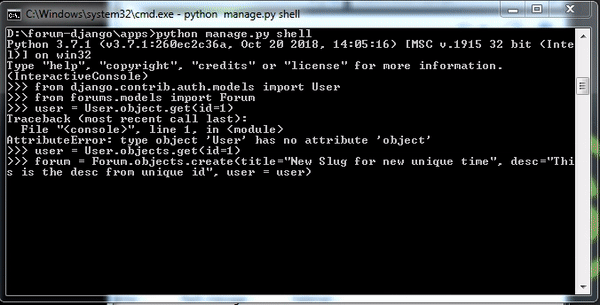
We can see in the picture above, in a way like we have made the snail unique because it could be the same title but the time must be different.
Manage admin dashboard
Admin dashboard is an interface that makes it easy for us to interact and manage the content that is on our forum application. In the previous tutorial, we already have an admin account. now we will enter the admin page to set up the forum application.
.gif)
We will learn how to manage admin pages by bringing up the modules in the application.
- Manage modules
Now what we will do in the admin is to manage the content in the admin. In this tutorial, we will make the settings separate between modules. By making separate settings we will easily set it up, the settings will be separated according to each class. We can set it in admin.py. For more details, we can see the example below:
admin.py
from django.contrib import admin

from .models import Forum, Comment // import models

class CommentInline(admin.StackedInline):
    model = Comment

class ForumAdmin(admin.ModelAdmin):
    inlines = [CommentInline]

admin.site.register(Forum, ForumAdmin)
Import models: The most important part is importing the model first because we will make the settings of the models. Later this model will have its own settings menu. In the model, we will import two classes namely Forum and Comment which are abstractions of the tables in our databasefrom .models import Forum, Comment.class CommentInline(admin.StackedInline): Commentline is the name of the class that will be used to organize content from comments. So far we have not added the comment feature to our application. But there is no problem to make the settings first in the admin. In this class, we will pass admin.StackedInlineCommentInline(admin.StackedInline). admin.StackedInline is used to set the appearance of comments to be a "stack" and of course the model used is commentmodel = Comment.class ForumAdmin(admin.ModelAdmin): We have created and defined the CommentInline class, but we need to register it. to register we will create a new class that extends the model.Adminclass ForumAdmin(admin.ModelAdmin)and then you can define the list to be inlineinlines = [CommentInline]Well in this example the class that will be inline is CommentInline. The type is in an array so you can add it with a comma (,) separator.Register module admin: After that, we will register the module in this way
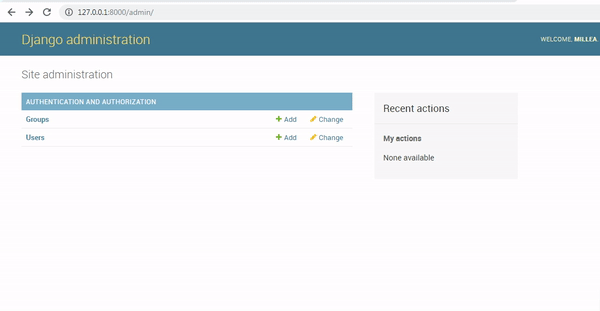
admin.site.register(Forum, ForumAdmin). If there is no error then we can see the new settings on the admin page. as we can see in the picture below:
.gif)
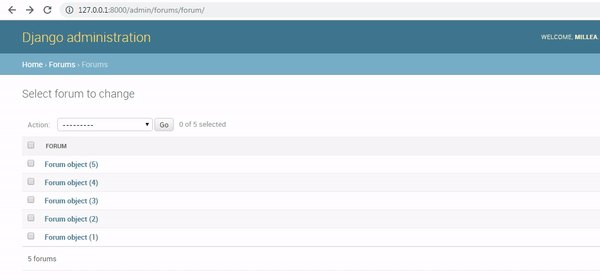
We can see in the picture above, we have succeeded in a new menu in admin, namely forums. Inside the forums, we can see various data that we have made before. like the picture below:
In the picture above the name of the data in the forums is still the name of the object. Of course, this name does not contain the information we need. So I will replace it with the name of the title to replace it we can change it in the model section like the following code:
    def __str__(self):
        return self.title
.gif)
Well, now we can see the object has changed to the title name and we can see the details that are in each forum and we can see the comments are still empty. In the next tutorial, we will activate the comment feature on our forum application. thank you for following this tutorial. thank you
Curriculum
- Class-based views
Tutorial Django - Class based view #2 : Use Class based view method and Get and Post method
- Forum app
Create a forum application using django #1 : Init projects and dependencies and Database schema
Create a forum application using django #2: Template system and Class-based view implementation
Create a forum application using django #3: Base template, Login and Register system
Create a forum application using django #4: Admin dashboard ang setting redirect
Thank you for your contribution @duski.harahap.
After analyzing your tutorial we suggest the following points below:
We suggest that you take more care when writing the tutorial, sometimes repeating the same word several times in the same sentence and paragraph. However, it is improving.
It's very interesting how you do your GIFs to demonstrate what you are developing. Good job!
Nice work on the explanations of your code, although adding a bit more comments to the code can be helpful as well.
Thank you for your work in developing this tutorial.
Looking forward to your upcoming tutorials.
Your contribution has been evaluated according to Utopian policies and guidelines, as well as a predefined set of questions pertaining to the category.
To view those questions and the relevant answers related to your post, click here.
Need help? Chat with us on Discord.
[utopian-moderator]
Thank you for your review, @portugalcoin! Keep up the good work!
Hi @duski.harahap!
Your post was upvoted by @steem-ua, new Steem dApp, using UserAuthority for algorithmic post curation!
Your post is eligible for our upvote, thanks to our collaboration with @utopian-io!
Feel free to join our @steem-ua Discord server
Congratulations @duski.harahap! You have completed the following achievement on the Steem blockchain and have been rewarded with new badge(s) :
You can view your badges on your Steem Board and compare to others on the Steem Ranking
If you no longer want to receive notifications, reply to this comment with the word
STOPDo not miss the last post from @steemitboard:
Vote for @Steemitboard as a witness to get one more award and increased upvotes!
Hey, @duski.harahap!
Thanks for contributing on Utopian.
We’re already looking forward to your next contribution!
Get higher incentives and support Utopian.io!
Simply set @utopian.pay as a 5% (or higher) payout beneficiary on your contribution post (via SteemPlus or Steeditor).
Want to chat? Join us on Discord https://discord.gg/h52nFrV.
Vote for Utopian Witness!