Tracking nearby Planes with a Laptop and $20
What you will need:
- $20 for an RTL-SDR (I bought mine from NooElec through Amazon; this is not a sponsored post, I only specify this one because it is what I used.)
- A computer
That’s it.... Keep in mind, this guide is meant for Windows (I’m specifically using Windows 8) but if this guide proves to be useful I can release a Linux/Mac OS X guide.
What is an SDR?
SDR stands for “Software Defined Radio” and in this case refers to our NESDR Mini SDR, which through the use of special drivers and software can receive (BUT NOT TRANSMIT) various “types” of radio waves. This guide intends to serve as a basic primer to get started in this fairly niche hobby and a list of resources to get started will be included at the bottom of the page.
Why would I want an SDR?
The SDR’s functionality is defined by software and so if you are a developer you could create your own software to interface with the SDR. Alternatively, you may be interested in the many other things you can do with an SDR. The following list gives some examples of what you could do with this $20 piece of equipment.
- Track the position of nearby boats transmitting AIS (“Automatic Identification System”) signals.
- Detecting the radio signal used to activate devices and create your own radio replay attack. (Though this would require a radio transmitter as well)
- Tune into FM/AM radio from your computer
- Receive HAM radio signals, I was able to receive a signal from someone transmitting 2 counties away.
Of course, this is a small list, but this is because what the SDR can receive is limited by its antenna. There are many kinds of antennae each designed with a use-case in mind. For example, I have planned in the future to build a Crossed-Dipole antenna which would allow me to receive higher radio frequencies. Specifically, this antenna is meant to be able to receive weather satellite signals at 144Mhz. Whenever a weather satellite passes overhead (usually a NOAA (USA) or COMET (Russia) satellite), we can receive and process the data to create an overhead image of our location from the weather satellite. Is this particularly useful? No…but it’s interesting.
The most commonly used beginner satellite is a Planar Disk antenna, and this can be built fairly easily with a couple of pizza pans, some solder and a coaxial cable (see reference 2).
Instructions
NOTE: If when plugging your RTLSDR into your PC, Windows offers to install a driver for the device, stop it from doing so, this is not the driver we want.
1. Download Zadig from http://zadig.akeo.ie; this program will help us to install the WinUSB driver which will allow us to use our RTLSDR. After downloading the program, run it and you should see your SDR probably listed as “RTL2838UHIDIR”, if you cannot find it go to Options > List All Devices. Next make sure that the field on the right of the green arrow is set to “WinUSB” by using the up and down arrows next to the field. Finally, click Install Driver and the required driver should now be installed. This can be seen in the screenshot below but with my screenshot showing “Reinstall Driver” as I already have it installed.

2. Download RTL1090 from http://rtl1090.com/ (I would recommend using the IMU installer, it will help install additional required files for you). This program will listen for and receive the signals using the SDR. Run rtl1090.exe and click “Start”; you shouldn’t need to change any settings but if you wish you could possibly increase the range of detection by deselecting “Tuner AGC” and increasing the gain. At this point, rtl1090 should look like the picture below.

3. Next, download Virtual Radar Server from http://www.virtualradarserver.co.uk/. This is what will allow us to plot the location of the detected nearby planes onto Google Maps and will provide us with additional information about the plane including the airline, route, speed, and turbulence. Run the Virtual Radar program and your screen should look like the screenshot below.

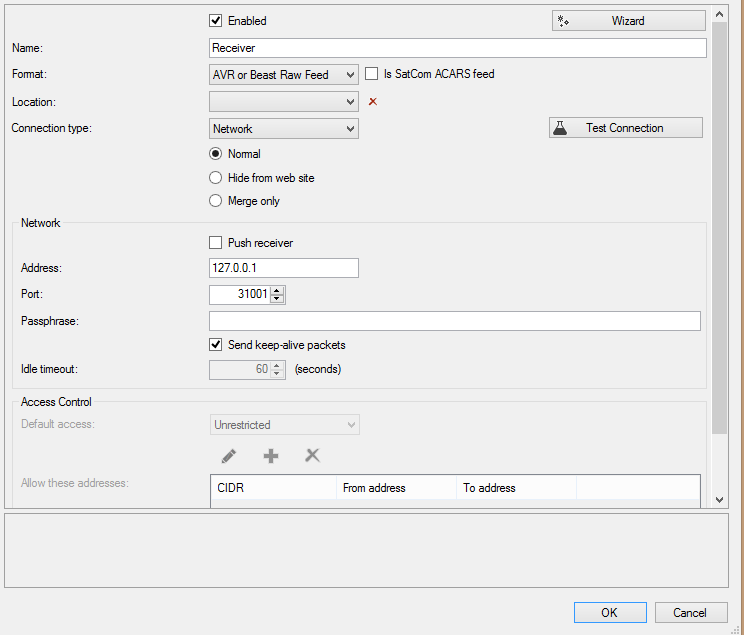
4. Go to Tools > Options and click on “Receivers”. Here we will add a new receiver; this may be the most challenging step but just copy the picture below. The only part you may need to change is the port under the “Network” subsection. To check if this is necessary, go back to rtl1090 and look to the bottom of the window where it should say “TCP Port:”, where you can find what port the program is communicating on; by default, this is 31001. Ensure your settings look like the picture below and click Ok.
5. The receiver should now be connected and receiving messages in the “Feed status” section. This means that Virtual Radar Server is now correctly receiving input from rtl1090 and is able to use this information. Click the blue link in Virtual Radar Server (should be something similar to http://127.0.0.1/VirtualRadar) and this should open up Virtual Radar in your default browser.
6. Your browser should now open to a page that looks like the screenshot below with updated information on nearby planes, and their current location.

That’s all there is to it. If you have any questions or feedback, feel free to leave a comment down below and I’ll try to respond as quickly as possible. Enjoy!
References
1. Wikipedia page for SDRs for those who wish to understand the technicalities. https://en.wikipedia.org/wiki/Software-defined_radio
2. The build guide for creating a Planar Disk antenna. http://www.wa5vjb.com/references/PlanarDiskAntennas.pdf
3. The subreddit page for the RTLSDR community, a good place for project ideas and information. https://www.reddit.com/r/RTLSDR/
@magicsysreqkey, welcome and congratulations on making your first post! I gave you a $.05 vote! If you would be so kind to give me a follow in return, that would be most kind of you!!
Hey @magicsysreqkey, great post! I enjoyed your content. Keep up the good work! It's always nice to see good content here on Steemit! Cheers :)
Cheers! Appreciate the kind words of encouragement, and thanks for the feedback :)
Will you follow me? 😊 @a-0-0
This post has been upvoted for free by @microbot with 5%!
Get better upvotes by bidding on me.
More profits? 100% Payout! Delegate some SteemPower to @microbot: 1 SP, 5 SP, 10 SP, custom amount
You like to bet and win 20x your bid? Have a look at @gtw and this description!
Congratulations @magicsysreqkey! You received a personal award!
You can view your badges on your Steem Board and compare to others on the Steem Ranking
Do not miss the last post from @steemitboard:
Vote for @Steemitboard as a witness to get one more award and increased upvotes!