How to set up Syndicate coin SYNX Maternode step by step instruction
Advice: Read it carefully 2-3 times to catch the milestones before proceed to action.
Send a small amount of coin if you found this guide helpful to one of these:
SYNX Wallet: SNPkNALRJKLdjtVr4dhK3ze2peYks5PK7p
ETH Wallet: 0xFCe7D0442D076A1295fb3e91b038D057E76e291b
BTC Wallet: 18KJ5MXAGnSMk1uAmAGXWRw2PFcbpXss92
Use this instruction to setup 1 Syndicate coin (SYNX) Masternode per VPS powered by Vultr!
This guide is for the creation of separate Controller Wallet & Masternode. For Security reasons, THIS IS THE PREFERRED way to run a Masternode. By running your Masternode in this way you are protecting your coins in your private wallet, and are not required to have your local wallet running after the Masternode has been started successfully. Your coins will be safe if the masternode server gets hacked.
This is the step by step guide the way I did it on Windows 10 with Syndicate-Qt-1.9.1-win32 wallet and Vultr VPS:
CPU: 1 vCore
RAM: 1024 MB
Storage: 25 GB SSD
Bandwidth: 1000 GB
OS: Ubuntu 14.04 x64
1. Desktop Wallet Preparation
1.1 Setup the wallet
- Download the latest stable wallet and extract it.
- Start and Close the wallet. (creates the folder structure)
- Start the wallet again and open:
Help -> Debug Window -> Console
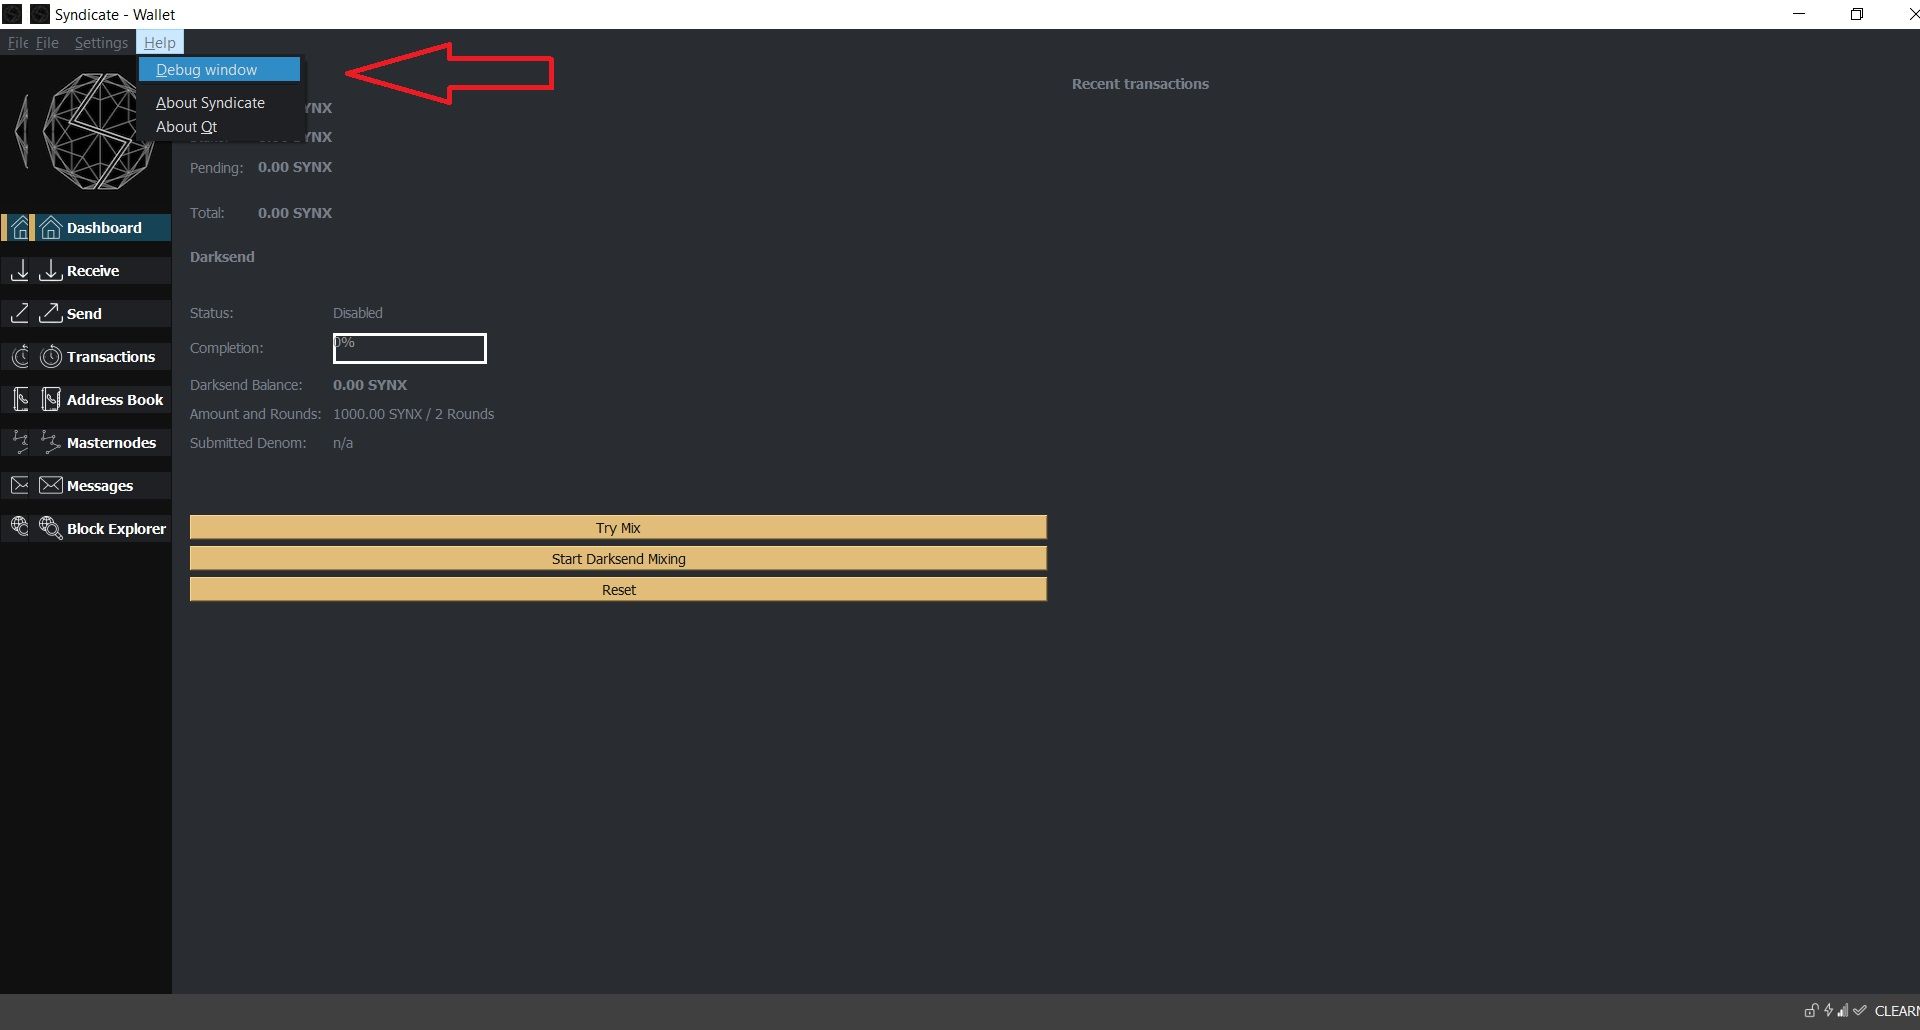
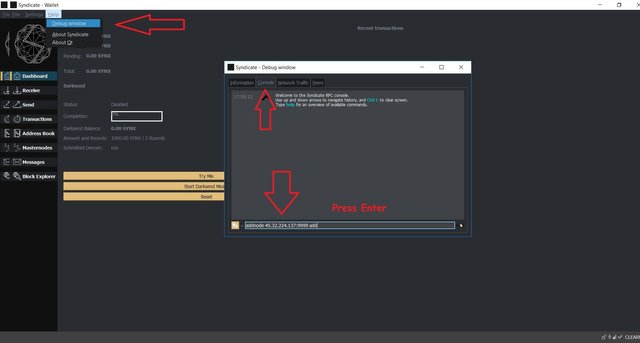
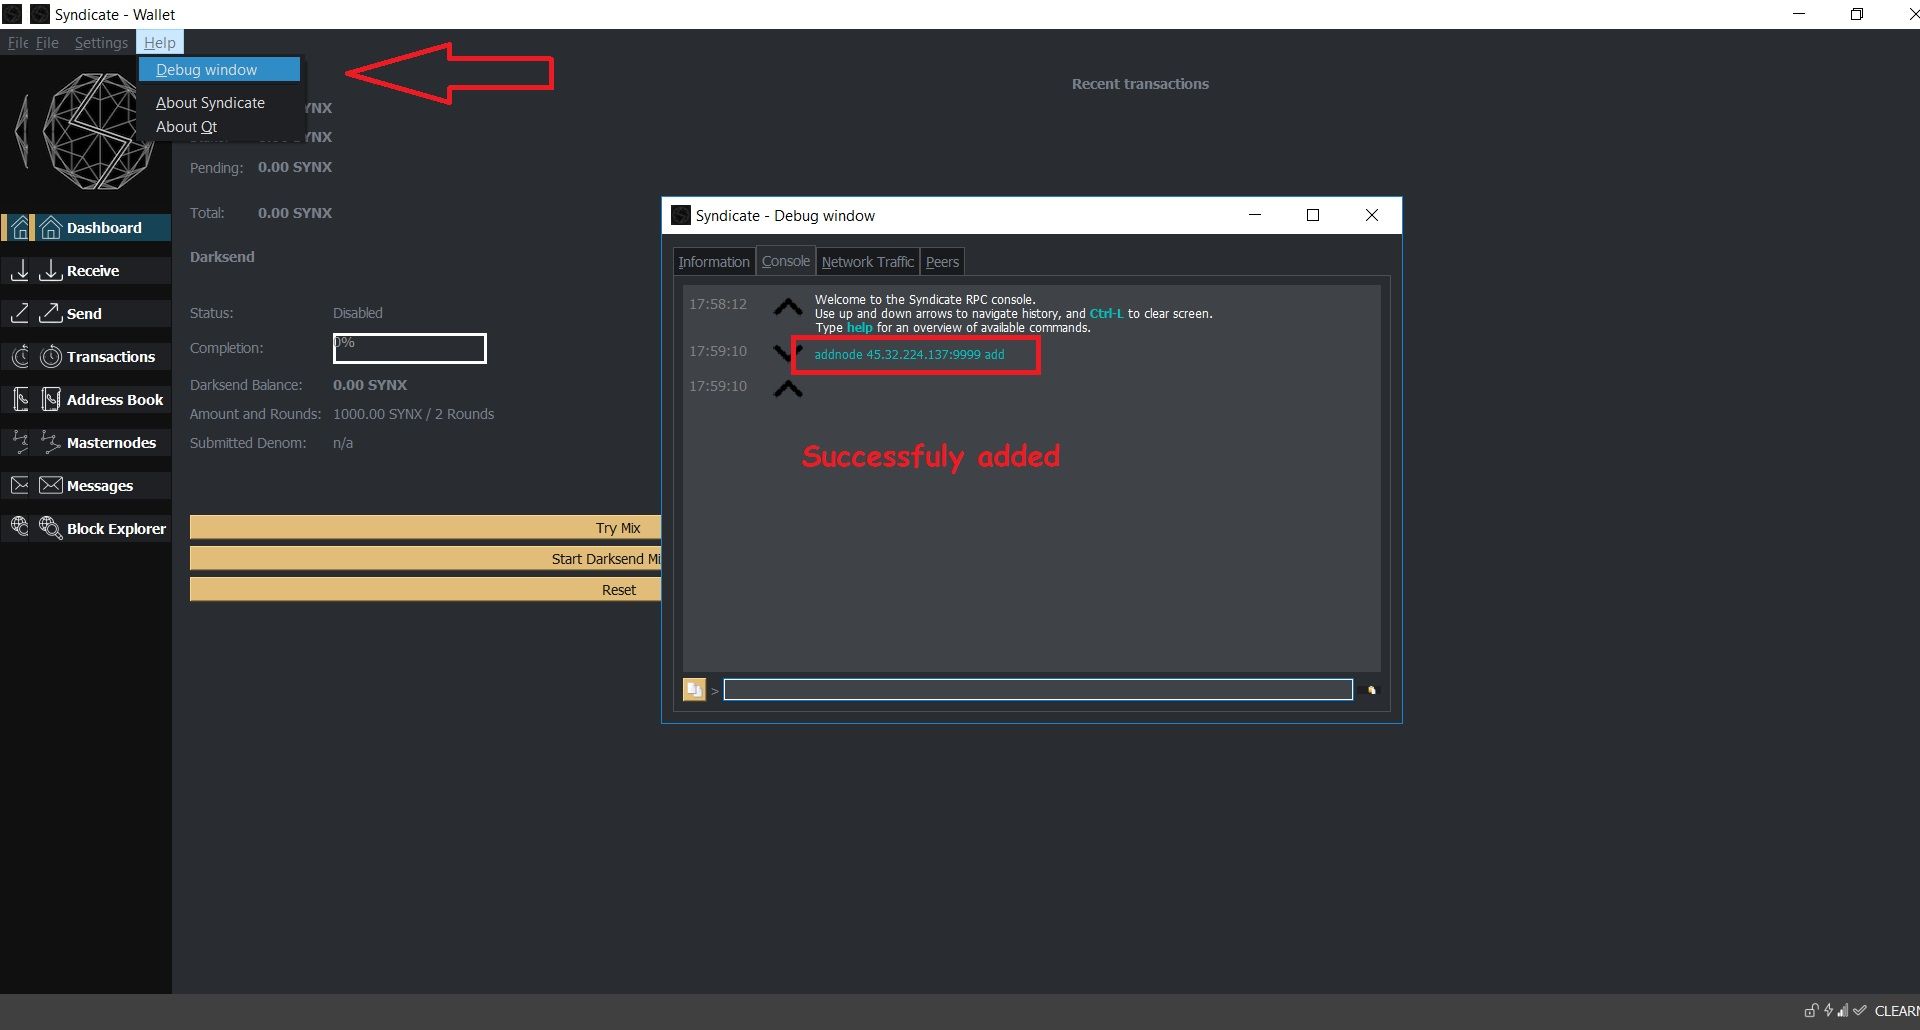
- Copy and paste line by line below strings right into the console and hit enter after every paste. You should see a string of green after every press of Enter.
addnode 45.32.163.18:9999 add

addnode 45.76.233.129:9999 add

addnode 45.76.34.135:9999 add

addnode 45.76.87.245:9999 add

addnode 45.76.23.132:9999 add

addnode 45.76.251.6:9999 add

addnode 45.76.179.109:9999 add

addnode 45.76.232.29:9999 add

addnode 45.76.134.163:9999 add

addnode 45.76.140.201:9999 add

addnode 45.32.203.165:9999 add

addnode 45.76.233.229:9999 add

addnode 144.217.7.160:9999 add

addnode 149.56.13.109:9999 add

addnode 192.99.58.134:9999 add

addnode 137.74.163.67:9999 add

addnode 45.76.235.245:9999 add

addnode 45.77.4.90:9999 add
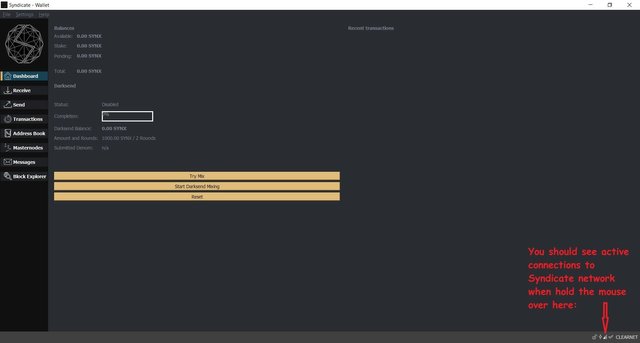
If you don’t see any active connections, restart the wallet and give it a few minutes. After a while, you should see active connections and be good to go!
- Wait 1-2 days to get in sync with the Syndicate network. Remember, the blockchain is over 500MB and will become larger and larger and is stored in
C:\Users\yourWindowsUsername\AppData\Roaming\Syndicate, so be sure you have enough free space inC:
ALTERNATIVELY: You can Download Syndicate_blockchain.rar bootstrap file. Close the wallet. Extract the zip file toC:\Users\yourWindowsUsername\AppData\Roaming\Syndicatefolder. Override existing files! Add the following content to theC:\Users\yourWindowsUsername\AppData\Roaming\Syndicate\Syndicate.conf
addnode 45.32.163.18:9999

addnode 45.76.233.129:9999

addnode 45.76.34.135:9999

addnode 45.76.87.245:9999

addnode 45.76.23.132:9999

addnode 45.76.251.6:9999

addnode 45.76.179.109:9999

addnode 45.76.232.29:9999

addnode 45.76.134.163:9999

addnode 45.76.140.201:9999

addnode 45.32.203.165:9999

addnode 45.76.233.229:9999

addnode 144.217.7.160:9999

addnode 149.56.13.109:9999

addnode 192.99.58.134:9999

addnode 137.74.163.67:9999

addnode 45.76.235.245:9999

addnode 45.77.4.90:9999
DeleteC:\Users\yourWindowsUsername\AppData\Roaming\Syndicate\peers.datfile. Start the wallet and wait for the sync. (30min to 10h depending on the number of the connections).
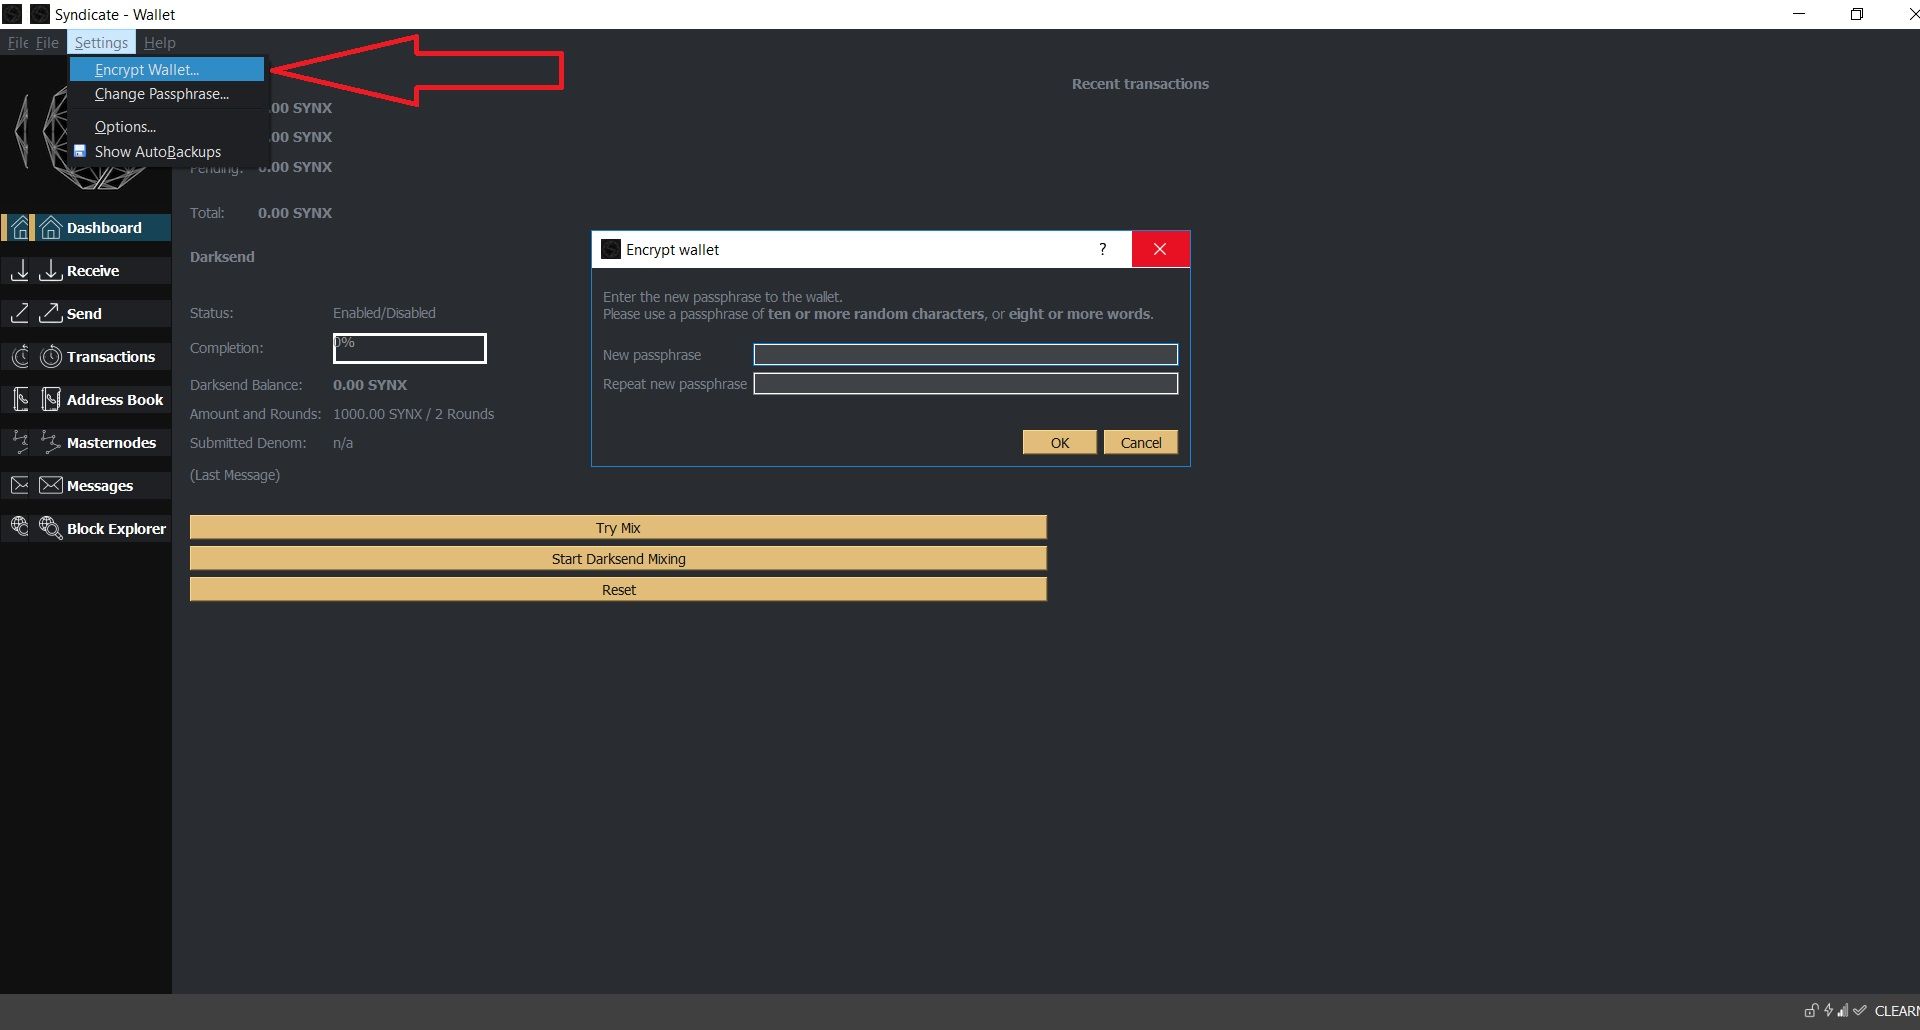
Personally I used the old school way and wait 1-2 days for the wallet to sync. - Hopefully at this point, you are actively connected to the SYNX network and you’re all caught up on the blockchain. If so, this is probably the time when you’ll want to encrypt your wallet to protect your coins.
SelectSettings -> Encypt walletAnd put in a very very strong password. And be sure not to lose it!!! Never lose it!!! Without it your funds will be unrecoverable!
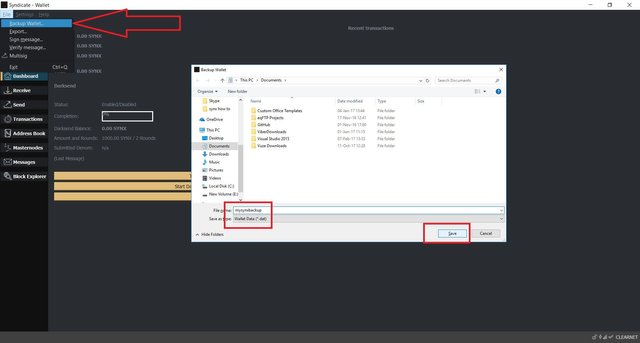
NOTE: You should back up your wallet file as well.File -> Backup Wallet -> Saveit wherever you’d like and keep it safe!! Also note that this wallet file only contains your private keys/address that exist at the time of backup. Creating new addresses containing coins will mean you need to backup another new wallet file. If you don’t, those new addresses/coins will be lost if you needed to restore your wallet!! This is NOT something to neglect!!
To restore your wallet, you would just take the backed up “wallet.dat” file, and drop it into a new install of the Syndicate wallet. Again, this is the file that contains the keys for your addresses! If you changed the name of the file and are now restoring your wallet, simply change its name back to “wallet” and it should automatically have the “.dat” extension. You should be able to start your wallet with the balance as it was.
2. Masternode Setup
2.1 Send the coins to your wallet
Case 1: If your coins are in an Exchange
- Create a new address:
Method 1: Open ConsoleHelp -> Debug window -> Console
Create a new address with this command:getnewaddress Masternode1
Method 2: Go toReceive -> New Address -> Type Masternode1 for Label, leave Stealth Address unchecked -> press OK - Now its time to backup your wallet again. As we mentioned before every time you create a new address you need to make a new wallet backup.
- Send exactly 5000 coins to this address. (One transaction, pay attention to the Exchange withdraw fee)
- Wait for the conformation.
-
Prepare to save somewhere Transaction ID, masternode outputs, masternode private key (Word or Notepad document for example):
a) Transaction ID:
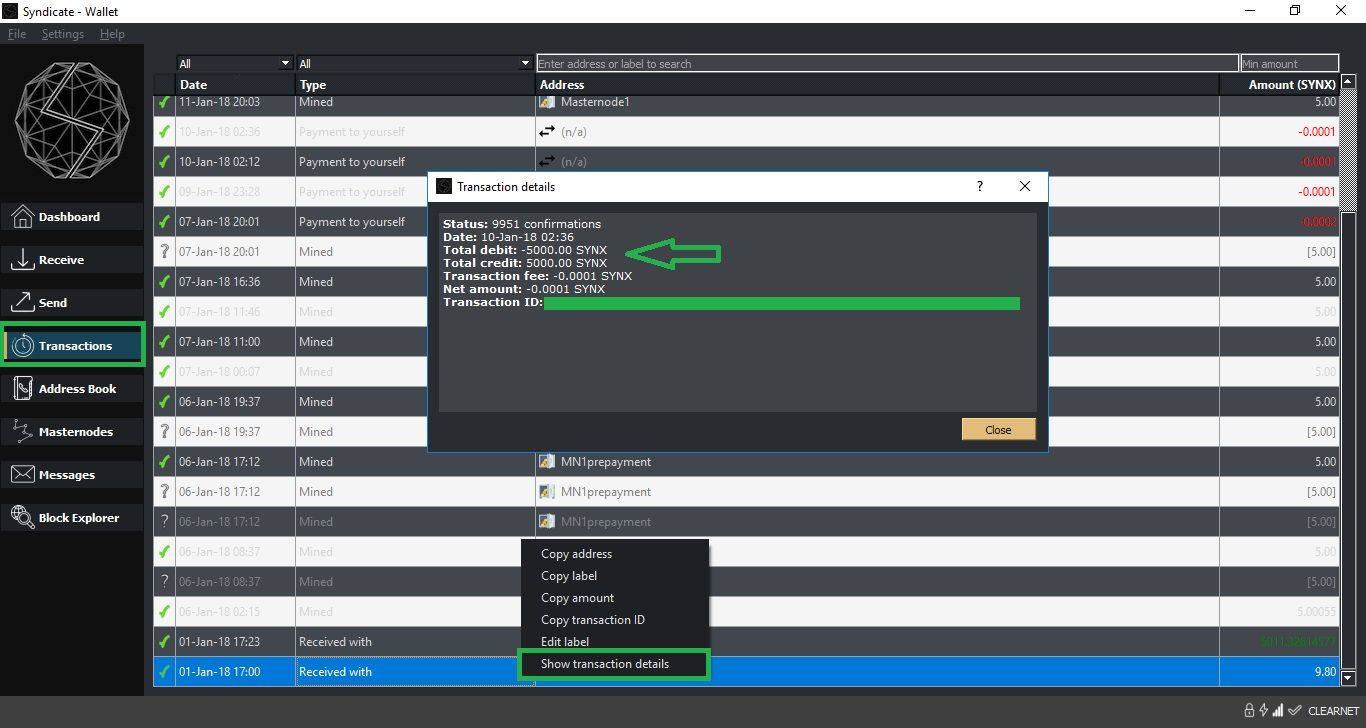
Go toTransactions
Right click on the transaction and selectShow transaction details
Be sure thatNet amountis +5000 SYNX and copy and saveTransaction ID(in my case I made a Self payment so that's why the transaction window on the picture is different and Net amount is not +5000 SYNX)
b) masternode outputs:
Open ConsoleHelp -> Debug window -> Console, typemasternode outputsand save the transaction id and index.
It should looks like:
{
"84jd40jskj9mnq7548nckk23xvpob873asn4y12" : "0"
}
You need to save84jd40jskj9mnq7548nckk23xvpob873asn4y12and0
c) masternode private key:
Again in the Console typemasternode genkeyand save the generated Masternode private key
Case 2: If your coins are already in your wallet (In my case I bought from Bittrex more than 5000 SYNX and first I made a small withdraw to my wallet to check if everything with withdraw works fine. Then I made all amount withdraw and then I had to make payment to myself to my Masternode1 address with exactly 5000 SYNX)
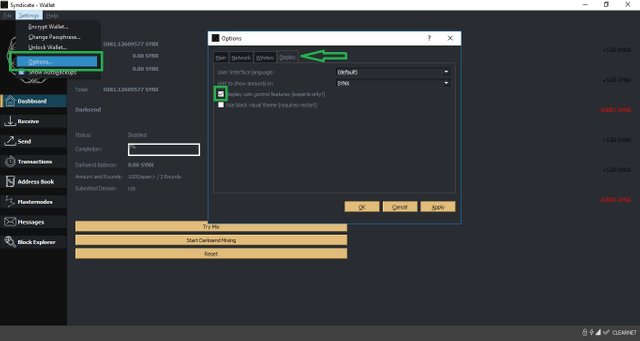
- Go to
Settings -> Options -> Display -> check Display coin control features (experts only) -> press OK
- Create a new address:
Method 1: Open ConsoleHelp -> Debug window -> Console
Create a new address with this command:getnewaddress Masternode1
Method 2: Go toReceive -> New Address -> Type Masternode1 for Label, leave Stealth Address unchecked -> press OK - Now its time to backup your wallet again. As we mentioned before every time you create a new address you need to make a new wallet backup.
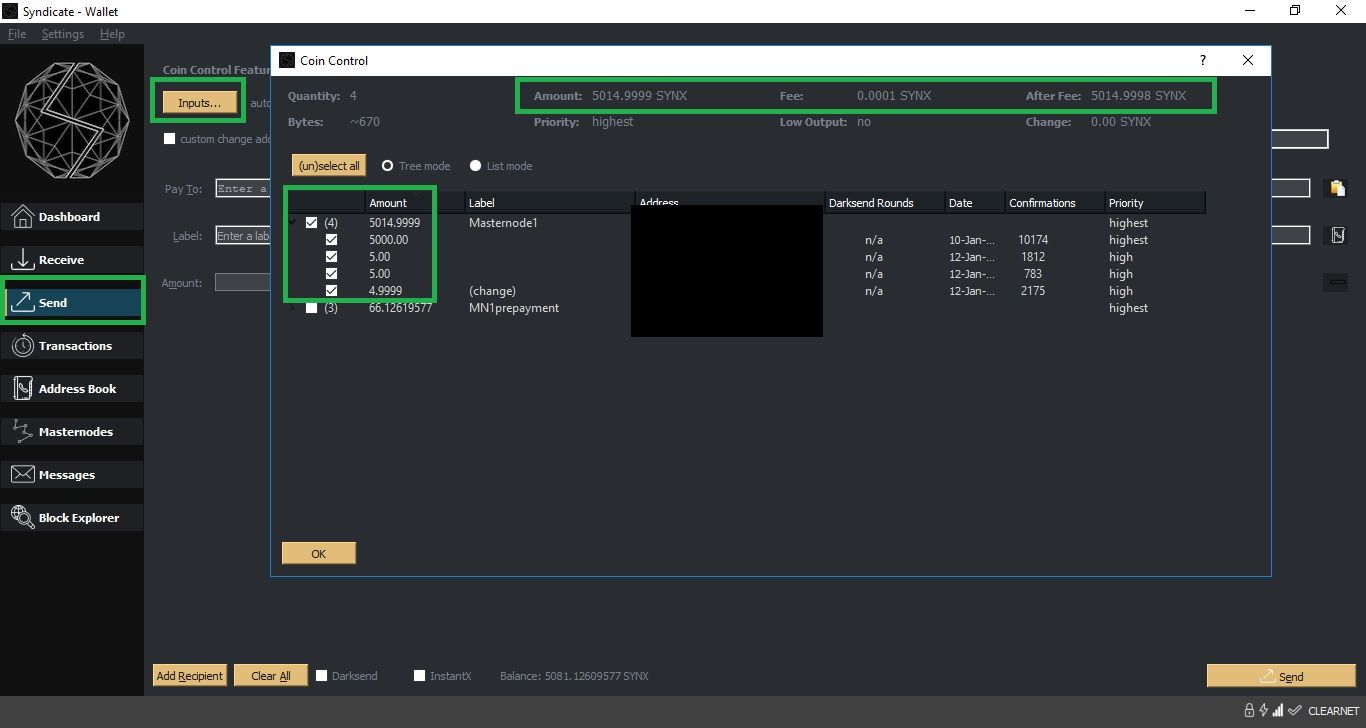
- Go to
Send -> Inputs -> use check boxes to select an amount with more than (5000 SYNX + Fee) ->
click OK
From this selected amount the payment to yourself will be made.
The more than 5000 SYNX selection is needed because of the transaction fee.
In my case the transaction fee was 0.0001 so the whole bill was 5000.0001 and obviously I had to select more than 5000 SYNX so after the charge of 0.0001 SYNX for the transaction the desired amount of 5000 SYNX remained untouched.
You can see all transaction's details below the Input button after the amount selection is done.
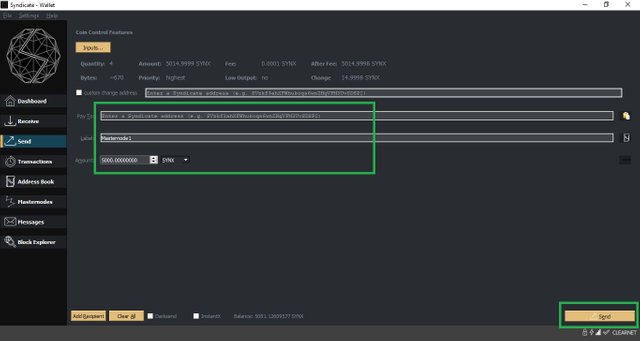
inPay toyou need to add theMasternode1address you just created in the previous step andMasternode1will appear in the label field automatically.
Now inAmounttype 5000 and then clickSend
You will see a Warning message. Accept it to proceed.
- Wait for the conformation.
-
Prepare to save somewhere Transaction ID, masternode outputs, masternode private key (Word or Notepad document for example):
a) Transaction ID:
Go toTransactions
Right click on the transaction and selectShow transaction details
Be sure thatTotal creditis +5000 SYNX and copy and saveTransaction ID
b) masternode outputs:
Open ConsoleHelp -> Debug window -> Console, typemasternode outputsand save the transaction id and index.
It should looks like:
{
"84jd40jskj9mnq7548nckk23xvpob873asn4y12" : "0"
}
You need to save84jd40jskj9mnq7548nckk23xvpob873asn4y12and0
c) masternode private key:
Then again in the Console typemasternode genkeyand save the generated Masternode private key
2.2 Vultr VPS setup
- Register on Vultr. (do not forget verify your e-mail)
- Send some money (10$ is enough for two months) to your account to deploy a server. (1 server cost 5$/mo, you can pay with bitcoin)
-
Deploy a new server.
Server Type: Ubuntu 14.04 x64
Server Size: 5$/mo,
CPU: 1 vCore
RAM: 1024 MB
Storage: 25 GB SSD
Bandwidth: 1000 GB
2.3 Automatic Masternode Setup
-
Open
C:\Users\yourWindowsUsername\AppData\Roaming\Syndicate\Syndicate.confwith some text editor like Notepad or Notepad++
Add these two lines on top (If they exist edit them with your username and password values):
rpcuser=typeHereSomeUserName
rpcpassword=typeHereSomeVeryDifficultAndLongPassword
Don't forget to save the file. - Download putty
- Start putty and login to your Vultr VPS server as root user. (Root password and server ip address is in vultr overview tab)
-
Paste this command and answer the questions:
wget https://raw.githubusercontent.com/u3mur4/syndicate/master/synx.py && python synx.py
The setup will ask you"How much masternodes do you want to setup?"
Type 1
*This guide is for 1 Masternode per Server
The setup will also ask you for:
rpcuser


rpcpassword


masternode private key
You've already saved these values in previous steps so copy and paste them into putty console. - Wait for the setup to finish installation
-
Secure the server from brute-force attacks after the installation complete:
apt-get install fail2ban -
Optional you can change the root password:
passwd root -
Allow SSH access:
ufw allow ssh
Tip: For better security if you have one or more static IP addresses you can grant SSH access to the server only from them.
In this case instead of executeufw allow sshcommand you need to execute next command for every of your static IPs:
ufw insert 1 allow from 123.123.123.123 to any port 22
*Replace 123.123.123.123 with your IP
NOTE: The installation script sets Ubuntu firewall to allow OpenSSH access to the server and if you are familiar with OpenSSH you can use it instead of SSH. You will need PuTTYgen to generate public/private keys, and after you can disable password auth and you won't need to allow SSH access. But in my opinion for non experienced users the OpenSSH auth is more complicated
2.4 Add masternode on the desktop wallet
-
You are still connected to the server with putty
In putty console execute:
su mn1
Now you should be logged into the server with user mn1
Now executewatch -n 10 Syndicated getinfo
You will get this result:
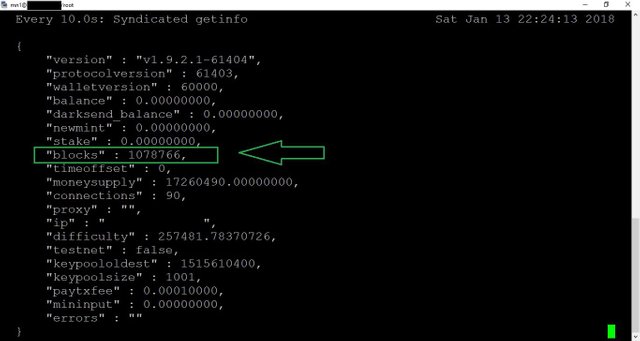
Pay attention to "blocks" string - Open wallet, wait for sync
-
Open
Help -> Debug Window -> Console
In wallet console executegetinfo
Pay attention to "blocks" string again
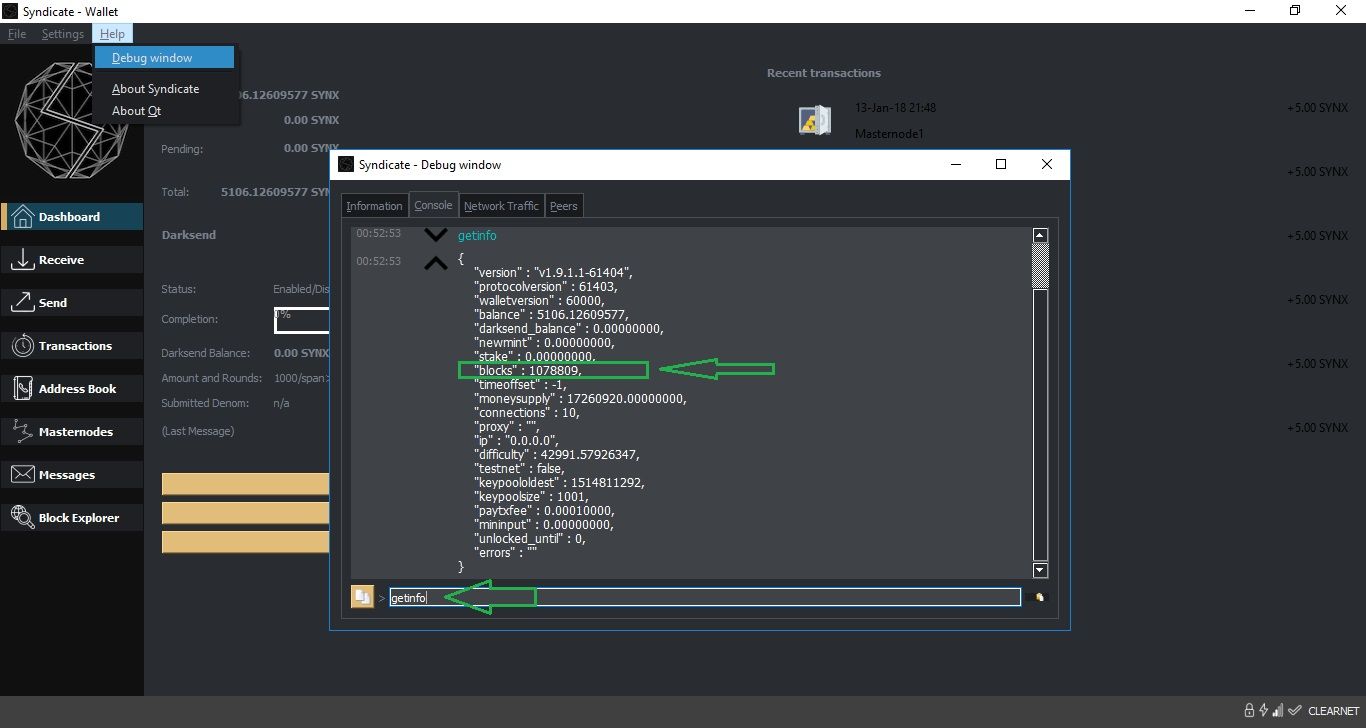
-
Wait until "blocks" from both consoles became equal
When they become equal recheck if they are really equal by executing again in wallet consolegetinfo
If Server blocks are still behind wait again to equal with the wallet blocks and recheck again
When they become equal you should see equal "blocks" values in both consoles no matter how many times you executegetinfoin wallet console. -
Unlock wallet
Settings -> Unlock Wallet -
Go to
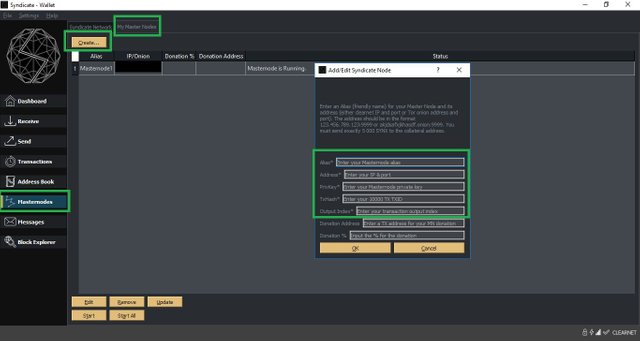
Masternodes -> My Master Nodes tab -
Click "Create" and fill all of the fields with *
Alias*: Masternode1
Address*: 123.123.123.123:9999 (replase 123.123.123.123 with your Vultr VPS IP address)
PrivKey*: Enter the masternode private key that you generated and saved earlier withmasternode genkeycommand
TxHash*: Enter your 5000 SYNX Transaction ID
Output Index*: Enter index frommasternode outputs(in my case it was 0 but it can be 1 or greater number)
Leave other fields empty and click OK
-
Click "Start All" and confirm
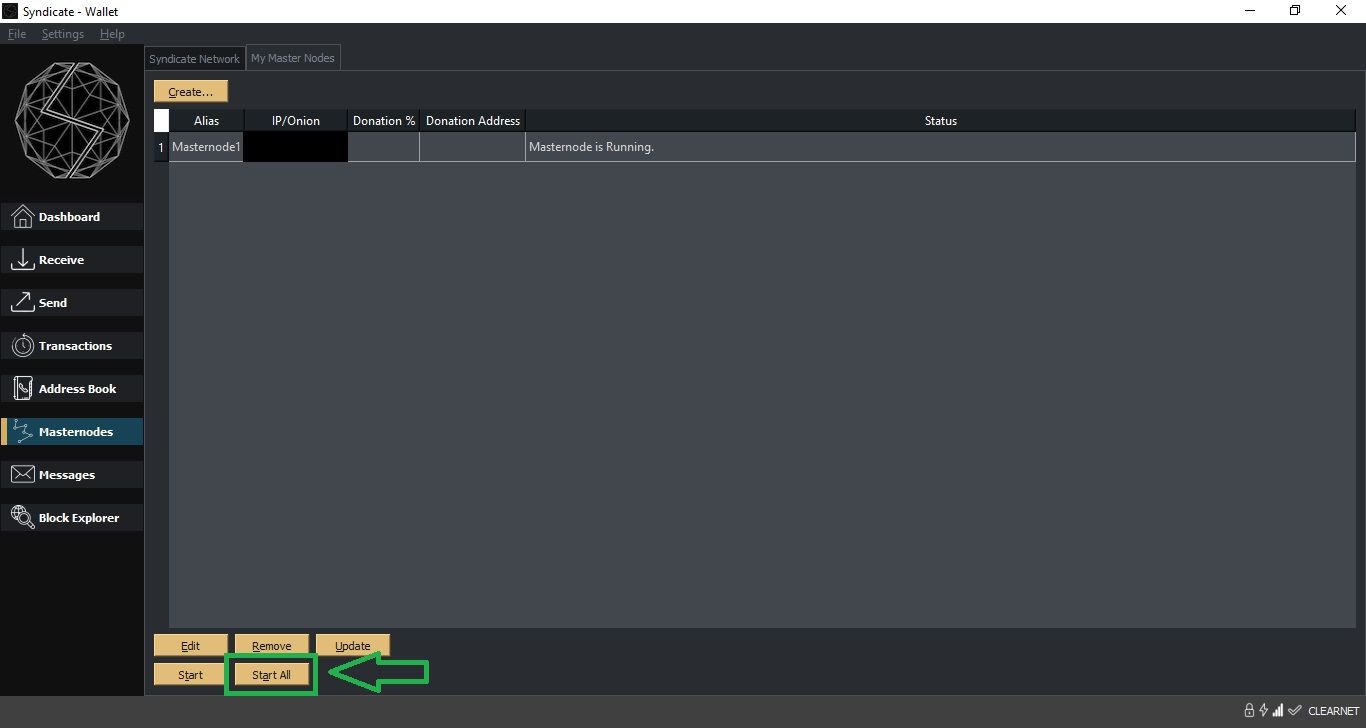
-
Click "Update"
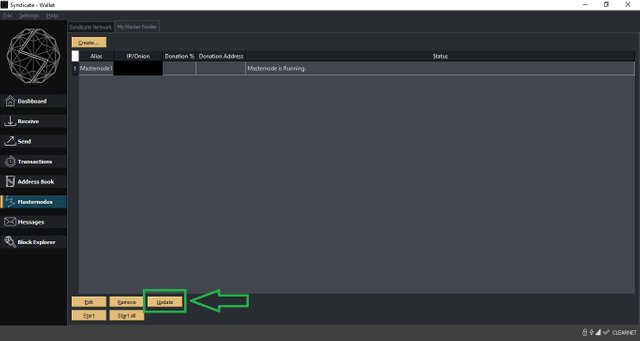
You should see status changed to "Masternode is Running" in Status column -
Go to server console, press Ctrl+C to stop watching the "blocks"
In server console executeSyndicated masternode debug
You should see message: "masternode started remotely" -
Wait half an hour and go to https://scrypto.io/s/mns-syndicate/ click Node List tab and search for your server's IP. Now It should be found there.
Or
You can also check in your wallet Masternodes section -> Syndicate Network tab for your IP. Sort by Address column and search for it. It should be found there if everything is OK.
Tip: If cannot find your IP don't panic. Wait....if still no success, restart the wallet and the server and wait a little bit more. If again no success check again all the steps. Probably you've missed something. - Wait 1 day to start receiving coins. Check your the masternode address here: http://explorer.syndicateltd.net/
-
Note: You can't edit the masternodes config in the wallet but you can edit the file:
C:\Users\yourWindowsUsername\AppData\Roaming\Syndicate\masternode.conf - Also you can help yourself with the installation by watching this very useful video https://youtu.be/-Lt-ifQxS-w thanks to another community member.
3. FAQ
-
What if I restart the server?
The script setup a cron job so the masternode automaticly starts every time when the vps turns on. -
How to get masternode profit?
Enable coin controll featureSettings -> Options -> Display -> check Display coin control features (experts only) -> press OK
Go to Send tab
Select from the input button only the 5 coin lines
Click OK
Copy "After Fee" value to Amount field
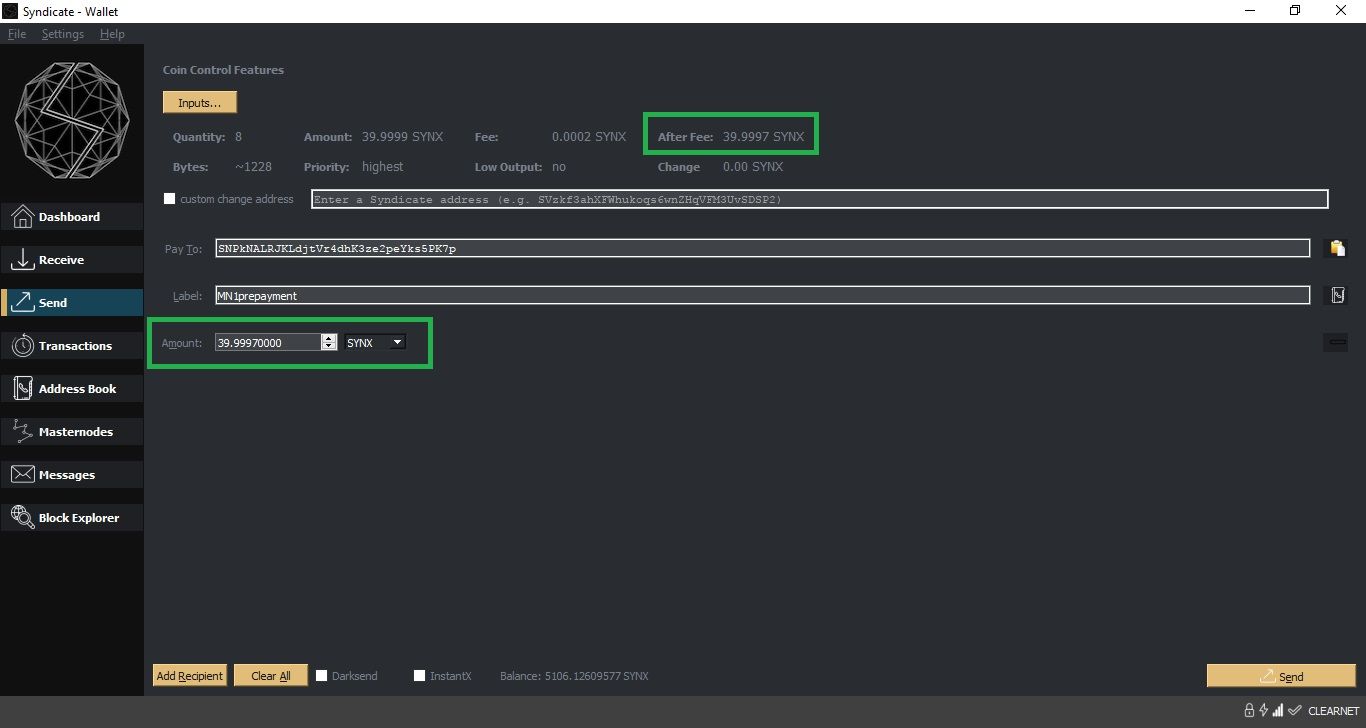
You can send selected amount to an address.
Note: DO NOT EVER Transfer synx from that original 5k deposit or you'll break your Masternode. -
What is the password for the mn1 server account?
There is no default password. When you create a user it does not have a password yet, so you cannot login with that username until you create a password. There is one other way to act as a new user without its password. As root typesu mn1
You need to set a password for the user. Use the passwd command:passwd mn1 -
I get the following error: "Could not allocate vin"
Probably you haven't unlocked your wallet before click "Start All" in "Masternodes" section -
My wallet says my masternodes are not running.
The wallet will tell you its not running sometimes when it is. If you still receving the masternode rewards then everything is fine. -
I got stuck. Can you help me?
Try to get help from the cummunity
synxhodl.slack.com
https://t.me/syndicateLTD
4. The last and the most important step
Send a small amount of coin if you found this guide helpful to one of these:
SYNX Wallet: SNPkNALRJKLdjtVr4dhK3ze2peYks5PK7p
ETH Wallet: 0x55674ff6000e1c43Aa331C7EE4b62204FddE6885
BTC Wallet: 18KJ5MXAGnSMk1uAmAGXWRw2PFcbpXss92
The best guide out there, very detailed and useful, many thanks.
That's a full comprehensive guide. I run two synx masternodes, am very happy with them. I wish i had a guide like this when i built them
Congratulations @grandeto, you have decided to take the next big step with your first post! The Steem Network Team wishes you a great time among this awesome community.
The proven road to boost your personal success in this amazing Steem Network
Do you already know that awesome content will get great profits by following these simple steps, that have been worked out by experts?
Great guide!
Gooooood!
Synxters, here you can watch a great video tutorial about 3.2 from the guide:
Mates There is a new wallet version and a new install scrypt.
Check out pinned message on https://t.me/syndicateLTD
The other steps are the same except instead of
Syndicatedcommand you should usesyndicated-cliHere's the latest step by step guide for 1.9.9 wallet --->
https://steemit.com/synx/@adis99/how-to-set-up-syndicate-synx-maternode-on-version-1-9-9-step-by-step-instruction
Congratulations @grandeto! You received a personal award!
Click here to view your Board
Do not miss the last post from @steemitboard:
Congratulations @grandeto! You received a personal award!
You can view your badges on your Steem Board and compare to others on the Steem Ranking
Vote for @Steemitboard as a witness to get one more award and increased upvotes!