Astronomical Imaging - The Basics - 3
In this installment - part 3 - of "Astronomical Imaging - The Basics" I will discuss how to correctly align a telescope mount so that it tracks the stars. This must be done to allow longer exposures without introducing star trailing. Without this process being complete it is impossible to do long exposure photography and difficult to do planetary and other high resolution work where multiple frames of the same object are required.
If you missed the previous parts please go here:
*Part I - Cameras, Lenses, Taking your first Astrophoto
*Part II - Camera Accessories, Tracking and Guiding, Telescopes
Polar alignment
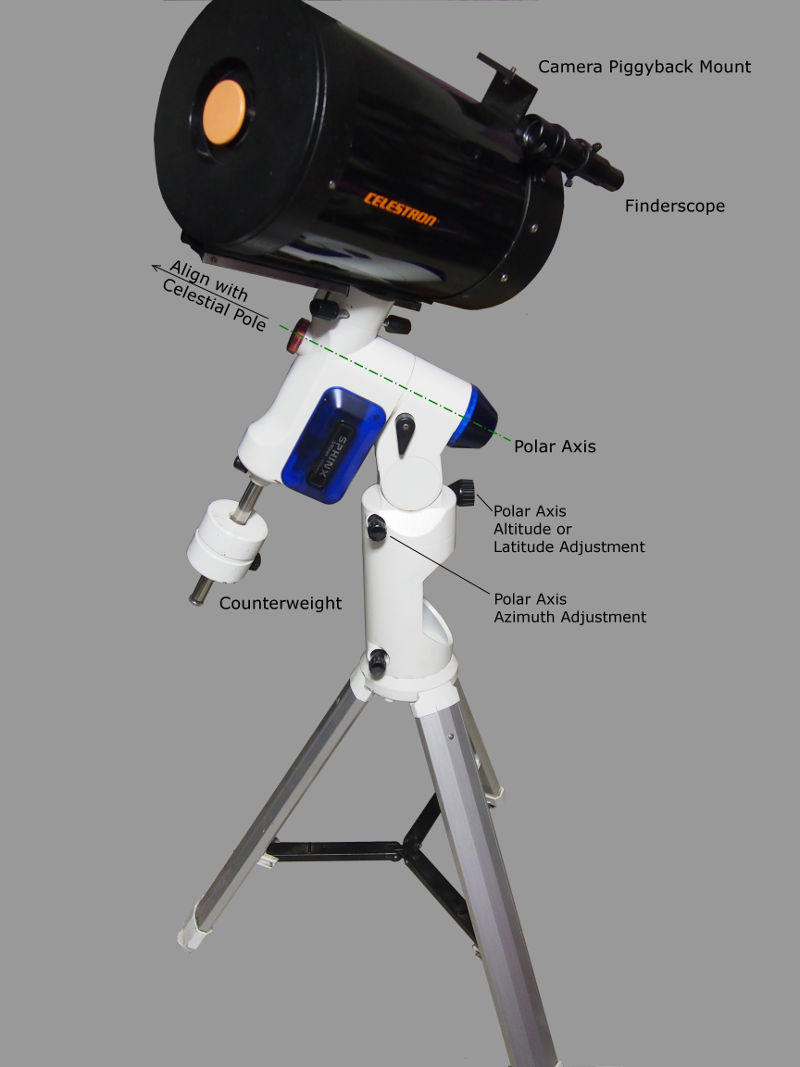
The German Equatorial Mount (GEM) requires it's polar axis to be aligned to either the north celestial pole (northern hemisphere) or the south celestial pole (southern hemisphere). This allows the GEM to closely track stars, enabling long exposure photos of the stars without trailing. In this article we will look at how to do polar axis alignment. Image Credit: Author
Perhaps the biggest challenge for a newcomer to long exposure astrophotography is the correct and accurate alignment of the tracking mount. For the most popular mount, the GEM (German Equatorial Mount), this requires aligning it's polar axis to the celestial pole. To achieve this accurately requires one of the following methods:
- Polar scope method (a small telescope that mounts within the polar axis shaft)
- Drift alignment method
- Assisted alignment using a polar alignment camera (eg Polemaster)
- Assisted alignment using a digital camera
But before discussing that there is one more option to visit, and that is Autotracking Alt-Azimuth mounts as featured in a number of Dobsonians. These require alignment with at least 2 brights stars and compute the necessary translations required to simulate the tracking of an equatorial mount. These work very well for shorter exposures of (less than 3 seconds), but problems such as field rotation and mechanical smoothness make them unsuitable for longer exposure work.
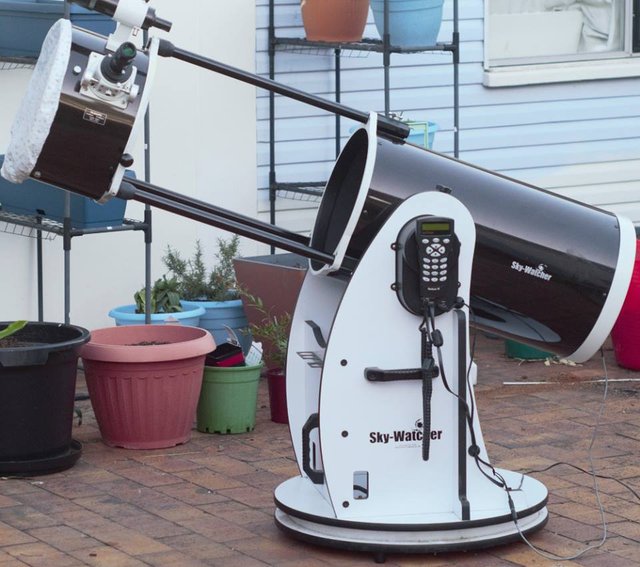
The author owned this autotracking Dobsonian which was capable of basic astrophotography of bright objects. Image Credit: Author
Rough Polar alignment of a German Equatorial Mount
Rough Polar alignment will be good enough for doing exposures of a couple of seconds through a telescope as well as imaging planets and the moon. A camera fitted with a wide angle lens can be mounted on the telescope and exposures of around 60 seconds will likely have good stars. For somebody starting out this is not a bad starting point.
Follow these steps to get approximate polar alignment:
Northern Hemisphere
- Use a compass or a landmark to determine rough north. Often roads, land and house boundaries follow a north-south or east-west bearing so it is worth checking those out on google maps as an aid for determining true north.
- Set the mount down on level ground, with the top of the tripod or pier level (use a spirit level). The polar axis should be pointing in the direction determined in the previous step.
- Set the latitude setting on the polar axis to match your latitude.
- When it is sufficiently dark identify Polaris. The chart below may help, but keep in mind the view will be rotated depending on the time of year. The main goal is to extend a line from the bowl of the Bigger Dipper towards Polaris.
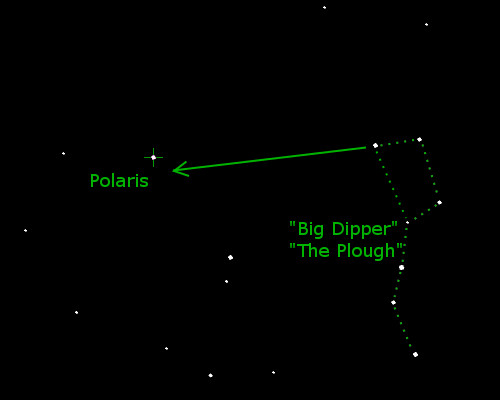
Image Credit: Author - Adjust the mount as best as possible, so that by eye the polar axis appears to point to the star Polaris.
Southern Hemisphere
- Use a compass or a landmark to determine rough south. Often roads, land and house boundaries follow a north-south or east-west bearing so it is worth checking those out on google maps as an aid for determining true south.
- Set the mount down on level ground, with the top of the tripod or pier level (use a spirit level). The polar axis should be pointing in the direction determined in the previous step.
- Set the latitude setting on the polar axis to match your latitude.
- When it is sufficiently dark identify the Southern Cross and the Pointers. The chart below may help, but keep in mind the view will be rotated depending on the time of year. The main goal is to extend a line from the Southern Cross and Pointers as shown to a place where they intersect. This is near the south celestial pole.
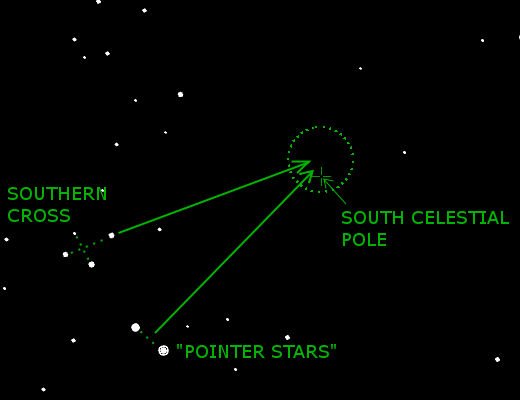
Image Credit: Author - Adjust the mount as best as possible by eye to the point identified as the south celestial pole.
At this point you may find this acceptable for planetary of shorter exposures, but to improve alignment there are a number of options that can be employeed. Lets cover those now.
Refining alignment - Polar Alignment Scope
Polar Alignment Scope : Many GEM mounts have a built in polar alignment scope, which contains a template that is used to lineup stars in the view. How this operates depends on the design but a generic description of how these work is as follows (using the northern hemisphere as an example):
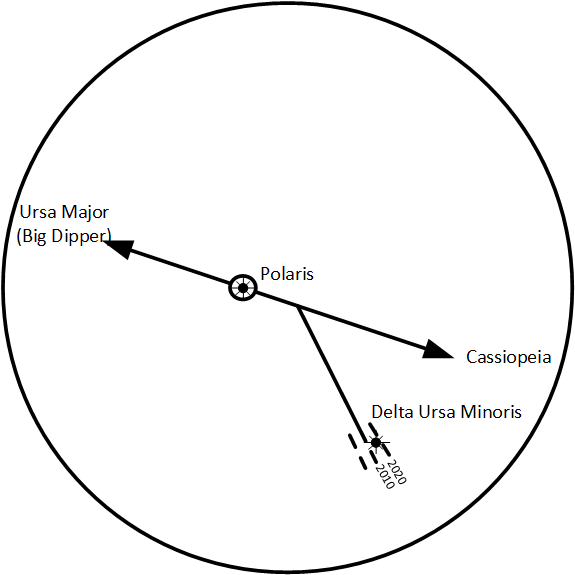
Assuming you are accurate enough, the star Polaris will have appeared in the field of view. The Polar scope reticle can be rotated by hand so that the prominent constellations Ursa Major (The Big Dipper, The plough or the Great Bear) and Cassiopeia are in the orientations shown. Then the Polar axis Azimuth and Altitude controls are adjusted until the stars Polaris and Delta Ursa Minoris are in the locations marked in the reticle.
Unfortunately, if you live in the Southern hemisphere there are no bright stars near the south celestial pole and a polar scope can actually be a bit of challenge. The same techniques apply but it can be difficult to identify the actual stars near the south celestial pole.
Drift Method
The method allows quite good polar alignment to be achieved, although getting it perfect can take some time, however it can certainly greatly refine a rough polar alignment quickly. It works by watch how stars drift in the telescope view over a period of a few minutes when the mount drive is switched on. Because the mount will likely be misaligned initially stars will not stay fixed as they should, but will gradually appear to drift, and this information can be used to make the necessary corrections to refine polar axis alignment.
To adjust the bearing or azimuth of the polar axis you observe the north/south drift in a bright star near the celestial equator that is at its highest elevation (meridian). Likewise, the inclination or altitude angle of the polar axis is adjusted according to whether a star low in the east drifts north or south. The adjustment's are done iteratively until the stars no longer drift north or south. Before doing this alignment, check which way is north and south by slewing the telescope northwards and viewing the direction in which stars pass through the field. Note there is a different process for the northern hemisphere and southern hemisphere.
Northern Hemisphere
After the mount has been rough aligned start the mount tracking. Slew the telescope to a bright star fairly low in the east (about 20 degrees above horizon, but it doesn't have to be exact) and observe the star in an eyepiece. Center the star and wait to see which direction the star drifts.
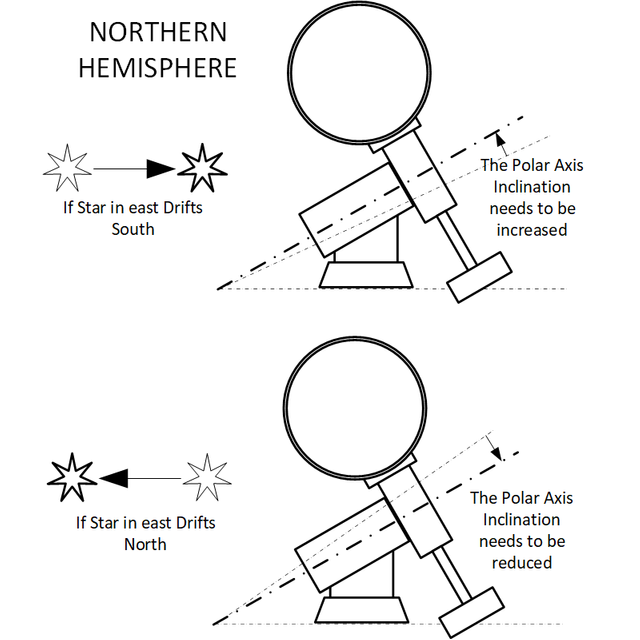
If the star has drifted south, then the polar axis is pointing too low and it needs to be adjusted upwards. But if the star has drifted north then the polar axis is pointing too high and needs to be adjusted downwards. Image Credit: Author
Slew the telescope to a bright star close to the meridian and celestial equator. To do this face south and look up above the horizon by an angle A, where A = 90 - latitude. So if you are in Los Angeles with a latitude of 34 degrees, you will want to look 56 degrees above the southern horizon. This does not have to be accurate, just the closest bright star that you can find. Center the star in the telescope and wait to see which direction the star drifts.
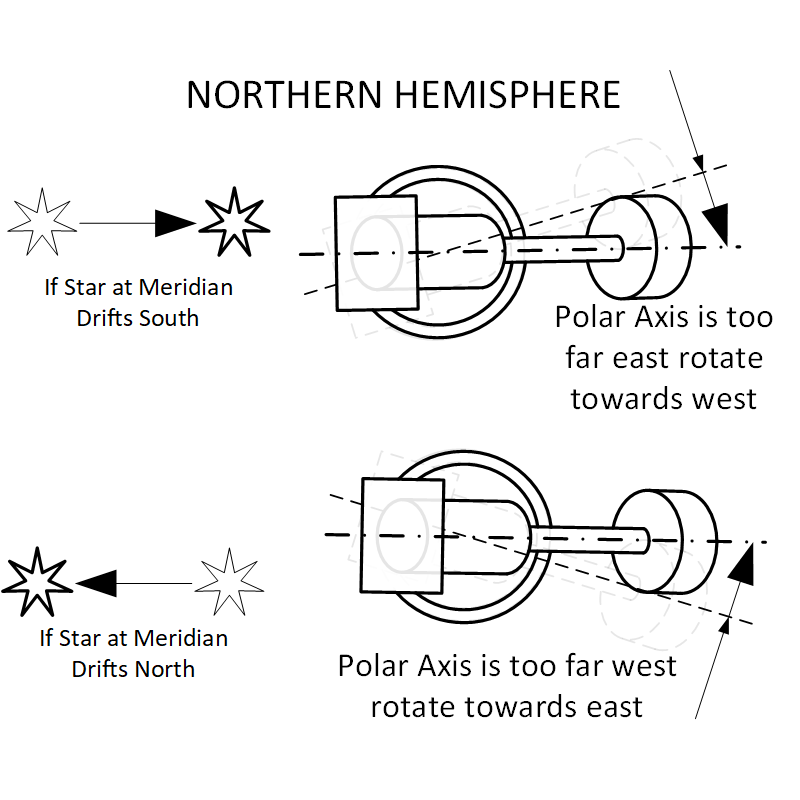
If the star has drifted south, then the polar axis is pointing too far east and it needs to be adjusted to the west. But if the star has drifted north then the polar axis is pointing too far west and needs to be adjusted to the east. Adjust the mounts Polar axis azimuth control to suit. Image Credit: Author
Southern Hemisphere
After the mount has been rough aligned start the mount tracking. Slew the telescope to a bright star fairly low in the east (about 20 degrees above horizon, but it doesn't have to be exact) and observe the star in an eyepiece. Center the star and wait to see which direction the star drifts.
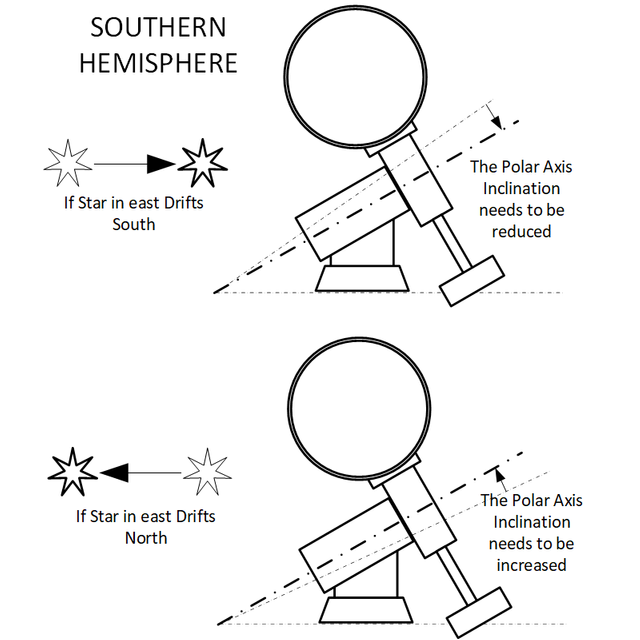
If the star has drifted south, then the polar axis is pointing too high and it needs to be adjusted downwards. But if the star has drifted north then the polar axis is point too low and needs to be adjusted upwards. Image Credit: Author
Slew the telescope to a bright star close to the meridian and celestial equator. To do this face north and look up above the horizon by an angle A, where A = 90 - latitude. So if you are in Sydney with a latitude of 34 degrees, you will want to look 56 degrees above the northern horizon. This does not have to be accurate, just the closest bright star that you can find. Center the star in the telescope and wait to see which direction the star drifts.
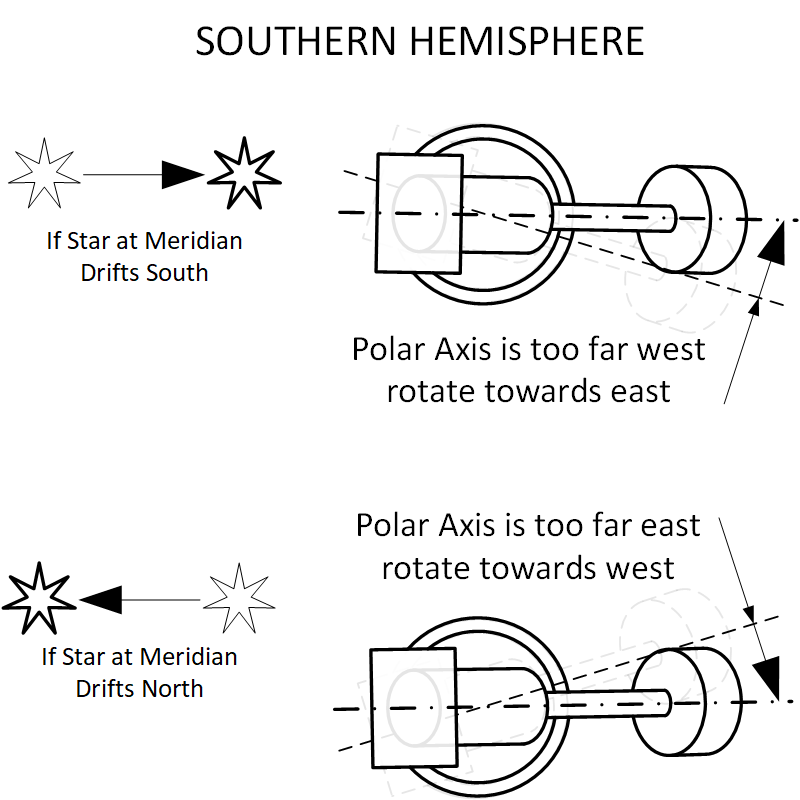
If the star has drifted south, then the polar axis is pointing too far west and it needs to be adjusted to the east. But if the star has drifted north then the polar axis is pointing too far east and needs to be adjusted to the west. Adjust the mount's Polar axis azimuth control to suit. Image Credit: Author
Assisted Polar Alignment
There are also some excellent devices available to help with Polar alignment. One I have personally used with success is the Polemaster, which is essentially a camera that mounts on the Polar axis as shown. The Polemaster software displays a video feed to a tethered computer that enables the user to accurately align the polar axis through a guided process in the software.
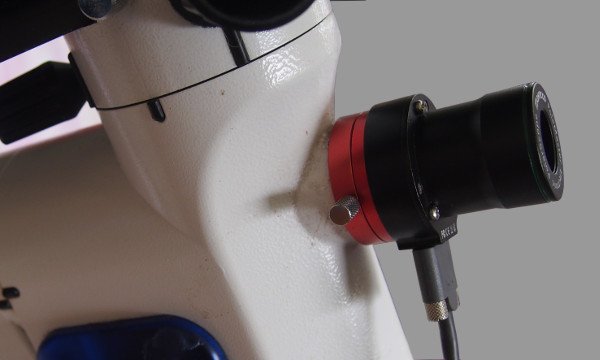
Polemaster attached to the Polar Axis, has a camera that interfaces with the Polemaster software that guides the user through an accurate alignment process. Image Credit: Author
Conclusion
I hope you find this article on polar alignment useful. In the next article - part 4 - I will look at focusing and some of the techniques you can used to get the best focus.
NOTE: All images are the authors, please give credit to @terrylovejoy if you wish to use them.
Being A SteemStem Member
Once again thank you Steemstem as well as TeamAustralia!
I find your posts fascinating @terrylovejoy. Half the time, I'm not even sure if I've got the astronomy map on my phone right when I point it at the sky. I would consider this a level up. :)
Thank you @choogirl ! I've had those astronomy apps on my phone and they work pretty good as long as the builtin sensors are working right. I found they are pretty good for finding the planets.
World of Photography Beta V1.0
>Learn more here<
You have earned 5.25 XP for sharing your photo!
Daily photos: 1/2
Daily comments: 0/5
Multiplier: 1.05
Server time: 02:02:57
Total XP: 137.57/200.00
Total Photos: 16
Total comments: 12
Total contest wins: 1
Follow: @photocontests
Join the Discord channel: click!
Play and win SBD: @fairlotto
Daily Steem Statistics: @dailysteemreport
Learn how to program Steem-Python applications: @steempytutorials
Developed and sponsored by: @juliank