Astronomical Imaging – Basics – 5
Prime Focus Astrophotography
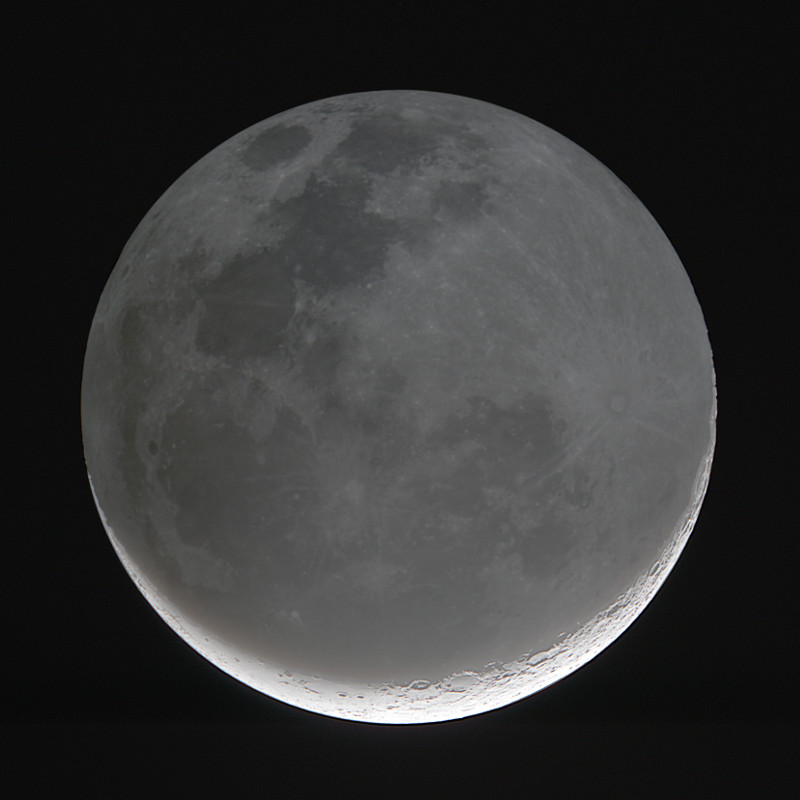
The moon is great subject for prime focus astrophotography. This image of the crescent moon was made at a focal length of 700mm using a QHY183c camera. Note the dark side of the moon is weakly lit by reflection of sunlight from earth (for this reason it is called earthshine). Click image for larger view.
Back in Part 2 of this series I demonstrated methods on to adapt a camera to a telescope and use the telescope as our lens. In that article I describe how to attach an interchangeable lens camera like a DSLR to a telescope. This technique is called prime focus astrophotography and is the subject of this article. It is called prime focus astrophotography as we are imaging directly at the telescope focal plane, without a camera lens or a telescope eyepiece.
Prime Focus Imaging – Recent Breakthroughs
As a quick diversion it is interesting to see the major improvements that have occurred in prime focus imaging over the past few decades. Firstly, high speed, high performance cameras have become available at an affordable price, as has the computer hardware required to support them. Secondly, excellent “Lucky Imaging” software is now freely available that help reduce the effects of atmospheric seeing. Thirdly, information sharing over the internet has helped improved technique.
In the 2 comparisons below I compare my own recent images using a 14” Telescope (from my backyard in Brisbane) with those by early space missions in the 1970s. Keep in mind there are much better images that are being done by other amateur astronomers, some of which I’ve linked further below. However, I think it clearly demonstrates the extraordinary progress that has been made in imaging technology.
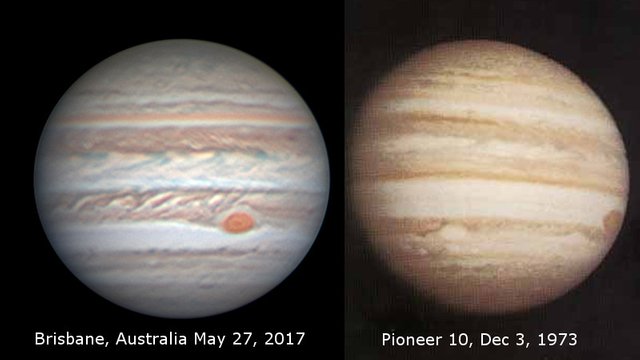
Jupiter image on the left was made with a 14” telescope on May 27, 2017, from the suburbs of Brisbane at a range of 715 million km. The image on the right was made by the Pioneer 10 spacecraft on Dec 3, 1973, from a range of 1.3 million km. Credit:JPL/NASA
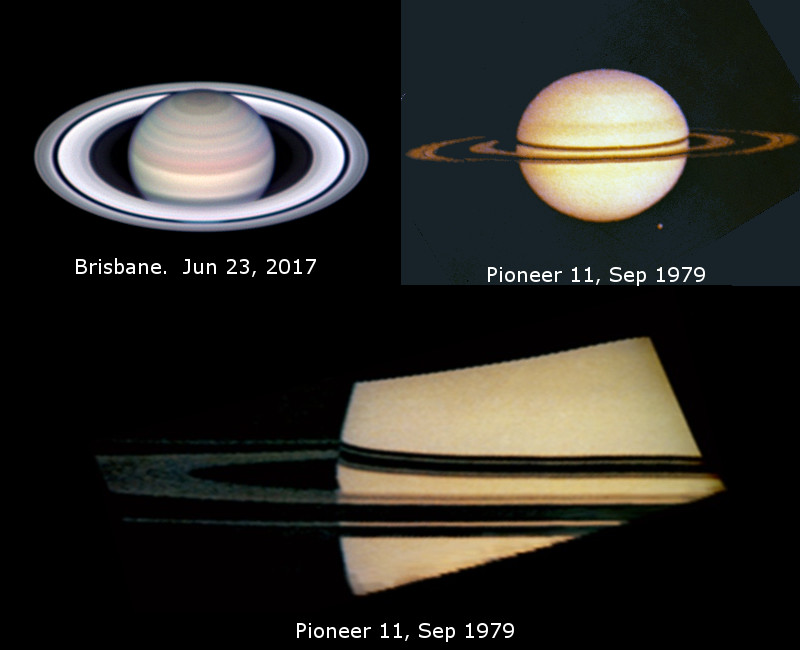
Saturn image on the left was made with a 14” telescope on Jun 23, 2017, from the suburbs of Brisbane at a range of 1,354 million km. The image on the right was made by the Pioneer 11 spacecraft on Sep, 1979, from a range of 2.3 million km. Credit:JPL/NASA
Here are some links to some of the best images of planets currently being done (all by amateur astronomers):
Damian Peach Jupiter Images . Be sure to check out the Jun 10, 2017, image that was made with the 1m (40”) telescope at Pic Du Midi Observatory in the French Pyrenees. It is possible this is the highest resolution image of Jupiter ever taken from the earth, also note the fantastic detail visible on the moon Ganymede.
Damian Peach Saturn Images. The Jun 10, 2017, image is simply outstanding!
Chris Go’s images. Chris’s images are extraordinary when you consider they were made with a 14” Telescope from his home in the Philippines. Chris has also discovered an impact strike on Jupiter.
There is also Anthony Wesley, who unfortunately doesn’t appear to have an image gallery currently online. But Anthony is famous for detecting 2 impact strikes on Jupiter.
Connecting the camera to a telescope
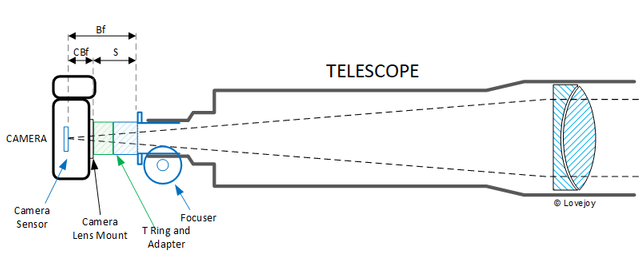
Camera connected to a telescope in Prime Focus using a T-Ring Adapter. Dimension Bf is telescope backfocus and Cbf is camera backfocus
We already covered connecting a camera to a telescope in Part 2, but essentially you will need a T-Ring to suit your camera, and then a T-Ring adapter to suit the telescope. Sometimes these are one part, so there is only one component required to connect a camera to a telescope. For my Celestron C8 pictured below you can see the T-Ring (Green) and T-Ring adapter (Blue) connected and the camera installed.
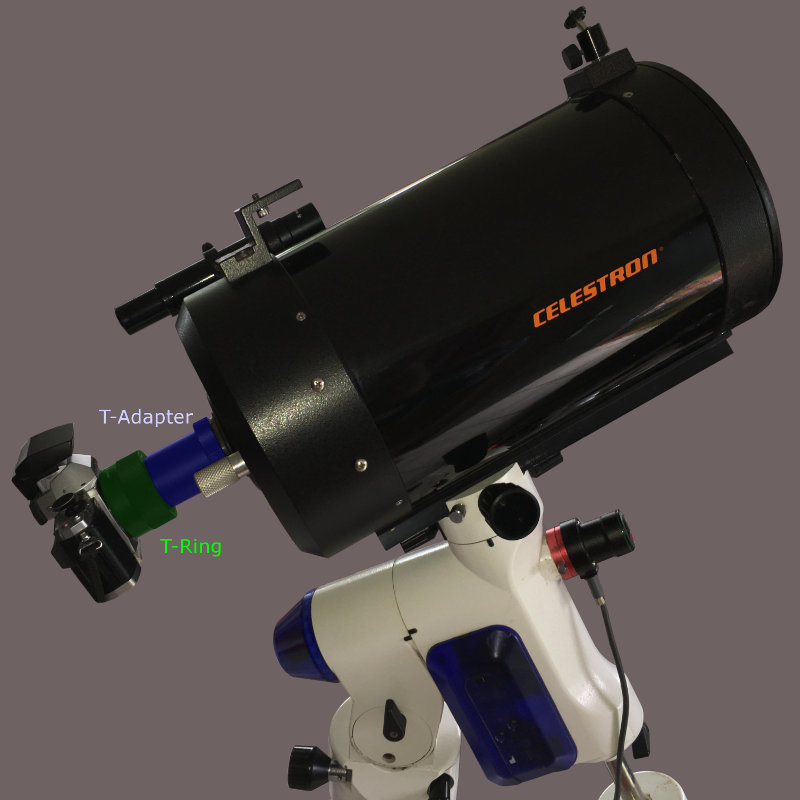
Camera connected to the Telescope's focuser. This is called placing the camera at prime focus
The other way also mentioned in a previous part was to use an eyepiece nose-piece, which means the camera is slid into where the eyepiece would normally fit in the telescope. I tend to use this method if I am doing planetary imaging and am extending the focal length using a Barlow. However, I feel the T-Ring method is more mechanically secure and is my recommended method.
As also mentioned in Part 2, make sure you check telescope backfocus (dimension Bf in diagram above) to make sure your camera can reach infinity focus! Check with the seller first if buying, to see whether you need to buy additional spacers. If you have been doing astrophotography for a while you will end up with a large assortment of spacers and adapters for this very reason!
Reducers and Barlows
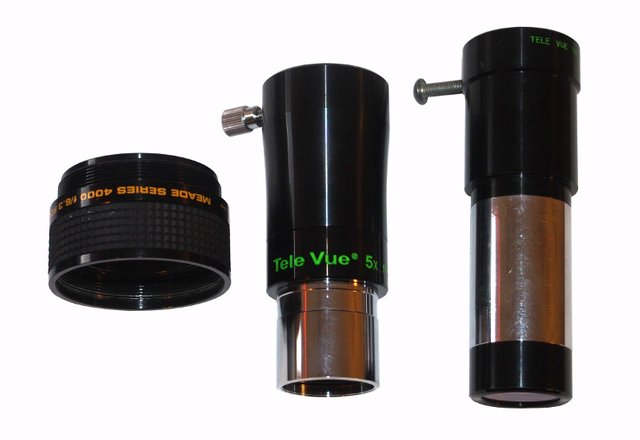
A set of various reducers and barlows, these modify the focal length of a telescope
There are frequently times you want to adjust a telescopes focal length to do one of the following things:
Maximise resolution (for planets)
Increase the field of view if the subject doesn’t fit.
Brighten the image to reduce the exposure length (for Nebula, galaxies and other Deep sky objects)
Increasing Focal Length : In photography it is common for people to use a tele-extender to increase the focal length of the lens and hence the magnification. In astronomy these devices are referred to a Barlows.
Reducing Focal Length : A reducer is employed to reduce the focal length of a telescope to brighten the image and increase the field of view. One word of caution is that reducers typically reduce the useable field of view, so that you may have to crop back your image particularly if you have a full frame camera and sometimes even with a Micro Four Thirds format.
Correctors and field flatteners
One common accessory used in prime focus is the field flattener/corrector. This is an optical component that fits between the camera and telescope and improves image quality away from the center of the image.
Optimising Prime Focus Imaging for Planets
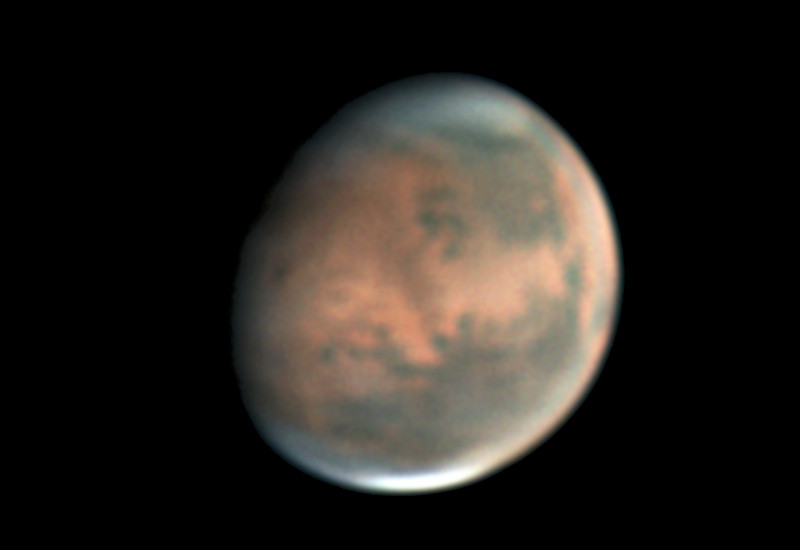
Mars on July 30, 2016, as imaged in a 12” Dobsonian telescope. I used a 5x Barlow to get close to an optimal focal length. At the time the planet was quite small, and about 60% of the size that it will be this July
We will now discuss imaging of bright objects like planets, stars and the moon. The approach is to take lots of short exposures, often in video mode, and then later select the best images and stack them together to generate a final image with much better detail than any single frame. This technique, called lucky imaging, has allowed amateur astronomers to produce images far better than what was being done by professional observatories a couple of decades ago. I will discuss how this is done in a later part.
With a small bright object, like a planet, we will likely be keen to do is increase the focal length of the telescope by using a barlow to magnify things as much as possible. The question arises then what is stopping us from increasing focal length as much as we like? If a 2x barlow improves our images, then a 5x barlow will be much better, right? Wrong!
As in most things in life there is no free lunch, and here is what happens as we keep increasing focal length/magnification:
There is a theoretical limit to what the telescope can resolve, it’s a bit like viewing a newspaper under a magnifying glass – there is no more detail to be had once you see the individual dots. In nature this is called diffraction, and there is more in the theory section later in this article for those interested.
As you increase focal length, the image gets dimmer. This means you need to increase exposure to compensate. For planets, this means atmospheric turbulence (called seeing by astronomers) starts to blur the image. The result is you start to go backwards and loose resolution, even though the image is more magnified.
The optimal focal length depends on many factors but a good starting point is this formula, which is based on a color camera (for a monochrome camera, use 4.5 instead of 6.5 in the formula):
Where:
f : Target Focal length in mm
p : Camera pixel size in microns
D : Telescopes aperture in mm
As an example, an 8” (200mm) aperture telescope used with a Sony RX100 (2.4 micron pixels) would have an optimal focal length of 3120mm according to this formula. If our telescope had a focal length of 1000mm, which is typical of an a telescope of this size, we would probably want to use a 3x barlow for best results.
Optimising Prime Focus Imaging for Deep Sky
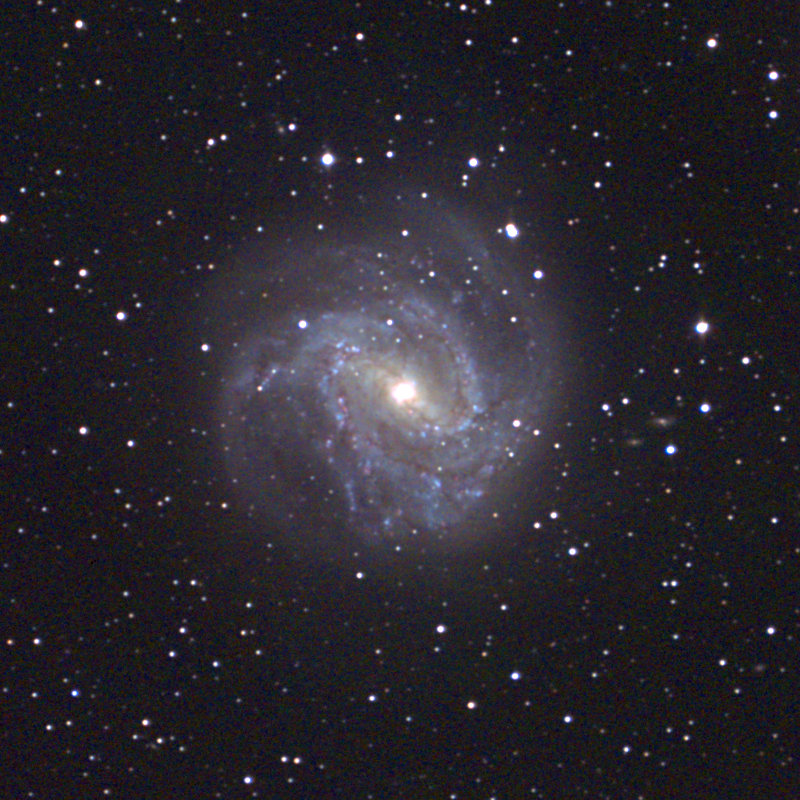
Galaxy M83 imaged with 180 x 4 second exposures with Celestron C14 + QHY183c camera + 6 x 30 second exposures with QHY9 camera. Although this amounts to 15 minutes total exposure, this is considered highly underexposed, and usually several hours of accumulated exposure is used for these objects.
Deep Sky refers the objects such as Nebula, galaxies, star clusters and other similar objects (but not stars themselves).
Unfortunately, bright and Deep Sky are pretty much mutually exclusive, so attempting to use the same approach for planets will likely lead to disappointment. Much shorter focal lengths are employed to brighten the image and to use longer exposures. To do this well requires a considerable amount of tuning and experience, as well as an excellent tracking system.
My simple advice here is go for the shortest focal length available that gives sharp images. There are several common telescope combinations that achieve this, here is an example list.
Newtonian Reflectors : The most common type of telescope used, and often used in short focal lengths. A reflector often has a focal ratio of F4 to F6, at least in the popular scopes. Because Newtonian reflectors suffer serious comatic aberation away from the center of the field it is recommended to use a coma corrector. Several manufacturers produce suitable coma correctors including Baader Planetarium and Televue
Refractors : Short focus refractors are commonly found in the Focal ratios of F5 to F7, and these can often used with reducer/field flatteners to not only speed up the Focal ratio to F3-F5, but also make the images sharp over the hole image field.
SCT : Schmidt-Cassegrain telescopes have a generally long focal ratio, so are not ideal natively for deepsky unless they are used with a reducer. A number of reducers are available that bring the focal ratio down to as low as F5, however, a number of the SCT’s can be used with a Starizona Hyperstar which allows them work at F2.
Theory
Calculating Image Scale
Image scale is photographic speak for magnification. It is important to know whether we will have enough resolution to clearly see the object we are imaging. It can be calculated simply as follows:
S = Pixel Size / Focal Length
Usually image scale is expressed as arc sec / pixel. Additional Pixel size is usually given as microns and focal length as mm. So, adjusting the formula for these units, gives the following:
S = 206.26 x Pixel Size / Focal Length (arc sec)
Why not cm or inches per pixel? The reason is that the imaging system doesn’t know how far away something is, so the apparent size of something as we see it does not reflect its true size. So, the only thing we can see is its angular size which is typically referred to in degrees, although in astronomy objects are often so small arc seconds are used. It turns out that the moon and sun have almost identical angular sizes of 0.5 degrees diameter, so to us on earth they appear the same size, but, the sun is far larger and appears the same size only because it is much more distant.
The Rayleigh limit
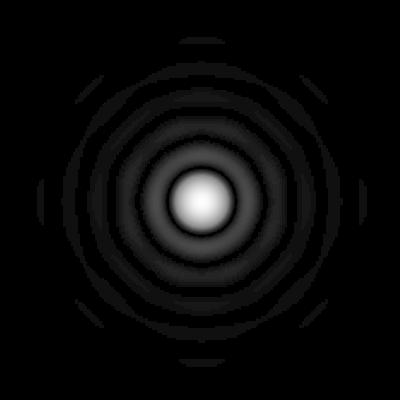
The Rayleigh limit is often used to estimate the resolving power of a telescope, and it relates to the diffraction of light. In Part 4 I touched on diffraction of light and how a point source like a star actually renders as an airy disk in a telescope at high magnification. Here is what a typical Airy disk looks like.
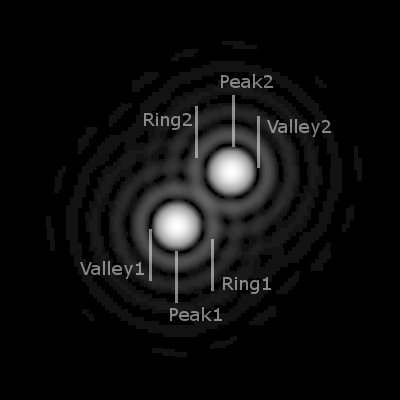
Consider what happens when you have 2 stars as shown in the image below. For clarity I have labelled the airy disk patterns so that inner peak of Star 1 is labelled Peak1, and inner peak of Star 2 is labelled Peak2. Surrounding the inner peak of Star1 is a dark void, which I have labelled “Valley1” and surrounding that void is a light ring which I have labelled “Ring1”. The same features in Star2 are “Valley2” and “Ring2”.
In the above image, the stars are clearly visible as separate entities, even though features Ring1 and Ring2 are touching. What happens when the stars are closer so that now Ring1 passes through Peak2, and Ring2 passes through Peak1. This is what the stars look like now.
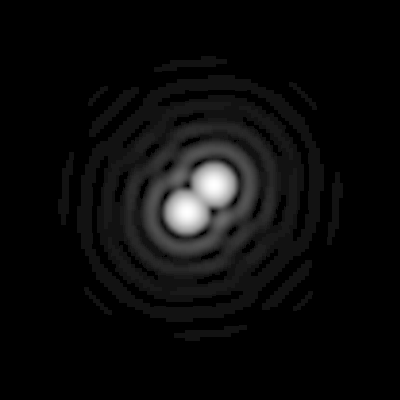
It is still possible to see the stars apart, but only barely as Peak1 and Peak2 now appear joined. What if we move them closer together again? Lets now bring them close enough that Valley1 passes through Peak2, and Valley2 through Peak1, this is what we see.
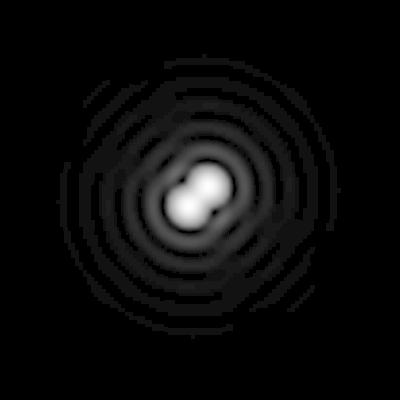
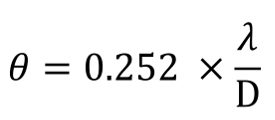
The stars are now on the borderline of being distinguishable as separate entities, as the “shoulder” between the Peak1 and Peak2 has all but disappeared. This point is called the Rayleigh criterion and can be computed using the formula below.
λ is the observed wavelength in nm
D is the telescope aperture in mm
θ is the Rayleigh Criteria in arc seconds.
Note, when human observers have been tested, they can exceed the Rayleigh criterion slightly, and using deconvolution techniques in imaging it is possible to resolve closer again.
Undersampling and Oversampling
At first glance it would seem to image at the telescopes resolving power would require setting the pixel scale so that one pixel spans a size equal to the Rayleigh criteria. This turns out to be incorrect and if we were to do this we would “undersample” the image which means detail would be lost. The reasons for this are laid out in the Nyquist sampling criterion but essentially it is because we cannot correctly sample the airy disk at a pixel scale equal to the Rayleigh criteria. Let’s see a practical demonstration, showing what happens as we change the pixel scale.

Original Double star, it’s actual appearance

Double Star at Pixel Scale = Rayleigh Criteria

Double Star at Pixel Scale = 0.5 x Rayleigh Criteria

Double Star at Pixel Scale = 0.33 x Rayleigh Criteria
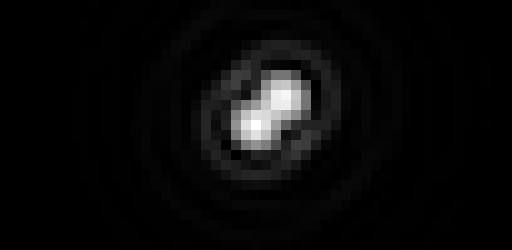
Double Star at Pixel Scale = 0.25 x Rayleigh Criteria
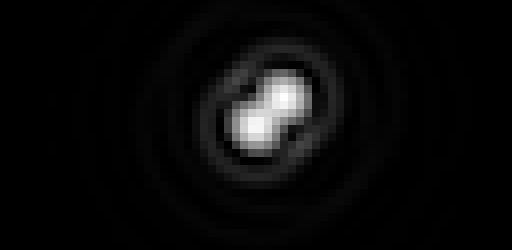
Double Star at Pixel Scale = 0.2 x Rayleigh Criteria
As can be seen setting the pixel scale at 0.33 x Rayleigh Criteria appears to be the best compromise in preserving detail. We can set the pixel scale smaller, but each time we do this the image gets dimmer and this can compromise image quality in other ways.
Conclusions
This covered a fair bit of ground, but I hope this gives readers an insight into what prime focus imaging is. In future articles I will start looking at image acquisition and image processing.
NOTE: All images are my own unless otherwise noted, please give credit to me if you plan to use them.

Being A SteemStem Member
Thank you!
World of Photography Beta V1.0
>Learn more here<
You have earned 5.10 XP for sharing your photo!
Daily photos: 1/2
Daily comments: 0/5
Multiplier: 1.02
Server time: 12:32:11
Total XP: 155.32/200.00
Total Photos: 19
Total comments: 14
Total contest wins: 1
Follow: @photocontests
Join the Discord channel: click!
Play and win SBD: @fairlotto
Daily Steem Statistics: @dailysteemreport
Learn how to program Steem-Python applications: @steempytutorials
Developed and sponsored by: @juliank
Congratulations! This post has been upvoted from the communal account, @minnowsupport, by terrylovejoy from the Minnow Support Project. It's a witness project run by aggroed, ausbitbank, teamsteem, theprophet0, someguy123, neoxian, followbtcnews, and netuoso. The goal is to help Steemit grow by supporting Minnows. Please find us at the Peace, Abundance, and Liberty Network (PALnet) Discord Channel. It's a completely public and open space to all members of the Steemit community who voluntarily choose to be there.
If you would like to delegate to the Minnow Support Project you can do so by clicking on the following links: 50SP, 100SP, 250SP, 500SP, 1000SP, 5000SP.
Be sure to leave at least 50SP undelegated on your account.
World of Photography Beta V1.0
>Learn more here<
You have earned 5.15 XP for sharing your photo!
Daily photos: 1/2
Daily comments: 0/5
Multiplier: 1.03
Server time: 07:42:16
Total XP: 201.27/400.00
Total Photos: 28
Total comments: 14
Total contest wins: 1
Follow: @photocontests
Join the Discord channel: click!
Play and win SBD: @fairlotto
Daily Steem Statistics: @dailysteemreport
Learn how to program Steem-Python applications: @steempytutorials
Developed and sponsored by: @juliank
A great intro into amateur astronomy. Didn't know your equipment now rivals and outshines that pros used only 2 decades ago.
Thank you @alexander.alexis . Maybe not 2 decades ago, but 4 decades ago.
Hello,
SteemTrail / https://steemil.com/@steemtrail as one of our top picks today.
TRAIL / https://steemil.com/@steemtrail token for your participation on our innovative platform...STEEM / https://steemil.com/@steemtrail .
SteemTrail Now / https://steemil.com/@steemtrail to get instructions on how to claim your TRAIL / https://steemil.com/@steemtrail token today.
TRAIL / https://steemil.com/@steemtrail tokens and SteemTrail / https://steemil.com/@steemtrail , stop by and chat with us.
Happy TRAIL! And Click Here / https://steemil.com/@steemtrail
Congratulations! Your post has been chosen by the communities of
Also, as a selection for being a top pick today, you have been awarded a
Please visit
If you wish to learn more about receiving additional
This comment links to a scam site, do not click any links. Do not enter your password.