Simply Steemit: Your No-Nonsense Guide to Getting Started
By @donkeypong and @kevinwong
Earlier this year, I organized a team of top Steemit writers: @cryptoctopus @stellabelle and @steemship to work with me @donkeypong on a basic introductory guide to Steemit. The four of us created the Steemit 101 book that is available on Amazon. We gave away 1000+ free copies. Even now, the book is priced at Amazon’s minimum of 99 cents (with all royalties being re-invested by the authors into promoting the book and promoting Steemit).
You can find the book here and it is also available on 13 other Amazon country sites: https://www.amazon.com/dp/B01HC47NLU
Unfortunately, people in many parts of the world do not have access to Kindle e-books. Once our exclusive contract with Amazon has been fulfilled (next month), we will make Steemit 101 available to everyone, everywhere.
Until then, I still get questions every day from new users about how they can get started on Steemit. To be honest, I don’t really enjoy writing “how to” materials that much. And experienced Steemit users are tired of seeing beginner tutorials on the main site. But with more new people arriving every day, the demand for this material is very real.
Other people have written some really good “how to” guides on various aspects of Steemit. And there have been some very useful ‘curated’ guides which contain organized links to these helpful posts. I especially like the ones that @teamsteem has done. But until today, there has never been a short, no-nonsense guide to Steemit for beginners. This has been sorely needed for quite a while.
Here it is! To fill the need, I invited @kevinwong to help create a shorter, condensed guide that can fit into this one large Steemit post. I think Kevin is one of Steemit’s most brilliant thinkers and writers, and I hope you will follow his blog by clicking on his name and then the “Follow” button.
We began by going through the Steemit 101 e-book. Kevin took the critical first chapters from that book and summarized their main points. We eliminated some things, added to others, reduced and revised the explanations, and ended up with this concise, original guide to getting started on Steemit (it is about 10 pages long, versus about 40 pages for the e-book).
Please bookmark it. Share it with new users. Link to it. And feel free to excerpt it or cut/paste it as needed onto other sites. We simply ask that you include a link to our original post here (so that I can pay Kevin some Steem Dollars from the votes)!
For your convenience, a PDF copy of this guide is available at the following link: https://drive.google.com/file/d/0BzjutiBS2DthaG96WmxCT0F2dmc/view?usp=sharing
Separately, I’d like to thank @jamtaylor for creating the title image for this post. He has a talent for both images and words. You should follow his blog, too.
-Tom @donkeypong and Kevin @kevinwong
Simply Steemit: Your No-Nonsense Guide to Getting Started
Welcome to Steemit! As you can see, the Steemit site is quite user-friendly. Once you start an account, you can write and submit a post. You also can vote and comment on other peoples’ posts. Steemit is a revolutionary social media platform that pays people to post, vote, and comment on good content.
Steemit is simple to use and you can have fun on the site right away. But it has a lot of moving pieces under the hood. If you want to make money here and get the most out of your experience, it’s important to understand the basic pieces and how they work. We’re here to help.
For a deeper overview of how Steemit works, we recommend the Steemit 101 e-book that a team of us wrote; it is available on Amazon. If you still have questions, you can join the Steemit.chat site and find us there.
Simply Steemit is your one-stop beginner’s guide. This post is the equivalent of a 10-page book, so we’ll call it a pamphlet. Bookmark it, link it, and share it with anyone who needs help getting started. We hope that new users find it helpful! –Tom and Kevin
Getting Started on the Website
*Note: The developers are constantly improving the Steemit platform. By the time you read this, something you learn about here may be re-named or moved. We’ll try to keep our descriptions general, while still being as helpful as possible in showing you the site.
Starting your new Steemit account only takes a few minutes. First, go to Steemit.com and follow the prompts to create a new account. Right now, you need to register using either a Facebook or a Reddit account, which also allows you to get a few dollars for free in your Steemit account. This may be expanded to include other sign-ups in the future.
Creating an Account with a Secure Password
Your screen name on Steemit probably will be the same name you have used for Facebook or Reddit. If you get to select a screen name, choose one that reflects a good image for you. It is important to build a good reputation on Steemit. You have a stake in it.
When you select a password, it may be a longer and more secure than anything you have used before. Steemit requires 32-character passwords. When you register, it may generate a random key for you, but if you have the chance to create your own password, please choose one with a mix of letters, numbers, and symbols.
It should be long and weird enough that you CANNOT remember it (because if you can, it’s too easy for a hacker to break into). Keep a secure record of your password, preferably offline, and consider storing it in a password manager so that you can use your password as needed. If you are considering a password manager, then this PC Mag article explains some top choices. http://www.pcmag.com/article2/0,2817,2407168,00.asp
Funding Your Account
You don’t need to put money into Steemit, but Steem Power provides compelling reasons to do so. Most of the new Steem that is created each day goes to Steem Power holders, protecting you from inflation. If you believe that Steemit has a great future, then holding Steem Power is similar to owning stock. Also, your voting influence will be much greater also when you hold some Steem Power.
The trade-off is not being able to withdraw all your value at once from Steem Power; you can only Power Down (withdraw from it) over a period of two years (in 104 weekly payments).
If you prefer to hold the price-stable Steem Dollars, then you also can make a return of 10% annually, which mostly exists to protect your holdings from any inflation. You can hold the liquid Steem as well if you wish, but due to inflation, it makes less sense to hold Steem for a long period. These currencies are explained more thoroughly below.
If you have never bought Bitcoin or cryptocurrencies before, you will need to convert some fiat money (U.S. Dollars, Euros, Yen, etc.) first using a site like Coinbase, CCEDK, or Local Bitcoins. Here is a tutorial on getting started with Bitcoin: https://bitcoin.org/en/getting-started.
To fund your Steemit account using Bitcoin, the Blocktrades site provides a simple exchange service that only requires a few clicks. There is a button for it on the Steemit website now (this is labelled “Buy Steem Power” and currently appears above the tag category listings). Or you can go directly to https://blocktrades.us and follow directions to convert Bitcoin to Steem Power, Steem, or Steem Dollars.
Alternatively, you can buy Steem or Steem Dollars using Bitcoin on an exchange such as Bittrrex http://bittrex.com or Poloniex https://poloniex.com.
Layout of the Site
There is a great deal of development going on with the website. By the time you read this guide, there may be additional features and some other parts may have been moved around to new places. We call it progress!
How Content is Organized: Views and Tags
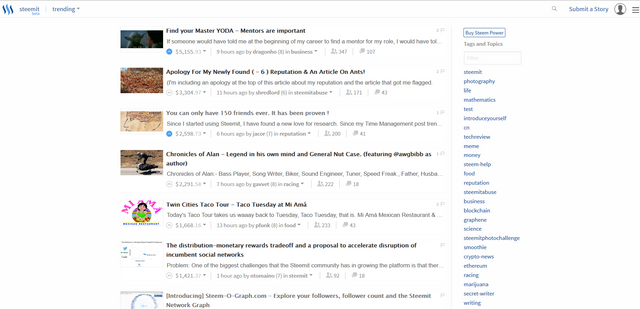
Posted articles are in the big center column. You can view the newest, hottest, trending, most active, and most popular posts by clicking the drop down menu on the top left corner of the screen and selecting any of the choices there (these views are explained more below). That drop-down menu is next to the Steemit logo. You also can view posts that are on your Recommended list by clicking your picture on the right side. The Recommended list is based on what you have read and liked in the past. The developers also are working on a good “Follow” list, so you will be able to follow your favorite posters there also.
The list of TAGS on the right side shows the various topics or subgroups where content is posted. So you can browse through those topic tags to find the ones that interest you most.
As more people find Steemit and post, additional tags will be created and the list of them will be quite long. Fortunately, you can search the tag names by clicking in the search bar just under the word TAGS. By typing in a keyword, you will filter the list to show you only tags that include that word. For example, if you are looking for a food category and cannot find it, you could type in “food” and the food tag would be displayed. If there is a separate “food-restaurants” tag or “food-fights” tag (anything with food in it), that would show up also and you could select the one you want.
While TAGS look like topics or subgroups, they are created when you submit a post on Steemit. Rather than having to file it in a category, all you need to do is include a #tag in the text of your post. For example, if you wanted to post in the “steem” category, you could just include #steem in your text. Your post will be filed there automatically when someone browses the steem topic tag. We will cover posting, including tags, more fully in a future chapter.
Functions on the Top Right
You can find many functions on the top right corner of your screen. These include Search, Submit Post, Your Account, and Steemit Menu. We will cover each of these separately below.
Searching Steemit
Moving from left toward the top right corner of your screen, the first thing you’ll see is a search icon. It looks like a little magnifying glass. Clicking on it open a Google custom search that lets you search all of the content on Steemit.com.
For example, let’s imagine that you have an interest in gardening and you want to learn how to apply mulch to the trees in your yard. You could go to the gardening tag and browse around, but you could find the right content faster by running a keyword search for a term like “mulch trees”. This custom search will show you every post on the site where your search term has been used.
Submitting a Post
When you click “Submit a Story” on the top right, a submission form will open up. This is where you can post your blog articles, videos, photographs, and other content. We will cover posting shortly and show you how to make the best use of the submission form.
Viewing Your Account
You can view your account by clicking the picture icon near the top right corner of the screen. When you click on it, you will see a drop down menu that shows your Recommended list as well as your recent posts and replies. This is also where you will find your wallet and a set of long keys called permissions. Let’s cover each of these in turn.
Blog, Posts, and Replies
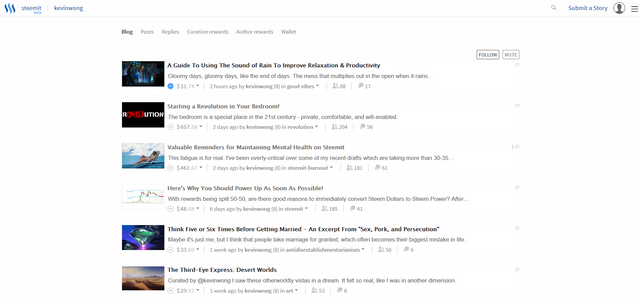
When you click on your “Blog”, it will look something like this. It displays your posts, beginning with most recent. This is a good place to keep track of how your recent posts are doing or to find something you wrote in the past.
“Posts” shows you everything you have submitted. That includes the blog postings. And it also includes any reply comments you have posted on other peoples’ blog posts, not merely your original blog posts.
“Replies” shows you any comments you have received from others. They might have commented on your blog post or they might be replying to a comment you made elsewhere. Some posts generate a lot of discussion, particularly if they are controversial, while others rarely get many replies. It is good to check on your “replies” regularly, because sometimes others have questions or important comments they communicate to you.
Separately, there are links within this account view to see both your author and curation rewards.
Wallet
Your wallet shows how much value you have in currency tokens and STEEM Power. These currency tokens, STEEM, STEEM Power, and STEEM Dollars, are explained more fully below. The wallet itself even includes basic descriptions of each currency token. You also will see arrows with drop-down menus next to each one; these allow you to take various actions (such as buy, sell, transfer, or Power Up) with the various currency tokens.
Exploring and Curating Content
Steemit pays you to improve the platform, whether by posting, commenting, or voting. This is like cleaning up your room, or tending to your lawn, but it is much more fun!
Make Steemit the community that you want to be part of.
To begin, head over to the content page by clicking on Steemit’s logo on the top left of the screen. From here, you may search for the tag / topic of your liking. Select the articles that interest you. If you love the content that you come across:
· Vote for the post if you like the content. Click that up-button at the end of the post.
· Comment / reply on that post. Be genuine, be constructive.
· Or you may flag the content if you find it abusive. Flag button is located on top of post.
Flagging/downvoting should only be used for any content that is particularly abusive, spammy or misleading.
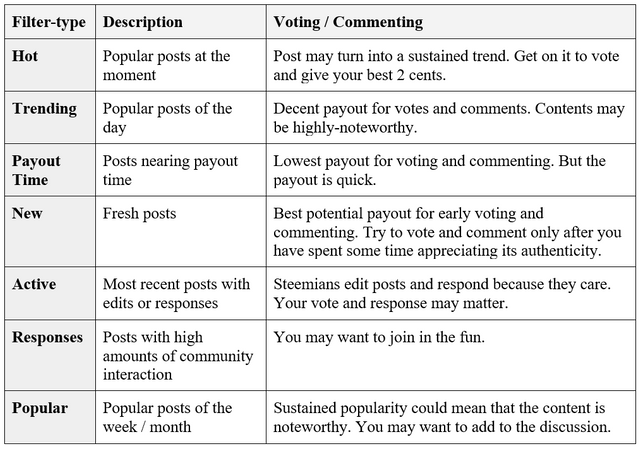
However, we suggest that you add another layer or filter to make your voting and commenting adventure more purposeful. You may begin to filter contents by view (Hot, Trending, Payout Time, New, Active, Responses, and Popular). You also can view your Recommended list, which is based on other posts you have liked in the past. Soon, the Follow lists will be available also.
Getting Paid to Vote and Comment
When an author is paid out for a post, its curators also get paid. Curating is the work of organizing, sorting, and cleaning up the site. This work includes voting on posts and it also includes commenting. You can get paid for making good comments, just as you can get paid for voting on them.
If you want to make money from voting, the best strategy is to find posts you think will become popular and upvote before others do. Steemit rewards voters for finding hidden gems. All other things being equal, the earliest upvoters of popular posts will get the most voting rewards. However, voting strength also is affected by how much Steem Power the voter has. Because Steem Power is like a preferred stock, those with more Steem Power also enjoy greater influence through their votes.
Even if you do not have much Steem Power, you can earn money by spotting good posts relatively early and upvoting them. But the more Steem Power you have, the more strength your vote will carry.
Here is an important caveat: you should not vote immediately on new posts. For the first 30 minutes after a post is submitted, all curation rewards earned by voting are shared with the author. If you vote right away after the post is submitted, then the author gets most of this reward, and you will get more if you wait longer. Of course, others can jump in during that time, so if you do wait longer, the consequences can be both positive and negative. On the one hand, you make a higher percentage of the payout by waiting as long as possible within that 30 minute period. But then again, other people may vote ahead of you, getting an earlier spot in line and reducing your payout.
You will need to decide when the best time is to jump in and vote. Watch what others do and when they upvote the posts that are likely to become popular. Look at your wallet to see how much you earned from your previous votes and find the strategy that works best for you.
And also, make sure you seek out new posters who are relatively undiscovered. Certain authors always get votes because they are already well-known. If you can discover good content from newer writers before most voters find it, then you may be in line for a much larger payout.
For a closer look at the voting rewards system, we recommend this useful post by @steemship and @the-alien : https://steemit.com/steem/@steemship/how-to-vote-smart-and-profit-from-steemit-s-new-curation-rewards
Creating Your First Post & The Way Forward
Steemit is a global community that values social identity. Your reputation is important. And you will be building it with every post and every comment. Do not rush to write something (anything!). Take time to study what others are doing, what works best, and then create your first post.
Your first post should be an introduction post. Before getting started, try to examine some examples in the “introduceyourself” tag and learn from successful posts. Pay particular attention to the verification methods that people use; they are not foolproof, but they still help you gain trust. The most common such method is to post a picture of yourself holding a Steemit sign with the date.
Get started by clicking on ‘Submit a Story’ button on the top right.
There are no subject limitations to your posts. All you have to do is to be honest and be genuine. If it’s Not-Safe-For-Work, then do your part in using the #nsfw tag.
Notice that short posts (less than two or three paragraphs) do not usually get many votes. Especially while you are new and establishing your reputation, it is important to take the time to write something thorough and meaningful. It does not need to be as long as a thesis, but it should be your own original content (not copied from elsewhere) and it should provide some value.
Many Steemit voters look at a post and, before voting, ask themselves whether it adds value to Steemit. Does your post make Steemit better?
Format your post well. This includes using titles and subtitles. Use paragraph breaks or a double [Enter] between paragraphs to make sure there is a space. Too much text is hard on the reader’s eyes. And make sure to proofread your work before submitting. Readers/voters are forgiving of a few minor errors, but you will gain a good reputation much faster if you make sure to turn out a high quality product each time you post. This means checking your work and correcting any simple errors.
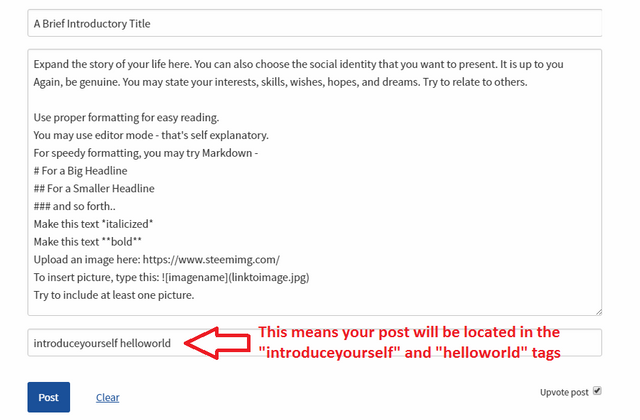
Formatting also includes adding images. Images can give some life to your text and help illustrate it. But don’t overdo the images unless your post depends upon them heavily (such as a post in the photography tag). Make sure to use the markdown code for an image so that it embeds correctly in your post.
Check the screenshot above, which shows you the markdown format. Be sure that you paste your own image's link into the parentheses. While the Steemit posting form is getting easier to use (the developers have done great work on the site), many of us still prefer to use markdown format. It is easy to learn. The image above shows you the simple formatting codes; when you include a # and a space before a word, for example, your text will come out as a headline.
When you are submitting your post on Steemit, the submission form will show you a preview of what it looks like. And if you have included markdown formatting, the preview of your post should show you how that formatting will look once you submit it. After you submit the post, check that it came out okay and make any edits that are needed before you move on to something else.
You NEED to get the format right or you will lose potential votes. Look at other successful posts and follow a similar model for format. If you have questions, feel free to join Steemit.chat and ask some members of the community there.
Reputation scores
To succeed on Steemit or even just to enjoy it, having a positive reputation is important. Recently, reputation scores were added to the site. Your score is the number next to your screen name. When your posts receive votes from others who have positive scores, your own score will begin to increase. If you are flagged repeatedly for spam or abuse, then your score will decrease (and can even go negative). As you are making positive contributions to the community, your score should increase over time.
Be Patient. It Takes Time to Build a Reputation and Start Earning Larger Rewards
If you are posting consistently, but not attracting much attention yet, then it could mean one of several things.
First, perhaps the community does not really know you yet. A good introductory post is a first step. You also can head over to the backroom chat site at steemit.chat and ask any questions or begin discussing things with other users. As people get to know you and trust in the value of your posts, you are much more likely to score additional votes. The more votes you get, the more your work gets noticed by others, and the more your reputation score goes up.
Most of all, keep posting good content. It may not make you much money right away, but when people notice that you are developing a good track record, your blog is like your resume.
Second, try to write some different things and post them in different tags (categories) if you can. There is a lot of content coming onto Steemit now. Not everyone reads certain tags. Having your work in different places probably means you will attract some different readers/voters. And hopefully, they start to follow your work.
Anything constructive that you do on Steemit (and its chat-companion platform at Steemit.chat) will increase your value, regardless if your contributions were obvious, tracked or not. This is a community first. If you support it and work positively with others, your opportunities will follow.
So you got your first payout
Congratulations! Note that post and comment payouts are divided equally into Steem Power and Steem Dollars. Voting payouts are always in Steem Power. On your post, you can click on the drop-down arrow next to the payout amount; this will show you when the next payout is scheduled.
Once you receive your payout, you can find it by clicking on your profile (at the top right of your screen) and then clicking again on your Wallet. Notice there are balances listed for three different currency tokens.
STEEM: You may buy or sell these liquid tokens in exchanges at any time. You may also power up Steem into Steem Power.
STEEM Power: These are network influence tokens, rather like a longer term investment in Steemit. The more SP you have, the more weight is given to your voting. Generally, it is beneficial to accumulate more SP for building up higher passive and active rewards. You may also liquidate SP to acquire Steem Dollars. SP is locked up for a period of time. So if you wish to cash out some of your SP, you can do so by Powering Down. It will pay out over a period of two years, split into 104 weekly payments.
STEEM Dollars: These tokens are always worth about $1.00, once traded with another cryptocurrency like Bitcoin. Direct trade for US Dollars or other fiat-currencies may be available in the future. You may also purchase more STEEM in the internal market.
You may click on any figures presented in the wallet page. Available actions will be shown.
To cash out into fiat currency or another cryptocurrency, you will need to trade STEEM or STEEM Dollars via an exchange, bridge, or gateway service. Two exchanges, Bittrex and Poloniex, allow you to sell your Steem or Steem Dollars. The Blocktrades service also provides a simple way to transfer Steem or Steem Dollars into Bitcoin or a variety of other cryptocurrencies.
Blocktrades: https://blocktrades.us
Bittrex: http://bittrex.com
Poloniex: https://poloniex.com
For more help on how to Power Up or cash out, we suggest this two-part article series by @donkeypong and @infovore that explains the process well. As always, some information may be out of date soon as more improvements are made. For example, the Poloniex exchange had not added Steem or Steem Dollars yet when these posts were written, but you have that link above as another option now:
That concludes this brief guide. We hope you have found it helpful.
Our final suggestion is to spend a few days browsing around and reading other posts. You will learn a lot more about Steemit from many different perspectives. The more time you spend on Steemit, the better you will understand not only its basic structure, but also this great community around it. With your help, we hope to continue growing Steemit by introducing more people to its great content and opportunities!
For your convenience, a PDF copy of this guide is available at the following link: https://drive.google.com/file/d/0BzjutiBS2DthaG96WmxCT0F2dmc/view?usp=sharing
-Tom @donkeypong and Kevin @kevinwong

Terrific work, guys! This is much needed. Looking forward to having the e-book more widely available soon, too.
Awesome post! These guides are much needed. Thank you so much for the praise you gave me! I really appreciate it. This recognition from your means a lot to me! Hopefully we'll have the chance to collaborate in the future! Keep on Steeming!
Hi there! Here's a preliminary PDF of Simply Steemit for easy reading and printing -
https://drive.google.com/file/d/0BzjutiBS2DthaG96WmxCT0F2dmc/view?usp=sharing
Well actually this maybe the final version, just waiting for @donkeypong to greenlight it in the post :)
EDIT: The official PDF link is in the post now!
This look awesome! I'm always looking to learn more about Steemit! So should everyone!
Hi,
this should be a sticky post, and emailed to everybody joining steemit.
I am following you after i read a couple of threads you wrote, and its always high quality. hope you didnt mind my commen on the western union thing.
maybe i have too much payment system knowledge, but that post was only scratching the surface.
anyway, keep up the great work!
Love the guide you have put terrific work , i wish their was more bloggers like you
Guides are a great way to help newbies in this beta. Trying to read the white paper, but it's a careful read.
I'd like to share a common steemit bug that will befuddle a lot of new users. Often your image links might be broken right after your post, even though they were fine in the preview. Edit the post and check the link. The link will be prepended with a steemit redirect. The "http://" will be missing from beginning of the url. Paste that back in at the start of your url, finish the edit, and it should be working again.
Hopefully this bug gets fixed soon.
Thank you for sharing knowledge about the image links. I do have a question and I am sorry to bother you about it, but where can I put these links? I click on the editor and nothing happens. There is no image icon for me to input one. I would like my articles to have that flair of images but so far I am having no success. Can you assist me? Thank you very much, I appreciate it.
Yes, I think I just fixed the problem with this one. Thanks!
I think it's worth mentioning that new users who are not seasoned bloggers shouldn't rush into creating content. New users sometimes are not aware how rewarding it can be to take the time to comment on submissions they liked. Leaving a thoughtful comment can be just as successful as a great post and it builds a better community.
@cryptobarry I fully agree. That is what I have done. I watched and now have slowly waded into the STEEM. Also, check out my post Steemit is Toast Thanks bud.
@streetstyle
I think you are right here. It seems that thoughtfulness of an important part of gaining reputation.
Nicely done, guys. 🙄👌
Amazing guide! Great work guys!
As this platform grows, new people arrive they would need something like this.
Well presented, perfectly condensed, very informative, all they need to know.. Awesome.
Glad too have you back Tom!
That is pretty comprehensive
Your doing good work helping people learn to steemit. {note to self use learn to steemit in a post} anyway could you check out my latest post I value your opion and there is aslo some good stuff in the comments. Im not going to repost it I Think twice is the limit.
This is great, you should make a few hard copies, and get them signed by yourselves and some of the devs. could you imagine what an artifact like that could be worth in a few years time..............