SmartCash SmartNode Setup Guide v2.1 (MAC Version) Quick Setup

SmartCash SmartNode Setup Guide v2.1 for Mac Users Quick Setup
Mac 10.13.2 (Local Wallet)
Ubuntu 16.04 LTS x64 (VPS smartnode)
Date 28/1/2018
By @controllinghand
Credit to @nflaw for maintaining the SmartNode site. Please visit this for updates and FAQs
http://smartnodes.cc/
Credit to @hannahlicious for her awesome video this new version was inspired by her video found here
Credit to @msg768 for his install smartnode script
https://github.com/SmartCash/smartnode
Last but not least
Credit to my new friend @Zaphoid who can be found on discord https://discord.gg/BDUh8jr helping everyone through setting up SmartNodes and more
Donation to my Smartcash please: SebFkuHrqDnj3obXvMtfxtQKRgFeVpXF5x
Digital Ocean referral link https://m.do.co/c/4f0c81328877 Free money $10 credit
Introduction
Welcome to this step by step guide that will take you through the process of creating your own SmartCash SmartNode. This guide is aimed at the casual MAC user who has already installed the SmartCash Wallet, purchased SmartCash but has little or no experience of using Linux or VPS (virtual private servers).
This guide also includes the install smartnode bash scripts for quick install provided by @msg768.
As a recommendation, please read through each section first and try to understand what is going on before doing it. As soon as one section is complete, please move to the next one. Don't miss any steps and please take your time.
This document is not an official document of the SmartCash team and has only been created by a hive member in the hope to assist others.
Creating a Virtual Private Server (VPS)
For a small monthly fee, you can run your own Virtual Private server to host a SmartNode without having to create one at home and having the extra headache of worrying about having your machine running 24/7 and managing static IP-addresses etc.
This guide has been created to give a step by step account using Digital Ocean. However, I would like to state that there is no recommended preference from the SmartCash team for picking a VPS service.
If you would like to see similar service offering please visit the OPTIONAL SECTION 3 for vultr.com in yoyomonkey's Guide http://smartnodes.cc/files/SmartCash_SmartNode_Setup_Guide_v1.2.pdf Which is also Windows friendly.
Requirements
10,000 SmartCash for each SmartNode.
Computer for running a local wallet only to start nodes and hold funds. Mac is used in this guide, but other QT version wallets work.
VPS server for remote node running 24hrs/day which includes:
1GB RAM (about half used for the OS and half for the daemon we install)20GB drive (less than 1GB used for wallet, some for OS, and some for future.1 Static IPV4 Address per node (IPV4 address that never changes) (No IPV6)
The remote node is actually the SmartNode, but for this guide we will call that remote node.
Section 0: Protect Yourself
- Backup:
- (!) IMPORTANT! First step you need to perform.
How to backup and recover your SmartCash Wallet (Mac Version)
- (!) IMPORTANT! First step you need to perform.
- Protect Yourself:
- $70,000 in ZCoin Stolen: User Gets Scammed Trying to Set up Znode https://cryptovest.com/news/70000-in-zcoin-stolen-user-gets-scammed-trying-to-set-up-znode/
- Don't give anyone access to your VSP.
- Don't give anyone any of your passwords
- Don't give anyone your private keys
- Don't trust anyone
- Disclaimer:
- The Author of this Guide is not responsible for, and expressly disclaims all liability for, damages of any kind arising out of use, reference to, or reliance on any information contained within document. While the information contained within the document is periodically updated, no guarantee is given that the information provided in this guide is correct, complete, and up-to-date.
Although the guide may include links providing direct access to other Internet resources, including Web sites, The Authors are not responsible for the accuracy or content of information contained in these sites.
- The Author of this Guide is not responsible for, and expressly disclaims all liability for, damages of any kind arising out of use, reference to, or reliance on any information contained within document. While the information contained within the document is periodically updated, no guarantee is given that the information provided in this guide is correct, complete, and up-to-date.
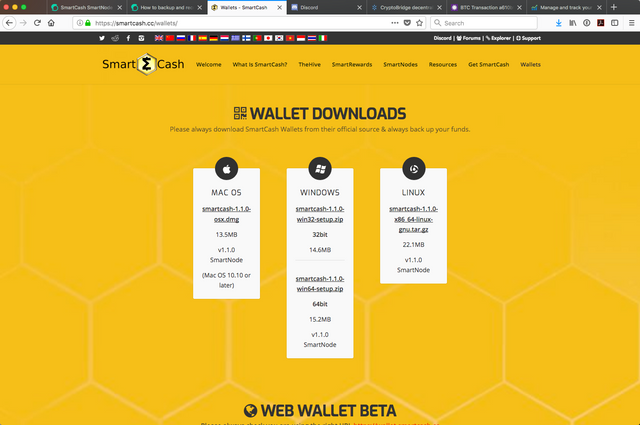
Section 1: Configure Mac SmartCash Wallet
- Install 1.1.0 SmartCash Wallet
https://smartcash.cc/wallets/
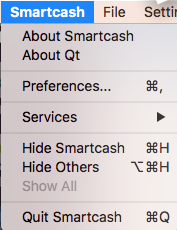
- On your Mac machine start your SmartCash wallet

- As soon as the wallet starts up go to the Smartcash menu and select Quit Smartcash. We need to make a Config change before syncing the wallet to make it able to manage the SmartNodes
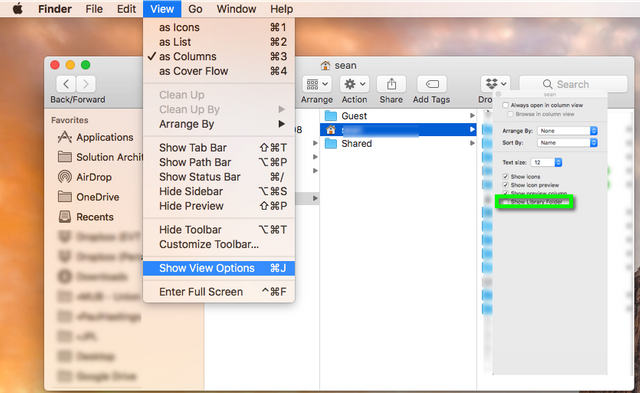
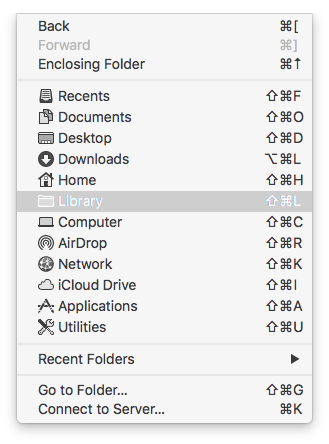
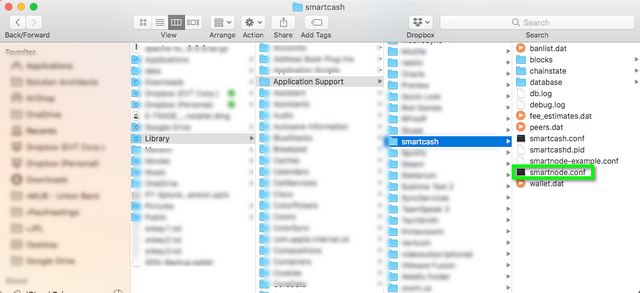
- To run a SmartNode we need to create a smartcash.conf file in the Smartcash folder (or the Data directory you selected when you installed the SmartCash Installer). Bring up your Finder and go to your Library Folder. If the Library Folder is missing go to Home folder and select View->Show View Options and check the Library box.
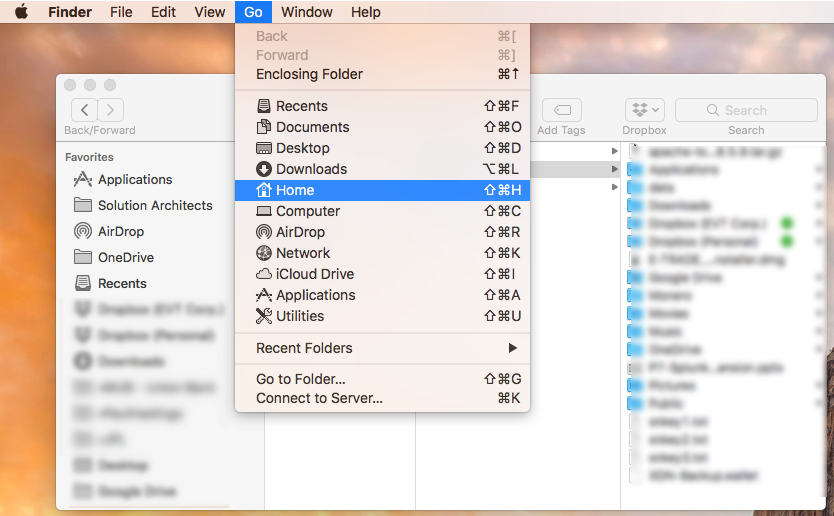
Reveal the Library directory
- Navigate to the smartcash directory
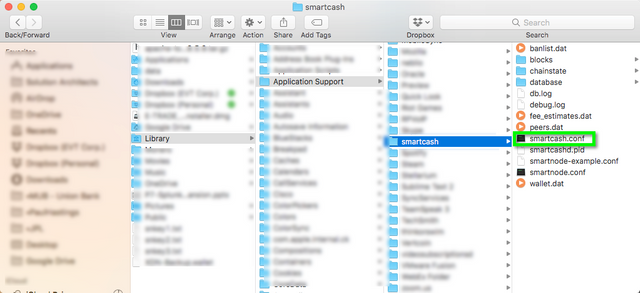
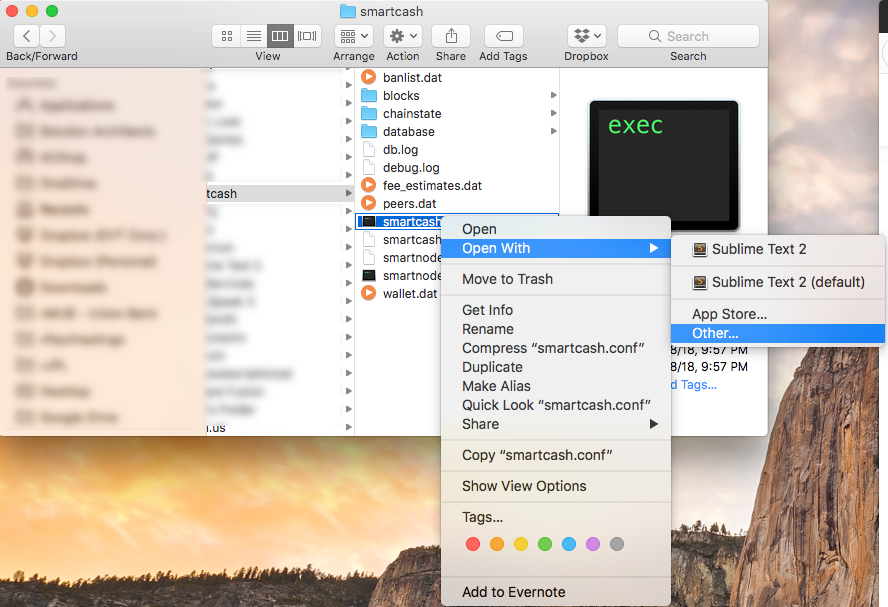
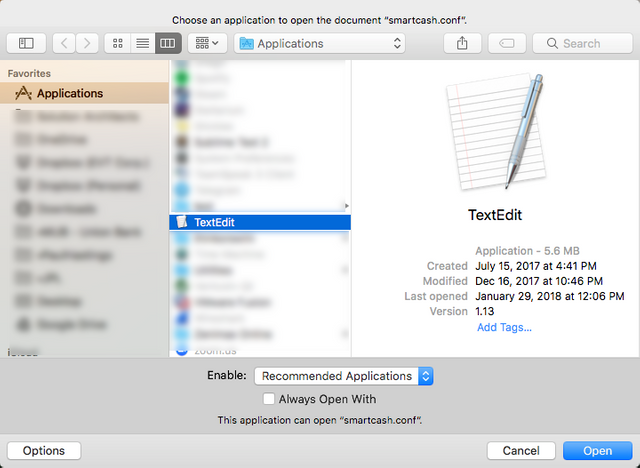
- Now edit the smartcash.conf file
You can use whatever editor your like. Or use the built in one that comes with Mac TextEdit. He is how you bring it up in case you don't know. Highlight smartcash.conf and right click ->Open With -> Other then navigate to TextEdit.
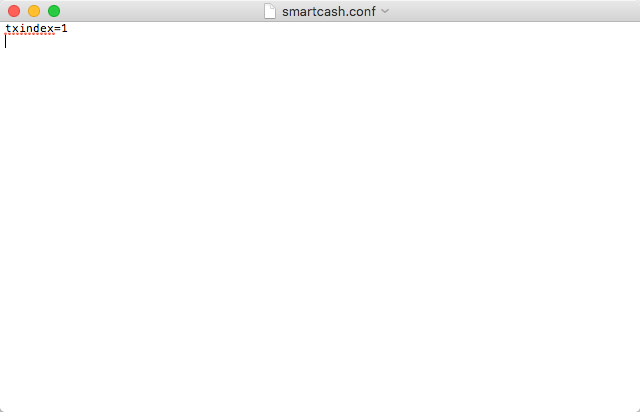
- Input the following into the smartcash.conf file
txindex=1
And Save
Note: some guides have you put in rpcuser? However, that opens up an unneeded security hole. - Optional Step - Bootstrapping
(!)Use at your own risk(!)
Do NOT do this unless you have backed up your wallet
(!)You can lose everything.(!)
This will download the blockchain and overwrite two directories. You don't have to do this step, but it can save you some time with syncing.
Open up a terminal and navigate to the smartcash directory: If you don't know how to do this skip this step.
curl -L0 http://proteanx.com/txindexstrap.zip > txindexstrap.zip
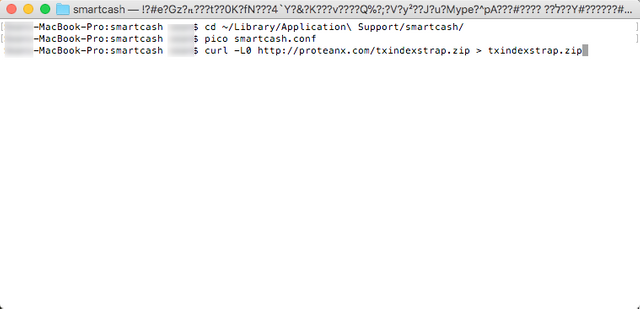
This will download the txindexstrap.zip file and you will see progress:

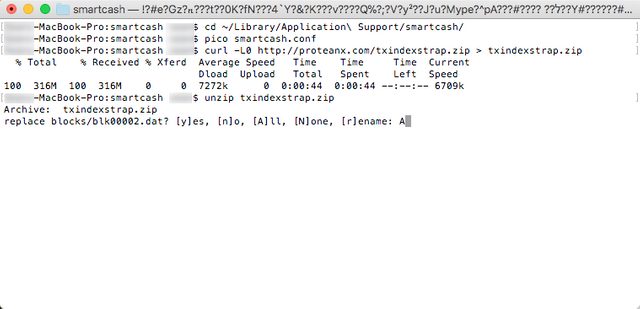
Next we will unzip and overwrite the blocks and chainstate directories
unzip txindexstrap.zip
when prompted typeAto overwrite all
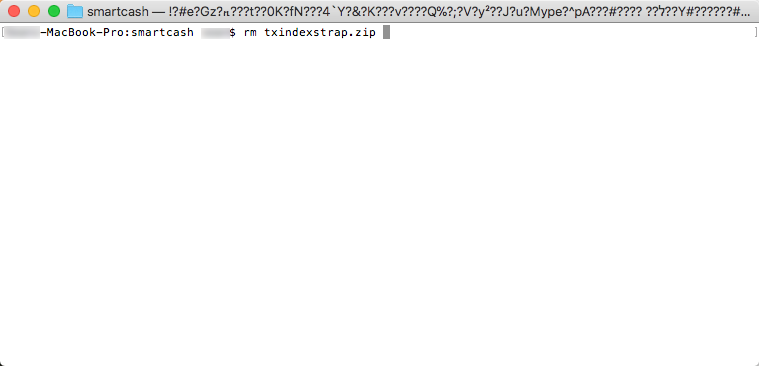
now for some clean up
rm txindexstrap.zip
- Start the SmartCash wallet again
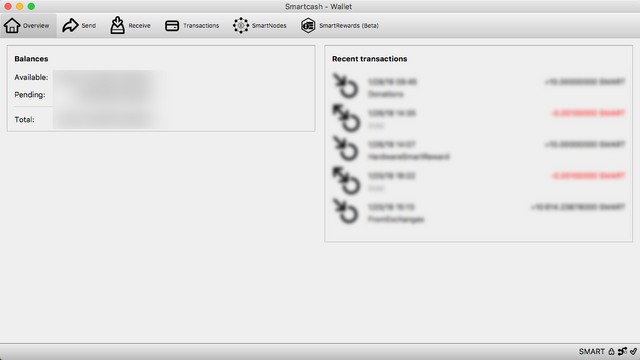
- Wait for the wallet to fully sync. This can take up to 8 hours depending on many factors including Network Traffic. Look for the tick in the Bottom Right Corner of the wallet to signify that the wallet has fully synced. If you did the optional step the bootstrap of the block-chain will save some time.
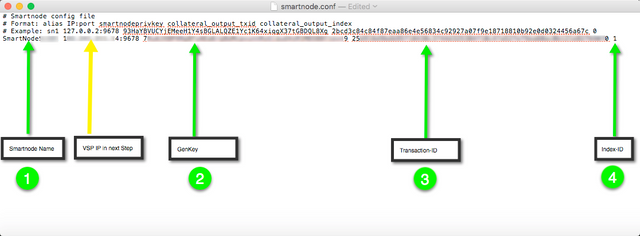
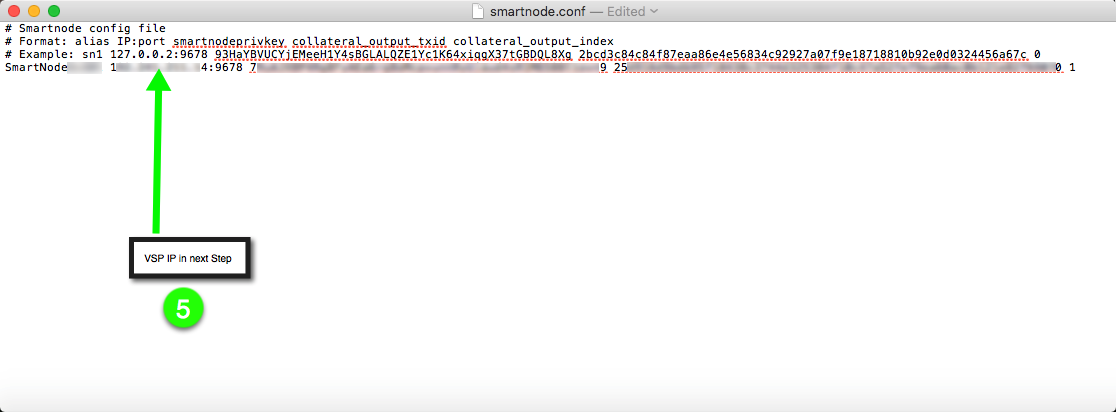
- Now open up the smartnode.conf file
This is where you will copy and paste all the variables related to your smartnode
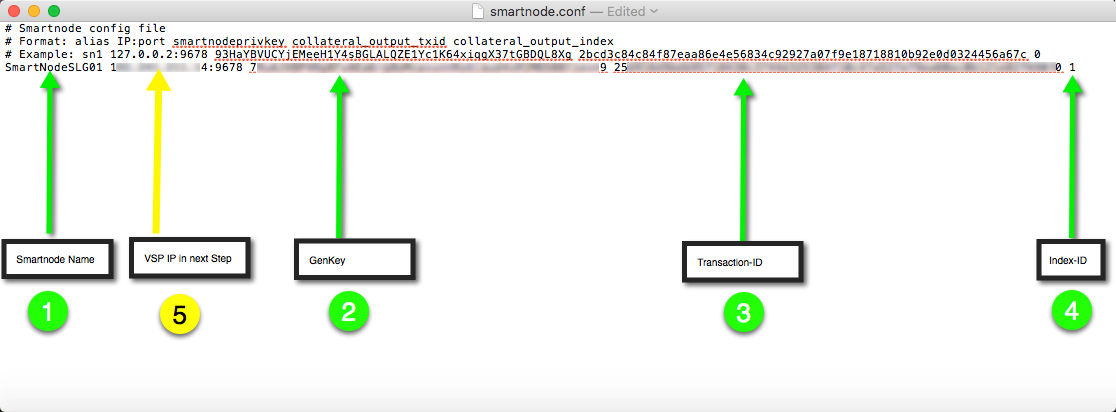
Keep this open while your work through the rest of the steps - On your Smartcash Wallet
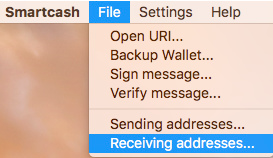
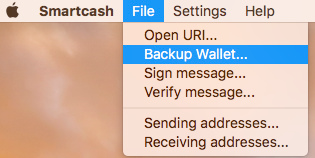
Go to File in the top menu bar and then select "Receiving addresses".
- Important Keep this SmartNode Name Create a new address. Click New. Call it something identifiable i.e. "SmartNode01". Click Ok.

Input this into smartnode.conf file
A second address should now appear in Receiving Addresses Window. Click the button "Copy".
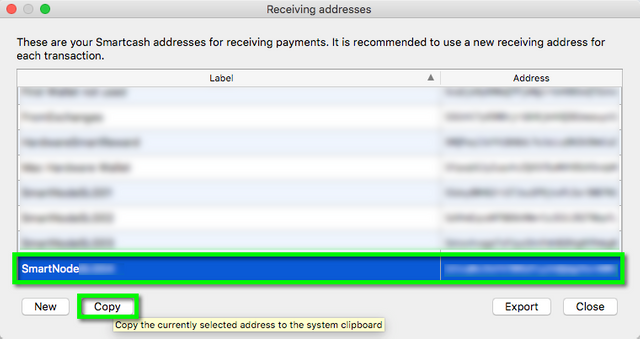
- This is your Receiving address that you will send your 10,000 coins to
Close the Receiving addresses window and lets send 10,000 coins to that address
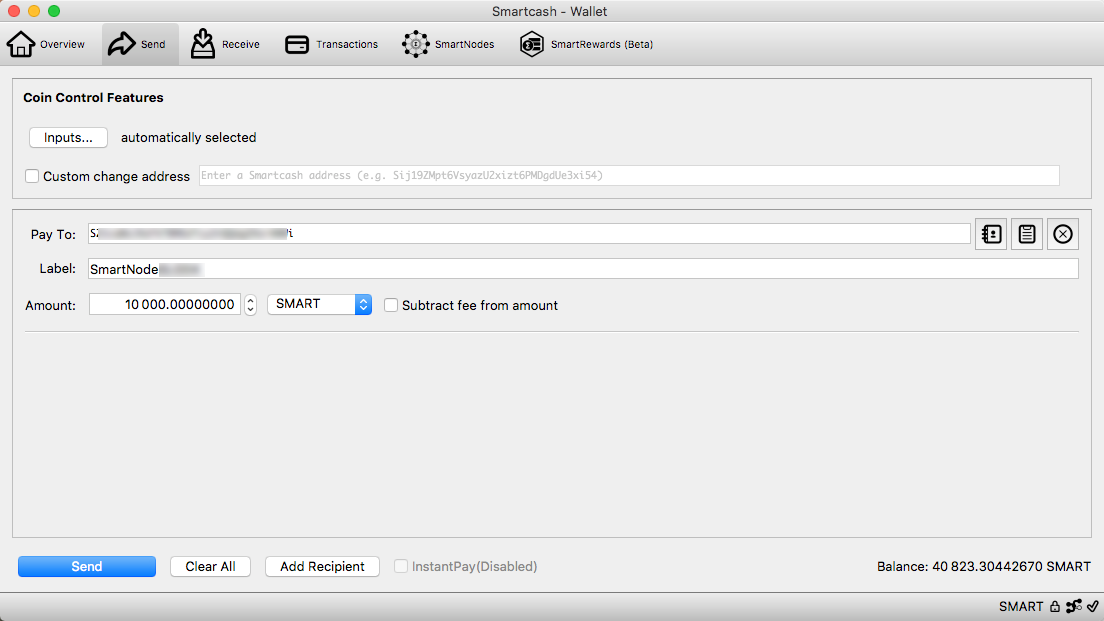
Send exactly 10,000 in one transaction. You can send from within the same wallet if you wish. Sending from an exchange may require an email approval - accept that and wait for an hour or two. Once off an exchange, in network transfers are seconds.
Paste the address into the PayTo Field: You will notice that the Label will automatically populate. Do NOT select subtract fee from amount and put in exactly 10,000 coins and hit Send
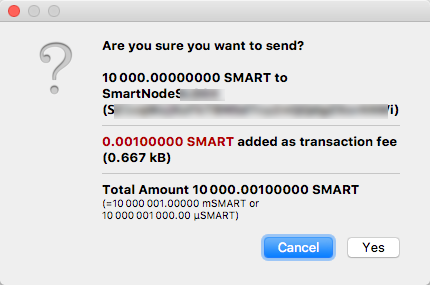
Put in the Password you used to encrypt your wallet

Select Yes to send
- While that's working let's fill out the rest of the smartnode.conf file
In the SmartCash wallet select Help in the top menu bar.
Click "Debug window"

- In the Debug window click the console tab.
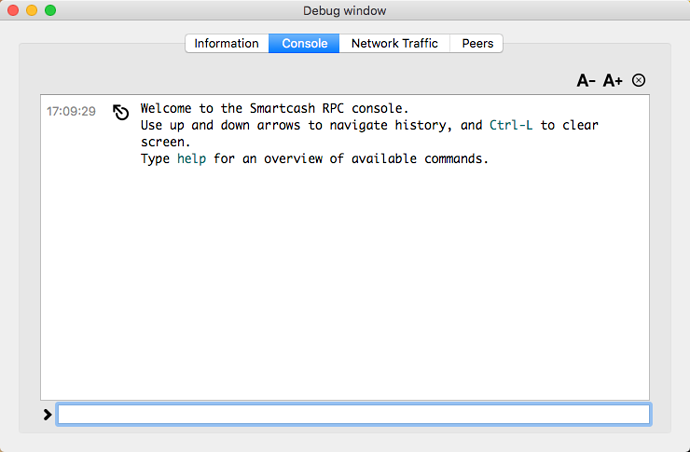
- Let's get the genkey.
At the bottom of the window type into the input box.
smartnode genkey
This will generate a long string of text. Copy and paste this into the smartnode01-addr-genkey file as you will need it later
Copy and paste this into the smartnode.conf file.


At this point you have #1 nodename and #2 genkey in the smartnode.conf file

- VERY IMPORTANT
(!) If you already backed up your wallet you can skip this step (!)
We now have to encrypt the wallet with a secure password.
Go to the main SmartCash window and go to "Settings" in the menu and select Encrypt Wallet

- (!) If you already backed up your wallet you can skip this step (!)
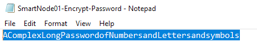
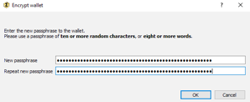
First, create a complex password in a notepad file (Save it as "SmartWallet-Encrypt-Password.txt") and keep this somewhere very safe. Copy and paste this password into the Encrypt wallet Window twice and select OK.
If you lose this password you will lose your SmartCash and no one will be able to get it back. Keep this file really safe!
- (!) If you already backed up your wallet you can skip this step (!)
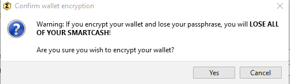
Read and confirm that you understand the message that if you lose this password there is no way of getting your SmartCash back!
If you agree click "Yes" to continue.
- (!) If you already backed up your wallet you can skip this step (!)
Please read this window carefully and backup your password file.
Once the "SmartWallet-Encrypt-Password.txt" file is backed up (printed it out on paper and I saved it on usb pendrive) remove this file from the machine itself.
Select "OK" and the SmartCash Wallet will close.

- Start the Smartcash wallet again.
Can't hurt to backup again :-).
Back up the wallet file by going to the File Menu and Backup Wallet.
Save this file to two USB backups and label them. The filename defaults to name as wallet.dat. Do not use these USB drives for any other use as these store your SmartCash funds.
- Now let's ket the transaction id and index id
In the Mac Wallet Debug Console (Help in the Menu and Debug Console) type:
smartnode outputs
Copy and paste the key and index(0,1,2...) in the file in smartnode.conf file

- At this point you should have the following:
SmartNode Name:
SmartNode Genkey:
SmartNode Transaction ID:
SmartNode Index ID:
At this point you can update your smartnode.conf will all the variable except your VSP IP which you will get in the next steps
Please continue with Section 2
Section 2: Using the built-in SSH client in MAC OSX
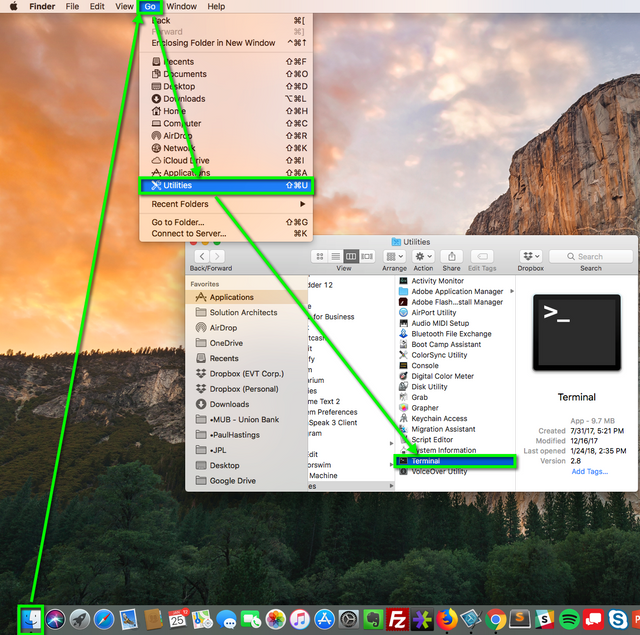
Mac OS X includes a command-line SSH client as part of the operating system. To use it, go to Finder, and select Go-> Utilities from the top menu. Then look for Terminal. Terminal can be used to get a local terminal window, and also supports SSH connections to remote servers.
RUNNING SSH FROM THE TERMINAL COMMAND LINE
Once you have the terminal window open, you have two alternatives. The first approach is to type ssh hostname or ssh user@hostname into the terminal window. This is more familiar for Linux and Unix users who are used to using a command line.
RUNNING SSH WITH A GRAPHICAL USER INTERFACE
The second option is to select New Remote Connection... from the Shell menu of Terminal. This opens a graphical dialog asking for the host to connect to and the user name. This also allows saving connections. This is recommended for users who are not accustomed to using a command line.
We will show you examples how to use this in the next section.
Section 3: Digital Ocean sign up and Droplet Creation
Digital Ocean referral link https://m.do.co/c/4f0c81328877
If you click the referral you get a $10 credit

Next are the steps to create a Virtual Server on Digital Ocean. For a small amount each month you can have an Ubuntu machine running in the cloud 24 hours a day, 7 days a week to run your SmartCash SmartNode.
- Open Google Chrome and go to
https://www.digitalocean.com/
- Click on the blue "Sign In" button in the top right
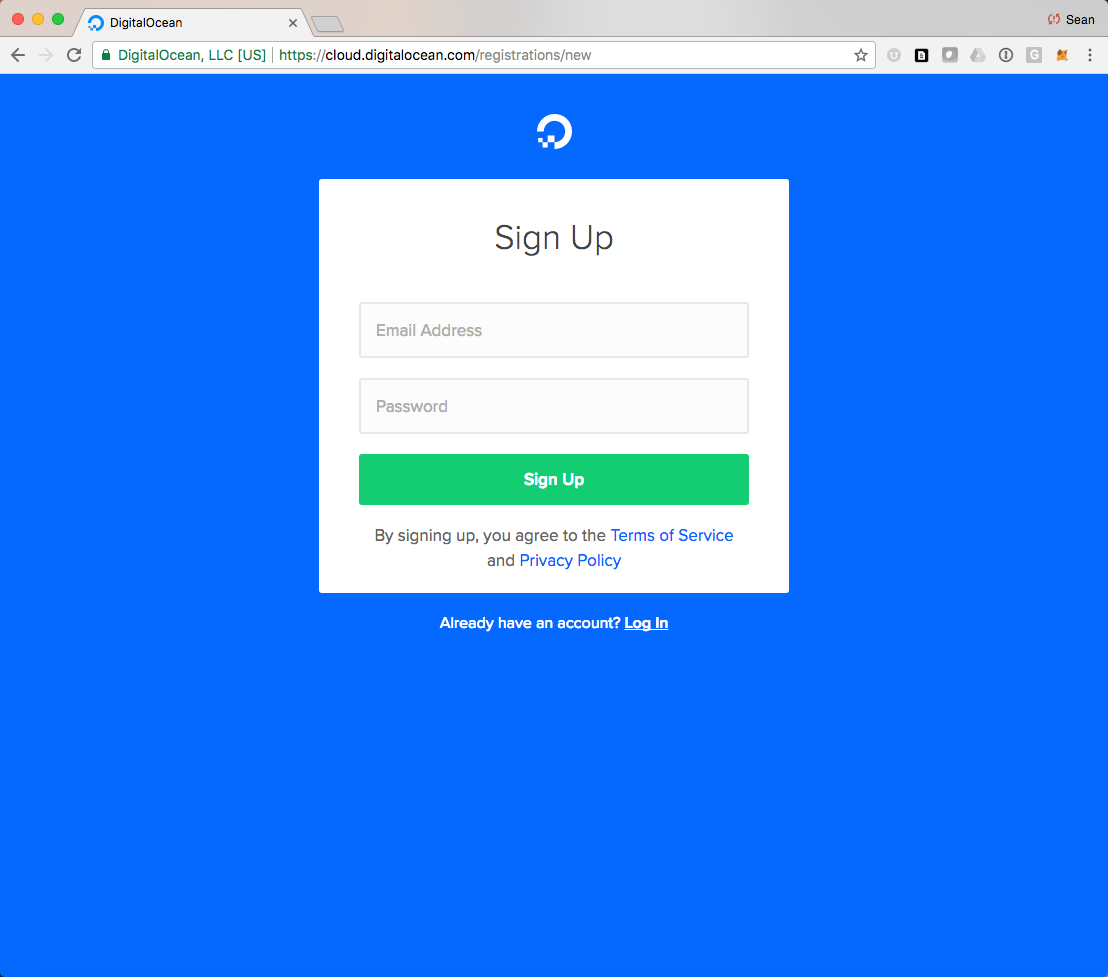
- Enter your email and create a password.
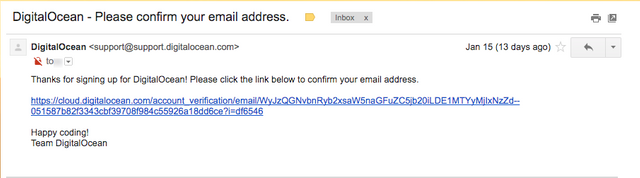
- Go to your email and check for a digital ocean email. Confirm the email.
- Enter in Payment Details so that you can create a Droplet (VPS)

- Once this is all done, log in again to Digital Ocean and go to "Create Droplet"
- Select an Ubuntu Distribution use Ubuntu Version 16.04 LTS. Select a monthly plan.
Our suggestion is to setup with 1GB or more of RAM. Although, 512MB of RAM will work for a few days, it will often cause the wallet to lockup when it runs out of memory. As we add features, our wallets will use more resources too.

- You Don NOT need to Add block storage so leave this empty.
Choose a Datacenter Region. If you have multiple nodes use different locations.
DO NOT select additional options
DO NOT add SSH keys
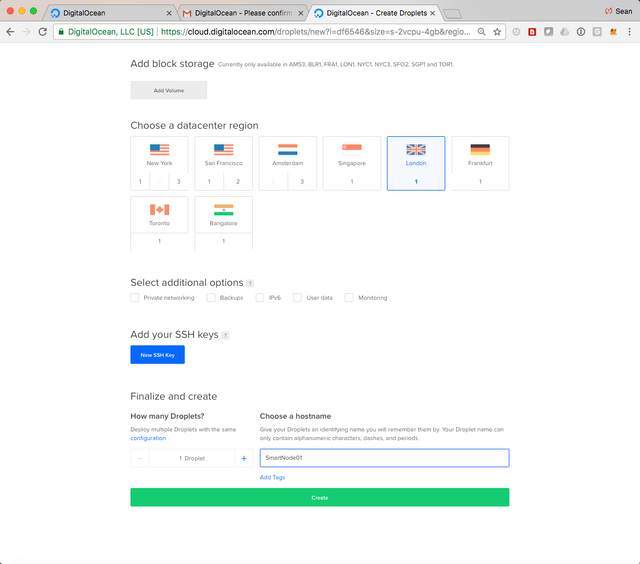
- Give your VPS a name and select create.
- Check your email account for an email from Digital Ocean which will contain the root password.
- Back on the Digital Ocean page in your Internet Browser.
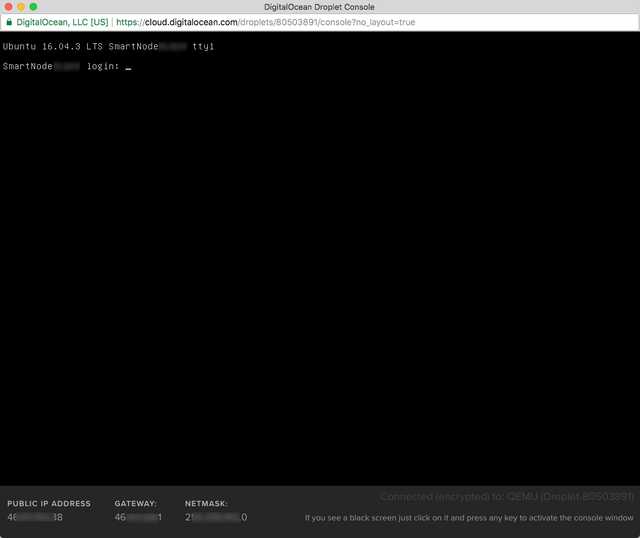
Once the machine is created you will be presented with this screen. Click on more link and select Access console.
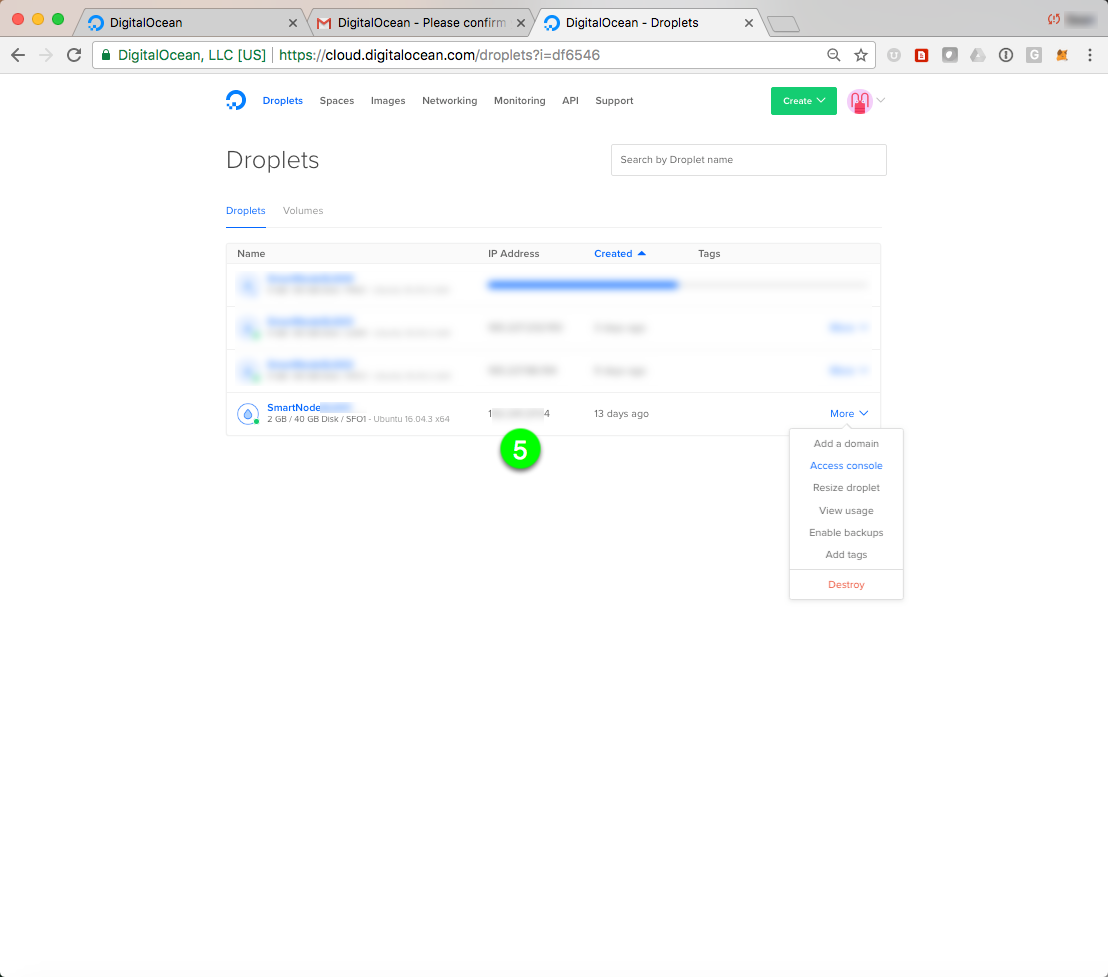
- On the console screen enter the root credentials with the password from the email (step 10) to log in.
Please note copy and paste may not work. So please type carefully.
- You will be asked to change your password so please follow the instructions and make note of your new password and keep it safe.
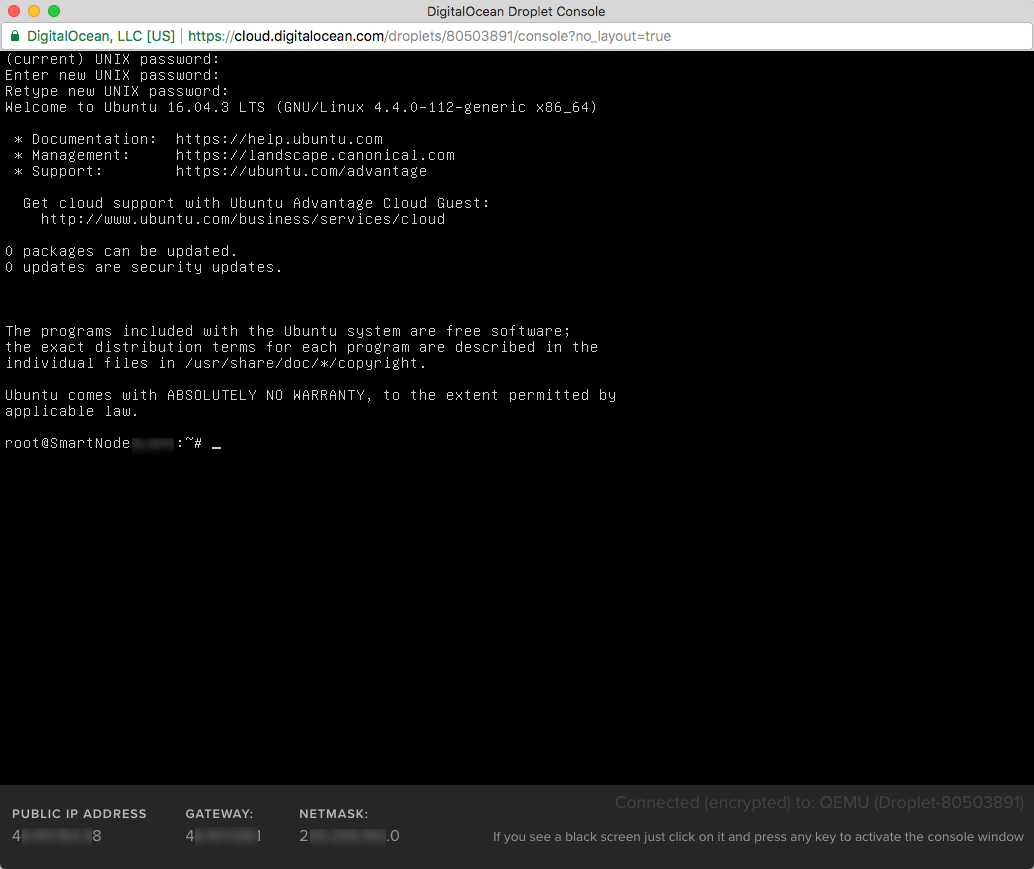
Congratulations. You have successfully created and logged into the VPS in Digital Ocean
Section 4: Install your smartnode software on to your VSP server
- In the connection to the virtual machine let us get the latest updates, please type in
apt-get update
And hit enter.

- Now type
apt-get upgrade
And hit enter it will ask you if you want to upgrade just type yes.

- Restart the machine with
reboot
And log in again.

- While that is rebooting update your VSP-IP in your smartnode.conf
- Let's open up a terminal session on your local Mac
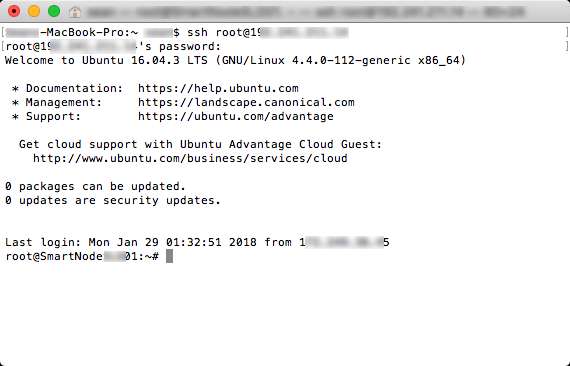
- Now let's log into our VSP with ssh as root
ssh root@VSP-IP
You might get a prompt like this: The authenticity of host '15.89.14.17 (15.89.14.17)' can't be established. ECDSA key fingerprint is SHA256:hUQMTzGc7+ui/JhVt7hzBp/Iah2nUqkCCocIFIXGEoE. Are you sure you want to continue connecting (yes/no)? If so type yes - Now download the install script
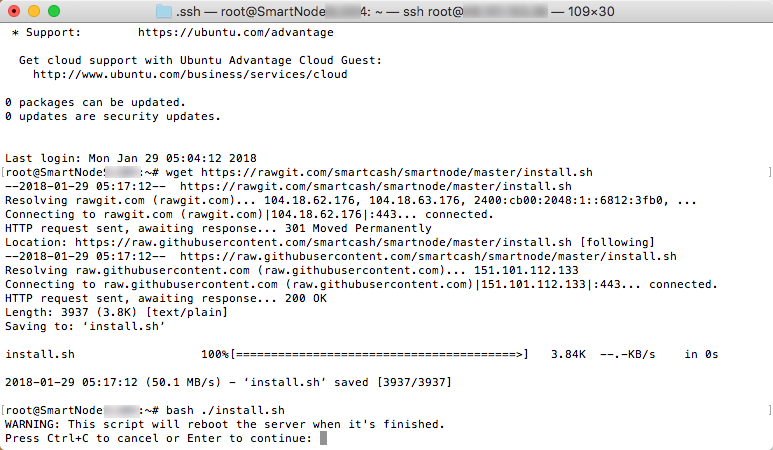
wget https://rawgit.com/smartcash/smartnode/master/install.sh
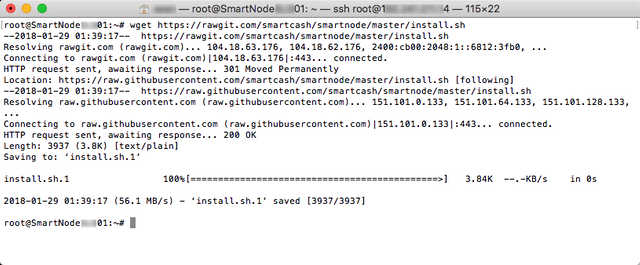
- Now install the smartnode software
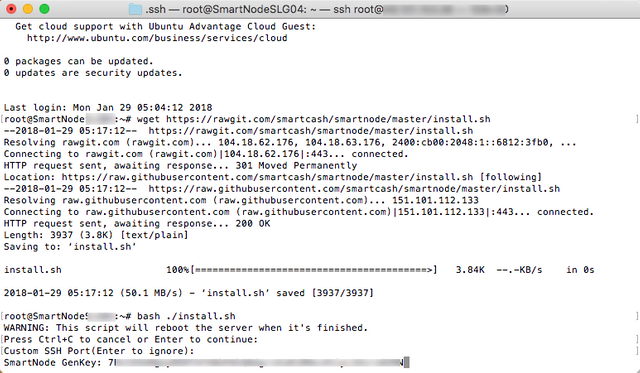
bash ./install.sh
Hit Enter to Continue
Hit Enter to Skip changing ssh port
Then input the GenKey (See Video for example) and hit enter

- Wait a minute or two and ssh back into the VSP
ssh root@VSP-IP

- Check the status of the smartnode
Now that smartcashd is running please leave it to sync the complete blockchain this can take about an hour.
smartcash-cli getinfo
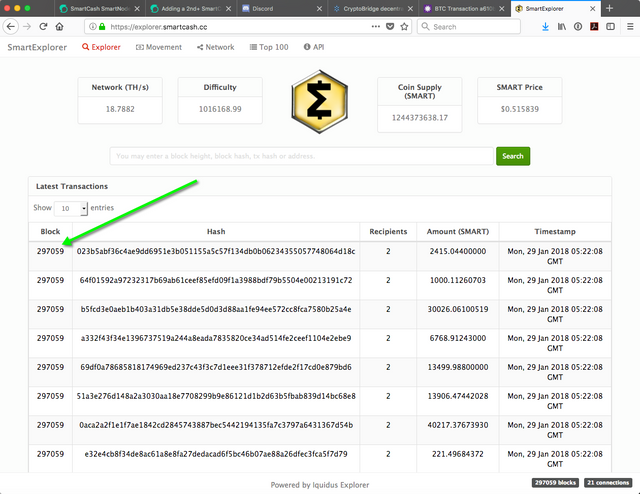
Type the above command every couple of minutes and check that the "block" field is increasing. When these numbers get within 1 block of the latest block explorer number you should then be fully synced.
Go to your Chrome Browser and get the latest block number from
https://explorer.smartcash.cc

- Once your VPS has completely synced run the command.
smartcash-cli smartnode status
This will return a smartnode status.
"Smartnode is capable but not activated"
or
"Smartnode is not capable"
That doesn't matter, just continue to the next step
Once you run the start command from your LOCAL wallet (Section 9) and wait a few minutes, it will say
"Smartnode successfully started".

Section 5: Start the SmartCash SmartNode
- Save your smartnode.conf file on your Mac
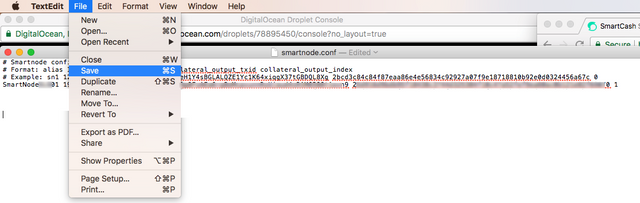
Save the file.
Note: for those doing more than one SmartNode
You would follow the same steps up to this point but add a new row into this file - Start the SmartCash wallet (If it is already started please close the application and restart the wallet so it can read the changes made).
Wait for the wallet to fully sync: Indicated by the tick in the bottom right corner
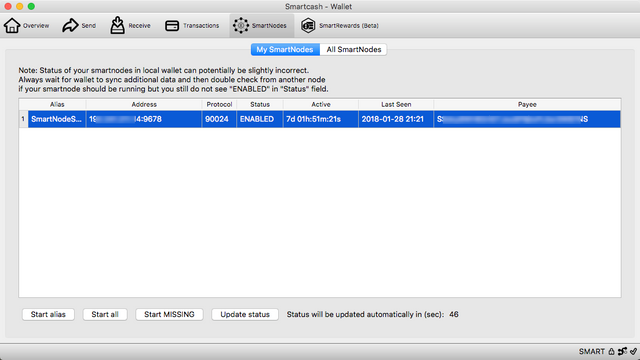
- Click on the "SmartNodes" Tab.
Wait a few minutes for the screen to load it sometimes takes a little bit - Click on the "My SmartNodes" Tab.
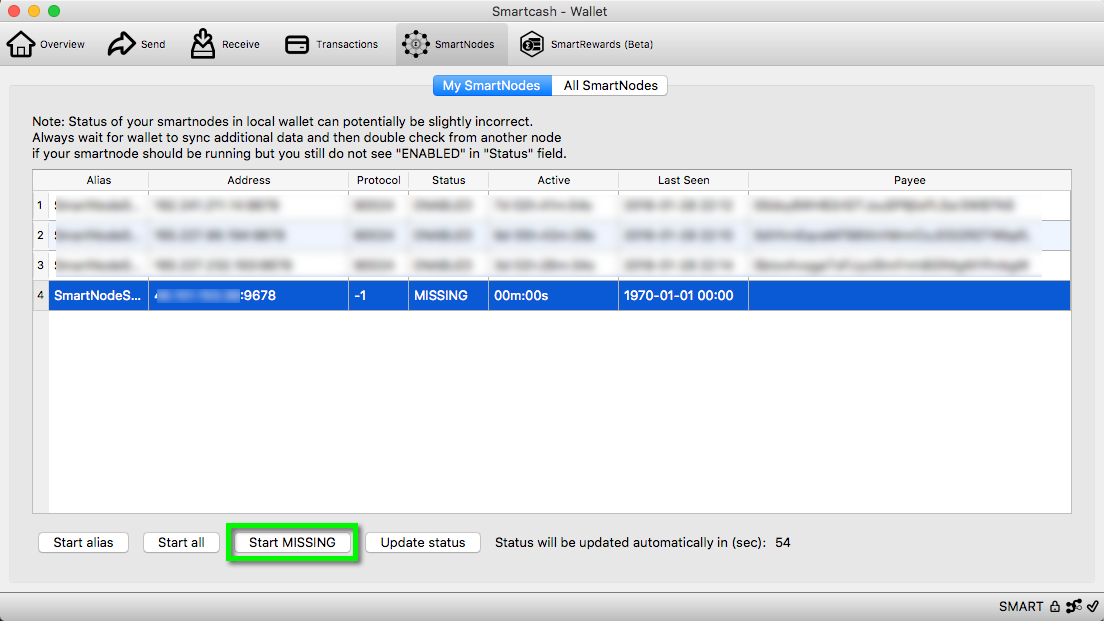
- Not to finally start your SmartNode.
Click on "Start MISSING" button. (Clicking on "Start all" will reset any other SmartNode already started and push their payment date back. Start MISSING only starts nodes that need to be started.)
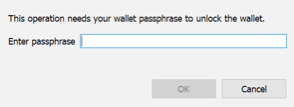
You will be asked to type in your passphrase.

- Your SmartNode will change from a "missing" status to a "pre-Enabled" to finally "Enabled" this takes about 10 minutes.
Congratulations you are now running your first SmartCash Smartnode! The local Mac wallet does not need to be left on 24/7. The Mac wallet can be used to see the rewards and SmartNode uptime.
Congratulations your SmartNode is now configured.
Section 6: Secure your Smartnode
This section will guide you through disabling ssh access for root and creating a smartadmin user that will have access via ssh with the keys controlled on your MAC.
Section 7: Monitoring your Smartnode going forward
This section will guide you through how to monitor your Smartnode and how to setup alerts when your Node becomes over burdened
https://forum.smartcash.cc/t/how-to-monitor-your-smartcash-smartnode-v2-0-vps-on-digital-ocean/3039
@controllinghand can you please do this style of guide for the new wallet update on MAC with a node on VULTR????????? PLEASE this kind of stuff is a walk in the park for you guys but to me it is like learning to speak russian if you were deaf....
@boonrock
this guide should work fine for the new wallet and for vultr. Ping me on discord https://discord.gg/BDUh8jr
and I can help you through a configuration if you like.
Great info! I don't use Mac but it's so nice to see such a detailed guide for those that do! I feel bad when people have Mac node/wallet questions on Discord and I can't help... Now I can link them here!
As long as you take care of my Window friends I'll handle the MAC questions. find me on discord @controllinghand
@smartbot tip @controllinghand 10
Σ$$$ Tipped @controllinghand
Σ10 SMART! Comment@smartbot helpto claim. Currently the price of SmartCash in the market is$0.605 USDperSMART. Current value of the tip is$6.05 USD. To find out more about SmartCash, please visit https://smartcash.cc.I love the SmartCash tip bot! Thanks my fellow hive member
I'm not sure what you mean?
Thank you
I'm not sure what you mean?
Thanks for the guide on setting up master nodes. Can't wait to accumulate enough to set up my own.
cryptobridge has the lowest cost for smartcash. Make sure to buy on that exchange. https://wallet.crypto-bridge.org/dashboard
When I close my eyes I see these screens I surprise myself by actually knowing the next linux commands. Oh my God I am becoming a geek!!!
It's just a matter of time until you will fall in love with Unix/Linux.
Awesome , Mac users really needed this 😉 because they are like little children with pretend computers haha 😂
I couldn't agree more
Bookmarked: thanks for your effort!
Here's to your smartnode soon. Let me know if you need anything.