How to sculpt a ruin miniature base from scratch!
Today I want to show you how I sculpted this little base. I will try to explain it step by step so everyone can easily give it a try if they want to. I will do a second tutorial on how to paint one of these after we've sculpted it. This will be a part of my next big project which I will give updates on regularly and most likely do tutorials on everything I do or at least a step by step posts. It will be some Evil Dwarfs, models from different manufacturers - starting next week with some models from Scibor (Amazing studio for miniatures.. check it out! They are master pieces!).

The materials you will need
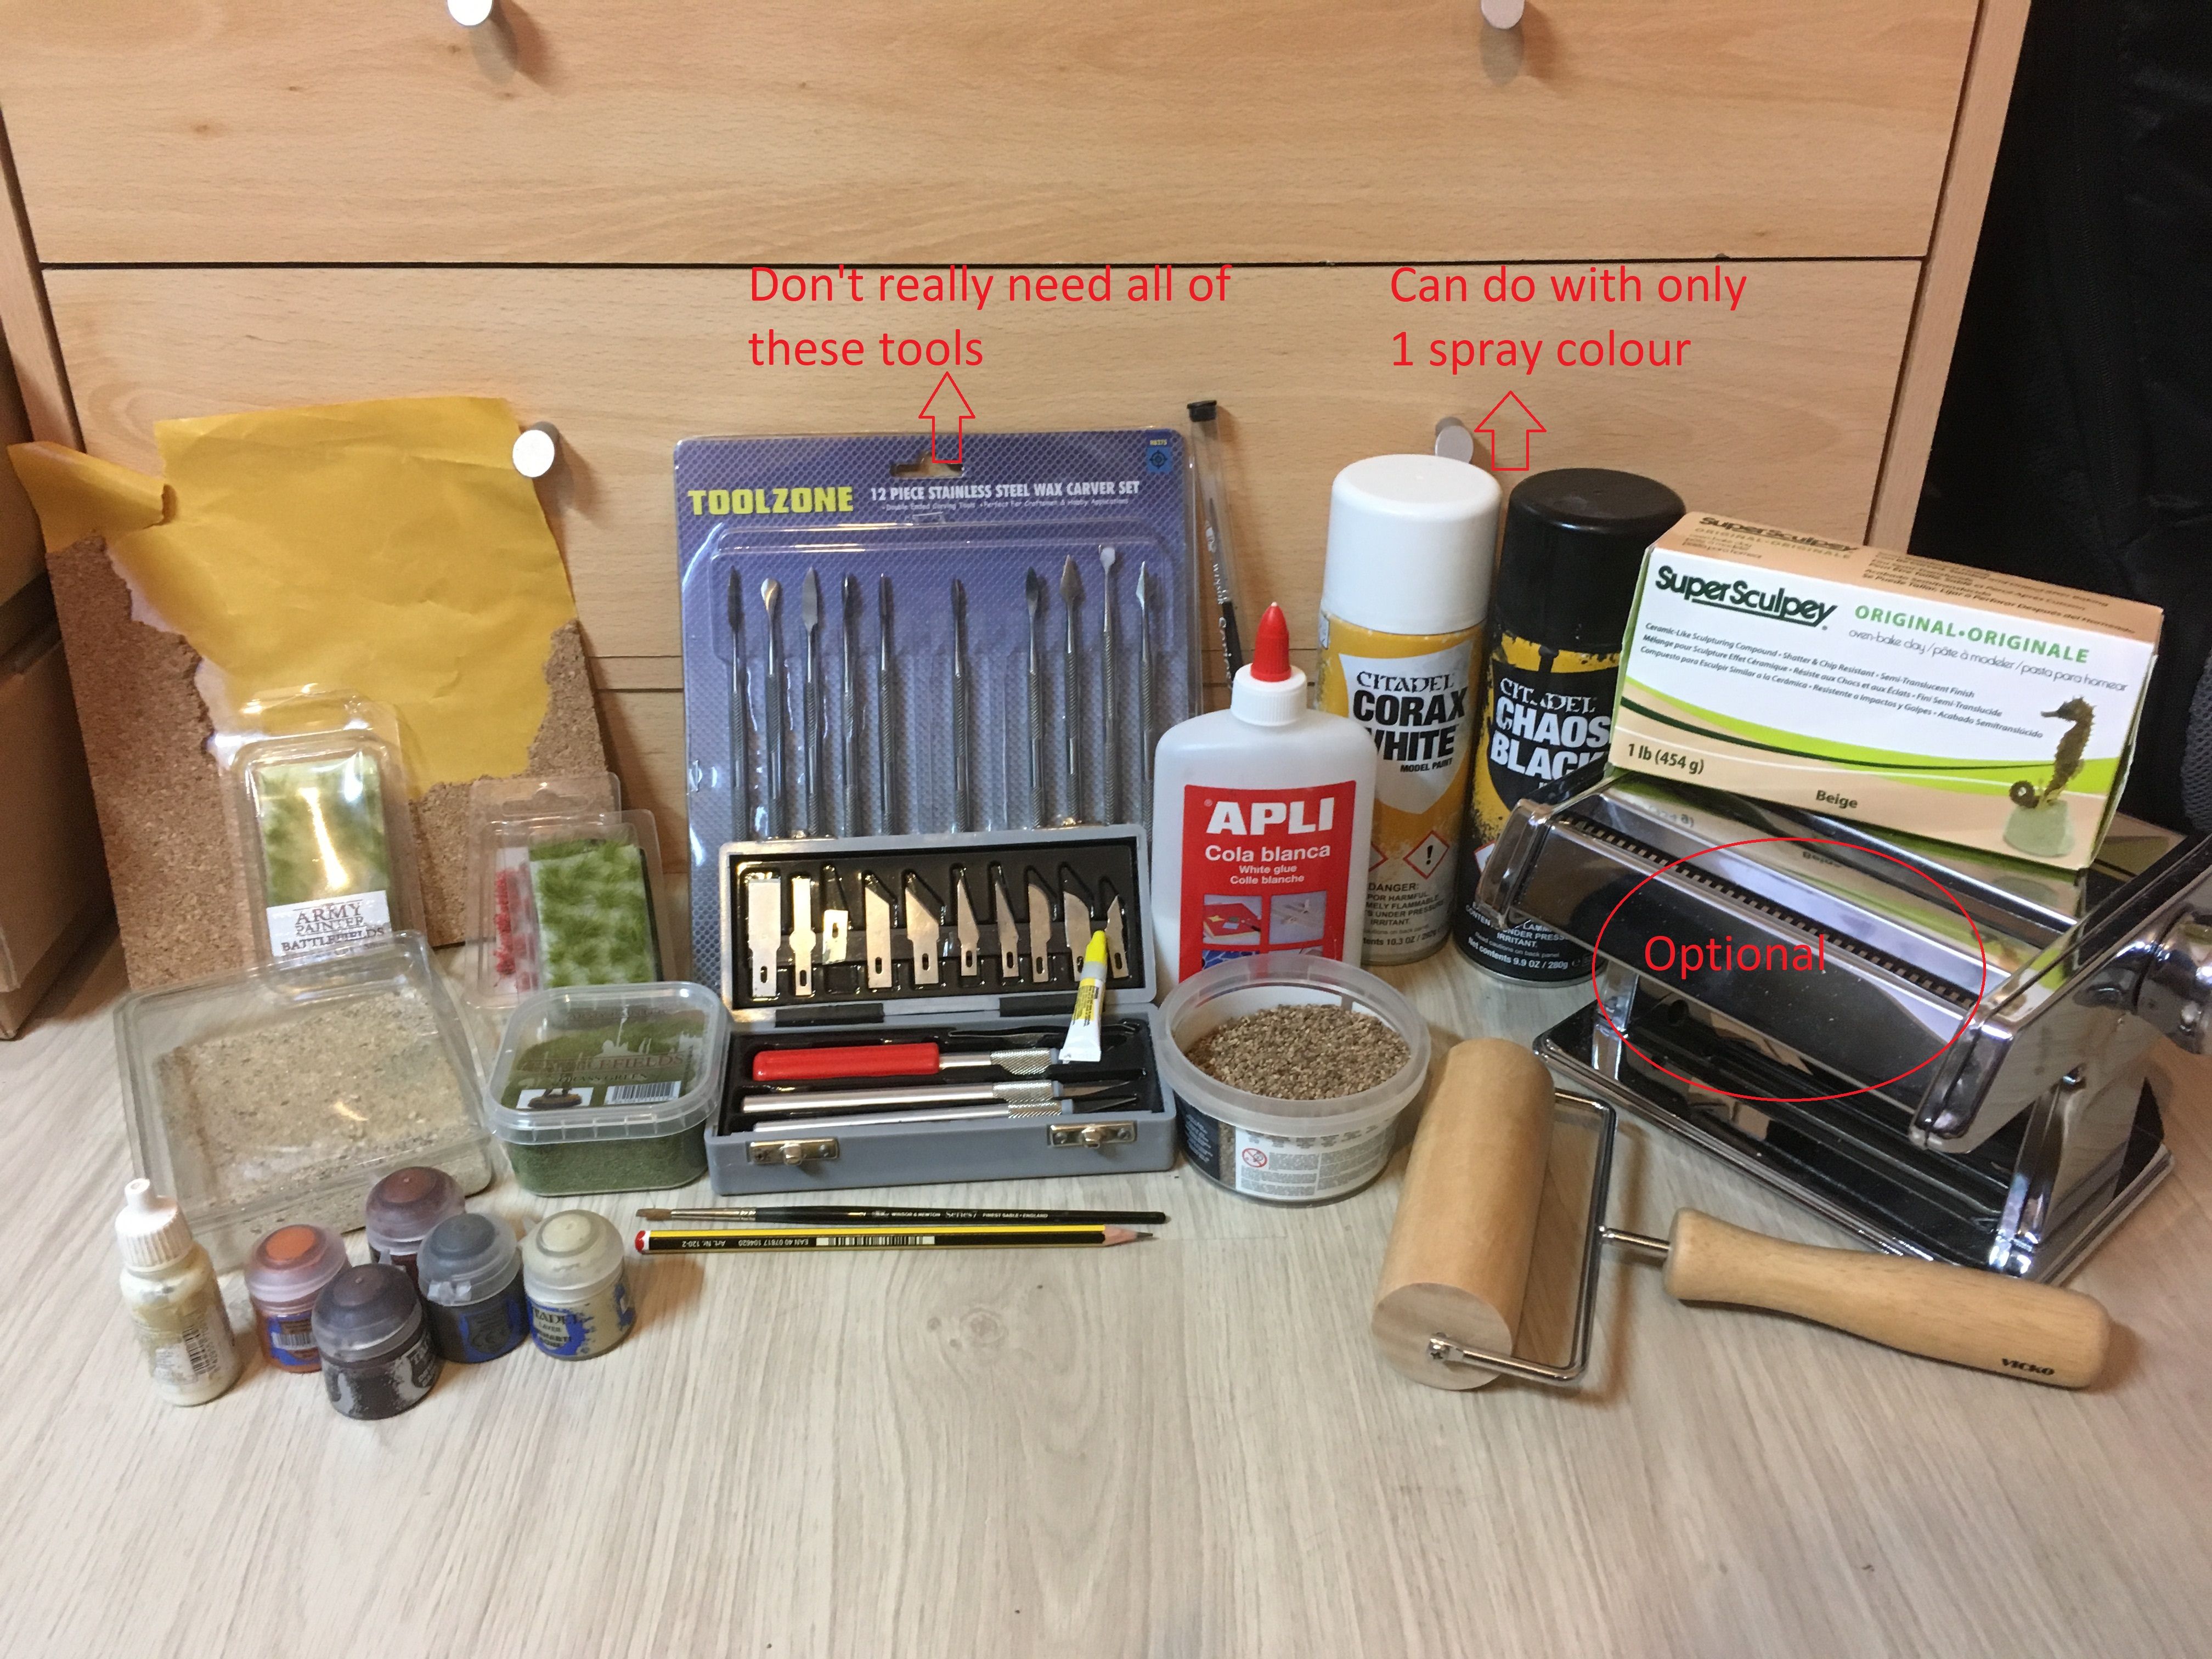
I know it looks like a lot but most of the things are reusable and easy to find. I haven't changed at all since I was a kid in that matter.. always bringing home dirt or rocks I found on the street or in the garden (Not only I paint and play with toys but now this.. I really am 25 though just slightly childish :)). Laughter on the side though it is so much cheaper and often a lot more natural using.. well nature on you bases. Here is a list of what I used to make this one in particular
- Super Sculpey (Oven-bake clay) - there are loads of brands you can chose from I just picked one from amazon
- Cork sheets - These come in many sizes and thicknesses. I use a fairly thin one since my bases are only 20mm
- PVE and Super glue - Super glue is for gluing the cork and the clay where though the PVE we'll use to add on all of the sand/gravel/grass etc onto the base afterwards.
- Sand - This is fairly easy.. I did take some from my hometowns beach (And yes.. I did bring it to the UK..) but you can buy some from a gardening store or just get some from outside as I did.. if you don't want to go through all this bother they are selling it in the hobby stores (fairly expensive though... £6-7 for like 200g of sand..)
- Gravel - Same as the sand you can find it outside.. I did have some from a hobby store though that will last me forever so I am using an old Games Workshop gravel.
- Some synthetic grass - loads of hobby manufacturers for that. I use Army painters Grass Green ( like theirs the most )
- Tufts (optional but gives a pretty good realism to the base) - you can find these the same place you would buy the synthetic grass from
- Hobby/X-acto knife and carving tools - Now I have a fairly large set of both of these and use them for many different things. All you really need is one hobby knife and something to easily carve the clay (sharp metal tool) and some small pliers.
- Pasta maker (optional but helps quite a lot) - We use this to thin down the clay before we bake it.
- Roller - This is the option that can be used instead of a pasta maker (takes quite a bit more effort and the clay ends up being a bit more thick but that is the plus side to it since the pasta maker makes the shapes very thin)
- Pencil and an old brush that has seen better days - to spread the PVE glue with.
- Acrylic spray paint - to prepare the miniature for painting
Preparing the Sculpey and baking it
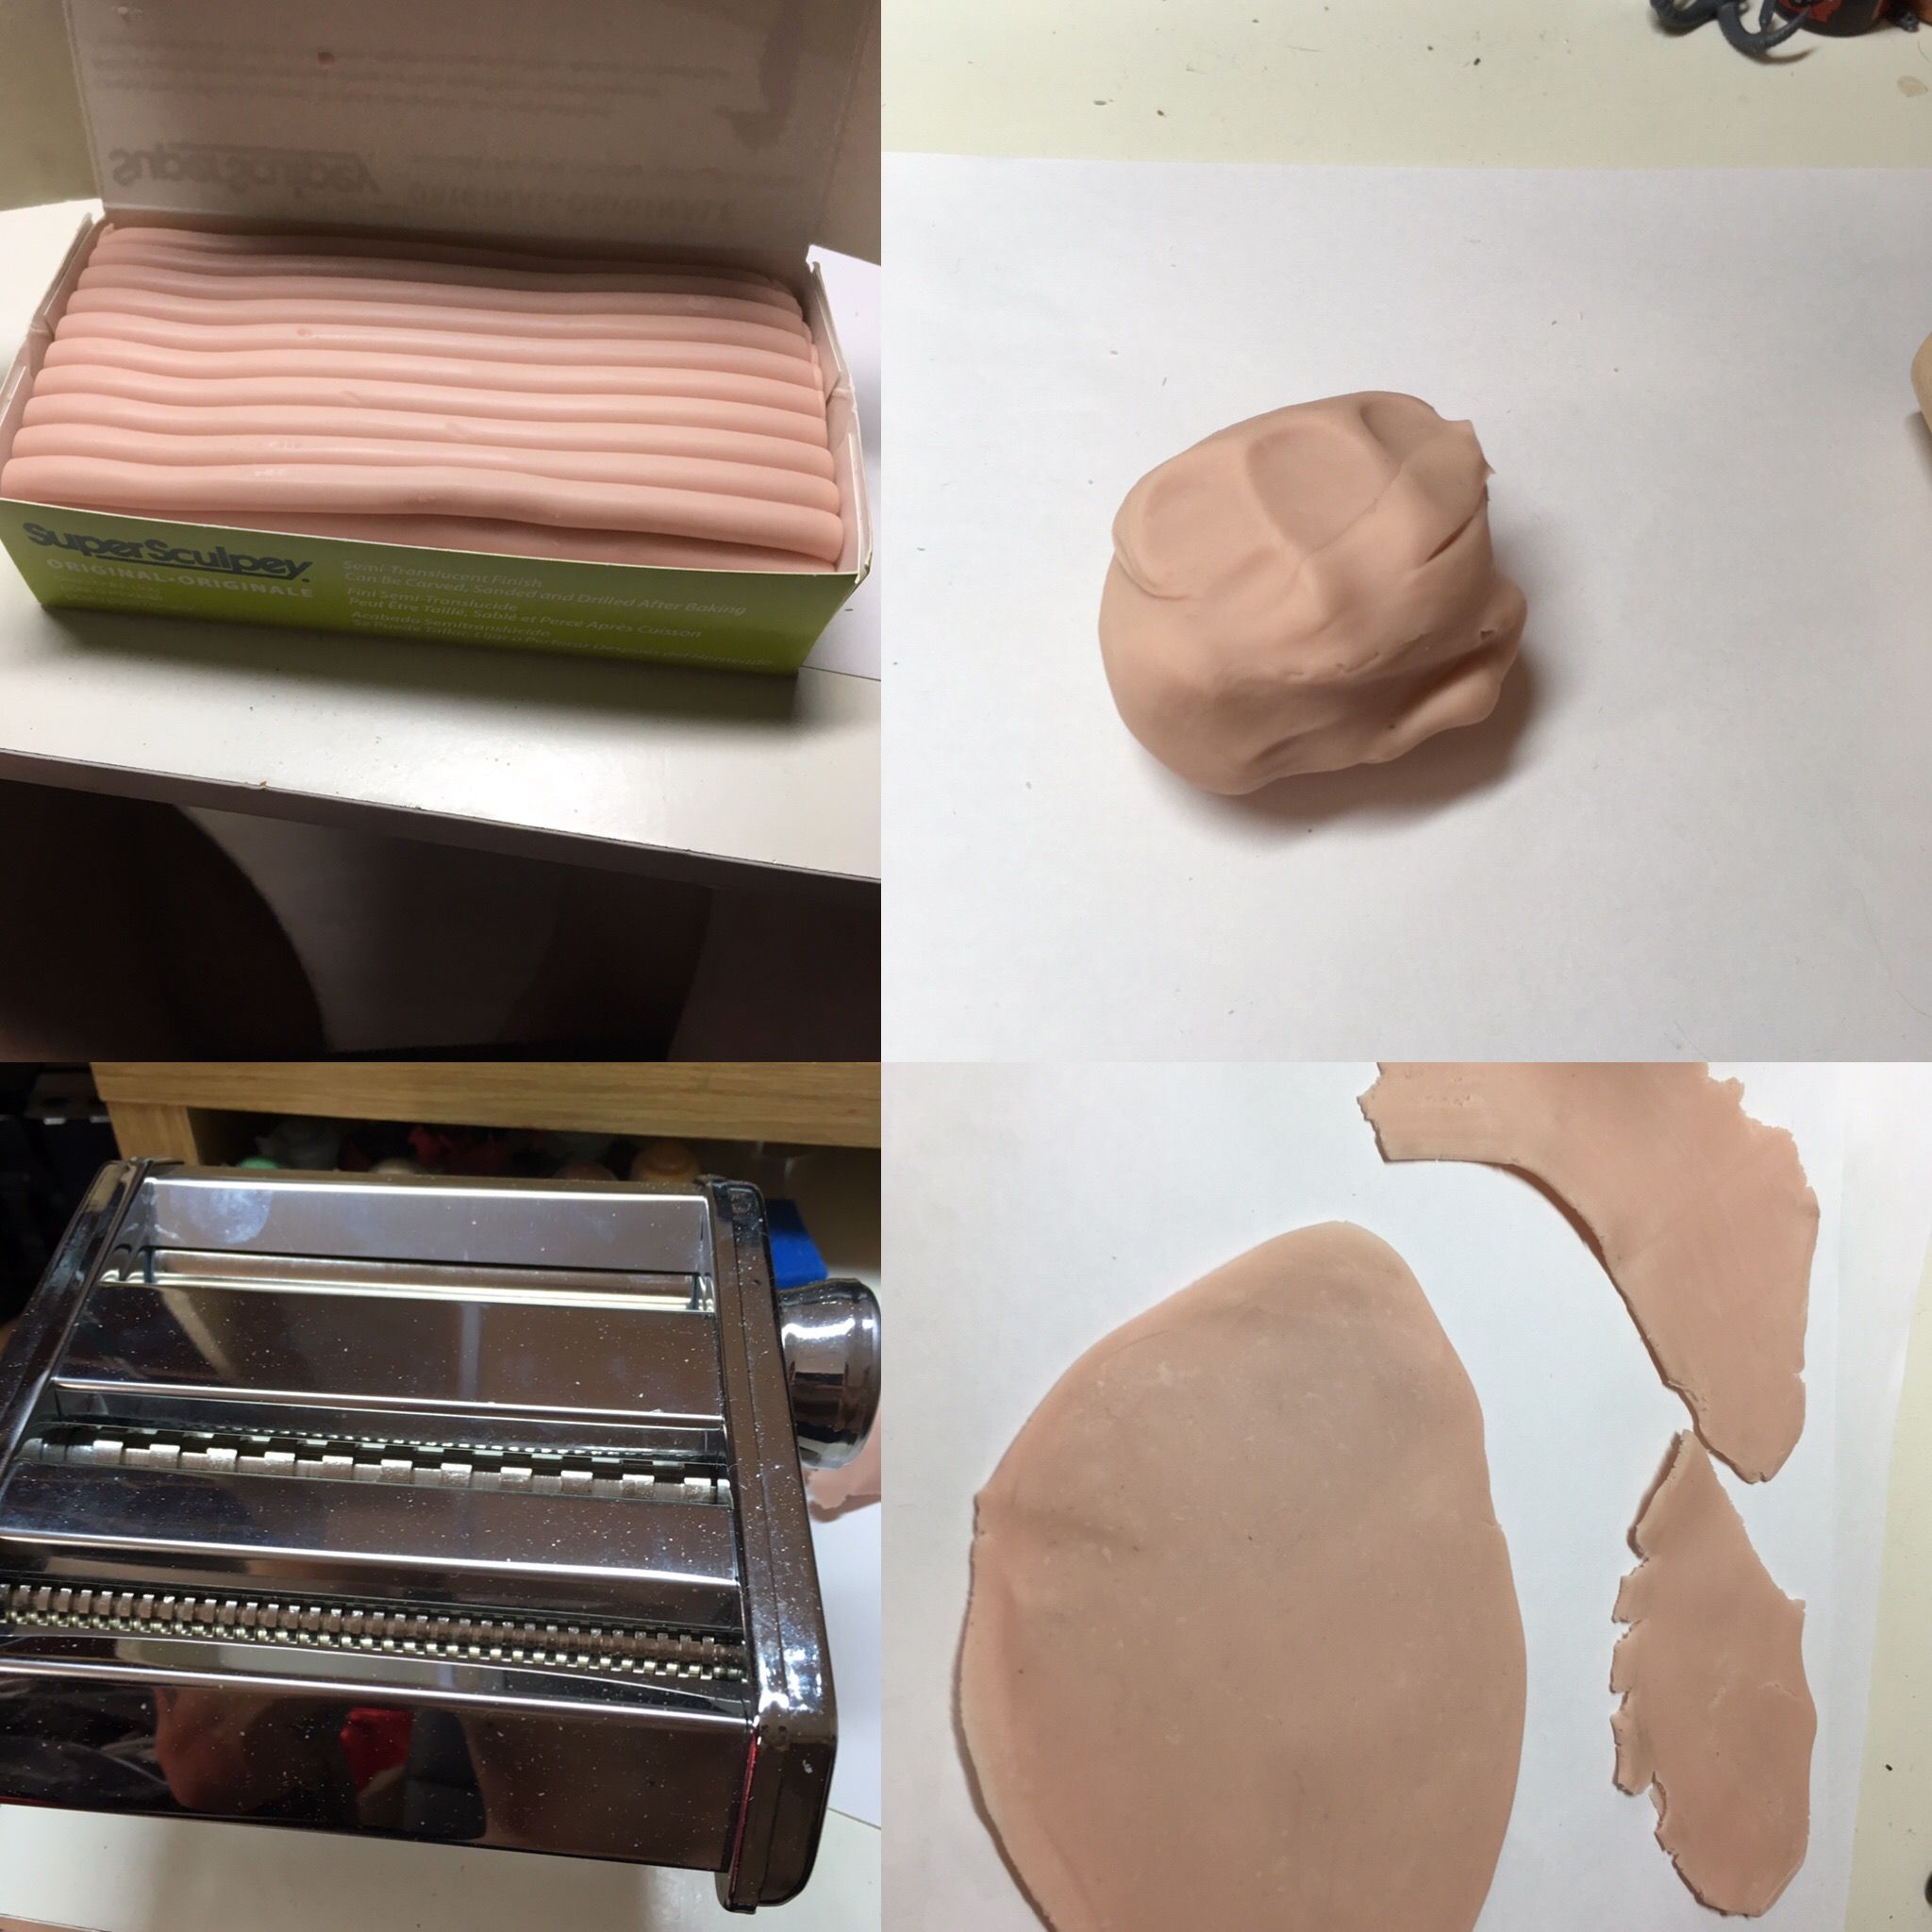
The sculpey comes in a package as one big chunk of clay so you need to take a part of it (as much as you think you would need) and close the rest in the box, put it in a bag and leave it on the side for it's next use. Work the part you took out a little bit so it can soften up a bit and mix up and then start thinning it down so it can fit into the pasta maker or so you can spread it easier with the roller. On the pictures I did 2 of the smaller bits with the pasta maker and the bigger blob with the roller. After you are done with these prepare a tray (or you can use ceramic tiles if you don't have an old tray and put the sculpey on top of them). Check the label of the Sculpey. Every manufacturer is different and it usually says what temperature you need to set on the oven and for how much time you need to bake the clay. Time will depend on the thickness of the clay as well so since we are baking fairly thin layers of it we will keep it on the lower end of the time frame it shows on the packing. The one I used needed 15-30 min on 135 degrees C. In 20 min it was done. You can use a grill as well for this if you don't want to occupy the cooking oven but NEVER use a microwave for it!
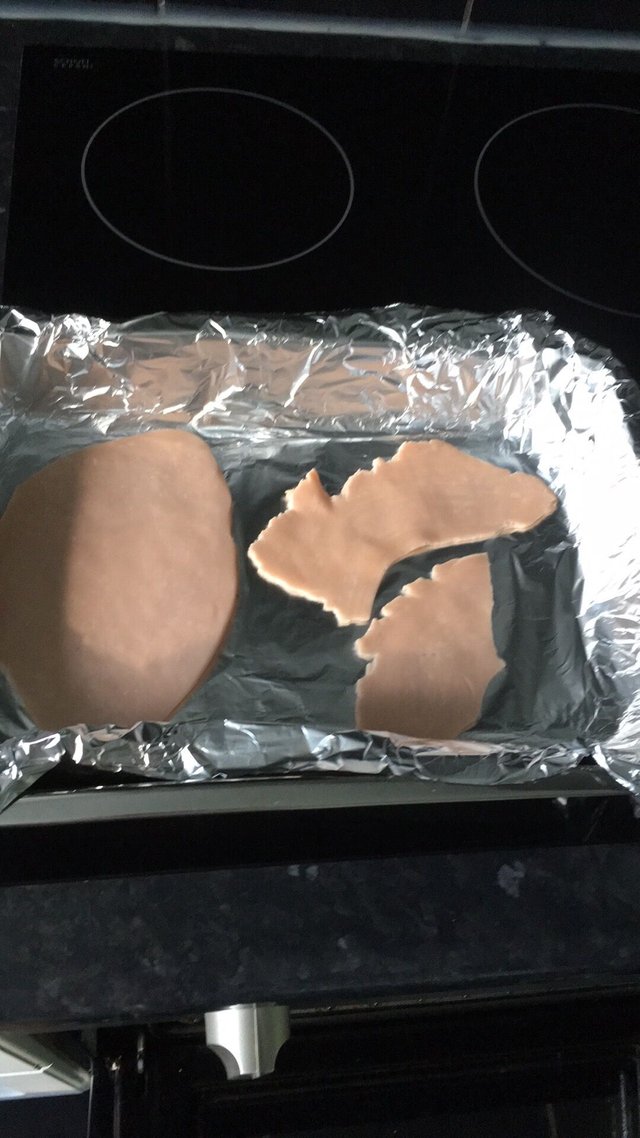
When you take it out of the oven the material will still be soft. Don't worry this is normal! The clay needs to fully cool off so it can cure and harden. Just leave it for an hour or two and it will be ready for work.

Building the body of the base
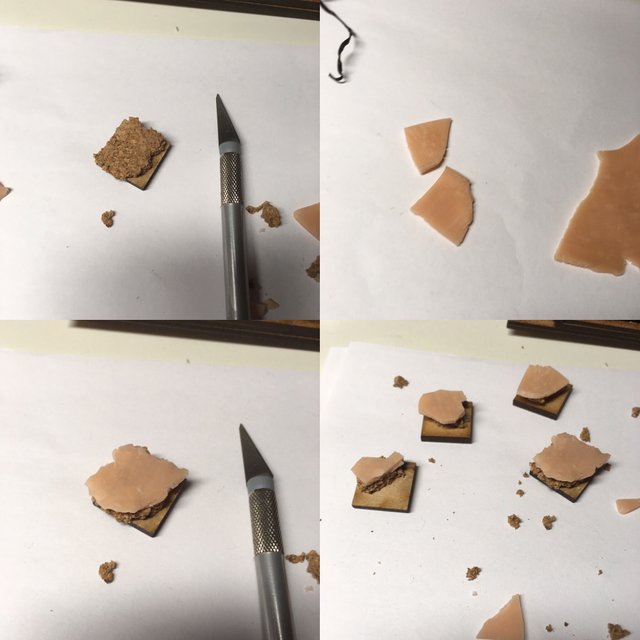
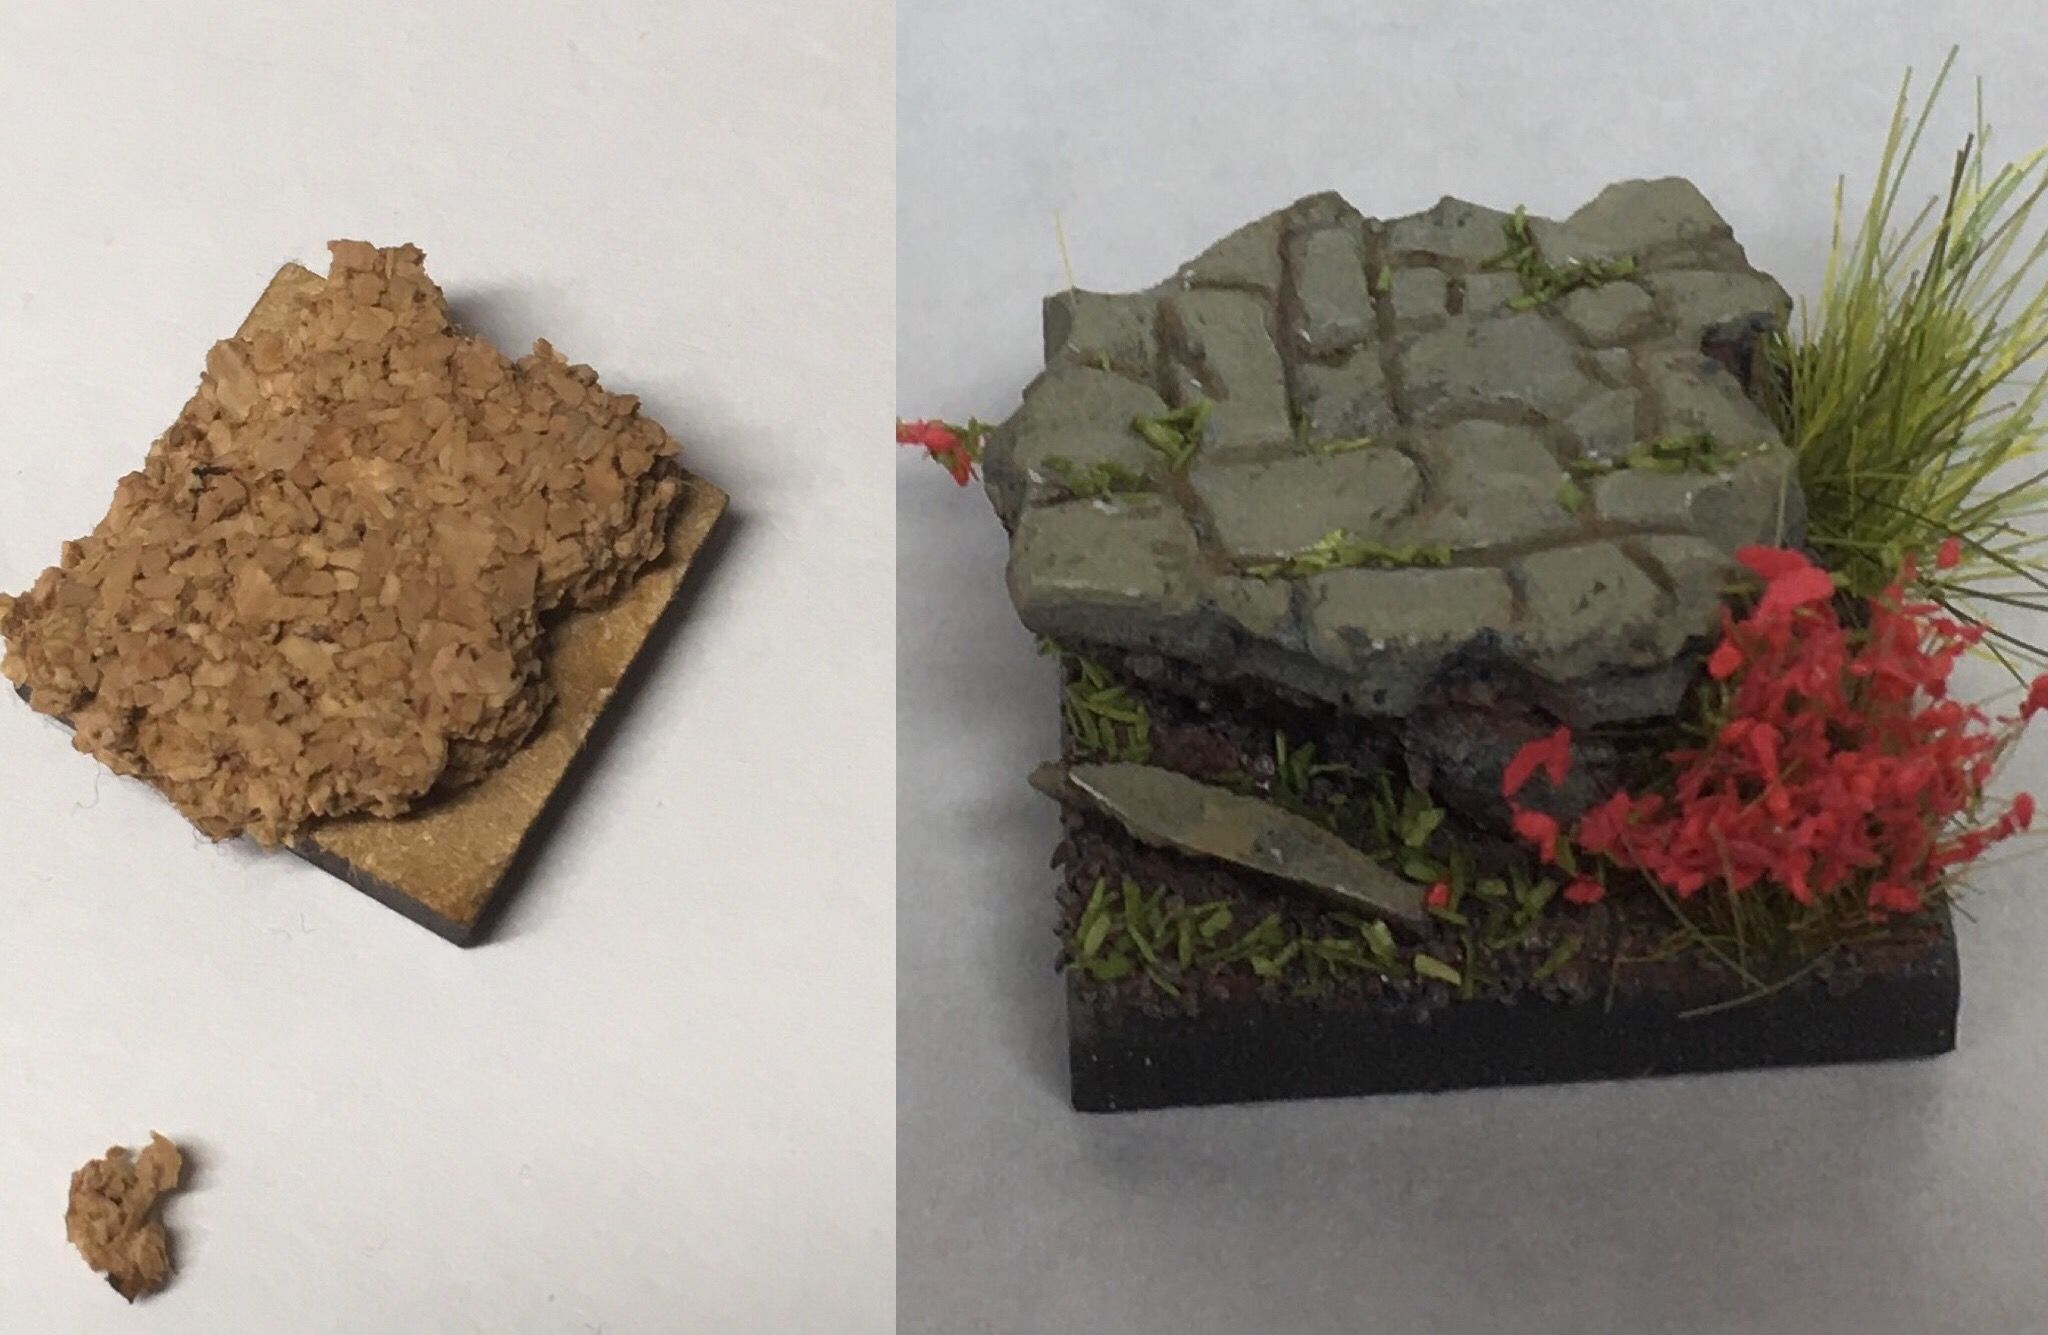
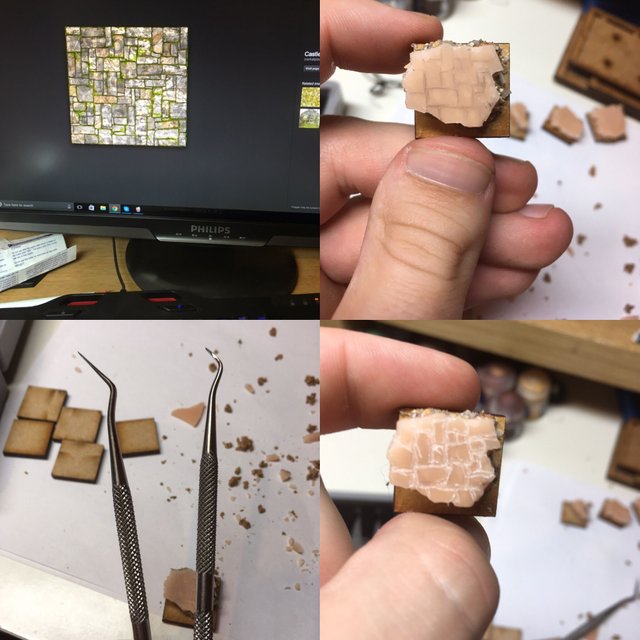
This is done rather fast and easy since the patterns look better when they are random. Take a bit of cork in a random shape that fits the base and glue it on it. If it excesses it just break it a little make it rougher on the sides with one of the tools or just something sharper. Once you are satisfied with the cork on the base we can put the sculpey on top. Just layer the block onto the cork and break it roughly around it so it can come off about the same size as the cork slightly overlapping it. Once you like the size and shape we grab the small pliers and start breaking little pieces around the edges just to make it more 'beat up' and random. Don't glue it before that since the clay breaks easily and randomly. Now that this is set glue the Scupley tile onto the cork. I usually use the hobby knife to roughen up the edges even more. Depends on what you want to do with it, here I wanted to build old ruins base so it made sense to be broken down. If you want to make clear marble bases for example this part could be done very slightly or not at all.
Creating the pattern
Once we are done with all of this it is time to choose a pattern for the carving. I chose this tile pattern but you can do whatever you like. Internet is a friend here and you can just pick a reference from there as you can see I have it opened up on my computer as I do it just to have a guideline. When you sculpt or paint something like this it is important to understand how it is structured and how to make it look more alive.
I sketched the pattern with a pen so I can carve on top of it. After I did that I started carving with one of the tools until I was satisfied with the depth of the recesses.
Adding dirt and rocks on
This part is fairly easy and fast. Put some PVE glue on and spread it on random spots onto the cork and all over the parts where the base is naked. First off start with the bigger bits of gravel and just spray some here and there randomly. After that sprinkle sand all over it until you cover all of the glue. Let it dry for an hour or two.
This is the result we get after it dries. Now it is ready to be sprayed
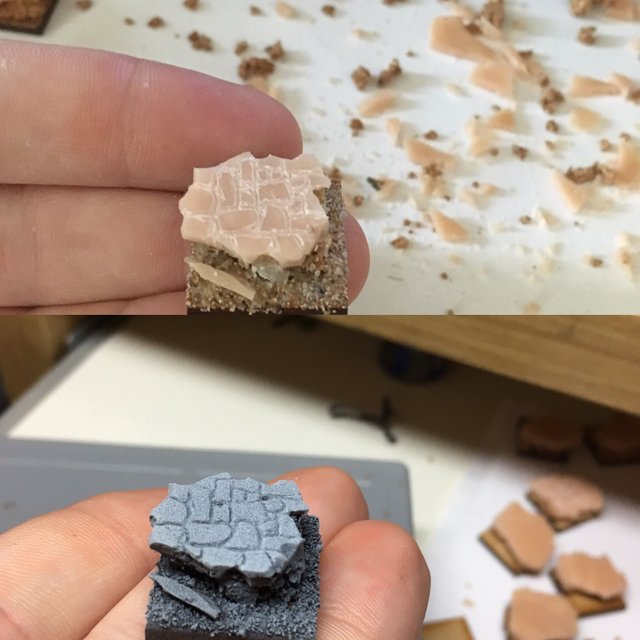
This is the final step for the tutorial today and the first one to our next one where the painting comes in.

This would be the end result.
Thanks for reading and I hope I helped or hooked you up on the hobby.. or at least tickled your interest. If you enjoyed the read don't forget to follow for more, upvote for some support and comment with questions or thoughts on what I just showed you. Have a great weekend and see you soon!
Upvoted and Resteemed by xx-votesplus, the dropAhead curation team!
Do you want more earnings?
By doing things above you will give us more STEEM POWER (SP) to give you more earnings.
Keep up the good work!
Most recent post: It is official, WE are witnesses!
This post recieved a vote from @minnowpond. For more information click https://steemit.com/steemit/@minnowpond/boost-your-rewards-with-minnowpond
This post recieved a vote from @minnowpond. For more information click https://steemit.com/steemit/@minnowpond/boost-your-rewards-with-minnowpond
It looks so real, you're a wizard :d
Haha thanks! :D
This post has received a 3.81 % upvote from @booster thanks to: @george-topalov.
Resteemed your article. This article was resteemed because you are part of the New Steemians project. You can learn more about it here: https://steemit.com/introduceyourself/@gaman/new-steemians-project-launch
@george-topalov got you a $1.68 @minnowbooster upgoat, nice! (Image: pixabay.com)
Want a boost? Click here to read more!