Salt Printing tutorial part II
Edit 08-03-2020...Re-steem part II from III
Yes indeed, this is a very old post ... from my early days on steemit
But I thought, in these corona times and quarantine, this might give some people ideas to pass the time. And admit it... who ever scrolls that far back in the feed to discover gems like this?
Nevertheless, if you like photography you should definitely try it out ... the results can be wonderful and it is at least original!
Happy reading!
Salt Printing tutorial part II
So, here we are with the second part. I published it before the weekend to give you the opportunity to make your hands dirty on Saturday & Sunday 😊 It’s not the final part, I’ve decided to cut the whole thing in 3 so the final part will be next week (and also before the weekend). I was very busy this week and didn’t find the time to finish the whole thing.But in this part there is enough to do on the preparation side…So let’s start by preparing our chemicals…
Chemical Solutions
As I explained in the first part of this tutorial, you will need 3 chemical solutions to obtain a salt print.
- The first one, and most easy, is the salt solution. If you followed my list you do have table salt and distilled water… just measure 20gr of salt and add it to 1 liter of distilled water. That’s it, your first solution is ready 😊 If you decide you need more (depending on the way you choose to salt your paper, by immersion or brushing) you can easily make as much as you need as long as you keep the proportion of 20gr/liter.
-
The second solution is the silver-nitrate solution. Although not the most dangerous chemical, you better use some gloves for the preparation of this solution and work under safelight conditions (no UV – so, no sun in the room. A bathroom without windows is perfect for this)
Silver-nitrate reacts to uv-light by becoming black and can make some nice tattoos on your hands if not handled with care. They will only disappear after a couple of weeks so… be careful. Also always clean your tools with lots of water after finishing your work or do as I do, keep a separate set only for this purpose. (spoon, beakers, measuring cylinders)
In the literature you will often find that you need a 10% to 12% silver-nitrate solution. Personally I use a 12% solution and I am very happy with the results.So, to get a 12% solution you have to dissolve 12gr of silver nitrate in 100ml water. Considering the price of silver-nitrate I don’t think you want to make 10liter of this solution 😊 Also keep in mind that it can only be kept for a couple of weeks… so no need to make too much. The best way to keep the prepared solution is in a dark brown glass bottle, somewhere in a dark place.
- Still following? 😉 Great, 1 more solution to go… The last solution is a 25% solution of Sodium thiosulfate. (250gr/liter). We will use this one to “fix” the print after the exposition. Fixing means stopping the chemical reaction of the silver-nitrate and make sure that your print will not continue to darken overtime… As we can reuse this solution a couple of times and that the correct way to use it is by immerging the print completely, I mostly make up to 5 liter of it.
So, a lot of preparation work has been done… but now you’re good for 20 to 30 prints, depending on the size.
Next thing we’ll do is the preparation of the paper…
Salting the Paper
This is the most easy part of the whole process and if you like to paint you will enjoy this part 😊
There are 2 ways to salt your paper, each with pro’s and contra’s…
The first way is to immerge your sheet of paper completely in a salt solution for about 30sec (the first solution we made). The pro sides of this technique are the speed (you can prepare a lot of sheets in a short time) and the fact that you avoid the curling of the edges while drying. The negative side (at least, in my experience) is that afterwards, as the paper is salted in depth, you often get a result with less contrast. As if the image is deep in the paper…
The other technique is just to brush your salt solution across your sheet, first horizontally and then vertically. After many experiences this is the technique I love the most… even if it takes more time. The results have by far more contrast and just look better.
Whatever technique you choose, make sure your paper is completely dry before the next steps. Best way is to hang the paper up after making sure there are no bubbles remaining and… leave it there for a day/night. Salted paper can be kept for several weeks… so I mostly make a bunch on 1 day and keep it in a box for when I need it (or for when the sun finally decides to shine 😊).
Preparing the film
After preparing the chemicals and salting your paper you still have some time for the next step on day 1… creating the negative. I don’t think this needs much explanation as everyone reading this has probably a lot of experience with photo-editing… at least, I hope so 😊
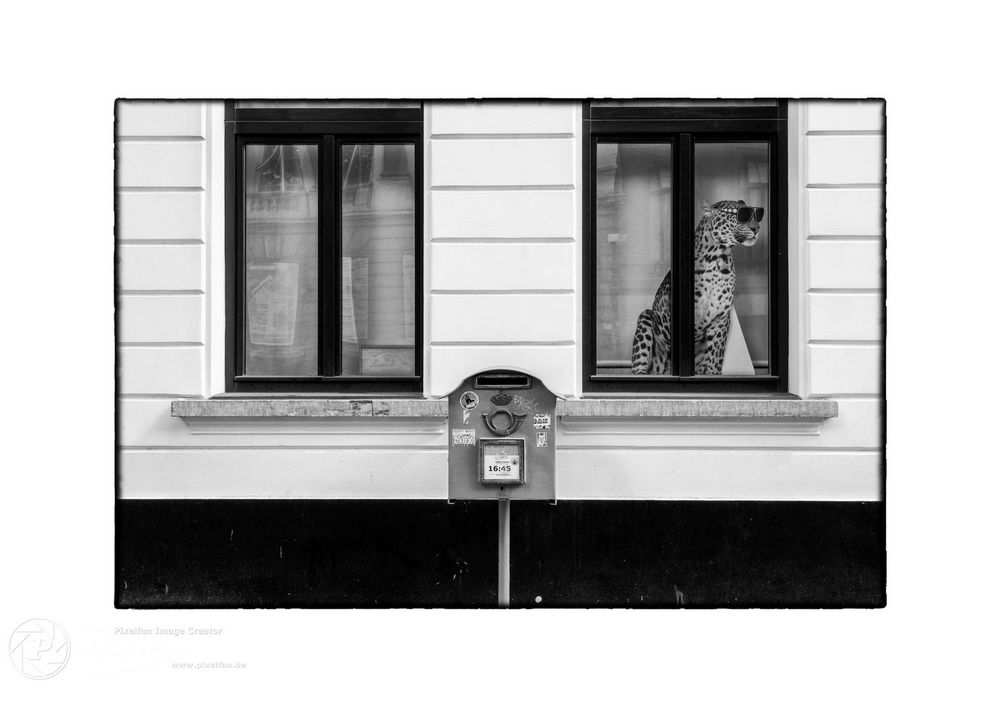
For your first picture try to find a picture with enough contrast. For this tutorial I will use this one :
Nice isn’t it? It’s not because this is a tutorial that I can’t show off my favorite pictures 😊
Next step is to turn the picture into B&W and and fine-tune the contrasts… the more contrast, the better results you will get. You can also, like I did, add some fancy borders… or not 😉
I use Gimp to do this but there are lots of other freewares where you can do those manipulations. So right now we have this :
As you can see on the picture above there is a very large white space around the picture… but it’s not a border. For those familiar with Gimp, the white space around the picture is in fact the bottom layer that I filled with white. It’s also the same dimension as the canvas… and in my case the dimensions are 297mm by 210mm. An exact A4. The image itself is than easy to align on the canvas.
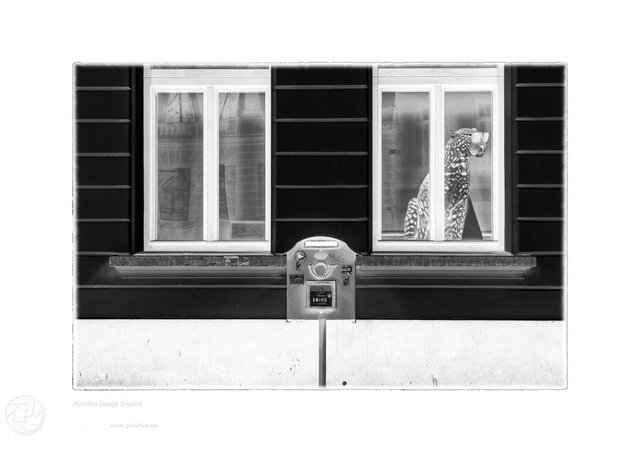
Last and very important step… don’t’ forget to invert the picture. Salt printing is a contact print process… in other words, black on the film will block UV light and stay white on the paper, transparent parts will let UV light pass through and turning brown on the paper. So, in the end, your film has to look like this :
All you have to do now is print the picture on film with your inkjet printer.
If you also use Gimp and you use the same A4 dimensions for your canvas as I do, you can export your picture as a tif-file in 240ppi. In windows 10 you can then rightclick the picture from the explorer and choose print, full-page picture, print… and the dimensions on your film will be perfect.
Depending on the quality of your printer, and the level of contrast of your initial picture, your film may be not dark enough for the black parts… A simple solution for this is to make 2 copies of the film. It’s a technique I often use to be sure the black parts on your film are dark enough to completely block the sunlight. You just need a steady hand afterwards to position both films right on your paper… or you will have bizarre ghosts on the end-result (but that’s maybe what you want 😉)
So, next week we will finish this tutorial and finally expose our picture to the sun… pray with me for a nice sunny day 😊
Feel free to ask if you have any questions… I’ll answer them as far as my knowledge permits 😉
If you missed the first part of this tutorial, just take a look here
Curious to see my other work?
Happy to hear that 😉
The best thing you can do is checking out my profile here on steemit ( @pixelfan ) and follow me. I’m always happy to connect with other photographers! (And of course I’m always very happy with a little upvote… although a large one is allowed too 😊)
But of course you can find me on other social media too... just check out:
- 500px - pixelfanfoto
- ello - bisje
- facebook - pixelfanfoto
- google+ - Eric Verbiest
- instagram - pixelfanfoto


Terrific tutorial @pixelfan, that has to be in the DPS. Upvoted & resteemed, of course.
OMG... you never sleep? You're always online ?😂😂😂
A big thank you for all... really appreciate it!!!
That's because of the heat @pixelfan. Several weeks already (lost the count, it's over a month) its over 40°C. Oh, how I would like to sleep… and one disk died of heat, so I was offline 😊
Nice tattoos on your hand? Hahaha. Thank you, @pixelfan this comprehensive and still easy to follow tutorial. Upvoted!!
That looks totally badass. I hadn't heard of salt printing before.
That's why I wrote it 😂
Cool! I look forward seeing the result. I think I have a silver nitrat and a fixer in the basement but it´s probably ruined of old age. But I´m going to test this out one day.
Thanks!
Be carefull with that fixer... if it's a commercial one it will probably be too "strong" and it will destroy your image...
So glad you did this, thank you! Will be trying my own once tomato season slows down 😉. I Resteemed both parts together (tactfully) in my feed and saved the posts as PDF so I can reread as I follow along. Awesome and super extensive, thanks again @pixelfan. Highly doubt mine will come out as well, but I'll be sure to share it and of course attribution you, the instructor! I already have a photo in mind, just have to find time. My business partners are toddlers, so I get all the hard tasks . STEEM ON 🔥🚀
Thanks Brandon, I'm looking forward to see the results... And be happy with your business partners... once they get in their 20's they will suck all profit out of your business, I know what I'm talking about 😂😂😂
@vcelier @pharesim @jamtaylor @svamiva @cub1 @bullionstackers @photo-trail @ocrdu @remlaps1 @cmp2020 @lighteye @cryptos @mariap @kibela @grow-pro @bragih @pixelfan @lisa.palmer @letc @swedishdragon
Wow, so many interest in my little tutorial… I’m a bit overwhelmed… The first part wasn’t such a success… but I suppose you didn’t expect I would write this second part… isn’t it? 😉
If it continues like this, and after publishing the last part that I’m writing now, I hope I will see a lot of salt prints appearing here on steemit 😉 I’m already looking forward to it!
In the meantime… thank you, thank you, thank you all for these really appreciated upvotes. This is what keeps me going… and now I’ll check your feeds…