Lesson #1 – DSLR photography 101 –
Lesson #1 – DSLR photography 101 –
The Exposure Triangle (Aperture, Shutter Speed, ISO)
I will start by explaining each of these individually as they are crucial to understanding how an image is exposed and it is important to understand how each parameter affects the outcome of your photo.
Aperture
The aperture, also known as your f/stop, put simply is the opening in your lens.
As in the image above you can see at different f/stops the hole in your lens gets either larger or smaller and this affects the amount of light that reaches your DSLRs sensor, it also affects your depth of field but we will come back to that shortly.
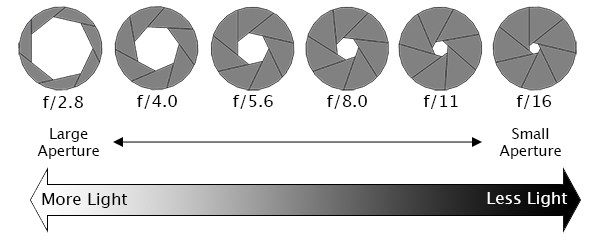
What I personally had trouble with in the beginning was understanding or remembering that large apertures are the smaller numbers, an f/2.8 for example is large compared to a small aperture of f/18. The picture above will give you a clue as to why that is.
The way I found easiest to remember it was to think of the aperture working from the outside of the lens into the center. If you have a small number then there is a small area of the aperture blades blocking light from your sensor but if it is a large aperture then you will have a larger area of the aperture blades blocking light from your sensor.
This leads me to one of the functions of aperture, to control the amount of light that gets into your sensor. One example might be shooting an event indoor in low light; a larger aperture (more light) will allow you to keep your shutter speeds faster. Ensuring your images stay sharp even when you’re shooting a musician running across stage. Or maybe you’re shooting the Milky Way, using a large aperture and a slow shutter speed (long exposure) will allow you to take in even more light, light that even with the human eye you cannot see.
Another example would be using a small aperture to try to limit the light you let in. I use this a lot when shooting waterfalls during the day. I want to be able to use the slowest shutter speed possible to give the waterfall that nice silky motion blur effect so I choose the largest aperture I can to let in the least amount of light so in order to have a correct exposure I need to expose for a longer period of time to let in the same amount of light.
The other function of aperture, and I believe this is the most important, is Depth of Field (DOF). If you can master DOF you will be making stellar images in no time.
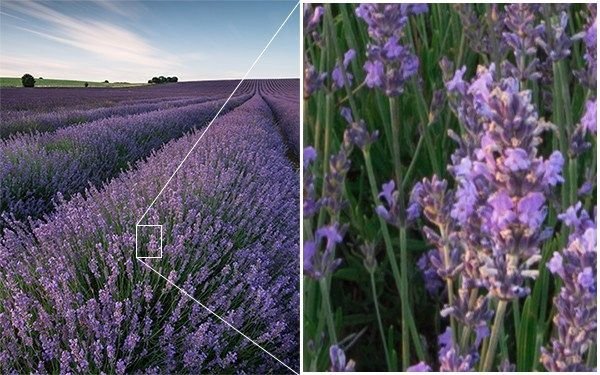
Depth of field is the measure of how much of the image is in focus. A large depth of field is produced by using a smaller aperture (e.g. f/18), and a small depth of field is created by a large aperture (e.g. f/1.2).
Image showing large depth of field / small aperture
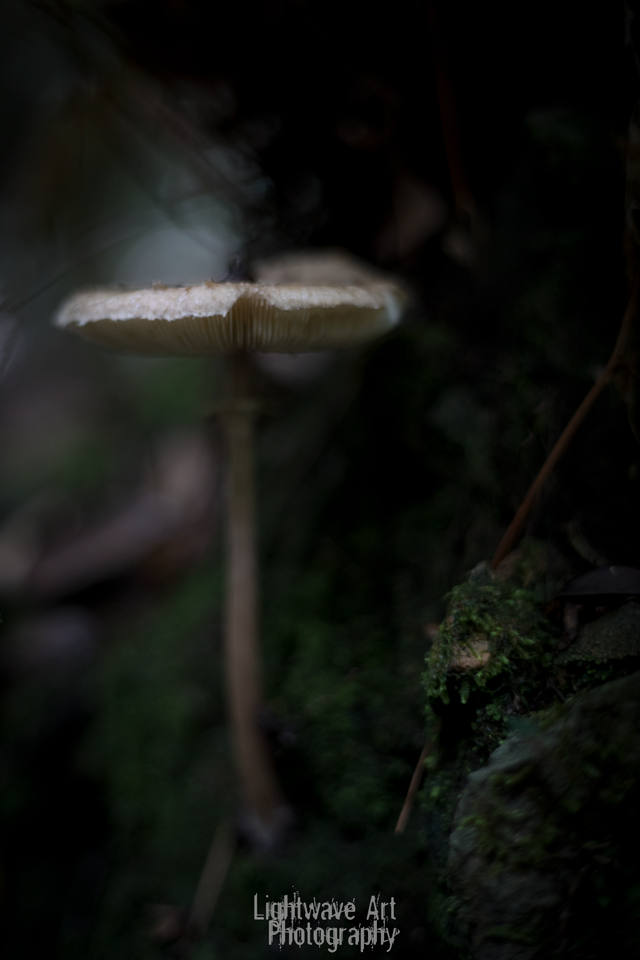
Image showing small depth of field / large aperture
When using a small depth of field it is important to choose your subject carefully and ensure that it is in pin sharp focus whilst allowing the rest of the image to fade out in a blur. Doing this can draw the attention to your subject, add drama to an image or as the names suggests, add depth.
Shutter Speed
Shutter speed is another way to control the amount of light you let into your cameras sensor but more importantly it allows you to control how you want a moving object to look. If you’re looking to freeze a moving object like a racecar or fighter jet in time then you will require a fast shutter speed. But if motion blur is what you are after you will need a slower shutter speed.
Shutter speed (depending on your camera) can be anywhere from 1/4000th of a second right through into minutes or even hours if you’re using BULB mode.
ISO
ISO is a measure of how sensitive the sensor of your camera is to light. The ISO sensitivity is represented numerically from ISO 50 (low sensitivity) up to ISO 12800 (high sensitivity) and beyond, and controls the amount of light required by the sensor to achieve a given exposure.
At ‘low’ sensitivities, more light is required to achieve correct exposure compared to high sensitivities where less light is required to achieve the same exposure. To understand this, lets have a look at two different situations:
Low ISO numbers
If shooting outside, on a bright sunny day there is a lot of available light that will hit the sensor during an exposure, meaning that the sensor does not need to be very sensitive in order to achieve a correct exposure. Therefore, you could use a low ISO number, such as ISO 100 or 200. This will give you images of the highest quality, with very little grain (or noise).
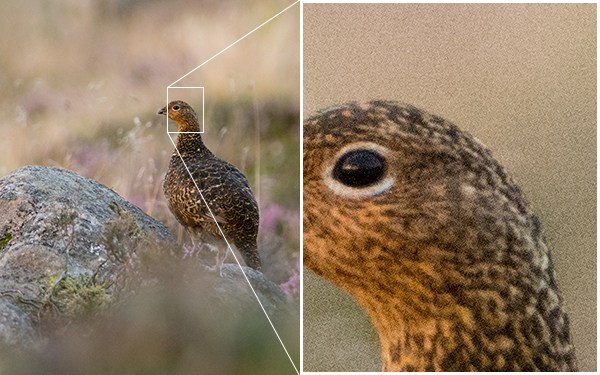
High ISO numbers
If shooting in low light, such as inside a dark cathedral or museum for example, there is not much light available for your camera sensor. A high ISO number, like ISO 3200, will increase the sensitivity of the sensor, effectively multiplying the small amount of available light to give you a correctly exposed image. This multiplication effect comes with a side effect of increased digital noise, which looks like a fine grain, reducing the overall image quality. The noise will be most pronounced in the darker/shadow regions.
It is important to note that aperture, shutter speed and ISO are all part of the ‘exposure triangle’. They all control either the amount of light entering the camera (aperture and shutter speed) or the amount of light required by the camera (ISO) for a given exposure.
Therefor they are all linked and understanding how they relate to one another will allow you to take creative control of your camera and create the images you see with your minds eye and not just what the glass in your lens see’s.
The different Modes (I will cover the 5 most common)
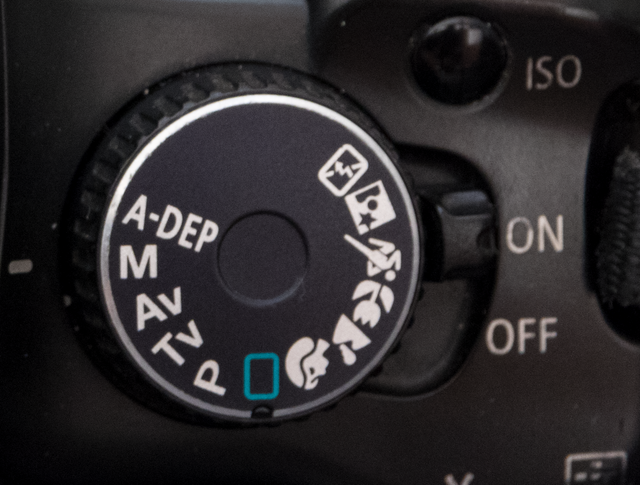
Auto (Green A or Green Square)
This mode as you might have guessed is full auto, point, shoot and the camera will do all the work for you.
This is great if all you want is nice looking pictures. But if you’ve spent the money on a DSLR then I believe you should be taking full advantage of the creative control you have at your fingertips.
My advice is leave Auto behind ☺
TV (Shutter Priority Mode)
Shutter priority is a semi-auto mode, as the name suggests, you choose what shutter speed you want the camera to shoot at and it will pick the aperture and ISO that will give you a correct exposure for the given scene.
This mode can be useful for wildlife photography for example when you’re wanting to freeze a fast moving subject like a flying bird. You would choose a fast shutter speed of 1/2000th of a second or more and let the camera work out the rest.
Or alternatively you might be shooting moving water and looking to blur the water movement and give it a nice soft appearance. In this case you would choose a slower shutter speed, 1 second or less (the slower the better). Again the camera works out the rest.
AV (Aperture Priority Mode)
Aperture Priority is another semi-auto mode only this time (yep you guessed it), You choose the aperture you want and the camera works out the rest.
I use this mode myself quite often and is the only mode I use other than Manual.
I find this mode super helpful if I’m in a low light situation that is changing constantly like a music gig or a rainforest for example, I pick a large aperture, say at least f/4 but the larger the better, 2.8 is perfect as long as your happy with a small depth of field. I will also usually opt to choose the ISO myself in this situation and pick a high ISO number that will give me good exposures but also limit the amount of ISO noise.
P (Program Mode)
Program mode is a cross between the semi-auto modes and manual. In program mode you can choose any of the parameters and lock them in or leave them auto and let the camera decide the best setting.
This gives you additional freedom that using either aperture priority or shutter priority cannot give without switching between shooting modes.
M (Manual Mode)
Now what does this mode do?
YEP!
It’s full manual you get to control everything!!
This is the mode I use at least 80% of the time, this allows you to have full control of your camera. You choose your aperture, shutter speed, ISO... the lot. And there is much more to it but for the sake of an intro I won’t confuse you with more words and buttons and functions... just yet. ;)
File Size and Type
Your DSLR allows you to choose not only the size of the file that will be saved but also the file format.
The file sizes are usually large, medium or fine, super fine etc. depending on your camera manufacturer. I personally think you should shoot at your largest setting if you intend to do any post processing of your images. The reason for this is the larger the file size the more information that will be stored about the scene in the file. This allows you to manipulate the image to its fullest extent.
The other option is file type, from my knowledge in pretty much all brands of DSLR you have the choice between either .Jpeg and .RAW files.
If you want to use your images creatively or sell them commercially I believe you should be shooting .RAW only. It is a much larger file type but for good reason. The amount of information stored in a .RAW file is massive in comparison to a .Jpeg and free from the compression and in camera editing of a .Jpeg file, just give it a go next time you are out shooting. The range of play you get when editing will quadruple if not more.
RAW files are uncompressed and unprocessed snapshots of all of the detail available to the cameras sensor. Because .RAW files are unprocessed they come out looking flat and dark, as .RAW images need to be viewed and processed using your camera’s software or in more robust commonly used software like Adobe Camera Raw prior to being ready for display or print.
The benefit though is you edit the image inline with your creativity.
White Balance
White balance is key if you want colour accurate images, and if you are shooting using .Jpeg you will need to get this right in camera. RAW is a bit more forgiving with regard to white balance and you can adjust it in post processing.
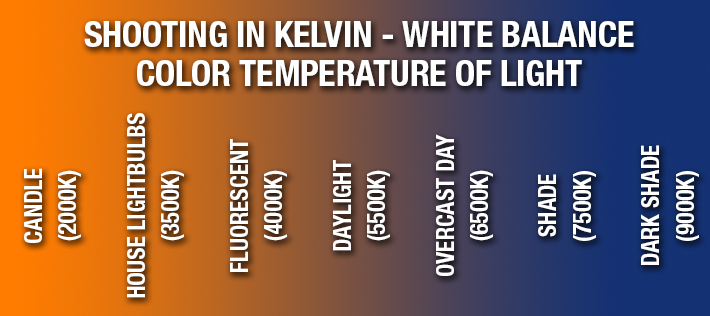
White balance is a measure of the quality of light hitting the sensor. By quality I mean hue or temperature of the ambient light. Whether it is daylight, which is about 5500 kelvins (Bluish white tint) or a Tungsten light bulb, which is about 3500 kelvins (yellow tint).
View the image below to get an idea of the different values and how they relate to real world lightning scenarios.
:D
Please Upvote, Resteem and Follow my page for more lessons in digital photography.
If you have any questions about photography feel free to tag or contact me at any time.
Lastly i would love to hear any constructive criticism you have about my post. I am new to writing how to's and instructional's so i would love to know what you think of my write up.
And please if something doesn't make sense let me know!! :D
Happy Fotoging!!!
Resteemed to over 10800 followers and 100% upvoted. Thank you for using my service!
Send 0.200 Steem or 0.200 Steem Dollar and the URL in the memo to use the bot.
Read here how the bot from Berlin works.
We are happy to be part of the APPICS bounty program. APPICS is a new social community based on Steem. The presale was sold in 26 minutes. The ICO will start soon. You can get a account over our invite link: https://ico.appics.com/login?referral=1fRdrJIW
@resteem.bot
Resteemed by @resteembot! Good Luck!
Curious?
The @resteembot's introduction post
Get more from @resteembot with the #resteembotsentme initiative
Check out the great posts I already resteemed.
Professional explanation :) Resteemed.
Thanks @Danielmarkiewicz
Very well explained!
Shared 👍