2011 GARDEN DESIGN AND BUILD
In 2008 I bought a house in San Bernardino, California in the San Bernardino Valley. It is a dry hot desert like climate which would reach as hot as 105 degrees during the hottest part of summer. For a good 6 months a year it would often be in the low to mid 90's. Spring and fall were nice, but short lived. Winter was usually down into the mid 40's and was the rainy season. I had a pretty nice sized yard for that area in California. It took a few years after moving in to get any type of garden going because of my lack of knowledge. Additionally, my work schedule was time and energy consuming.
As I said in my previous introductory post BAREFOOT IN THE BOONIES: EXPOSING MY ROOTS, the beginning of my journey leading up to permaculture stemmed from a mixture of my childhood roots, love of architecture/design, as well as life diversions into Recording Engineering, which ultimately helped me acquire the resources needed, and steered me towards, permaculture. I look back at it all now as one of those full circle type of things. This is the first in a series of posts starting with my experiences with gardening and permaculture. In the spring of 2011 I designed and constructed my first garden.
PHASE 1: DESIGN
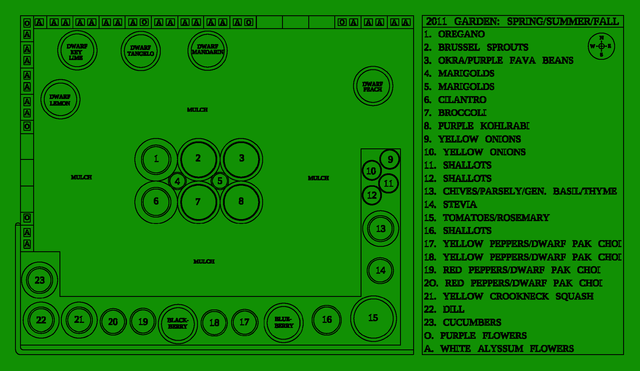
Here is the design I settled on in a CAD drawing. If you open it in another window you can see it in full detail
This garden was designed with the following goals:
1)Autopilot: I could not invest time into maintaining my yard on a regular basis, let alone a garden, for a number of reasons. A driving factor was being gone for 12-14 hours a day, plus the other responsibilities, which made it impossible to hand water on a regular or consistent enough schedule.
2)Conserve physical energy: Weeding, mowing, bending, shoveling, carrying, etc, were not something I was capable of doing at the time. Therefore, I needed raised beds, irrigation, no weeds, no mowing, no tilling, no physically demanding chores of the garden save for the initial setup. (It took me about a month altogether to get this installed, which was the majority of my effort for the next 2 years. However, most other people could set it up in a weekend.)
3)Aesthetically pleasing: Although not a huge yard, I could not maintain it, so building the garden designs helped the aesthetics and improved the curb appeal in my front yard (unfortunately that was only temporary). The backyard was not really visible to other people, but it looked nicer to me. It was mostly the front yard that needed to be pretty. The intention was to expand outward in sections to eventually have the whole back yard turned into a garden. (that never happened but the back yard tire garden/orchard I was very happy with as it met all my goals!)
4)Utilize what was already there: There was a preexisting south facing chain link fence to use as a trellis that was relatively close to the water faucet. There were tires I kept when my tires were changed. There were some cinder blocks stacked beside the detached garage when I moved in plus some landscaping bricks which reduced how many I would have to later buy. There was a Purple Heart Succulent plant and an Ornamental Banana tree that were all but dead on the property which I relocated and revived. There were also pieces of plywood laying in the garage I used in addition to the plywood I bought to construct the raised area. I used recycled bread twisty ties from bread bags. There was also a 5 foot wide chain link gate that was detached in the yard as well as 3 6' long rebar pieces against the garage I put to good use.
5)Cheap to setup and maintain: The initial investment in seeds/plants, soil/compost, mulch, building materials, and irrigation was about $400. If I would have had more time and physical capability I could have saved even more. Once I decided on the plan I went with purchasing the rest of the materials to get the design in because I didn't want to wait too long or collect too much stuff. I didn't want to procrastinate any more and I had the means at that time. That being said, I certainly could have saved more with more free-cycling. Having the garden on an irrigation system helped tremendously, too. My average water bill during the hottest months was only about $10-$15 more per month then prior to having the garden. Some of the supplies, like the pots used on the raised area, were recycled from when the fruit trees were transplanted. Others were bought at the 99 Cents store, as opposed to purchasing them from the garden stores, which were anywhere from $3-8 each.
6)Source and use free-cycled materials: California is a generally conscientious place and heavily populated, so the FREECYCLE is strong with that state. I still get several emails a day from people in San Bernardino who are giving away boxes, pots, furniture, computers, Magazines, dishes, clothes, cars, campers, allllll sorts of things LOL. You name it, people are giving it away to strangers for free. I did get some things free but not from the freecycle groups because with my schedule I was not fast enough on getting there. However, i did still get some free items for the gardens. I picked up a van full of large and medium sized tires for free from the local tire shop who changed my tires. There are regulations at most places. Not only do the companies have to pay a disposal fee, they are technically not allowed to give tires away, which is why they pass that tire disposal fee onto customers. However, if you choose to keep your tires to avoid that fee, you can do that. I was able to get a van full of free tires because, well, they were nice and it wasn't a situation where either of us were too worried about getting in trouble for it. If I would have shown up with a Uhaul trailer, that might have been a different story. Later on my neighbor gave me a couple of bags of rubber mulch left over from building children's playgrounds, which was his job at the time. My coworker from Arizona, who drove 8 hours each way to work (YIKES) brought me a couple of bags of aged horse manure from his farm. A friend had some easily propagated succulents she gave me, too. Another friend gave me a couple of old weather worn wood patio chairs that were missing cushions which you will see in future posts for the front yard garden.
PHASE 2: THE BUILD PROCESS
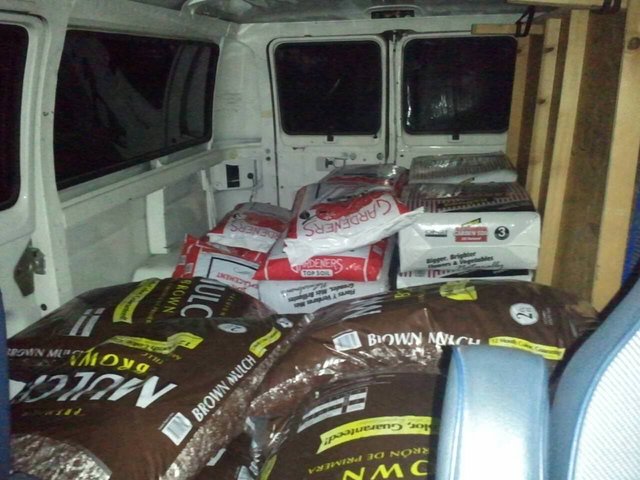
Home Depot trip for the Backyard Build. Notice the twin murphy bed. I had a long commute. Sometimes I needed to sleep in my van. That's one of the reasons I picked the white FBI surveillance looking van. haha
Once the design was settled on it was time to put in the garden, starting with the back yard.
1)I assessed what materials I already had, so I could figure out what I needed. This wasn't too precise but is ALWAYS worth the time so you avoid haphazardly guessing what you need, how expensive it will be, and generally just being efficient. You will likely find yourself spending more than you planned if you don't itemize and estimate costs. You will forget parts, which will cause extra trips to the store, so on and so forth. Firstly, the most important tasks for me were that I needed some way to suppress the weeds, a raised surface for plants to grow on, irrigation supplies, a perimeter, plants, soil/compost/fertilizer, and containers. The materials I bought at Home Depot were:
- 3 sheets of plywood, 2 cut at 3 foot wide lengthwise and one cut in half lengthwise then cut in half widthwise
1 50 foot by 10 foot roll of 6mm black plastic from the paint section
package of landscape staples
about 20 cinder blocks
about 20 bags of mulch (this covered both the back yard and a portion of the front yard. The front yard will be discussed in a separate post)
about 10 bags of potting soil
about 3 bags of compost
a container of fertilizer pellets
irrigation supplies
  * 50' roll of 1/2" irrigation tubing
  * 50' roll of 1/8" irrigation tubing
  * 50' roll of 1/4" soaker hose
  * adjustable drip irrigation pieces
  * mister pieces
  * 1/4", L and T connectors
  * irrigation hose hole punch
  * 1/2" hose stakes
  * a 4 hose battery operated automatic water timer
  * backflow and pressure regulators
plants
  * Blackberry plant
  * blueberry plant
  * dwarf lemon tree
  * dwarf key lime tree
  * dwarf tangelo tree
  * dwarf mandarin tree
  * dwarf peach tree
  * two honeysuckle bushes
  * a flat of white Alyssum flowers
  * a few 4" potted purple flowers, I forget the name
  * potted rosemary
  * potted mint
  * donated and misc. plants around the property
  * a variety of vegetable seeds
2)I rounded up the materials I already had putting them into roughly categorized piles. Then I went to collect tires. My neighbor happened to see me outside moving everything. He offered to give me 2 large black trash bags of that rubber mulch used to build children's playgrounds. My friend gave me most succulents, old chairs, and so on.
3)I laid down the 6mm black plastic to the rough dimensions, generously overlapping where necessary, to give me roughly a 18'x20' area, adding the cinderblocks around the perimeter as I went to keep the plastic in place. Didn't bother with leveling but did use the flat landscape bricks to create an entrance on the north side beside the water faucet, and one on the west side which was closest to area I entered the back yard. Then I tediously poked holes in rows about 6 inches apart with the pitchfork for drainage since this was just black plastic. The reason for using the black plastic was it was much cheaper than landscape fabric and would last longer as a weed suppressant. It was also so that in the future if I moved the garden, It would be easy to just pull up and start fresh there. I didn't know about using cardboard yet. In hindsight there are many things about this garden I would have done differently. But, as time has gone on, I DID do things different over the years, learning from this first garden.
4)After the plastic was laid down, I arranged the cinder blocks on the south facing edge, which was against the chain link fence, so that it would support the 3'x8' sections of plywood. Home Depot will cut the wood for you, which was what I chose to do since I did not have tools at the time for cutting. I used 2 of the 3 ft wide pieces along the fence (an area of 3'x16'), and 1.5 2'x8 (making an area of 2'x12') pieces along the east side of the garden (west wall of the house). The left over amount was put against the short gate and was 2'x4'. I used the leftover wood from the previous owners to brace any of the weak areas and gaps. The raised area was generally close to an L shape. Thanks to using the bricks on the property, the raised areas was about 10 inches off the ground before adding the planters.
5)Next I covered all the plywood with black plastic in order to prolong the life of the wood, since there was going to be contact with water otherwise, securing with a staple gun. The excess I hung over the edge to lay flat on top of the plastic already laying on the ground. I secured the plastic hanging off the side into the walkway of the garden close to the raised area with landscape staples.
6)After all of that was done, I rolled the tires into place into the center of the garden and on top of the plastic covered ledge. In the picture you will see a row of large tires on top of a second row of large tires. Only first of row of stacked tires closest to the house were left in that arrangement, as I later used the other 4 tires in the front yard. There were chipped bricks and concrete chunks in a pile from where I had cleaned the yard of debris that I added to fill the lower large tires for extra drainage and to use them rather than throwing them away.
7)I placed in the empty planters to get a visual of everything spaced out to see what would fit, make adjustments, so forth, then moved them back outside the perimeter next to the wheel burrow, to keep from damaging the plastic.
8)The bags of mulch were added around the tires to about a 4 inch depth.
9)The soil, compost, and fertilizer, was mixed in the wheelbarrow. The large pots were filled with the mixture, then the trees, blackberry and blueberry plant were transplanted and moved into their locations. Next I filled the smaller pots then positioned them on the raised ledge where I had previously spaced them out. I planted seeds in the empty planters on the raised area at this time.
10)Irrigation tubing was laid out along the L shaped raised planters to be measured, cut, holes punched, pieces connected, and drip attachments placed into the planters and tires, secured to the fence with recycled bread ties, then attached to one of the 4 hose connectors on the battery operated automatic timer. The peach tree and tire planters in the center of the garden were connected to this run of the hose because the watering requirements were similar. Likewise, a hose was ran and setup for the citrus trees on the second hose output of the water timer, because citrus requires less water. This created two separate watering cycles that could be set independently of each other. The third hose output of the watering timer was connected to a 50' hose to reach back of the property for any hand watering that might be needed.
11)The irrigation was tested to make sure all the drip connectors were working, to adjust the drip amount, and setup the watering length and intervals.
12)Finally, the wheelbarrow was moved into the walkway to fill the tires with the soil. It was time to plant seeds in the tire planters!!
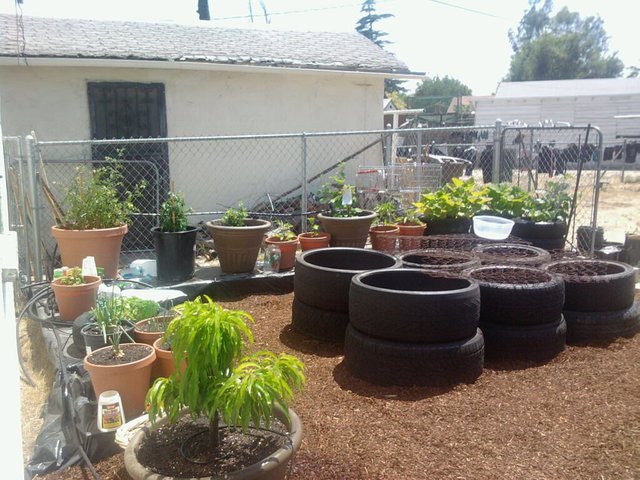
Picture facing Southwest with a general overview of the Tire/Raised bed planter before filling them with the soil
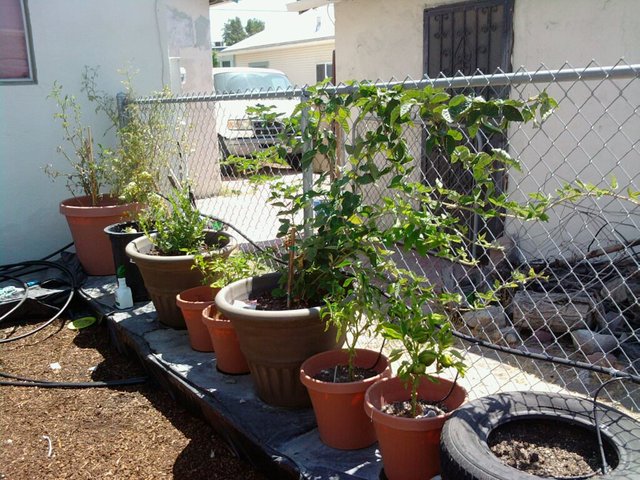
The raised garden, picture facing Southeast
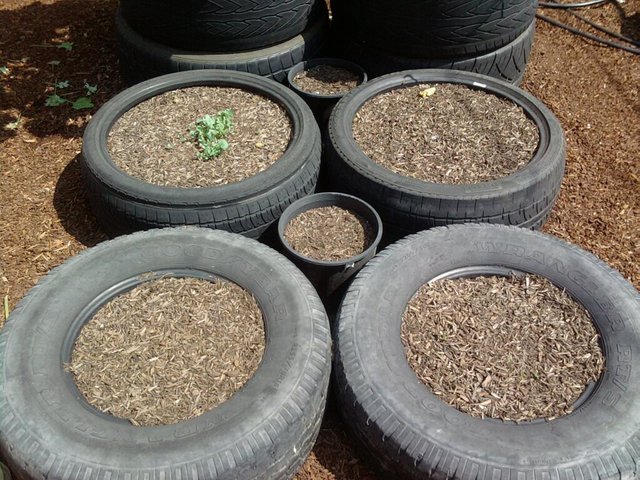
Tires prepped and beginning to sprout
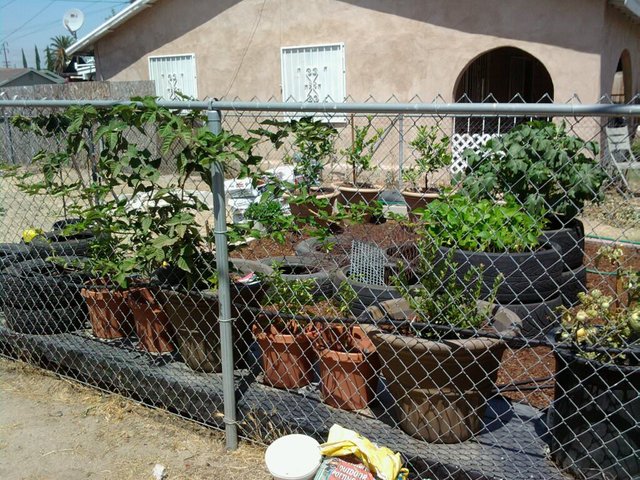
Overview of the chain link trellis, picture facing Northwest
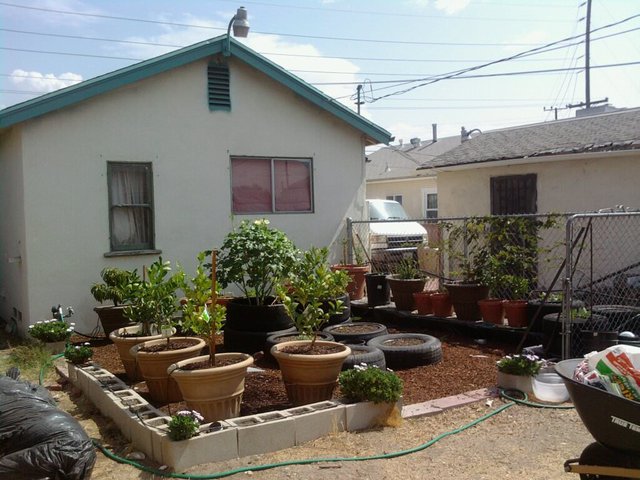
Overview of the entire garden about late spring, picture facing Southeast
All images copy-write @phedizzle 2011
As a recap:
What I am PLANNING to do is chronicle memories and experiences from childhood through adulthood that will tie all of the elements in life which have molded this convoluted variety in interests into the ultimately cohesive path towards permaculture and homesteading. Concurrently will be a series of Gardening/Sustainability/Homesteading/Permaculture specific posts with tons of pictures documenting my progression from 2011 to 2017. Thank you for sticking around till the end. I hope you will enjoy these short stories.
For reference, here are the previous posts:
BAREFOOT IN THE BOONIES: EXPOSING MY ROOTS (introduction post)
BAREFOOT IN THE BOONIES: Chapter 1
TO BE CONTINUED...

That's all for now. Until the next post... If you found this post enjoyable, please consider upvoting, resteeming, following, and commenting! Thank you kindly for reading.

Phedizzle signature created by @bembelmaniac

Proud to be a member of @qurator, a curation group whose purpose is to help curate new Steemians get established on steemit, who are working hard to post quality content.

Looking for more quality posts about #homesteading, #permaculture Enthusiasts, and folks who believe in Sustainable Practices? Well then, check out the #homesteadersonline community, too. Hopefully you'll decide to join us.


So come say hello in the following Discord chat rooms:

Interested in participating in a social experiment called steembasicincome? check it...

I love how this is all planned out! The tires is a neat idea!
Thank you! A neighbor dropped off a bunch of tires last year at the new place I'm at. Not sure what to do with them yet. I've mixed feelings about growing food in them this time.
It sounds like you might not live in Southern California, but if you do, we are forming a discord to promote local meetups. here is an invite https://discord.gg/TeX8QBz
Thank you. I actually did live and work in southern California for 8 years but am now back in Missouri. Too bad, I'd love to have been able to go. I miss Cali a lot sometimes.
You did and learned so much in this garden! I love the re-purposing of used materials. Thinking about your goals is so important for being realistic with yourself and important for the success and enjoyment factors.
Thanks @sagescrub. ( : Completing goals is the best feeling. Getting to there is satisfying, too.
Very cool! I can't wait to get my garden going this year.
I can't wait to see you blog about your garden this year!! I love how many people on steemit are into gardening and permaculture/sustainability.
It makes sense crypto is all about independence and so is gardening.
True that!
Another well written and thorough post!
I like what you did with your garden back then. It looks like it served the purpose pretty well.
It was the best thing at that time. I loved looking out my window to see it and how stress-free it was.
PhePhe!!! How amazing to find you here! I miss you lots and lots! --Love,Cat
Omg it's LOVECAT!!! I swore I was already following you. Blame badawg, he shared a post he wrote on facecrack that lured me here ( ; I MISS YOU GUYS SO MUCH. I love Missouri but all my friends are far away. Hug and kiss the family for me. Miss you!
All of us love and miss you loads!!! I am so excited to reconnect on this "block party" via kismet. I follow @torico although I have never met them, and they resteemed this post. Ever so serendipitous, I think! Yay. Now we can keep up with each other without all that facecrack. Hehehhee!!!! 😻
yay!! i did a good deed :)
phe is mah homegrrl. you should stop by da chat n hang!
So freakin cool! I would love to join the chat. Is it linked above? La duh, I guess I could reread....hehehe!
MSP-PAL Server Invite
Thank you!!!!
@torica, I have known lovecat since 2010 and I am so thankful you shared my post and she saw it. Tbh I'm a little teary. The feels are strong right now. It was bittersweet leaving California. Love you lovecat.
be forewarned, msp chat is different type of crack wink haha. would love to see you there!
fantastic post! such a great project and I love reading the details and logistics of your plans, your reasons why and seeing photos of the real thing.
Thank you! I'm excited to have finally got all the pictures sorted to start posting these regularly. Happy about it. Steemit has been so motivating and inspiring with everyone posting such great homesteading post. Thank you for the comment.
This is an awesome project. Well thought out and executed. You remind me of a book I read several years ago titled: Farm City. It was about a lady who created a farm in the heart of Oakland. She worked full-time on her garden, which I understand you can't do. However, the idea is very similar. Best of luck on your adventure. I look forward to seeing more of the results. Also, better you than me in San Bernadino. I hated the weather there and in Riverside. ;)
Thank you for the thoughtful comment!! I will keep an eye out for the book.
You know what's funny? I was not a fan of the weather, either!! Lol. It was HOOOT in the valleys. Before I moved to California, people were like, "oh, it's dry heat, so it doesn't feel as hot". I'm convinced they either never went or were liars hehe. Right there with you on that sentiment!
Congratulations! Your post has been selected as a daily Steemit truffle! It is listed on rank 8 of all contributions awarded today. You can find the TOP DAILY TRUFFLE PICKS HERE.
I upvoted your contribution because to my mind your post is at least 18 SBD worth and should receive 68 votes. It's now up to the lovely Steemit community to make this come true.
I am
TrufflePig, an Artificial Intelligence Bot that helps minnows and content curators using Machine Learning. If you are curious how I select content, you can find an explanation here!Have a nice day and sincerely yours,

TrufflePigThis post used the @earthnation tag.
Earth Nation is a Planetary Alliance of cooperative businesses and humanitarian organizations creating decentralized/ethical alternatives.
Into new paradigm, conscious focused, humanitarian, spiritual, or pro-active solutions?
Join like-minded souls and let's build a better world.
Visit: http://earthnation.world