Briggsy's Vega 56/64 Monero Mining Guide: Part 2 - Installing the AMD Beta Blockchain Drivers

![]()
Preamble
I am writing this guide because Mining Monero with a Vega card, especially when done correctly, can be extremely rewarding, more than any other coin. No other graphic card comes close to matching Vega for Mining Monero. Even the best CPU's for the task like AMD EPYC with 32 cores/64 threads are good, but not as great as Vega. While everyone who is already mining monero with Vega will say "shhhh!!! don't tell everyone!" I'm confident that anyone with a Vega card already knows about the cash cow in their possession, and if they don't, they probably aren't interested.
Other Stuff
When writing this guide I have assumed that the reader (whether a person or artificial intelligence) has a working knowledge of cryptocurrency mining, editing batch files, adding exceptions to windows or 3rd party security software (i.e. Kaspersky), and the risks involved with mining - like heat generation, damage to other hardware, and power consumption. I assume no responsibility for any consequences of any choices or actions of anyone reading or following this guide.
This guide will only focus on setting up a single Vega 56 Mining computer, as anyone building a 6+ GPU system will agree (afterwards) that Vega cards are finicky and the drivers have a mind of their own. I wish to remain headache free, so this guide will teach you how to get a single Vega card mining Monero using Cast XMR Miner for Windows; the rest is on the reader to struggle through.
This guide assumes the reader has a basic understanding of computer hardware, and as such the reader is responsible for using an adequate power supply unit (PSU) - gold or platinum 80+ rating is best - with at least 600 watts output on the 12v rail for one Vega card, and an extra 250-300 watts output for each additional Vega card. using a weak, cheap or undersized PSU could fry your whole setup in cases of extreme failures. You do not want to be pushing a PSU at 100% watt potential either, because a PSU will degrade over time by a small amount, causing power delivery potential to be lower. Consider using a Power Supply splitter if you want to used more than 1 PSU for a single system. This is the smart approach as using a secondary PSU's pci-e cables without being controlled by the motherboard is insanely stupid and will fry power supplies and pci-e splitters/risers (I speak from experience, sigh...).
Also, a PSU is often most efficient between 50-60% load, and efficiency gets worse as the load reaches 100%. Efficiency is the percentage of electrons coming from the wall that end up being used. Because a PSU converts AC power from the wall into DC power for your computer, there is a percentage of electrons that escape and this leakage results in heat generation. This is why a gold or platinum 80+ rating is good, because the components are stronger and less prone to leakage, which means more of the power coming from your wall is being used, and not being turned into heat. If you live in a cold area, maybe terrible efficiency isn't such a bad thing. Buying a Kill-A-Watt meter to see how much power you are using from the wall can help you determine how much power from the wall your setup is using.
By reading and following this guide, you acknowledge that you (and only you) are responsible for any and all damage to any hardware or electrical systems, any data corruption, any lost earnings, and any monetary costs you or anyone else might incur by following this guide. If mining cryptocurrency is illegal where you live, I encourage you to stop reading now - if not, you assume full responsibility in finding out what your local laws are, and in choosing to break them. I cannot be held responsible in any way, shape or form if anyone (whether a person or an artificial intelligence) chooses to break their regional laws.
Also of note, you can CTRL+Shift+Click any link to open it in a new tab instead of this one. That way you won't lose your spot on this guide.
Click here for Part 1: Flashing Vega 56 with Vega 64 BIOS
Click here for Part 3: Tuning Vega's Clocks for XMR Mining
Click here for Part 4: Mining Monero with Cast XMR Miner for Vega
Part 2: Installing the AMD Beta Blockchain Drivers
NOTE: This is an important step. You will not be reaching 1.9 KH/s on a Vega 56 without these Drivers. Period.
Head on over to here, scroll down a bit and download the appropriate version for your setup. By now most people are using Windows 10 64bit, but I'm not here to judge people's love of Windows 7; it's still a good OS.

It might also be a good idea to run Display Driver Uninstaller if you have been using you Vega 56 with newer drivers for some time, but this is not a critical step in my opinion - unless you also have old Nvidia drivers installed somewhere; they should be DDU'd for good measure.
You can get DDU if you CTRL+Shift+Click here and scroll down to the Download Locations. Select whatever server you want and click one to get your copy of DDU. The download will be in a .Zip file, which contains an executable file, which when run will unzip files to a folder of our choice. From there, you can run DDU to completely remove any AMD or Nvidia drivers. Best option to choose is to remove drivers and restart.

Once you are ready, install the AMD Blockchain drivers and then restart your computer after driver installation is done.
This is where we run into some fun with AMD Vega drivers. This doesn't just happen with the block chain drivers, but it's clearly annoying if you are using the Vega graphic card as your display output in the system, instead of the integrated graphics on the CPU, or another Graphic card.
The problem is that whenever Radeon Wattman crashes and restores to default settings (like if you had an unstable overclock), then the graphic card drivers also need to be reinitialized. If you are outputting to your display from the Vega graphic card, you will need to restart your computer whenever you get the windows notification that Wattman crashed.
If your Vega card is not being used for display output, you will need to do the following if you crash wattman while testing overclocks (there are programs out there to automate this, but I'm ironically lazy):
-hit windows key on your keyboard
-start typing "device manager" and part way through typing it will probably be selected, and hit enter on keyboard, or click on the shortcut for Device Manager.

inside device manager, click on display adapters, then right-click on the Vega card in question and select "disable device." wait for a few moments and then right-click the card again and select "enable device." This will reinitialize the drivers for that card. Don't do this for whatever Device is being used for your display, or your screen will go blank and your will say D'oh!
Another thing to know about is the HBCC feature (High Bandwidth Cache Controller) in Radeon Settings. Without this feature turned on, you won't be getting full Hashing potential out of your Vega card.
Even more annoying, is that whenever Radeon Wattman crashes, you have to turn off HBCC; click apply; wait for Radeon Settings to restart; turn on HBCC again and click apply. This is important to remember, because a Wattman crash needs the drivers to be reinitialized and have HBCC turned off and then on again as well.
To reach the HBCC settings, right-click on your desktop and click "Radeon Settings." Then, click on the "Gaming" Tab (because we are going to be gaming, right?).
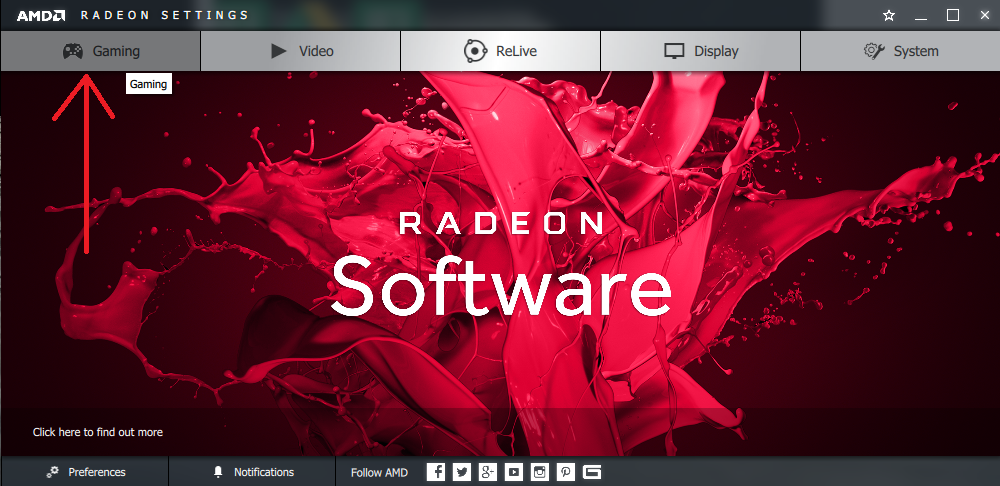
Then click on Global Settings.

You will now be in the Global Graphics tab. HBCC is on the bottom. once you turn it on or off, buttons will appear below that you might need to scroll down more to see, and click apply.
Don't worry about the HBCC memory Segment size; The computer I took this screenshot on only has 8GB of system memory, yet Radeon settings will accept nothing less than ~11.5GB.

Damn your software is buggy AMD...sigh
Anyway, with that information out of the way, this concludes Part 2 of this guide.
Click here for Part 1: Flashing Vega 56 with Vega 64 BIOS
Click here for Part 3: Tuning Vega's Clocks for XMR Mining
Click here for Part 4: Mining Monero with Cast XMR Miner for Vega