Briggsy's Vega 56/64 Monero Mining Guide: Part 1 - Flashing Vega 56 with Vega 64 BIOS
![]()
Preamble
I am writing this guide because Mining Monero with a Vega card, especially when done correctly, can be extremely rewarding, more than any other coin. No other graphic card comes close to matching Vega for Mining Monero. Even the best CPU's for the task like AMD EPYC with 32 cores/64 threads are good, but not as great as Vega. While everyone who is already mining monero with Vega will say "shhhh!!! don't tell everyone!" I'm confident that anyone with a Vega card already knows about the cash cow in their possession, and if they don't, they probably aren't interested.
Other Stuff
When writing this guide I have assumed that the reader (whether a person or artificial intelligence) has a working knowledge of cryptocurrency mining, editing batch files, adding exceptions to windows or 3rd party security software (i.e. Kaspersky), and the risks involved with mining - like heat generation, damage to other hardware, and power consumption. I assume no responsibility for any consequences of any choices or actions of anyone reading or following this guide.
This guide will only focus on setting up a single Vega 56 Mining computer, as anyone building a 6+ GPU system will agree (afterwards) that Vega cards are finicky and the drivers have a mind of their own. I wish to remain headache free, so this guide will teach you how to get a single Vega card mining Monero using Cast XMR Miner for Windows; the rest is on the reader to struggle through.
This guide assumes the reader has a basic understanding of computer hardware, and as such the reader is responsible for using an adequate power supply unit (PSU) - gold or platinum 80+ rating is best - with at least 600 watts output on the 12v rail for one Vega card, and an extra 250-300 watts output for each additional Vega card. using a weak, cheap or undersized PSU could fry your whole setup in cases of extreme failures. You do not want to be pushing a PSU at 100% watt potential either, because a PSU will degrade over time by a small amount, causing power delivery potential to be lower. Consider using a Power Supply splitter if you want to used more than 1 PSU for a single system. This is the smart approach as using a secondary PSU's pci-e cables without being controlled by the motherboard is insanely stupid and will fry power supplies and pci-e splitters/risers (I speak from experience, sigh...).
Also, a PSU is often most efficient between 50-60% load, and efficiency gets worse as the load reaches 100%. Efficiency is the percentage of electrons coming from the wall that end up being used. Because a PSU converts AC power from the wall into DC power for your computer, there is a percentage of electrons that escape and this leakage results in heat generation. This is why a gold or platinum 80+ rating is good, because the components are stronger and less prone to leakage, which means more of the power coming from your wall is being used, and not being turned into heat. If you live in a cold area, maybe terrible efficiency isn't such a bad thing. Buying a Kill-A-Watt meter to see how much power you are using from the wall can help you determine how much power from the wall your setup is using.
By reading and following this guide, you acknowledge that you (and only you) are responsible for any and all damage to any hardware or electrical systems, any data corruption, any lost earnings, and any monetary costs you or anyone else might incur by following this guide. If mining cryptocurrency is illegal where you live, I encourage you to stop reading now - if not, you assume full responsibility in finding out what your local laws are, and in choosing to break them. I cannot be held responsible in any way, shape or form if anyone (whether a person or an artificial intelligence) chooses to break their regional laws.
Also of note, you can CTRL+Shift+Click any link to open it in a new tab instead of this one. That way you won't lose your spot on this guide.
Click here for part 2: Installing the AMD Beta Blockchain Drivers
Click here for Part 3: Tuning Vega's Clocks for XMR Mining
Click here for Part 4: Mining Monero with Cast XMR Miner for Vega
Part 1: Flashing Your Vega 56 with a Vega 64 Bios
(skip this step if you already have a Vega 64)
Note: this guide does not necessarily require you to Flash a Vega 56 with a Vega 64 Bios, but it helps. The reason for this is that a reference Vega 56's memory is defaulted to 800Mhz out of the box, and can only be overclocked to (normally) hit between 900-960Mhz memory, depending on your luck and how loud you want the fan to go (AMD reference card fans don't spin faster, they spin louder 😉). The Vega 64 BIOS comes with a higher Memory voltage, which allows you to push Memory clocks as high as 1100Mhz or even higher on a Vega 56, although I would recommend 1050Mhz or lower for the leaf blower cards, as HBM is very heat sensitive when overclocking, and 1100Mhz+ memory clocks may require you to keep HBM temperatures in check. Just food for thought, your mileage may vary.
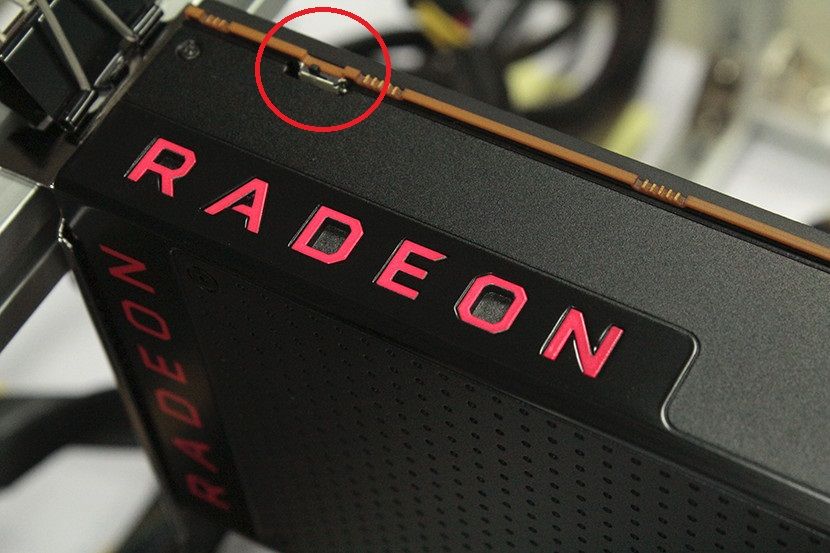
First, your Vega 56 Graphic Card will have 2 different Firmware's that were flashed at the factory, and you need to have the correct BIOS selected before trying to flash your card. The switch is tiny, and usually located on the side, near the exhaust end of the card. Make sure the switch is pushed to the left toward the exhaust end of the card (or the end that is visible when looking at the back of a PC). the other BIOS is programmed for power saving and limits the card to a lower wattage, and it cannot be flashed through normal means anyway.
Next you need to save your factory BIOS. If you don't already have the latest version of GPU-Z, you should grab it from here (CTRL+Shift+Click for new Tab)
I will assume most readers are familiar with GPU-Z, but if not that is okay; just follow the pictures. Installing GPU-Z is simple, and does not take much space so no guide for that is necessary.
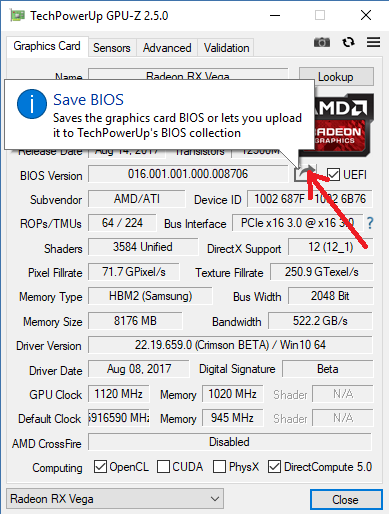
Open up GPU-Z and this window will greet you. Click where I have the red arrow pointing and save your BIOS where it won't get lost or deleted. Consider backing it up in more than one place if you're really worried.
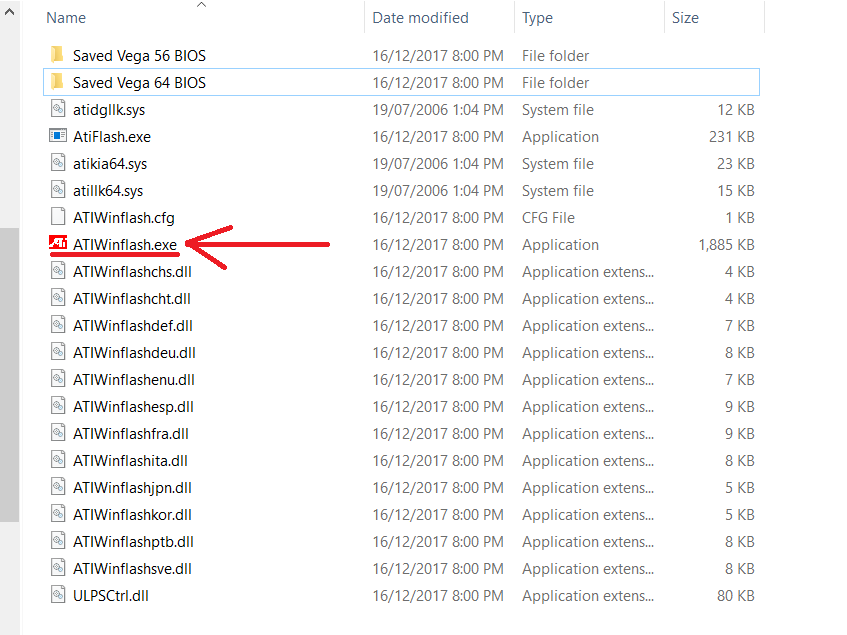
Now that you have your Vega 56 BIOS saved, CTRL+Shift+Click here and download ATIWinFlash, a program that you will use to flash your BIOS. The program comes in a .zip file, so you will need to unzip all the files to a single folder somewhere.
Next, head on over here and fetch the Vega 64 BIOS that is appropriate for you Vega 56 Card. If you have a reference "leaf blower" model with the RADEON Logo that lights up red on the side, then the BIOS you want is going to be Version 016.001.001.000.008706.
Once ready and your computer is not under abnormal load, go to the directory where you unzipped ATIWinFlash and right-click on the ATIWinFlash executable, and select "Run as Administrator."
A window will open up, and the only thing you should need to do is click on the "Load Image" Button, and select the Vega 64 BIOS you downloaded earlier (the file will probably be called AMD.RXVega64.8176.170719.rom).
Also make sure (if you have more than one AMD graphic card in your system) to have the correct graphic card selected at the top of the ATIWinFlash window.
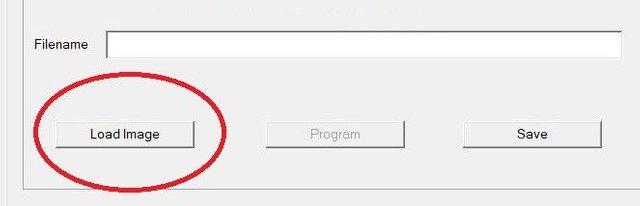
Now the "Program" Button will be selectable. When ready, click the "Program" Button to flash your BIOS. You will see a progress bar, and the program may even appear to freeze for a few moments, but the flashing process shouldn't take more than a few moments.

Once the new BIOS is flashed, you will see a message telling you that the Flash was successful (or if you forget to set the BIOS switch to the Left-side position, the message will say the BIOS could not be flashed). If successful, you now need to restart your computer for the new BIOS to take effect.
Note:If you have a non-reference Vega 56 (like one with multiple fans, LED's and bling everywhere), you may need to consult someone who knows for sure what BIOS you need. Testing different BIOS files can be a headache, especially if you are prone to freaking out. If you somehow have flashed the wrong bios for your card, you need to flash your original factory BIOS back (the one you saved earlier). The easiest way is to shut down your computer, flick the BIOS switch to the Right-side position (for the power saving BIOS), turn on your computer, and once inside windows flick the BIOS switch back to the Left position and repeat the steps using ATIWinFlash to flash your factory BIOS back on, or to test another BIOS if you aren't bothered with experimenting.
This concludes Part 1 of this guide.
Click here for part 2: Installing the AMD Beta Blockchain Drivers
Click here for Part 3: Tuning Vega's Clocks for XMR Mining
Click here for Part 4: Mining Monero with Cast XMR Miner for Vega
looking for a easy way to mine monero from any device go here > https://goo.gl/fgyUR7
want to know how to be massively successful in crypto go here > http://satoshipapi.io/freelance-services