How to attach a garden trellis to a wall (aka: Making all the mistakes...): IFC S02R12

This is my entry for the Information Finding Championship Season 02 Round 12 (run by @ifc and @apolymask) with the subject "Teach Something".

The Mission

Now, let's get this out of the way at the start... I'm pretty much a complete dunce when it comes to handiwork of any sort. Normally, if I'm drilling holes in the wall, I'm pretty happy if the wall stays up and there are no fires or explosions. Anything beyond that, well... is a bonus as far as I'm concerned. So, if you are looking for professional "How-To", then this is probably not the post for you! However, if you are looking for a "How-to" written by a complete noob who will make all the same mistakes that you are likely to... then read on!
Recently, we had our house re-mortared... let's just say, I'm glad I'll never have to do that again... between the noise and the mess of the concrete dust... I'm still trying to clean up many weeks later.... Anyway, we had to take the trellises (Trelli?) off the garden walls so that concrete could be drilled away and replaced. Which meant that I now have the wife-given task off attaching the trellises on the wall (for the first time, I just stuck them in the soil and called it a day....)...
Required Tools

Part of the reason that I'm more willing to actually attach the Trelli to the walls is the fact that I'm now the proud owner of some proper power equipment... more specifically, the hammer drill on the left! Last year, I had borrowed a hammer drill from a friend... and let us just say that the difference for drilling into a wall... is just night and day... I used to think it was my crap technique that made me drill terrible holes in concrete and brick... Now, I can say that the equipment more than makes up for my lack of ability!

What I had also learnt in my few years of screwing up home projects... was to have a ready supply of different screws and plugs of a wide variety of sizes and lengths. I can't tell you how many times I've been to a hardware store and come away with what I thought was exactly the right type of screw/plug... only to need to return several more times until I got it right!
So, I've ended up buying a good selection of materials to make sure that I'm covered for any situation...

Speaking of proper equipment... the Makita hammer drill came with this pretty spiffy cap, which I'm sure increases your drilling ability by +3, with a -5 Charisma disadvantage. So, in the end, I agreed with my toddler that she could take the cap and I would handle the power tools. It appears that the cap comes with also a +5 Scooter riding ability bonus as well!
Remember to match the plugs, screws and the drill bit with the same diameters... I chose 5mm for this job. I had in the past thought that I needed a slightly bigger diameter drill bit in comparison to the plug and screw... guess how that job turned out!
Gritting the Nitty!

From my extensive Google and YouTube research (I'm too embarrassed to ask my neighbour... who actually works in construction...), you are supposed to attach wood blocks to the wall first... and then attach the trelli to the wood blocks. This gives more airflow behind the trellis and makes it easier to tie the plant as well. Interestingly enough, these blocks are called "Battens"... as in "batten the hatches...."! There you go... even when I'm trying to go practical, I get waylaid by the abstract!
So, out with the trusty rusty hand held saw (definitely a -1 to sawing ability...)... and a treated wooden plank. I figured six blocks were required to give three anchor points for each trellis. I did measure them pretty roughly, after all... these are going to be hidden from view!

I did let my older girl try and do some cuts.. but it ended up being to tricky with the angle of the cutting (she wasn't tall enough...). The rusty blade didn't help either... anyway, a tiny noob tip... let the teeth of the saw do the cutting, you don't need to push down with force... just like the way you use a bread knife (although, I'm sure my wife still presses too hard with that...).

With each batten, I was going to anchor it to the wall with three screws. I thought three or four were probably the ideal amount of points, but I settled on three as it was easier to fit with the brickwork. Marking the spots in pencil (again, something that I learnt... mark in the spots, don't just wing it... or you may end up needing to put a hole in the mortar...) gave me three easy targets for the drill. Now, drilling on the wood was done with the yellow deWalt screwdriver/drill combo. It's a battery powered and has been a god-send purchase! Ikea furniture and various screw related jobs are now a cinch... as are light drilling jobs like this (use the correct type of drill bit, for wood, metal or masonry... it really makes a difference!).

Yes... it is still possible to stuff up... when you attach the drill bit... make sure that it is actually well attached and gripped by the machine... or you will end up with the drill bit coming out half way through the drilling! As with the sawing, use the lightest necessary pressure on the wood with the drill, just let the bit do the work!

Unfortunately, I don't have any photos of me drilling with the hammer drill (probably not a great idea to do a solo selfie whilst drilling... and the toddler ran screaming into the house as soon as I started... so she was no help either).
I used the handheld drill with a slightly thinner drill bit to mark the wall in the correct places where I would have to use the hammer drill. Holding the batten up against the wall (in the right spot...), I would drill through with a masonry drill bit (use a thinner one so you don't get stuck on the wood... guess who made that mistake!... in this case I used a 4 mm drill diameter), not much, but just enough to scratch the brick so you have a clear target for the hammer drill.
Just look at that perfect hole! I can't claim credit for it... make sure you have the right tools and good quality ones, you will be astounded by the difference it makes! I forgot to mention, make sure you use the depth gauge on the drill, it is hard to know exactly how far you need to drill for the plug length if you wing it. It is critical that it is the right depth as well, too deep and the plug will go too far in and the screw won't grab it it well enough... too shallow and it will be sticking out.

See the effect of the depth gauge! The plug sits exactly at the right depth into the wall! Ready to attach with the screws and the handheld deWalt combo machine!

PIG#$%@#$^%$^@%$... well, the plug was perfect... but the screws that I used were too short, and didn't end up expanding the plug at all... which meant the whole batten fell straight off the wall! Easy enough to fix... I have about a million different varieties of screws... so, I found one with a longer length and the same diameter (5 mm).

Success! The wood batten is securely fastened and takes a pretty decent amount of weight.... I didn't test it to breaking though! So... at this point, it is rinse and repeat with the rest of the battens... making sure at each stage that the placement of the battens would make sense for attaching to the trellises. After all, only a complete noob would attach the battens, to find that they didn't actually correspond to an attachable part of the trellis!... I didn't manage to do that... but it is the sort of thing that I might forget!
The Main Event!

Finally, the moment of truth... attaching the trellis to the batten. This was my first attempt... where I used the handheld de Walt to directly screw a screw through the trellis and into the batten (with my wife holding the trellis... I tried once to do everything... that went badly...). Let's just say that the first time is where you make the mistakes and then improve on it...
First of all the screw was standing out a long way from the trellis itself... it had to be a long screw that would go through both the trellis and the batten. Which made it very difficult to apply pressure with the drill as it would slip around... Add to the fact that the screw also split the wood a little bit as it made the hole and then pushed away from the batten as it was biting into the batten. You can see the gap between the trellis and the batten in the photo... and the small split wood....
So, for the next attempts... I made small guide holes with the drill first (4 mm diameter), through the trellis. This would make it easier to get the screw through the trellis (also keeping it straight). As you can see below, the results were much much better! No gap and no splitting of the wood.

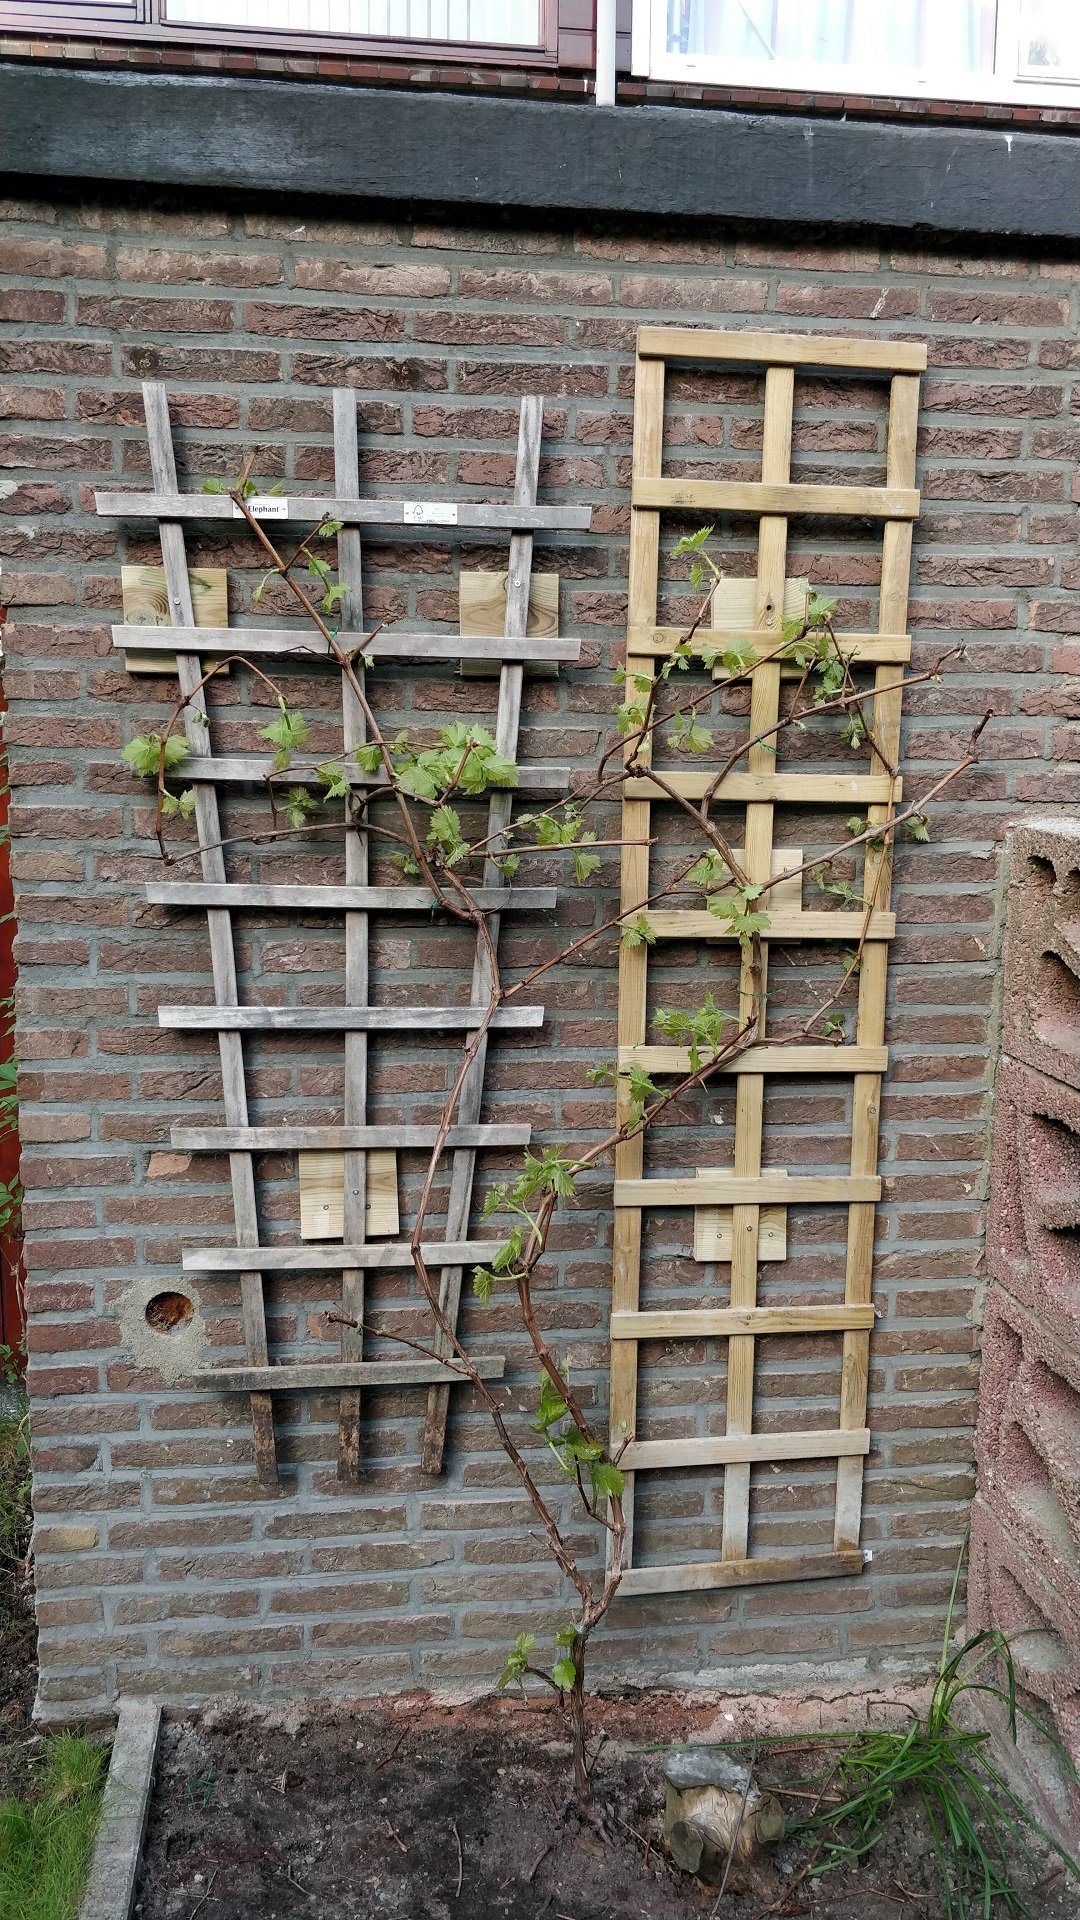
Attaching the rest of the battens and trelli was a quick job after that... the one on the left was attached in a triangular pattern which is much more stable than the one on the right. The one on the right is secure, but it wobbles left and right as the connection points are all in a line... I should have known that... stability in a line is much less secure than a triangle. However, I'm not fixing it... it will be a lesson for next time!
The job is done, and the grape vine was reattached back to the trelli! All in all a successful day of handicraft, making mistakes and learning... I really feel like I've leveled up my Handyman ability this day... I'm probably sitting at Level 1 now!

Account banner by jimramones


.gif)
I love the first picture. That would be my reaction to doing any of this. (Just burn the damn place down and start over.)
Ha ha... Yes, but it gets too much to keep burning the house down everytime you want to hang up a picture of change a light fitting!
What a great post. I'm older than you so have made most of these mistakes a couple of times. The good news is that I seem to remember just after I screwed the pooch the first time and can get on with what ever.
I do have to put a patch on my (tin) roof that could be hilarious. I may or may not take photos and publish. My normal "What's the worst thing that can happen?" has a lot of ugly possibility :)
Thanks. I enjoyed this enormously. And I think the Makita hat worked really well for scooter accompaniment!
Ha ha, sounds like it would be a great post! Even if it is only to make the rest of us feel better about ourselves!
Well done @bengy! It really helps when you have good tools and a helper wearing a Makita hat! Feels good when you get it done, now just imagine all of the other projects you'll be able to do now that you have successfully completed this one! :)
Yes, definitely the Makita cap is the key ingredient... Keeps the little one busy whilst doing the drilling!
You know what, not bad at all. I'd attach a piece of wood on the top corners of the trellis to not make it shake. A tip, get torx/star bit screws for construction. They cost more but they won't strip, ever, even if a total noob were to endeavor to strip the bit or the screw.
Posted using Partiko Android
Torx! I thought that was only for computers, that's the only time that I come across them! I had no idea that they were used in construction, thanks for the advice!
Well you made a good job of those trellis, I’m impressed with the amount of screws and raw plugs you used to keep them up! I try to use the minimum because I hate drilling into walls!
Posted using Partiko iOS
I like to make sure that I never need to do them again!
That sure was an entertaining read for a subject I wouldn't normally be very interested in. :D I've done a good amount of yard work, manual labor and construction type of stuff in the past though it's really not one of my strong points and I think I'm pretty clueless when it comes to a lot of that kind of stuff even though my father was like a master at it! I tended to gravitate more towards tech and intellectual stuff though, so sometimes I kinda feel like I should be much more knowledgeable and skilled at such.
I'm not sure if I'll ever have to set up any trellises in the future, but if I do I'll try to remember the lessons here. :) I'll do a proper Google/YouTube search as well probably, though the more info the better! It all helps and most importantly you helped to give me some good laughs and it was entertaining to read about your adventure. :D Cool entry bengy! Thanks for playing in another round and for being you! You have a great sense of humor and I bet it would be fun to hang out with you in person.
LOL, I thought that Garden Trellis Attachment is the newest hot topic that is trending across Steem, Twitter and Facebook! Everyone wants in on the Trellis action....
... but that said... it is kinda fun to try and make it sound interesting and engaging!
You just received a 100% upvote from @rewards-pool. Thank You for being apart of the @rewards-pool community
nice, that turned out pretty good. at first I thought that you are going to use one of those hook like looking screws and then just hang those garden trellis on them, but this I guess is a bit more stable and will hold a bit better. :)
I had considered that as well... But I didn't end up finding the hooks. Plus there would still be a bit of give, and Netherlands is kinda windy...
I won't be plant'n grapes onboard me ship yet, p'haps on me next class of Pirate ship I upgrade to. "Batten ye trellis!"
Ah... You need the fruit to ward off scurvy!
No, no, no you don't want to get scurvy.
I dont think that I've ever completed a project without a few hiccups along the way. Looks like it turned out alright in the end. Nice work!
Posted using Partiko Android
Yes, I'm getting better with each project... I guess you just see the pros do it... And it looks so easy, but they had many years of experience!