New Kitchen Garden - Update and Overview

If you have followed my weekend homesteading reports then you know I'm building a new kitchen garden. But all the pictures and info are scattered across multiple posts so I thought I would make a new post that brings it all together.
As you can see in the top picture the garden is finally starting to look like well a garden! :)
But there is still a ton of work to do and I will be building up the log retaining wall at least 1 more log high and perhaps 2. Plus I still need to finish moving the soil back into the beds.
There are some aspects of this garden that make it a bit different from your average garden so lets start from the beginning.
Starting the Garden - Location
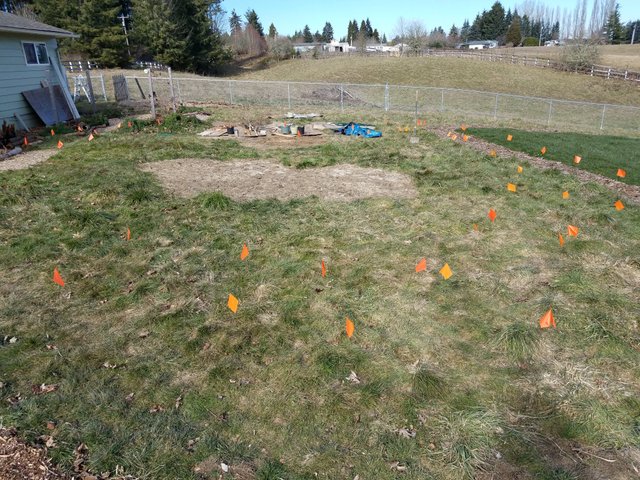
This new kitchen garden is located right outside my backdoor. This spot is sunny but actually not my sunniest location. It will get some afternoon shade from the house which is on the west side of the new garden.
So why did I pick this spot?
Well despite the afternoon shade it will still easily get 10+ hours of sunlight during the summers and even in the winter it will get a good amount of sun. This spot is actually sloped towards the morning sun.
Getting morning sun and early afternoon sun but then shade in the later afternoon is actually great for a garden. This way the garden gets full sun but avoids some of the harshest afternoon sun which reduces watering needs a fair bit.
In addition, being located right out side my backdoor will be great when it is time to harvest and when I need to do any maintenance work.
This is also why the garden has a big open area in the middle of it. This area will be a gathering area with a picnic table and eventually I will be adding a whole outdoor kitchen to this area. Then we will be able to harvest, cook and eat without leaving the garden!
Starting the Garden - Removing the Sod and Digging
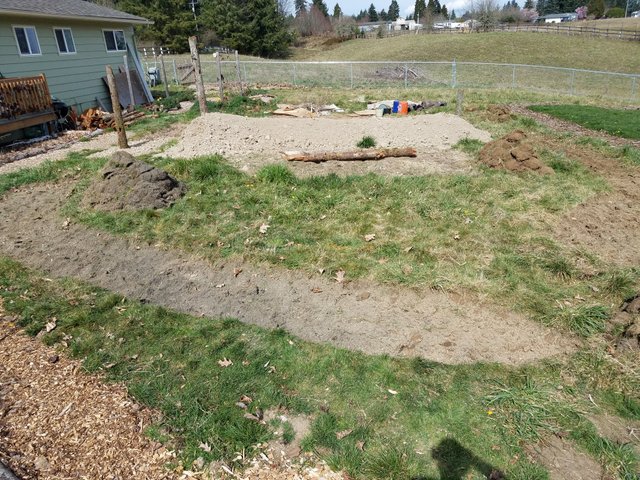
The first thing I did after flagging out the garden beds was to dig out the sod. But I saved it for later. These garden beds are all hugelkultur beds so I wanted to add the sod back in later.
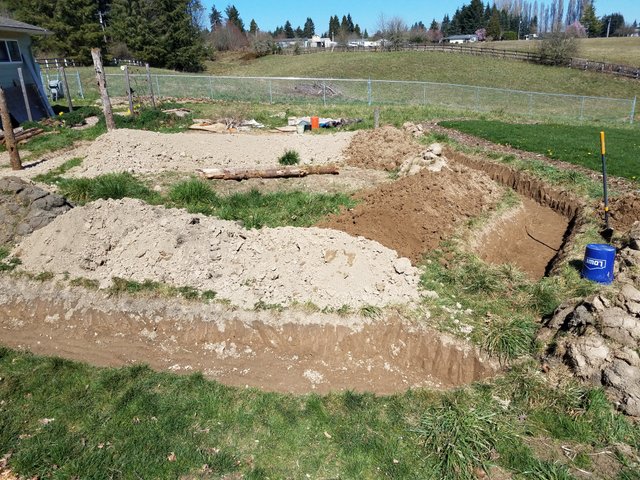
After removing the sod it was time to dig out the beds. There are 3 beds in total and digging them out took a fair bit of work. I did all the digging using a regular shovel.
The beds are approximately 1.5 to 2 feet deep though they are not 100% even in depth. But this will give the plant roots a lot of nice soft soil to grow through in the future.
Starting the Garden - Adding Wood and Returning the Sod
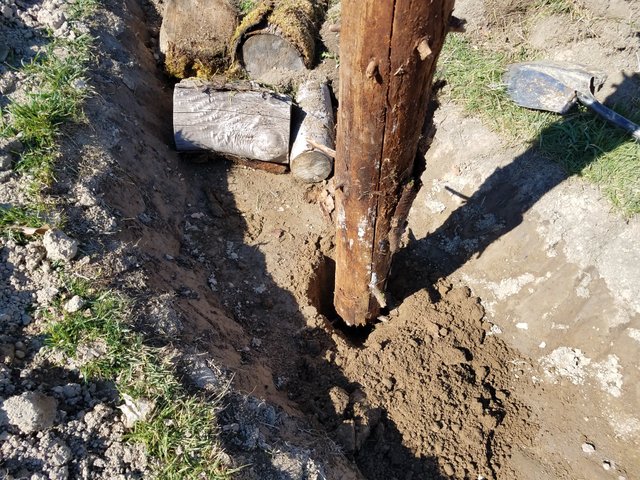
One of the more unusual things about this garden is the snags (dead standing trees) that I installed. Putting them in is no different than putting in a fence post.
Snags provide perches for birds and help create habitat for other beneficial critters. I have already seen multiple birds using these snags. I got the wood for the snags from actual snags from a forest that was being developed. This means the snags are already filled with forest microbes and fungi.
Not all of these forest critters will survive but some will which should benefit the new garden.
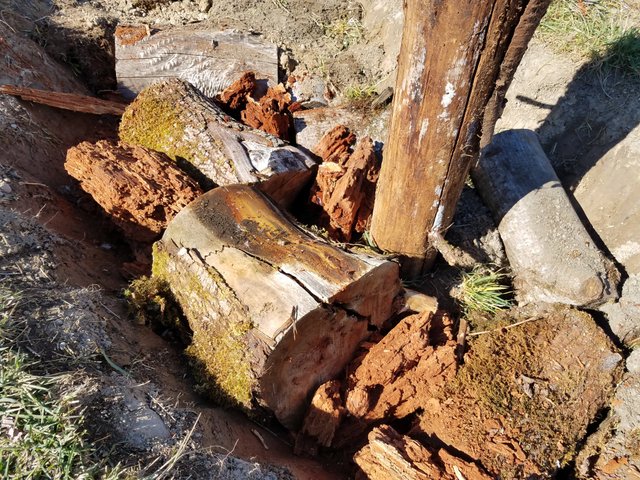
In addition to the snags, I also added a lot of large pieces of wood to the beds. Some of this wood was already rotten and others were fairly fresh. I like to use a mix of wood for more diversity of underground habitat.
This is called a hugelkultur bed which basically mimics a nurse log which is common in the forests here in Washington.
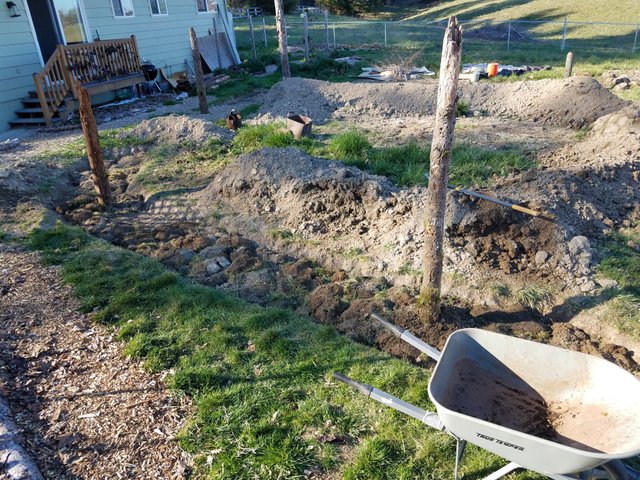
Once the logs were in I added the sod back but I made sure to push it between the logs and I also used soil to fill in all the gaps.
One issue people have with hugelkultur beds is rodents and the soil collapsing. In my experience this is due to people just throwing the soil on top of the wood without filling in the gaps. I view this as more of a slash pile with a topping of soil rather than a true hugelkultur bed.
In the long run both approaches will work but you will need to wait a lot longer for everything to settle if you don't fill in the gaps. Plus, in drier climates the gaps can make the hugelkultur beds dry out.
So while it takes longer I'm very careful to fill in all the gaps between the wood. This also makes it easier for plant roots.
Starting the Garden - More Wood and More Soil
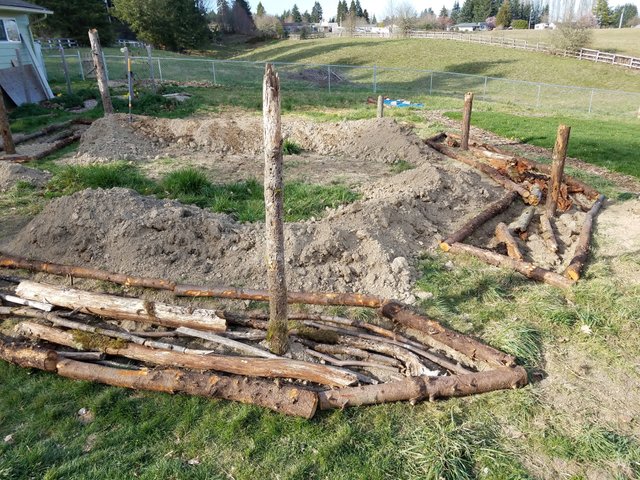
So despite adding a ton of wood I decided I need to add more! Sometimes it feels like this project will never end...
The first thing I did was add a bunch of large logs that were all old and filled with fungi. Having these up top should help benefit the plants more quickly while the wood buried even deeper slowly decompose.
I then added a bunch of large(ish) branches to fill in the beds even more. I actually added a fair bit more after I took that last picture.
Most of these branches were aged and already partially rotten. I don't like using fresh stuff up near the top where the vegetables will be growing while getting established.

Going back to the first picture I then added the soil I had originally dug out on top of this 2nd layer of branches and logs. It was a pain filling in all the gaps between the smaller pieces of wood but well worth it.
I forgot to mention earlier that I had added logs around the sides of the bed as the border. These logs were salvaged from a prairie restoration site where they were removing the trees to restore the prairie. The site is an abandoned Christmas tree farm and is in bad shape.
So the logs are rough but they work. I will be cutting off any rough parts on the outside edges once I finish the garden.
Now that the wood is all covered the garden is really starting to take shape. But there is still more to do.
Next Steps to Finish the Kitchen Garden
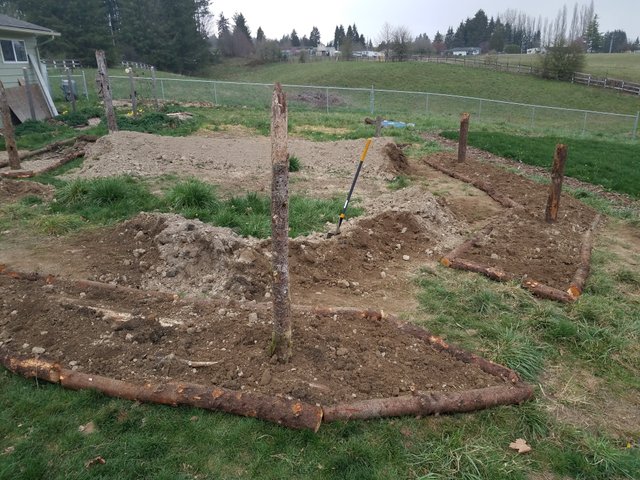
I'm really liking how this garden is coming together. I still need to finish covering the wood in the 3rd bed with soil and then go back over all the beds and fill them up with all the soil I have left.
Hopefully this will be enough for me to add a second log layer to the retaining wall. Assuming there is enough soil I then want to bring in some nice rich garden soil and add a third log layer making the whole garden come up to my knees give or take a couple inches.
But all in all this garden will be roughly 3 feet deep which will be great for growing food.
I also need to build some habitat areas using wood and rocks. These areas will be part of the garden and will be planted with native edible vegetables. More on that later!
When the beds are all finished I will also need to mulch all the grass around the garden beds and in the middle gathering area. And of course add the picnic table!
So not exactly your traditional garden but here are the benefits of this approach:
- Little to no watering after seedlings become established.
- No need to fertilize.
- No future tilling.
- Lots of habitat for beneficial critters which will aid in pest control.
- Easy access for maintenance and harvest due to the location.
- Sequestering large amounts of carbon.
- Beautiful area for family and friends to gather.
I'm going to add edible flowers and plant perennial vegetables which while not unique to this garden will bring some additional benefits or support the existing ones.
All in all I'm excited about this garden but I still have a lot of work to do. I have done a lot already but I think I'm only about halfway done at the moment.
Hope you enjoyed this update and I'm sure I will be talking about this garden in each of my weekly homesteading weekend reports for the rest of the month. Watch for those if you want to follow my progress.
I will also make a summary post once it is all done that will build on this one.
Thank you!

Weekly Blog Post
- What You Need to Know About Permaculture Zones
- Companion Post on Steemit - Getting Started With Permaculture Zones
Related Blog Posts
- How to Work With Nature to Rewild your Homestead (And Why You Should Do It.)
- Hugelkultur Beds: The Best Raised Beds for Your Garden
- 3 Things Your Garden Needs to Attract Birds
- 5 Ways to Transform Your Garden into a Low Water Garden
- Control Garden Pests without Toxic Chemicals
Follow me for more posts all about homesteading, working with nature, and growing your own food: @wildhomesteading
And check out my blog - www.wildhomesteading.com for weekly in-depth posts on working with nature to grow your own food and start/build your homestead.
Congratulations, your post has been selected to be included in my weekly Sustainability Curation Digest for the Minnow Support Project.
Compiler of the Homesteaders and Preppers on Steem list.
Compiler of the Homeschoolers & Unschoolers on Steem list.
Thank you! :)
Congratulations @wildhomesteading! You have completed the following achievement on the Steem blockchain and have been rewarded with new badge(s) :
You can view your badges on your Steem Board and compare to others on the Steem Ranking
If you no longer want to receive notifications, reply to this comment with the word
STOPDo not miss the last post from @steemitboard:
Vote for @Steemitboard as a witness to get one more award and increased upvotes!
Looking like it i really coming together nice work 💯🐒
Thank you! :)
Congratulations! Your post has been selected as a daily Steemit truffle! It is listed on rank 14 of all contributions awarded today. You can find the TOP DAILY TRUFFLE PICKS HERE.
I upvoted your contribution because to my mind your post is at least 5 SBD worth and should receive 262 votes. It's now up to the lovely Steemit community to make this come true.
I am
TrufflePig, an Artificial Intelligence Bot that helps minnows and content curators using Machine Learning. If you are curious how I select content, you can find an explanation here!Have a nice day and sincerely yours,

TrufflePigHi Daron!
It is so exciting to see a new garden taking shape! I am sure that all the effort you are putting into it will be generously rewarded :)
I wanted to ask you something about the hugelkultur beds. I know that uncomposted organic matter should stay on top of the ground and I even found a relevant remark on your post about mulch.
My question is why this doesn't apply at the hugelkultur beds. It sounds logical to me that during the decomposition of the logs in the beds the nitrogen should decrease but apparently it doesn't. I would be most obliged if you can answer this question that has been bugging me but it's ok if you can't :)
Greetings from Crete!
Stefanos
Hello and thank you! The main reason is that the mulch being much smaller than the logs breaks down much more quickly which takes more nitrogen. The decomp of the logs is much slower and more based on fungal decomp as opposed to bacterial decomp. Bacterial decomp uses more nitrogen than fungal decomp.
Also, with hugelkultur beds the wood should be buried down at least 4 to 6 inches. This keeps the logs down far enough that the plant roots have plenty of soil to go into. If you till in mulch it will be near the surface where most plant feeder roots are located--especially when the plants are just getting established.
But just to be safe I also tend to add some material higher in nitrogen around the logs. In this case that was green sod. But animal manure would work too. I don't really think it is needed but it does not hurt either.
Hugel beds really are a longterm investment. Most hugel beds don't really take off in terms of plant growth for 2 or 3 years. But I still find that mine do fine in the 1st year--they just do better 2 or 3 years in.
Forgot to mention... I also always grow a fair number of nitrogen fixing plants in my hugel beds when they are new. But I do this with all my non-hugel beds too. It just helps them all do better.
Hope that helps!
Posted using Partiko Android
It does!
Thank you very much for your thorough response!
Till now I am adding compost and organic matter on top of the beds but at the next ones I will try to put some logs on the bottom. It sounds like a very good idea :)
Awesome and that sounds great! Good luck! :)