Getting started with permaculture zones

Are you familiar with permaculture zones? Have you designed your property with these zones in mind? Using permaculture zones can help you place each element (garden, chickens, fruit trees, etc.) in the best spot to make the most out of interaction between elements all while saving you time and energy.
But if you are not familiar with permaculture zones then an overview might be what you need to get started. This week's blog post is all about providing you with what you need to get started with permaculture zones.
If you are already using permaculture zones on your property please leave a reply with how you have setup the zones on your property.
Basic Idea Behind Permaculture Zones

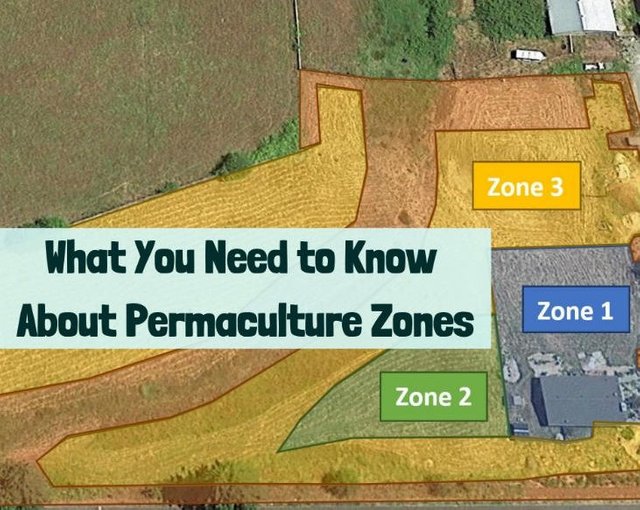
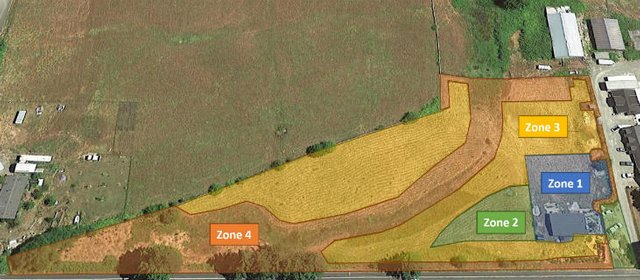
Often permaculture zones are shown as concentric circles like the rings on a tree moving out from a central point (often a house or other structure). But as you can see in the above image showing the general zone layout for my homestead you can mix up the zones to better fit your own property.
In general permaculture zones are broken up into 5 different zones. Some people add additional zones to this but to keep it simple I'm just sticking with the original 5.
The basic idea is that elements that need your attention the most (kitchen garden for example) are placed in the lower zones (zone 1 for the kitchen garden) and elements that don't need your attention are placed in the higher zones with zone 5 being reserved for wilderness.
This week's blog post covers each zone in detail so please check it out to dive further into each of the zones and the type of uses that are appropriate in each.
I'm curious--how many zones do you have on your property?
Permaculture Design
This video shows a great example of a relatively small permaculture system.
Permaculture zones are just one part of permaculture design. Beyond zones there is also the sector analysis and of course all the individual projects such as swales, ponds, kitchen gardens, etc. How far have you gone in your permaculture design?
If you are just getting started or need a refresher then make sure to check out the blog post for more information including steps to get started with using permaculture zones.
But my general recommendation is to use google maps to get a screenshot of your property. If you paste that screenshot into word, paint, or some other program you can draw on it. Draw the extent of the zones on the map. That is what I did to make the image showing the zones on my property. Of course you can also sketch out your property by hand if you want.
Once you have the zones drawn on the map take a moment to make a list of the elements you have and want to have in the future on your property. Mark which zone these go in and add them to the map. Think about if you have enough space in each zone and think about if you have enough time to manage them all.
Tip: if your life is already very busy consider having more zone 3 (or even 4) than zone 1 and 2. This way you can focus on perennial based food systems that won't need as much regular attention. Later if your schedule changes you can expand your zone 1 and 2. Remember, the higher zones don't have to be far away.
Thanks for reading this post!

Weekly Blog Post
Related Blog Posts
- How to Work With Nature to Rewild your Homestead (And Why You Should Do It.)
- Read this Before You Start a Homestead
Follow me for more posts all about homesteading, working with nature, and growing your own food: @wildhomesteading
And check out my blog - www.wildhomesteading.com for weekly in-depth posts on working with nature to grow your own food and start/build your homestead.
The CooperFelix-Multiservices Team appreciates the content of this post by giving it a 50% upvote. We invite users to participate in the Project by offering a small donation on Fundition.
Wellness Is Green
The image is owned by the author and the use, reproduction or quotation without authorization is forbidden
Congratulations @wildhomesteading! You have completed the following achievement on the Steem blockchain and have been rewarded with new badge(s) :
You can view your badges on your Steem Board and compare to others on the Steem Ranking
If you no longer want to receive notifications, reply to this comment with the word
STOPVote for @Steemitboard as a witness to get one more award and increased upvotes!
Inspiring I can't wait to get my hands into my little project. Will be messaging for tips don't doubt it 💯🐒
Thanks and sounds good! :)
Posted using Partiko Android