How I make custom @freedompoint knives step 3: Heat treating
On this wonderful knife build we are getting onto the next step in the process...heat treating.
When I build knives I use the term create. I do not mass produce, so each one is different and unique. Given the tools that I currently have I love to push the limits of what I am able to do. My goal was to use everything that I had so that I was sure I could continue to make knives. If I had done something "special" I am not sure I can reproduce an idea. Let's get to it...
Heat Treating
This part of the build is a bit more technical. The other parts may be all about art and creating, but for this we need to call in some science. The temperatures all have specific purpose. There are going to be two parts to the heat treating. First is to harden and the next is to temper.
Hardening
Wikipedia :
Hardening is a metallurgical metalworking process used to increase the hardness of a metal. The hardness of a metal is directly proportional to the uniaxial yield stress at the location of the imposed strain. A harder metal will have a higher resistance to plastic deformation than a less hard metal.
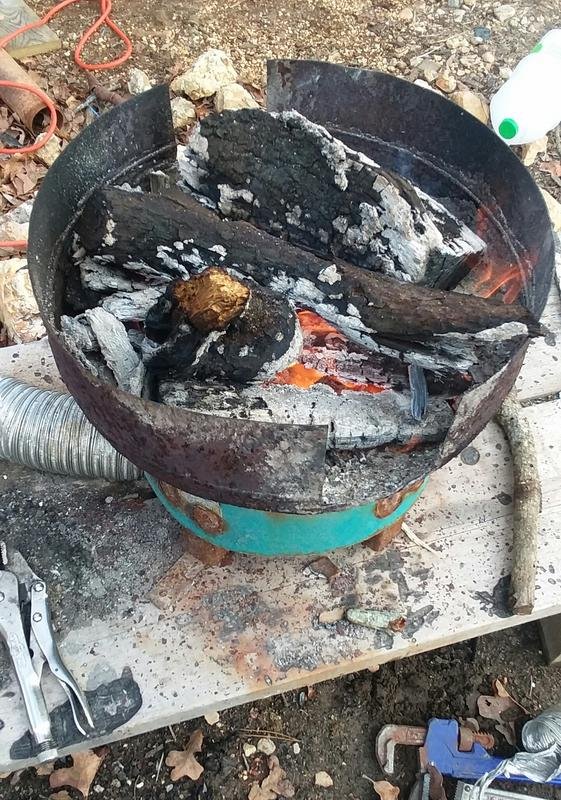
For this part I use my forge and wood. Since we live in a forest I figure this is the best and most abundant fuel for me. My forge is built from a well tank. It has been cut down and galvanized pipe added to the bottom, to empty built up ash. In the glavanized pipe there is a tee. From the tee I have dryer hose attached that goes over to a bathroom exhaust fan. The air flows through the metal dryer hose and up through the center of the well tank. There is a metal grate over the hole to help keep coals from falling into the hole. This all works to increase the temperature efficiently.
I put the future knife in through the side of the forge at a point that the flames are blowing hot. Then I wait for the blade to "soak". I do not have a way to accurately measure the temperature, but I do know what works for me. When the blade becomes glowing orange it is now "soaking". At that point it should no longer stick to a magnet. So I have a couple of magnets stacked near my forge. I remove the blade from the fire and touch it to the magnets to see if it is magnetic and if it doean't stick I quench it. I only quench the blade to ensure hardness but not the handle so I can still drill holes.
I use canola oil that has been preheated to quench. This ensures that my blades should be food safe. I used to use old motor oil, but it was very bad to breathe and messed with the carbon in the blade really bad causing decarberization. I use a metal rod that has a nut and washer on the end to preheat the oil. I put it into the fire until it glows orange and then stir it into the oil. I do this a couple of times especially when it is really cold outside. You want to preheat the oil to not have an extremely quick cooling. There is nothing worse than incorrect temperatures and then hearing the dreaded ping. Meaning your blade cracked while quenching. The whole quenching process is referred to differential quenching. After I feel that they are cooled enough in the oil, I lay them aside to cool while I get other tools together.
Clean Up
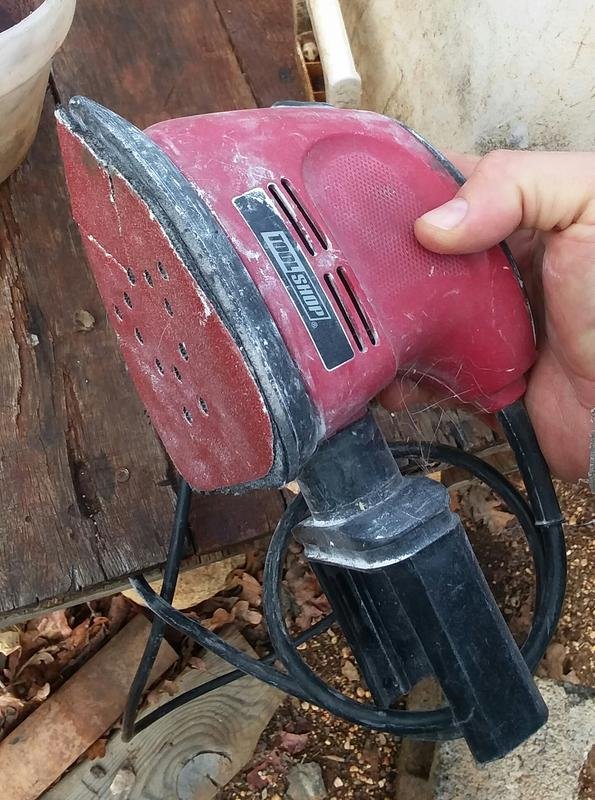
After the quenching is done it is time to clean it up. The blades are all black and need to be cleaned to help see the colors while tempering. I use a palm sander to clear off the whole blade.
Tempering
Wikipedia:
Tempering is a process of heat treating, which is used to increase the toughness of iron-based alloys. Tempering is usually performed after hardening, to reduce some of the excess hardness, and is done by heating the metal to some temperature below the critical point for a certain period of time, then allowing it to cool in still air. The exact temperature determines the amount of hardness removed, and depends on both the specific composition of the alloy and on the desired properties in the finished product. For instance, very hard tools are often tempered at low temperatures, while springs are tempered to much higher temperatures.
The idea of tempering is to reduce the hardness of the steel. Once the blade is hardened it is extremely hard, and this makes it very brittle. When you temper the blade it adds a bit of give to the metal. The less it is tempered, the harder it will be. This will give you a very sharp edge for a long time, but you risk the blade chipping. The more it is tempered the "softer" it is. So it can be extremely sharp, but not for a long time and would need touched up more often.
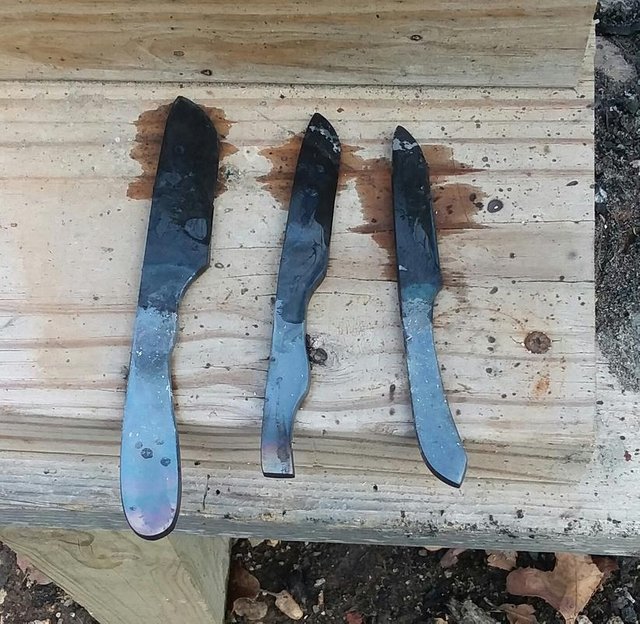
For this I temper using a propane torch. I start by heating at the spine of the blade. I move the flame from the handle to the tip and try to heat it evenly. As I continue to do this the color of the spine begins to change color. It slowly creeps to the cutting edge. You want the color to be a straw color at the edge. This is a great temper for an everyday knife. The colors are based on a rockwell scale for hardness.
Edge Test
When all of this is done I use the belt sander to clean the blade up and put an edge on the blade.
The blade needs to be tested to ensure performance. With these, since they are smaller, I use a baton. I baton the knives and cut notches out of a piece of wood. I do this over and over. When this is all done I check the cutting edge to see if it chipped or rolled. Is it too hard or too soft or just right. With bigger knives I chop the pieces of wood and I gouge the tip to ensure strength. These two passed the test!
The next post is going to be about putting the handles on.

I hope you enjoyed this post. You can check out my previous posts in the series here:
Introduction:
https://steemit.com/homesteading/@freedompoint/how-i-make-custom-freedompoint-knives-introduction


These knives are created with loving and artistic hands. Someone will treasure these knives...
Thank you! I love what I do. If I think they won't be good I stop and start over.
Very interesting. Looks like a lot of work and more of an art form than I had previously thought. Keep the knife making education coming.
It takes a little finesse. A basic working knowledge and alot of practice. Once you do it a bit, it really makes sense. I can't really get into the highly technical stuff, I just do what I know haha
Thats so cool. Its on my list of things to learn.
I love it. Being able to create a very functional tool is amazing!
Are you in SW or SE MO?
You cant be all that far from me. I'm close to Joplin MO
Well, central like half way. A few miles north of highway 60
Very interesting stuff. I've never been involved in any knife making, but I sure have enjoyed reading your content about it. Thanks for sharing.
Thank you so much! I really enjoy it, and I hope to continue to improve equipment and quality!