A few days ago, an elder brother of our factory gave me this fan. This person let me repair a whole thing that I posted yesterday, which was an electric kettle, and the fan belonged to that person. He gave me the fan and said that it was not charging through the charger and the fan and light were running very little and there was a lot of dirt. You should repair it properly. Then I brought it home and started working on it step by step, so let's see how it works.
Step -01
First I took the fan to my work table, and you can see that the fan is covered in a lot of dirt and black, and an LED light is on, and the inner fan is rotating, and the light and fan are running on the charge of the battery. Then I opened the fan, and you can see that it is divided into two parts; on one side there are two batteries with a cover, 3.7-volt lithium batteries. And on the other side, there is a controlling circuit.
Step -02
Now I took my phone's Type C charger to measure its output and bought a charging input and tested it to see if any output is available from inside. Then you can see that I connected the charging pin and opened the clip from the circuit and tried to see its output, but it is not giving any output here, which means that the charging pin of this type of fan has been damaged from the inside.
Step -03
And to see if the battery is good, I measured the battery, and you can see that an output is coming from the battery here, whose rating was 3.91 volts. And looking at the battery quality, it is understood that the batteries are still good. Then, to check the controlling circuit and to clear my doubts, I took a six-volt power supply and directly supplied 5 volts to the circuit through the clip, and you can see that the controlling circuit is indicating a red light here, and it means that it is charging, and I am 100% sure that my type C charging pin is the problem.
Step -04
What you can see in my hand now is basically a type C charging board for charging this fan, and at its end there is a clip which is attached to the circuit. Now I have taken it apart and will go to the market if I can replace it, or I will get another type of charging pin and modify it. So before buying this charging pin from the market, it is important to clean my fan because there is a lot of dirt accumulated here, so I decided to clean its dirt.
Step -05
Now you can see that I have washed the two body casings on both sides nicely with soapy water, and the blades of the motor have been washed and cleaned by someone, and now they look white and look like new. Then I went to the market and bought this type C complete charging pin for 40 taka, and if I want to replace it in the fan, I have to make a hole and modify it.
Step -06
Then I made a hole in the body cover of the fan like this and inserted it inside and fixed it well with two screws, and a black wire and a red wire will work as a high-voltage output, which will be inserted into the circuit, so I joined it with a parallel connection without dropping the clip of the previous charging pin. Then I checked the output with a DC 5-volt mobile charger, and here you can see that the output is 4.94 volts.
And here is another interesting thing: I was able to repair my previous charging pin, which was damaged later. I cleaned it nicely with two drops of diesel inside with a brush after cleaning the dirt inside. The previous charging pin was working, and now there are two charging pins inside this fan which will work as a backup.
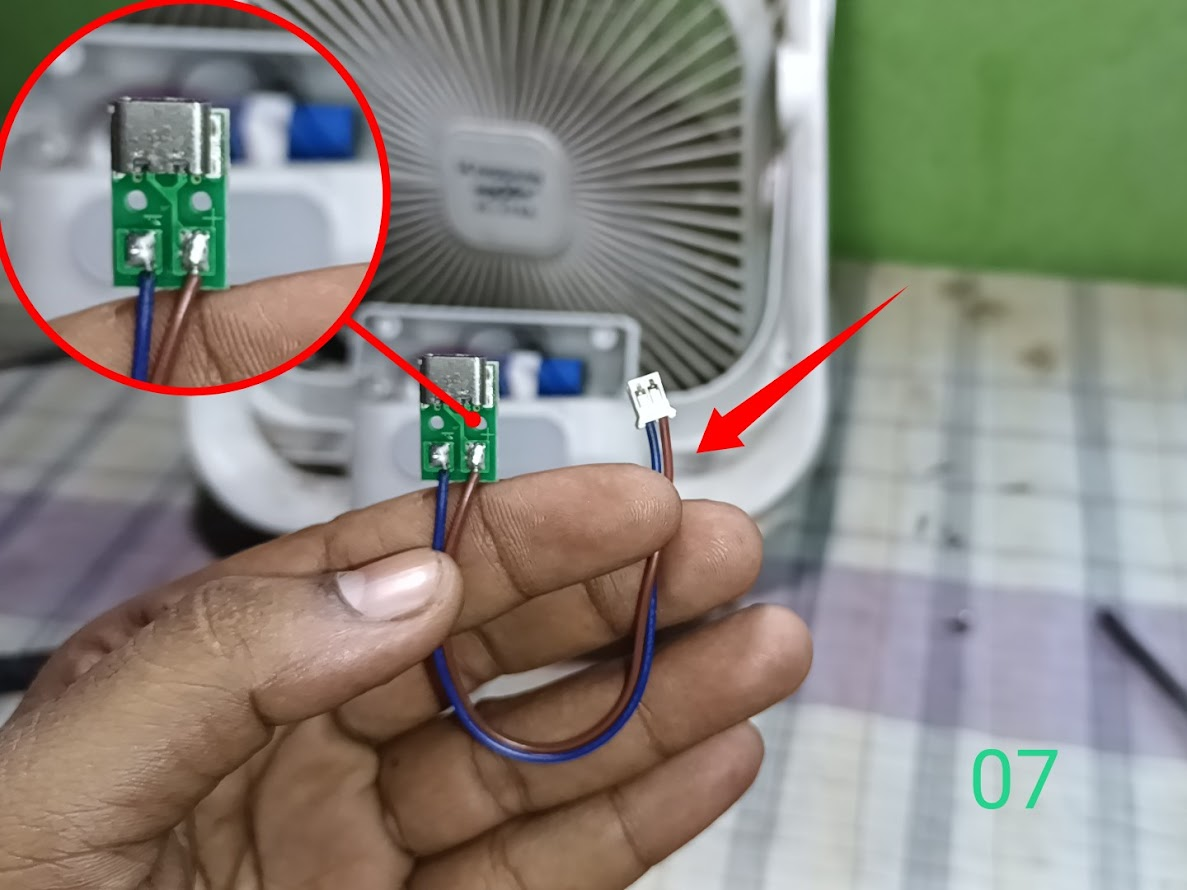
Step -07
Then I did the complete fan fitting, and you can see how beautiful it looks; the previous dirt is gone, and the new charging pin is attached, and the previous charging pin is also there, and I charged it, and it was charged, and the light fan is running beautifully. So to show you once again, I charged it again through a DC 5-volt mobile charger, and you can see a red light is indicating through a beautiful small hole that it is going to go, and now it is charging.
I personally liked the work of this fan because this fan is liked by me and my wife and my daughter and all our family. It was giving very good and smooth air, and its light is very beautiful, and it will be very convenient to carry anywhere. So I later decided to buy such a charger fan that runs on DC 5 volts. And with my repair work, I took a picture, which I also like very much.
Video Tutorial: To better understand the practical part of this tutorial, you can watch the video below.
✅ We support @pennsif and @pennsif.witness for the growth of this platform. pennsif.witness his contribution to the Steemit community. Vote for him as a Witness here: Click to Vote
🟩 Thank you for reading my post and giving your valuable time. Stay well and stay healthy. God bless you.
🟩
.png)


Please add a title to your video in youtube mentioning steem
Please consider supporting Proposal #100 to boost the video on Steem.
"Type less, smile more"
Curated by @alejos7ven