Graphic Design Class 6 | Designing a Banner with the Pixel lab Application|
I also want to use this medium to appreciate all our graphic design students @stanleynnah @dibie @chairulrizalx @hazmat @habdallah @masrull @madilyn02 @razzor @christianyocte @n-chris @cyberking25 and @sheza786 for their active participation in our previous class-1 dated 15th September 2021
This is our second class on smartphone graphic design and as your "Design App Teacher" I'll be teaching you how to design banners using a smartphone application called "PIXEL LAB"
Having known the functions of the icons on the pixel lab app in our previous class, we'll go ahead now to apply them in our banner design creation. And in this class, we'll be learning how to create this!

To make it more practical, I will try my best to show the detailed steps of my banner design process with picture screenshots for an easy understanding. So follow me!
WHAT IS A BANNER
In the online world, a banner is a rectangular or square advertisement placed on a website, which includes graphic images and text, and links to the advertiser’s website. source
5 KEY THINGS YOU NEED TO DO TO DESIGN OUTSTANDING BANNERS
Make inquiries from your clients and gather the findings you got for a proper information to be passed across to the audience. I.e information like the banner title, logo, business colour if any, and contacts should be gotten.
If you want to crop a picture effectively, that is to remove the background to become a PNG file (without background), Use
remove.bgIt's a site for removing backgrounds or turning jpeg images to PNG images. You can try it now!While searching for images on your browser, you should learn how to search for images that best conveys the message you're passing across on the banner and also search with the appropriate words. Example,
If I want a dark lady smiling putting on corporate, I would type; Dark smiling lady in corporate and I'll get different pictures, keep checking you would see more to choose from. Same thing you do for any picture you're looking for online.If you want to download Social media icons, such as facebook, whatsapp, twitter and the likes simply go to google, and type; facebook icon PNG, or Zoom icon png and then download.
Your choice of fonts should be professionally chosen, Curvy fonts depicts creativity and flexibility. Straight fonts depicts firmness. Just as it's advisable not to work with too many colours, It's also good not to work with more than 2 fonts while designing. Sometimes all straight fonts, sometimes a curvy and straight font.Working with only curvy fonts usually looks bad. Companies usually make use of straight fonts. Catering firms usually make use of curvy fonts. But any can go. Straight fonts usually balance a curvy font so to know which font serves best, ask yourself "Is it balanced visually?"
STEPS TO DESIGN A BANNER WITH THE PIXEL LAB APPLICATION
SET THE BANNER SIZE
There are two ways of setting or changing the banner size on this app.
From the three dots at the top right, select
image sizeand set the size. We used the custom size 1280width and 1280height for this class banner creation, you can set yours too.From the background icon, after clicking on the background icon, you can also click on the
image sizeicon to set the size
 |  |
|---|
CHOOSE A BACKGROUND COLOUR
Choosing a colour for the banner should be done carefully because you do not want the audience to frown or come across a poor design.
Click on background icon, select the colour option and choose your preferred colour. we are working with only 1 colour "BLUE" So, i'll go ahead and choose from the colour option.
But if you want to work with 2 colours, choose the gradient colour option
 |  |
|---|
ADD THE TEXTS
Click on the + or add icon and select Text I input my text and chose a good font type, size and colour. I also did same for all other texts.
Remember we are working on our texts now, so any effect we want to add to our text would be gotten from the "TEXT ICON"
 |  |
|---|
ADD IMAGES
Shapes like square, circle and so on are seen as images. So to fix my text inside an image, I clicked on the + or add icon and selected shapes
I increased the radius of the square shape to 5 inorder to achieve a curve at the two ends of the shape.
 |  |
|---|
I scrolled down a bit to choose the colour "ORANGE" for my square shape as well.

I copied the "GRAPHIC DESIGN" text clicked on the edit icon and edited to "SIGN UP FOR FREE" then I placed the edited text inside my square shape and "MERGED" them together to become one.
 |  |
|---|
 |  |
|---|
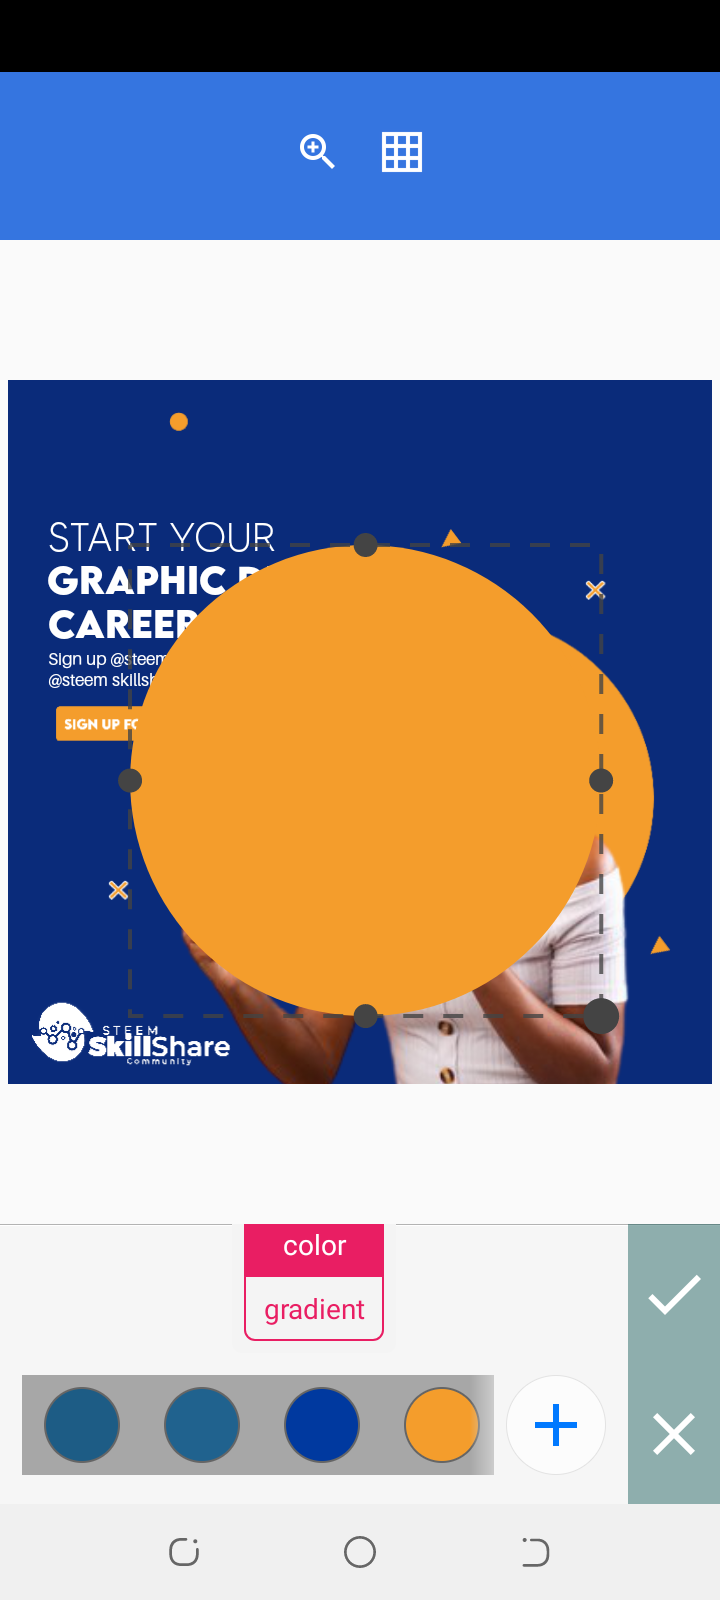
Still on the + or add icon, I added another shape but a circle shape this time.
|  |
|---|
Then I clicked on the from gallery option to get a downloaded image that suits my design from my phone gallery folder. I also did same for the steem skill share community logo and adjusted them to a good location.
 |  |
|---|
To add more beauty I added more shapes on my banner design and reduced their sizes.

Then I created a little design with my "circle" and "square" shapes.
Below are the steps;
Get your circle shape from the + or add icon and change the colour of the circle shape
Add your square shape on the circle shape, drag to increase the width "almost looking like a rectangle" and click on the copy icon to duplicate the shape on the circle shape and arrange properly then you merge all together; "the circle shape and all the rectangle shapes"
 |  |
|---|
- Click on
erase colourand adjust the tolerance. We are working with a tolerance of "25" for this class, You can choose yours.
 |  |
|---|
I changed the colour to white and also reduced the opacity before I duplicated and placed at their right positions.
 |  |
|---|
ALIGN YOUR WORK PROPERLY
Making sure that your work is properly aligned is a good thing to do because it makes your work look neat and orderly. You can align your texts and images with the ruler or grid line icon
 |  |
|---|
Our banner design is ready!

Conclusion
We'll stop here now. I hope you understood all the processes involved in creating a banner design? Go through the notes on today's class carefully, practice and you'll be amazed at how creative you will become with the pixel lab app on banner creation.
The next class will be on 1st Oct, 2021 and anchored by @lhorgic our "Design Science Teacher". Stay tuned!
Assignment
What site is used to remove backgrounds from images? (2 marks)
State 2 ways in which the banner size can be set and with picture illustrations too (3 marks)
Create a simple " THANK YOU" banner design appreciating our able graphic design headmaster @atim1234 for organizing this amazing graphic design class in the steem skill share community(5 marks)
For the question 3, you will be given 5 marks if you accurately apply the following;Use of good fonts
Use of compelling or attractive colours
Use of a quality picture that portrays your "THANK YOU' message, be it downloaded or your own original picture.
Below are the rules for the assignment;
• Make your Post title: CLASS 6 GRAPHIC DESIGN APPLICATION ASSIGNMENT ON BANNER CREATION by your username
• Drop the link for your assignment in the comment section of this post.
• You have to also tag me in your assignment post for me to get notified.
Note
• No plagiarism
• Last date of submission 29th Sep, 2021
• Use hashtag #niglystask
GOODLUCK!
Special regards,
@atim1234
@printskill
@lhorgic
@milakz
Thank you so much for your classes. I really appreciate them. Here's a link to my assignment:
CLASS 6 GRAPHIC DESIGN APPLICATION ASSIGNMENT ON BANNER CREATION by @christianyocte
You've got a free upvote from witness fuli.
Peace & Love!
Thank you very much!
I appreciate.
Wow this is so great. Thanks for sharing this great knowledge.
You're welcome @abu78
Thanks!
Wow
This is article is amazing.
I'm glad you find it amazing @rfprincess
Thanks!
Interesting lecture, I didn't realize a complex process like that could be done on a mobile app.
I feel good you know now @hazmat
With the pixel lab application, graphic design is simple and easy!
Are we using your colour combination or we should be original with our design??
@niglys8
Use your preferred colour choice @dibie
Your preferred colour choice must be compelling and attractive.
Ok thanks for the clarification ma'am
Hi @niglys8 please check out my Assignment https://steemit.com/hive-197809/@chairulrizalx/class-6-graphic-design-application-assignment-on-banner-creation-or-by-chairulrizalx
thank you @niglys8
Good job
Thank you!
@niglys8 You're really opening me up to greater possiblity using mobile app for designs...who would have thought this amazing design was possible using a mobile app? Kudos my amiable "Design App Teacher"
The pixel lab application makes all kinds of amazing graphic designs.
I feel so fufilled passing on the knowledge to you and to others as well.
My pleasure @lhorgic