Achievement 4 : Applying Markdown
Achievement 4 : Applying Markdown
Objectives of this task are:
- Newcomers have basic Markdown skills.
- Newcomers are able to use some advance markdown with the given markdown template.
A post needs to be nicely formatted to be able to be read easily.
Steemit supports Markdown and you can achieve an attractive result, by using basic syntax & easy to remember commands.
There are also tools that you can use as editors, such as hackmd.io
Below are the collections of basic markdown and some advance markdowns code/template that you can apply into your post for little variation on presentation of your post. These were compiled by @katerinaramm and the original post is here
Image Source

Headlines
Headlines and sub-headlines are important elements as they show the structure of your post and guide the eye of the reader.
There are two ways to create a headline.
(a) You insert at the start of the row a # symbol. As the number of the hashtag symbol # increases, the headline size decreases.
For instance:
Headline 1
Headline 2
Headline 3
Headline 4
Headline 5
Headline 6
The above are created with this code:
# Headline 1
## Headline 2
### Headline 3
#### Headline 4
##### Headline 5
###### Headline 6
Tips for Headlines (only for H1 & H2)
Instead of adding the #, you can add your title and underneath three dashes or three times the equal sign.
This will be a headline 2
---
This will be a headline 1
===
Tip You can make the headline centered, italic, strikethrough as follows
- centered headline
# <center>Headline here</center> - italics headline
#Headline` - Strike through
#Headline& Headline

Text
You can do a number of things with text. One thing you can do when writing an essay on steemit, is justify your text.
Justify Text
<div class="text-justify">
Lorem ipsum dolor sit amet, consectetur adipiscing elit. Nunc eget purus a tortor egestas placerat sit amet vitae sem. Nullam sit amet finibus justo. Donec volutpat ipsum leo. Pellentesque habitant morbi tristique senectus et netus et malesuada fames ac turpis egestas. Suspendisse sit amet dignissim ante.
</div>
The Output will be
(without the justify command > )
Lorem ipsum dolor sit amet, consectetur adipiscing elit. Nunc eget purus a tortor egestas placerat sit amet vitae sem. Nullam sit amet finibus justo. Donec volutpat ipsum leo. Pellentesque habitant morbi tristique senectus et netus et malesuada fames ac turpis egestas.
Align text into two cells
Sometimes you may need to write something in two languages or input it in two different columns.
<div class="pull-right">
TEXT RIGHT Cras pellentesque, diam ut fringilla luctus, massa mauris fringilla magna, sed consequat mi odio in ante.
</div>
TEXT LEFT Cras pellentesque, diam ut fringilla luctus, massa mauris fringilla magna, sed consequat mi odio in ante.
How to center text
You will need to add the <center> text here </center> to align text
How to add Subscript
You can use the <sub> text or number here </sub> to make a text or number appear below the baseline.
H<sub>2</sub>O has as output the H2O
You can also use subscript to write a note in between a text or under a photo / video
How to add SuperScript
You can use the <sup> command for a text to appar above the baseline
A reference goes here<sup>1</sup> has as output >> A reference goes here1
Tip: You can add a clickable link
A reference goes here<sup>[1](https://steemd.com)</sup> has as output >> A reference goes here1

Links
Adding links in our posts is very useful and we often need to do it numerous times.
- When we add a steemit username, along with its
@, the name becomes clickable (leading to the steemit blog page) i.e. @katerinaramm - When we add a link, it is automatically recognized and is clickable i.e.
https://steemit.com/@katerinaramm> > https://steemit.com/@katerinaramm - We can hide a link in a word or phrase, using the below syntax
[this will be an inline link](https://steemit.com/@katerinaramm)transforms to >>
This will be an inline link

Tables
You can create a table in two ways
Easy way to create a table
Copy and paste the below and add as many headers and cells you need.
Header 1 | Header 2
--------- | ----------
Cell 1 | Cell 2
Will have the output >>
| Header 1 | Header 2 |
|---|---|
| Cell 1 | Cell 2 |
Create a table using html
An HTML table is defined with the <table> tag.
Each table row is defined with the <tr> tag. A table header is defined with the <th> tag. By default, table headings are bold and centered. A table data/cell is defined with the <td> tag. source
<table>
<tr>
<th> header 1 </th> <th> header 2 </th>
<tr>
<td> cell 1 </td> <td> cell 2 </td>
</tr>
<tr>
<td> cell 3 </td> <td> cell 4</td>
</tr>
</table>
The output of the above code will be
| header 1 | header 2 |
|---|---|
| cell 1 | cell 2 |
| cell 3 | cell 4 |
Tips
- You can add cells by adding
<td>and</td>and the in between syntax - You can add extra rows by adding
<tr>&</tr> - If you wish to add an inline link you need to use the
<a href="link">title</a> - If you use inline images, make sure that they have correct and similar dimensions, so that they can look orderly put.
- You can use inline commands such as center, headlines, etc.
Code
Adding Code in a post is sometimes necessary, it works in the below two ways:
a. Adding one back-tick (`) before and one after the markdown syntax
**using bold syntax** >> using bold syntax
or b. you can use <code> before and after the command </code> at the end of the word/sentence
<code> *hello* </code> output will be >> hello
You can read more info here
Quotes - Blockquotes
We often need to write a quote, a phrase that someone said or wrote.
That is when we use the > in front of the sentence
Blockquotes with > for something that someone has written/said
> “Any fool can know. The point is to understand.”
― Albert Einstein
“Any fool can know. The point is to understand.”
― Albert Einstein
Line Break
There are sometimes that we need an extra line break between text.
We can use the <br> to include an extra line space

Videos
We often need to insert videos or gifs in our posts.
YouTube videos are instantly embedded, so if you put a link it appear in text. If in any way it interferes with text or images, you can put ruler before and after it.
Gifs are also embeddable, just put the link and you can even center them with the <center> command
https://media.tenor.com/images/917de53340b903bb7c142031b411593e/tenor.gif

Tip: You need to find the url that finishes in .gif
DTube can be embedded but requires some more time than YouTube.
Scenario a: When you upload a dtube video, it automatically is embedded in your steemit post.
It also shows the link to the youtube video and to the screenshot.
For instance: https://steemit.com/music/@thetroublenotes/ap0ofmc6

These are both the links we will need + use (the dtube link and screenshot used)
If you already have the above information, you can upload the video using this code:
<center><a href='https://d.tube/#!/v/thetroublenotes/ap0ofmc6'><img src='https://ipfs.io/ipfs/QmNnrP6KnhTHqFAfwt8CnB6XeRHfMZ5Qj2ngyT7dgt2UwP'></a></center>
(output)
Scenario B You do not have a steemit link where the dtube video is located, but you do have the dtube link.
You right click on the video and click on 'save snapshot' After you select folder, you upload it as a normal photo on steemit and you insert the following code (similar as above)
<center><a href='https://d.tube/#!/v/thetroublenotes/ap0ofmc6'><img src='https://cdn.steemitimages.com/DQmYc7f5HaZhZC1tnofBByafrCrq7dC2x4CbjskYkJvWguC/QmdkNq6R6yvrxN6kvQDVnCHqqqHyoWHtbzysNGdVyitLob.jpg'></a></center>
the output will be
ps The positive with this way is that you can select your own favorite shot!
Ruler
If you wish to separate a theme you can upload a ruler or you can use at the beginning of the line 3 dashes, 3 stars or 3 equal signs
--- or *** or ===
Images
How to align images
You can align your images at the center, at the left or right side.
Align left
<div class="pull-left">
https://cdn.steemitimages.com/DQmbFjWmi4mxw5AXo9BjVNvobWGc5fmAQyxvhR8S3s4QMtf/20180312_114323.jpg
</div>
text below
If you align the image to the left, the text will go to the right
This will also reduce the image's dimensions by 1/2
More text can go here
And more
And more...
Align right
<div class="pull-right">
https://cdn.steemitimages.com/DQmbFjWmi4mxw5AXo9BjVNvobWGc5fmAQyxvhR8S3s4QMtf/20180312_114323.jpg
</div>
text below
If you align the image to the right, the text will go to the left
This will also reduce the image's dimensions by 1/2
More text can go here
And more
And more... ----
Align center
<center>https://cdn.steemitimages.com/DQmbFjWmi4mxw5AXo9BjVNvobWGc5fmAQyxvhR8S3s4QMtf/20180312_114323.jpg</center>
A simple and elegant way to insert link + caption under the aligned image
(with the help of @mobbs & @noble-noah)
<div class="pull-left"><center>https://cdn.steemitimages.com/DQmbFjWmi4mxw5AXo9BjVNvobWGc5fmAQyxvhR8S3s4QMtf/20180312_114323.jpg<sub><a href="https://www.steemit.com">LINK NAME</a></sub></center></div>
OUTPUT
and some text goes here
and some more
How can I make my image clickable (to open into a new, bigger version of my image?)
STEP 1. You upload both images (big + small dimension)


STEP 2. You remove the 
STEP 3. You add the code as:
<center><a href="https://cdn.steemitimages.com/DQmXMrYxPPVCRN4SMyHzd3KFrNjmzdURQnLoh6yoscrN8Fx/500500.jpg"><img src="https://cdn.steemitimages.com/DQmYHaS3cTTweaGZNvyeLksCjZ1oXHE3uc7ziBDeBLWBs2P/244.jpg"></a></center>

How to scale down an image on steemit
It is usually best if you have resized your image before you upload it on stemit. However sometimes we have no time or it is not possible. That is when you can resize it directly on steemit.
STEP 1. You upload the image
The code will look like this

STEP 2. You leave only the main image (without the alt text and the parenthesis)
https://cdn.steemitimages.com/DQmeNf3mCmKEGR2mmF2jRxS55oExBc398GSgLEzsg6ex7eK/20180127_094041.jpg
STEP 3: You copy the https://steemitimages.com and add to it /0x0/ so it will become https://steemitimages.com/0x0/
STEP 4. You paste it on the start point of your photo so that it will look like this
https://steemitimages.com/0x0/https://cdn.steemitimages.com/DQmeNf3mCmKEGR2mmF2jRxS55oExBc398GSgLEzsg6ex7eK/20180127_094041.jpg
STEP 5. You are ready to reduce your image! Input the number of pixels you want in the first or the second 0 place holder. This will result to a scale down of the image in the desired dimensions.
EXAMPLE

https://cdn.steemitimages.com/DQmeNf3mCmKEGR2mmF2jRxS55oExBc398GSgLEzsg6ex7eK/20180127_094041.jpg
This image has a height of 600
https://steemitimages.com/600x0/https://cdn.steemitimages.com/DQmeNf3mCmKEGR2mmF2jRxS55oExBc398GSgLEzsg6ex7eK/20180127_094041.jpg
https://steemitimages.com/0x100/https://cdn.steemitimages.com/DQmeNf3mCmKEGR2mmF2jRxS55oExBc398GSgLEzsg6ex7eK/20180127_094041.jpgNote Copyright is very important when it comes to images. If you are unsure about which images to use and how to find the best ones, click here
Bonus
Sometimes we see something on a post and we wonder .. How did he do it!?
It is possible to see the code in every steemit post, all we need to do is replace the (it) with (d) in the url.
For instance my post: https://steemit.com/steemit/@katerinaramm/make-the-most-out-of-steemit-a-personal-approach-by-katerinaramm
would become https://steemd.com/steemit/@katerinaramm/make-the-most-out-of-steemit-a-personal-approach-by-katerinaramm
If you replace it with d you see this image:
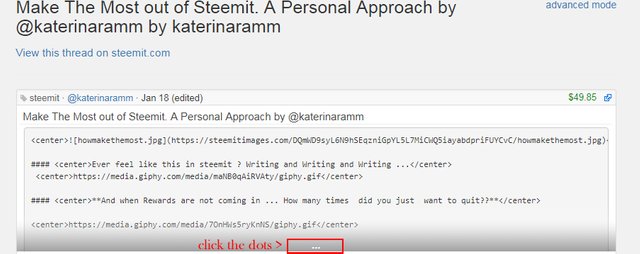
You can click the three dots to open the whole text and see the code.
Addition by @mathowl (thanks!)
If you see some kind of layout in a post and have no idea how to replicate it then you can just access the webpage source in your browser (right mouse click on webpage -> view page source or inspect element) and copy paste what you need :)
Extra Bonus Compilation of Markdown Templates:
Check out this post on markdown templates that you can use for your post on music, poetry, photography, recipe and fiction story Markdowns Templates Compilation
Task for Achievement 4: Applying Markdowns
Create content by applying at least 5 types of markdown provided in the above section.
The title of your post should be "Achievement 4 by @youraccountname Task : Applying Markdowns"
Please put the name of the country where you currently residing as one of your tag and this achievement tag #achievement4
We looking forward to your markdown post.
This is a publication that never goes out of style and is ideal for those who are starting to publish. Although it may seem a little difficult at first, with practice it becomes easy and even fun. Thank you for this publication!
Hi @nancybriti yes agree with you, I actually just use some of them on my post, applying them on our post actually fun as you said. Glad this post helps 😊
Very well described in simple terms, understood clearly
I found at least a couple typographical errors in this tutorial, such as where it says "/center>center>" instead of just "/center>". (There were open brackets before these, but if I included them, steemit would interpret them rather than showing them.)
Thank you, though, for the informative post. I enjoyed doing this achievement.
Hi @jeffbradt Happy New Year to you and family! Thank you for pointing that out, I will edit it shortly. Great that you enjoy this task series. See you around more!
This is super cool @cryptokannon. My new recruits will learn a lot from it. Resteemed
Nice! Glad it helps. Don't forget to tell your recruits about our Pro Minnow Program and Steem Greet community here 😃
Thanks @cryptokannon. I have been on Steemit since 2018. Although I left about 5 months ago, I was not fully here. Am I expected to also do the Pro Minnow program?
@focusnow I think you have sufficient knowledge of how steem works already and don't need for the Pro Minnow Program. We appreciate it if you could help spread the words about this program to the people that you bring into steemit and we also have a program for existing steemian that have been in steem for over 6 months but their all-time author rewards still below 500SP, you can check this with the tools steemworld.org
Details about the 500SP Minnowsupport Program
We will think of how to compensate you based on how many newusers you can bring into the program. Thank you.
@cryptokannon. I am not just going to bring in many ordinary users, I will bring in people that will make small investments on this platform. I originally planned to do that on Hive, but there was zero support. So I decided to come back to the platform I left few months ago. The organization and newbie support I saw here in the last few days is phenomenal. So my small group of friends started signing up yesterday. I have forwarded to them the achievement posts from achievement 1 to 4. I also reblogged them to my page. I will follow up their training in our WhatsApp group. I will set a target to onboard 7 persons each week. Whatever support we will get from you in the future to build our community here will be appreciated. I will be messaging you about our progress through discord. Thanks
Wow! I would really love to be part of this
@cryptokannon Hello, pls how do i check my authur reward
Hi @izraelinspired you can check here with this tool https://steemworld.org/@izraelinspired
scroll down to post and click on any of the active posts then see "summary" tab.
Ok thanks.
This details are really useful. I was wondering how to edit some parts when I write articles in steemit. Thank you very much @cryptokannon guiding us to be more creative 😊🙏
https://steemit.com/hive-172186/@angeljenny64/achievement-4-by-angeljenny64-task-applying-markdowns
Cool
Glad it helps
Achievement 3
https://steemit.com/cryptokannon/@vlad2004/achievement-2-mentor-by-cryptokannon-basic-security-on-steem
Заранее благодарю ❤️
This is the link to my post @cryptokannon
https://steemit.com/hive-172186/@kombatnatuka/achievement-4-by-kombatnatuka-task-applying-markdowns
Este es mi Logro 4¡¡¡