Tutorial - Learn to develop video games | Artificial intelligence (AI) of the enemy, Health Bar and more. [Part. 5]
Hello everyone, we continue with the tutorial of learning to develop a video game. In the previous tutorial we learned to configure the animations to our character and also, we learned to work with the events in Construct 3.
In this tutorial we will work with the Artificial Intelligence of the enemy, we will configure the health bar of both characters and we will order our events by means of groups.
Before we go to Construct 3. I have designed these simple Slashes in Adobe Illustrator, one for the main character and one for the enemy, it will be necessary for what we will be doing in this tutorial.
 |  |
|---|---|
| Download | Download |

Load Additional Files
Now we go to Construct and we will load the animations in a sprite every Slash, with a size of 220x130px. We then delete both slashes from the scene. Once this is done, we will create another Sprite and call it life. We color it with the Red Paint Bucket, size 500x20px. We right click on the health bar and clone, we change the name to life2.
Again we create another square sprite, with any color to test obstacles. The scene should look like this:

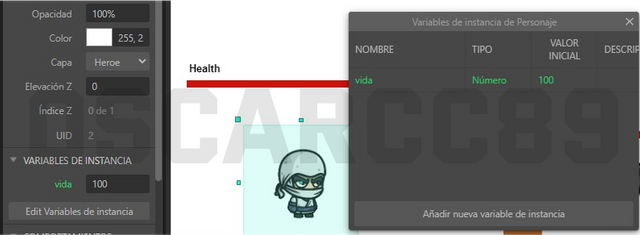
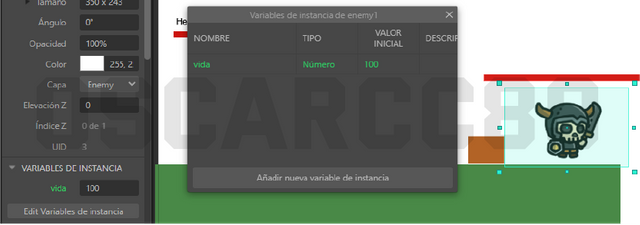
Create Instance Variables
Now we will need to create Instance Variables for the life of our character and the enemy. This is very simple, we just click on the character and on the left side menu we click on Edit Instance Variables. We name it Life with an initial value of 100, we do the same for the enemy.
 |  |
|---|
Create Groups
We can now enter the Event Sheet to start working with the enemy's AI, but first we must create groups to organize our work. To create a group simply right click in the gray space of the Event Sheet and click Create Group. Type a Name and click OK. Then drag the groups on top of each other to create a subgroup.
I have created the following groups:
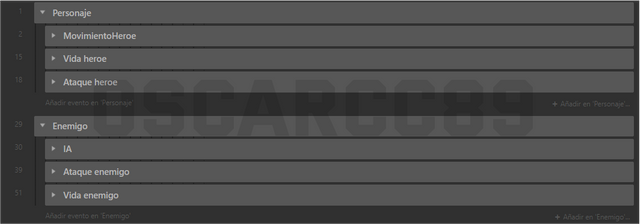
Set enemy AI
This is our Artificial Intelligence that will make our enemy chase us if we enter his vision range. This is accomplished with the Line of Sight behavior that we added in the last tutorial.
These events tell us that if the character enters the enemy's vision cone, it will activate the movement to the left or right according to the character's X position, likewise it will establish the Walk animation to chase us.
Once the enemy reaches us, that is, his position is equal to or less than 130 in X or Y, he will establish the attack animation. And he will not rest until we get out of sight of him or die.
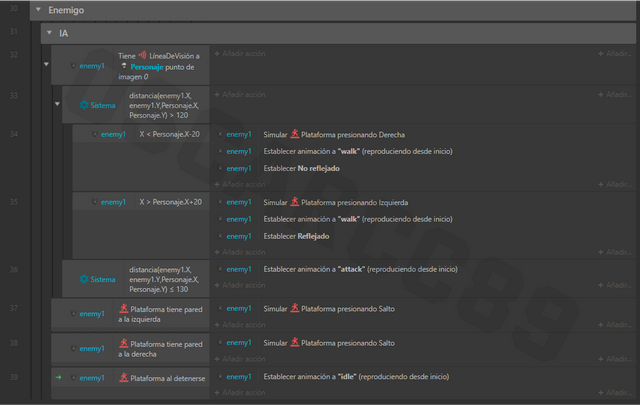
The last 3 events is the AI that corresponds if the character collides with a wall or a solid object, the enemy will jump to try to dodge it. This way you will have a more vivid artificial intelligence.
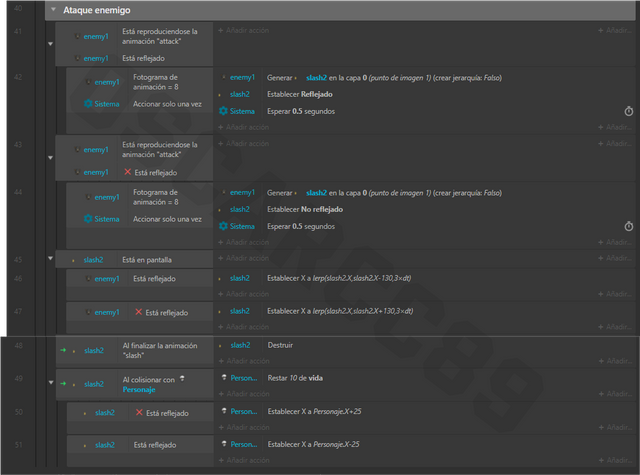
Enemy Attack
We have already instructed the enemy to attack if he hits us but now we must deal damage to that attack. We will do this by generating a Slash when the attack animation is executed.
These events tell us that if the attack animation is playing and reaches frame number 8, a Slash will be generated at position 0 of the enemy.
With each collision the slash has with the character it will push the character back 25px in X and subtract 10 health from the character's instance variable. Once the Slash's animation ends, it will be destroyed.
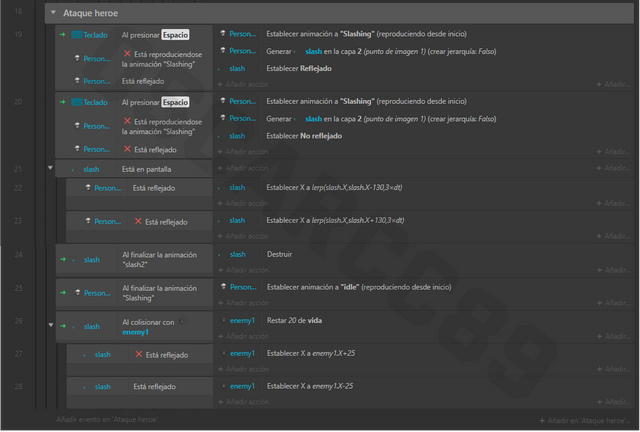
Main Character Attack
Now we will finish configuring our hero's attack. It basically works in the same way as the enemy attack, but instead of running by itself, we will activate it when we press Space on the keyboard. With each attack the hero will subtract 20 life points from the enemy, only if the hero's slash collides with the enemy.
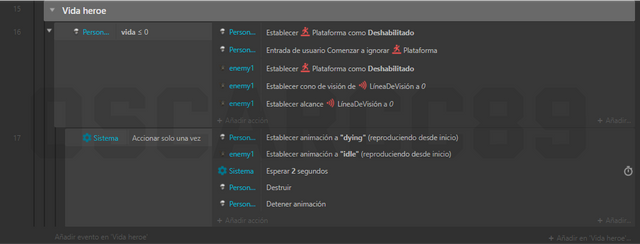
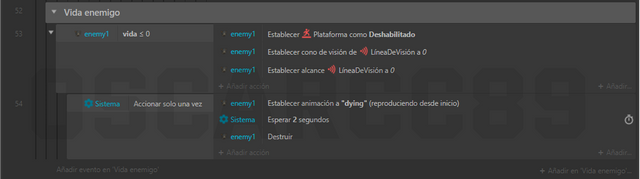
Hero and Enemy Health
Here we tell the system that if the instance variable of the hero or the enemy is equal to or less than 0, the Dying animation will be executed, then the characters will be destroyed after 2 seconds. We also disabled the movement options of both characters.
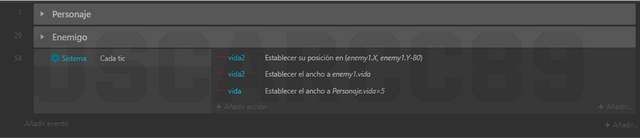
Health bar
In these events, we say that each tick of the system, that is to say at each moment the health bars of the character and the enemy set the width according to the value of the instance variable Life. Simply put, the width of the bar will decrease with each attack.
Result of this Tutorial

Conclusion
Well, in this tutorial we learned many things, especially establishing the AI of the enemy, which is something very important in video games, we still have some things to include but we will do it as we go along. I'm pretty sure you'll like the next tutorial as we'll start working on the level design and HUD.
I hope you liked this tutorial a lot!

My PC:
| Procesador: | AMD Ryzen 5 5600g |
|---|---|
| Almacenamiento: | SSD 500gb |
| RAM: | 16 Gb DDR4 |
| Graphic Card: | XFX RX580 8gb |
| S.O: | Windows 10 |
| Join the community | Join to Discord | General Rules |
|---|
| 50 SP | 100 SP | 250 SP | 500 SP |
|---|---|---|---|
| 800 SP | 1000 SP | 1250 SP | 1500 SP |

The continuation of the tutorial that you carry out is surprising, I really like the way you explain, and of course how it leads to the final executed product. The animation is phenomenal. Greetings.
His publication was selected as quality content by the "Art Curators Team" the selection was made by @cindycam to vote positively with the account @steemcurator04. Congratulations!
Keep sharing original and quality posts.
Nice job!