🌱 Home Gardening with Hydroponics - My Main Outdoor Hydrogarden System
Welcome gardening enthusiasts to another home hydroponics gardening post. Here I will show you my garden systems and how I go about growing the majority of our produce-type foods right at home, even with NO farmable land.
As I continue to grow my next batch of plants after my poorly thought through plan to clean out all my hydroponic systems at the same time, it gives me a good opportunity to showcase each of my garden systems, explain how I do things, and show how they all work together to produce food for our family.
Late last year, October 2016, I decided to rebuild my front hydroponic garden system using everything I had learned from the old system I had built back in 2013. It was mostly a lesson in space planning, understanding how I can properly utilize the area I had to grow the most food. The old system was great, but I miscalculated the lower sun angle during the winter months which forced me to tie up lines of string like a crazy spider web to support the vines further out to get full sun. This effectively made the smaller rail system on the fence useless for growing the lettuces and herbs it as intended for since it was now blocked by the larger plants growing across the tangled web of strings. In time I was growing cloned cuttings from the main tomato plants out of the side rails just to make use of them. With that, I knew it was time to rebuild.
My Main Outdoor Hydrogarden System - December 5, 2016
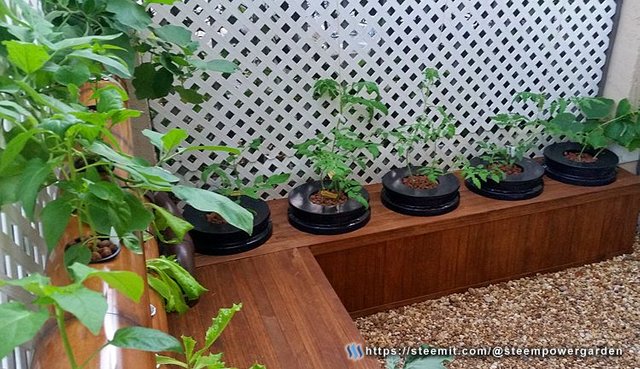
My outdoor hydrogarden system is roughly 7' x 7' and built around the perimeter of our front patio/garden area. There was a triple palm tree right in the middle of this area that we really liked, but it just took up too much space. Over the last two years I cut down two of them and kept the middle one for some mid-day shade. This is not an easy space to build in, especially with the palm in the middle, so I had to build my garden system in two sections and assemble it in place.
The right side of the hydrogarden consists of five(5) "Dutch Bucket" setups. I typically grow 2 plants in each bucket, but keep each plant to a single stem. I grow a mix of tomatoes and cucumbers in these buckets and hang them from a support bar running left to right as they get taller. As the vines grow taller, I drop them down and let the stems wrap around at the bottom.
Left side vertical garden with new starter plants.
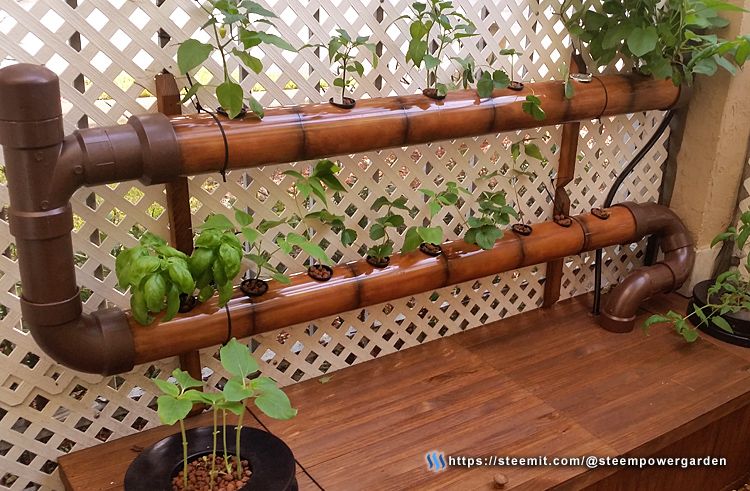
The left side of the hydrogarden has a large vertical garden space with 4" PVC pipes circulating back down to the main tank. The upper level is designed to hold 6 larger plants such as large bell peppers and eggplant. The lower level is designed to hold 9 smaller plants like strawberries, beans, and additional herbs if needed. The lower cabinet on the left side also hold a single Dutch bucket setup that I use to try new plants in hydroponics. Earlier this year I grew sunflowers in that spot just to see how it would work out. They did pretty good, but not as good as the ones in the back yard in soil. Not all plants can handle a constantly wet-root environment.
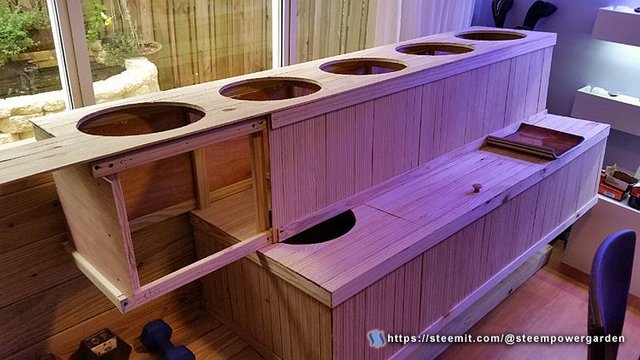
Main sections built and waiting to be stained - October 11, 2016
I had to wait a few days for the rainy weather to pass before I could stain the wood. I kept the sections, along with an 8' bench I built for the back yard, inside the house to keep them dry. October was a tough month in the house, I built everything in the only space big enough to fit them - the living/dining room area. So we had to live around the mega projects I had going on all over the place.
Our son thought this was great, he would climb through them and use them as forts and bases for his action figures.
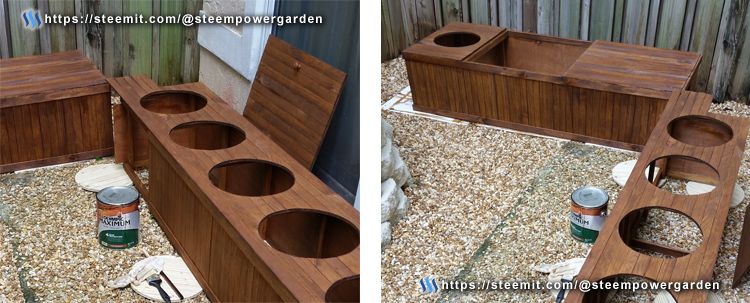
Staining the main sections before assembly - October 14, 2016
I used pressure-treated wood to build with, so adding a good water proofing stain will help extend the life of the system even longer. I started with the sections upside down to stain the inside surfaces, then flipped them over to do the outside. I let them dry a few hours before carefully moving them to the garage to dry completely for a few days.
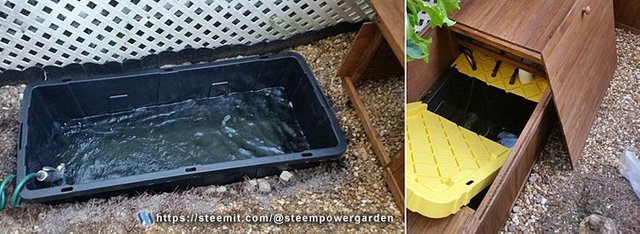
55 Gallon reservoir tank buried in the ground - October 21, 2016
There are 2 reasons I bury my reservoir tanks with my outside systems.
First, is to save vertical space. Losing an extra 20" to cover an above ground tank is not very efficient when your space is limit. I only have 6 feet of vertical space I can grow in since everything has to be below the fence line or I face the wrath of the dreaded HOA. As you can see, I already put up the white lattice on my fence to get some privacy.
Second, is for temperature control. Here in Florida the summers get really hot, so keeping your tanks in shade is a must, and burying them adds an extra layer of insulation and keep the water temperature more stable throughout the year. The last thing you want is warm water in your systems, that creates all kinds of issues with algae, root decay and rot, and other diseases that will kill off your plants in a hurry.
Now I'm not going to lie, it's a crappy task. As I mentioned earlier, this is my second system out front ( I will show my original system in a future post) and both times I hit mega rocks, tree roots, construction materials, and my favorite - 3' long pieces of rebar. It took me the better part of a day to dig it out, but it's worth it.

Inside look of the main feed and return lines.
Inside the main cabinet sections I have a 2" PVC return flow pipe with 1" holes drill in the tops to fit the 1/2" drain pipes from each of the Dutch Buckets. This is shown in the left-side photo above. There is also a main 1/2" black feed line that run directly from the pump all the way to the last bucket. I connected 2 feeder lines for each bucket and have them drill into opposite sides for even flow.
On the far left side of the picture is the white 3" return pipe and black 1/2" feed line for the main vertical garden section. The pipes are vinyl-wrapped and painted up top to look nice, but I never have any painted pipes inside near my reservoir tanks.
The right side pictures shows the connections for the solo Dutch bucket on the left end of the system and the electrical connections for the pumps. I still have them connected to a timer even though they run 24 hours a day. The timer was used in my old setup that also had container soil gardens needing automated watering.

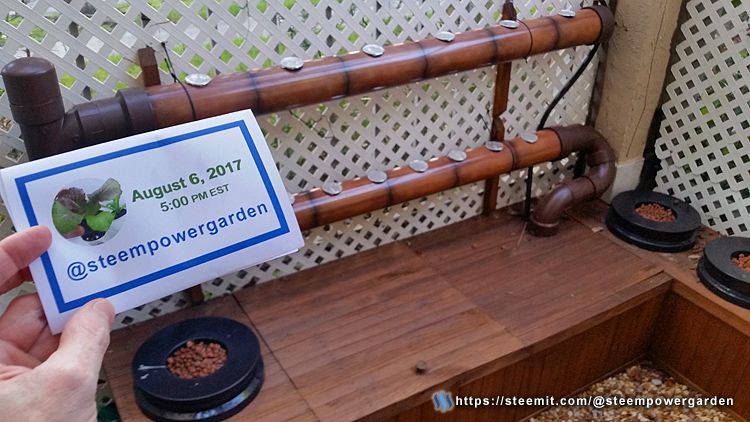
Tomatoes at peak production: March 1, 2017.
Last season, November 2016 to June 2017, I was growing 4 varieties of tomatoes with 2 single-stem vines for each type, Super Steak (Large heirloom ugly style - Left side vines), Supersweets (High-yield cherry tomato - middle vines), Climstar (Standard smooth skin cluster tomato - right side vines), *Brandywine (Pink heirloom ugly - far right not fully in the picture).
The Super Steak varieties grew very large, most over 1 pound and had an incredible taste. The Supersweets cherry tomatoes never disappoint with non-stop harvests week after week for 6 months. The Brandywine was our least favorite, slow to grow, low yield, and didn't taste so good, so it will not be grown this time around.
From March to June, we were averaging 2-3 big tomatoes and a dozen or so cherry tomatoes every other day, along with 1 of each of the two types of cucumbers every 3 days. We left them on the vines until we needed them, and gave the extras to family and friends so they would not get wasted. The peppers and beans were more sporadic and came in inconsistent waves.
My outdoor garden system is currently empty.
At the time this post was written (August 8, 2017), just like my garage system, there isn't anything growing in my outdoor garden system. I'm still waiting on the seedlings growing inside after a full clean-out of all of my hydroponic systems. It will still be a bout 30 days before I have plants mature enough to finally move to my outside system.
Be sure to follow along to see the progress of all my hydroponic gardens as I take you from seed to harvest in the coming months.
I hope you enjoyed learning about my main outdoor hydrogarden system.
If you have any questions or comments, just drop a reply below.
As always, please upvote this post and follow me if you like my work and want to see more.
If you think others will enjoy this Please ReSteem it!
Thanks for reading, now get out there and get GROWING!
💡 These are the image from this post that is not showing for some reason.
Wow, your hydro game is serious, I have never heard of Dutch buckets so thanks for that introduction.
Like you say there is a lot of trial and error, taking into account the low winter sun and the fact not all plants like to have wet roots,
I will be following your progress and it feels good that I will get to see the whole process from start to finish.
Thanks for sharing all this wisdom with us @steempowergarden.
Thank you Mark, I'm happy what I am sharing is starting to help and inspire others to get into growing their own foo, even if it's not in hydroponics, but at least getting started growing in some way.
Yeah, with the Dutch buckets, it is a variation of the commercial "Bato Bucket" systems - if you need that term to research it. The Bato buckets have a specific shape to allow them to sit over the return line. Using the 3 or 5 gallon buckets with a "net cup" style lid and PVC fittings to achieve the same results is what we refer to as Dutch buckets.
Awesome job mate! I like how classy your whole setup looks with the stained wood and everything.
My system isn't as polished as yours, I do have over 20 buckets connected atm and I'm working on a vertical system similar to yours; I'm having problems finding suitable fittings for the end caps.
You version gave me some ideas, so thanks!
Thanks Cos, yes I saw you previous greenhouse update post. Amazing setup with such incredible yields. The more people learn from the examples we provide the better off we will all be. All the benefits of growing your own food however you can, it's the best.
Thank you!
I just like growing my own food, it's not even about some other benefits, the pleasure I get from doing it myself is enough for me, heh.
But you're right, the more people find out how easy it is, the better it will be for all of us!
Great post and a very nice set up, I know what you mean about digging through the roots I had to put up a privacy fence that was the worst part. I'm glad your tomatoes and cucumbers do well mine struggle growing them in pots.
Thank you. I used to grow in both soil containers and hydroponics when I first started with this, once I saw how much more I got from hydro, and how much less work it took to keep the plants healthy and producing, I switched over most of my growing.
Upvoted and Resteemed by xx-votesplus, the dropAhead curation team!
Do you want more earnings?
By doing things above you will give us more STEEM POWER (SP) to give you more earnings.
Keep up the good work!
Most recent post: It is official, WE are witnesses!
WOW!! I'm a hydro gardener too - but WOW - it looks really great and a clean stylish way to produce your food - SUPER LOVE WHAT YA DID - check out my blog as i have a couple of similar systems - though not nearly as classy as yours!
but I also have an outdoor NFT and a new RDWC system i just built this year for tomatoes - keep it up!
Hey Hydroconomist, Thank you for the support. Yeah I try to keep everything looking like part of the house of garden area to blend in like furniture :-) I did check out your post show the dutch buckets and vertical nft rail systems. How are they doing now? Do you have an update post in the works?
they're doing great so far - just recorded some content for an update too so that should be out soon - i'm learning quite a bit and love it! there's some tweaks i'll need to do for next year - but so far they're off to a smashing start!
So good to hear. That's the thing, we never stop learning and improving as we go.
that's part of why i love it - i feel kind of like a mad scientist when i do this stuff lol! and because as deep as we can get into our systems, we can even be a little lazy with them occasionally because they just seem to always work so well! lol
So true :-) minimal maintenance once they get up to speed.
Im so glad I found you! Amazing post. I am working on building a hydroponic system right now for a home I moving into in a few weeks... It only has a tiny stone patio and I am used to growing majority of food. I hope it works out well! I will be reffering to your page! Thankyou.
Thank you :-) I'm happy I have been able to help and inspire so many people with my posts. Hydoponics is definitely the way to go for high yield in small spaces. Can't await to see what you get setup.
Thank you, I am pretty excited to have it up and running. Grantine I am starting my build at the end of the season. I hope I am able to grow some before winter bites.
This is such a wonderful setup! Thank you for sharing your outdoor hydro garden system!
Thank you :-) I can't wait until I have new plants out there. It's been such a bummer having to buy produce items again during this time.
Yes I know the feeling when I go buy something that's in season and think- dang, why didn't I plant that!
So true! :-)
sweet! i want a hydroponic situation.. some day
Hi @doitvoluntarily, Hopefully I can help you with some ideas and tips that I have learned over the years.
Congratulations @steempowergarden! You have completed some achievement on Steemit and have been rewarded with new badge(s) :
Click on any badge to view your own Board of Honor on SteemitBoard.
For more information about SteemitBoard, click here
If you no longer want to receive notifications, reply to this comment with the word
STOP