[Tutorial] Part 6 : How to create a HTML5 game using Tiled Map Editor, JS and Canvas
This is a continuation from the previous post ...
Part 6: From Tiled Map Editor to Javascript Canvas
Hello Steemians, Welcome back to another episode of my Tutorial. Today, I am going to talk about :
- How to load Map exported from Tiled Map Editor with XMLHttpRequest().
- How to render background tiles which are only visible to camera.
- How to make the camera follow the Player.
- How to do simple Bounding Box Collision Detection.
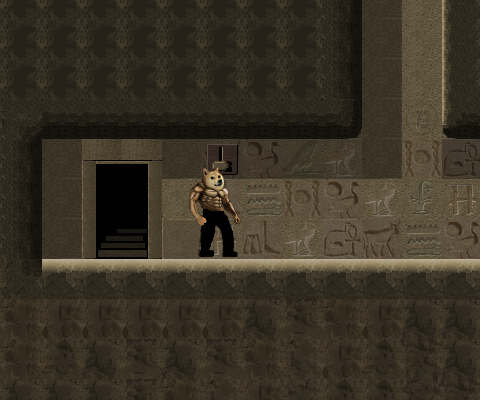
At the end of the tutorial, your game should look something like this , in which you can control the character walking around the level you design using Tiled Map Editor.
Alright, let's get started.
Exporting Map in Tiled Map Editor
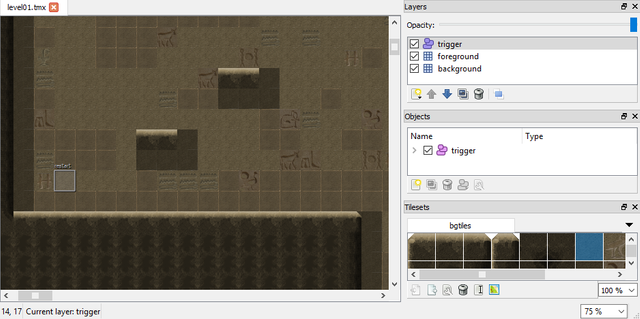
Assuming you have completed tutorial part 2 and have your tile sets and level map ready. Make sure all your tiles are in the correct layer (i.e background and foreground).
Adding an Object layer and a Restart Position marker
On top of these 2 layers, I want to add one object layer. Rename it to "trigger". This layer is to keep any extra markers and trigger objects which is not visible but functional in game. I ll talk more about what is a trigger later when we place enemies and stuffs.
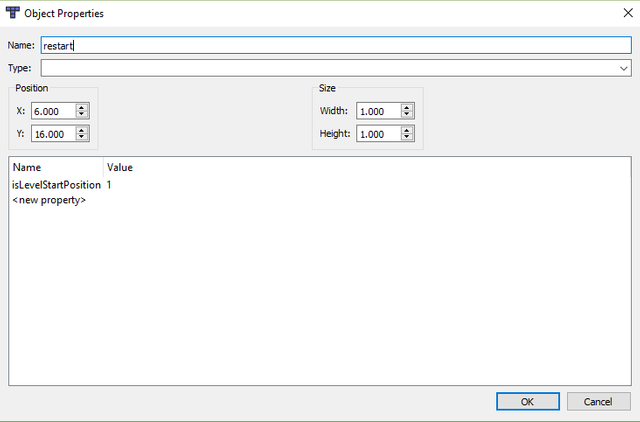
In this layer, add a simple rectangle object, double click it, rename the label to Restart, and add a property key "isLevelStartPosition" and set the value to 1
Ok, now you are ready to export. Just click File and Export As .json.
Create a map directory and put your json file into it. You only need to deploy the output of the Tiled Map Editor, which is the json file. The .tmx source file you can keep it for modification later if needed.
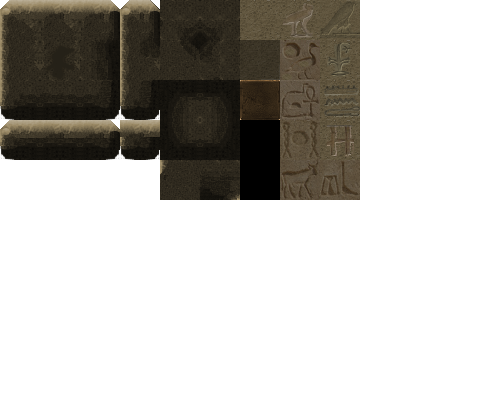
Next, you need to put your Tile Set image file to your game image directory.
bgtiles.png
So now our directory structure looks like this:
index.html
dogewarrior.js
images
    |_ dogewarrior_body.png
    |_ dogewarrior_head.png
    |_ bgtiles.png
map
    |_ level01.json
Make the js reusable by multiple levels
Next, we need to move the following block of codes out of our dogewarrior.js file into index.html and enclose it with a script tag. Also, supply "01" argument to the init() method of DogeWarrior object.
<script>
document.addEventListener("DOMContentLoaded", function() {
    dw = new DogeWarrior();
    dw.init("01");
});
</script>
The reason is because we need to reuse the Javascript file when you add more levels eg: level02.html, level03.html ... so on . Each level will load different .json map file based on the argument passed into it. This makes updating your game easier when you have deployed multiple levels.
We also need to modify our init method to take in one argument and set to the instance variable.
this.init = function( level ) {

    this.level = level;
    ...
}
Loading tile map .json with XMLhttpRequest()
Alright, next we need to add this block of function to load our .json map file
this.loadJSON = function( path, success, error ) {

    var xhr = new XMLHttpRequest();
    xhr.onreadystatechange = function() {
        if (xhr.readyState === XMLHttpRequest.DONE) {
            if (xhr.status === 200) {
                if (success)
                    success(JSON.parse(xhr.responseText));
            } else {
                if (error)
                    error(xhr);
            }
        }
    };
    xhr.open("GET", path, true);
    xhr.send();
}
and in our loadResources() method, call it
this.loadJSON("maps/level" + this.level + ".json?",function( map ) {
    dw.map = map;
    dw.load_map_resources();
    dw.on_load_completed();
}, false);
The entire .json map file is basically a Javascript Object, therefore there's no parsing needed. Simply assign the response map object to our instance variable and we can access all the exported data.
Loading Bundled Resources
Different level map will use different bgtiles images. Having the map file loaded, we now know which bgtiles sprite sheet png file to load. For now, we only have bgtiles.png bundled under this map file, at later tutorial we have more level dependent resources bundled under the map file such as sounds, monsters.png, etc..
this.load_map_resources = function() {

    var dw = this;
    var imagePath = "images";

    for ( var i = 0 ; i <  this.map.tilesets.length ; i++ ) {
        if ( this.map.tilesets[i].name == "bgtiles" ) {

            // Tiles
            this.sprite_bgtiles = new Image();
            this.sprite_bgtiles.src = imagePath + "/" + this.baseName( this.map.tilesets[i].image  );
            this.sprite_bgtiles.addEventListener('load', function() {
                dw.on_load_completed();
            },false);
        }
    }
Mapping Layer Name to Layer ID
Tiled Map Editor exports different layers as an array of objects. So when i want to refer to particular layer, i need to use array index (0,1,2...). We can add a hash map to map the name of layer to array index for easier reference later. The reason why I used name instead of index is because I still need the flexibility of changing layer order in Tiled Map Editor. For example, if you add another layer beneath background layer in Tiled Map Editor, your background layer is now having index of 1 instead of 0. By using the name, you will always refer to the correct layer.
    // Create a map of layer name to layer index for easy lookup
    this.layer_id = {};
    for ( var i = 0 ; i < this.map.layers.length ; i++ ) {
        this.layer_id[ this.map.layers[i].name ] = i;
    }
Get Tile Width and Number Of Tiles Per Row for your Tile Sets
This is important because the Tile ID kept in the map data array is actually row_index * number_of_tiles_per_row + col_index
    // Get how many tile items per row
    this.setting_minblocksize   = this.map.tilesets[ this.layer_id["background"] ].tilewidth;
    this.setting_bgtiles_x      = this.map.tilesets[ this.layer_id["background"] ].imagewidth /  this.setting_minblocksize;

}
Rendering the Tiles
After loading the map and the Tile Sets, we are now ready to render the Tiles onto the Canvas.
To do this, we only need to draw what is visible to the camera. But we don't want to go through all 200 x 200 tiles to know whether each tile is in the camera POV. To reduce number of checking, we can first convert camera coordinate to Tile row index and column index by dividing them with tile size, after that only iterate through the tiles which are involved.
    var cam_tile_y = this.camera.y / this.setting_minblocksize >> 0;
    var cam_tile_x = this.camera.x / this.setting_minblocksize >> 0;
    var tilex_count = this.canvas.width / this.setting_minblocksize >> 0 ;
    var tiley_count = this.canvas.height / this.setting_minblocksize >> 0 ;

    if ( this.map.layers ) {
        for ( var layer = 0 ; layer < 2 ; layer += 1 ) {

            for ( var i = cam_tile_y - 1; i < cam_tile_y + tiley_count + 2 ; i++ ) {
                for ( var j = cam_tile_x - 1; j < cam_tile_x + tilex_count + 2 ; j++ ) {

                    var data =0;
                    if ( i >= 0 && j >= 0 && i < this.map.layers[layer].height && j < this.map.layers[layer].width   ) {

                        var data = this.map.layers[layer].data[ i * this.map.layers[layer].width + j ];

                        var tile_framex = ( data % this.setting_bgtiles_x ) - 1;
                        var tile_framey = ( data / this.setting_bgtiles_x ) >> 0 ;
                        var sprite = this.sprite_bgtiles;

                        if ( tile_framex >= 0 && tile_framey >= 0 ) {

                            this.ctxt.drawImage( sprite ,
                                            this.setting_minblocksize * tile_framex,
                                            this.setting_minblocksize * tile_framey,
                                            this.setting_minblocksize,
                                            this.setting_minblocksize,
                                    (j * this.setting_minblocksize - this.camera.x ) >> 0,
                                    (i * this.setting_minblocksize - this.camera.y ) >> 0,
                                    this.setting_minblocksize,
                                    this.setting_minblocksize
                                        );
                        }

                    }
                }
            }
        }
    }
The order of drawing will determine the z-order of the objects on canvas. Anything that gets drawn first will be placed behind. So, draw the tiles first before the main character.
Updating Camera Position to follow the Character.
Next we need to make the character in the middle of the camera at all time. To do this, we can do it simply by updating the x,y coordinates of the Camera to hook to character's x,y coordinates with some offsets as such:
this.update_camera_position = function() {

    this.camera.x = this.player.x - this.canvas.width / 2 ;
    this.camera.y = this.player.y - this.canvas.height / 2;
}
To improvise this, we can apply some acceleration / deceleration to the camera as a function of distance from the player as such:
this.update_camera_position = function() {

    var camera_target_x = this.player.x - this.canvas.width / 2  ;
    this.camera.x += (( camera_target_x - this.camera.x ) / 10 >> 0 );

    var camera_target_y = this.player.y - this.canvas.height / 2 ;
    this.camera.y +=  (( camera_target_y - this.camera.y ) / 10 >> 0 );

}
This creates a much smoother camera movement.
Collision Detection with simple Bounding Box
Alright, now we have our background drawn to the Canvas, but the character can walk pass all the walls.
We need to make the character to have some simple collision with the walls and floors.
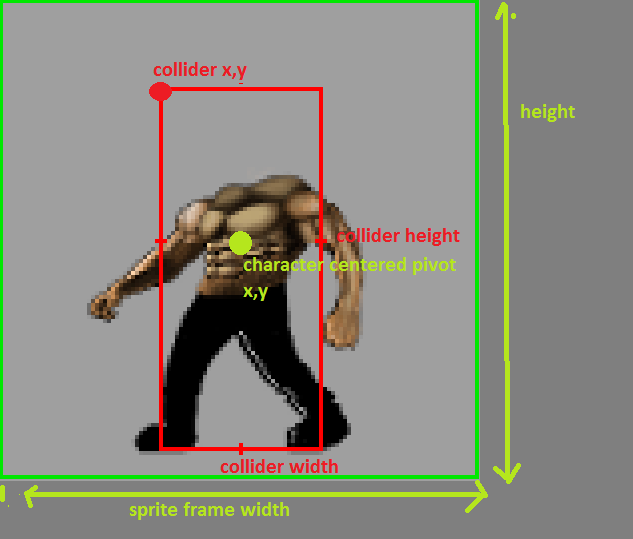
First, we need to define a box_collider object to the player's properties, which is a simple javascript hash object as such:
this.player.box_collider = {}
this.player.box_collider.width = 34;
this.player.box_collider.height = 75;
The width and the height of the box collider will determine how much you allow your character to collide with the wall/floor before it is considered as a collision.
Note that, sprite frame size is independent of the bounding box size. For the bounding box, i'd keep the pivot point at top left corner for easier calculation later.
Coding Collision Detection
We can create a simple collision detection function that takes 3 arguments, which are :
- A Box Collider object
- The direction of the movement (0: left, 1. up, 2 right and 3.down)
- The delta (Difference of position) of the movement.
Basically the idea is that before we move the character into a new position, we always check the new position whether it will cause any collision with the walls/floors or not. If it does, we need to subtract the amount of delta so it doesn't crash into the wall.
When we do the collision hit test, it is important for the function to return how "deep" is the collision so that we can calculate the excess to subtract from the delta.
This is important especially for jump action, where your character is falling from high point and about to land on the ground, there's a moment where adding some y amount of delta will make the character plunge through the ground, but you still have to move it because it still hovers above the ground. So we need to subtract the excess from y delta to land the character perfectly on the ground.
this.collide_with_wall = function( box_collider , direction, delta  ) {

    for ( var j = 0 ; j < 3 ; j++ ) {

        var pof_x = null;
        var pof_y = null;

        if ( direction == 3 ) {

            pof_x = box_collider.x + j * ( box_collider.width - 1) / 2 ;
            pof_y = box_collider.y +     box_collider.height  + delta ;

        } else if ( direction == 1 ) {

            pof_x = box_collider.x + j * ( box_collider.width - 1) / 2 ;
            pof_y = box_collider.y + delta ;


        } else if (direction == 0 ) {

            pof_x = box_collider.x + delta ;
            pof_y = box_collider.y + j * ( box_collider.height - 1) / 2  ;


        } else if ( direction == 2 ) {

            pof_x = box_collider.x +  box_collider.width + delta ;
            pof_y = box_collider.y + j * ( box_collider.height - 1) / 2 ;
        }


        if ( pof_x != null && pof_y != null  &&  this.map.layers ) {

            var pof_tile_y = pof_y / this.setting_minblocksize >> 0;
            var pof_tile_x = pof_x / this.setting_minblocksize >> 0;

            // Static foreground
            for ( var k = pof_tile_y - 2 ; k <  pof_tile_y + 2 ; k++ ) {
                for ( var l = pof_tile_x  - 2 ; l < pof_tile_x + 2 ; l++ ) {


                    var data = this.map.layers[ this.layer_id["foreground"] ].data[ k * this.map.layers[ this.layer_id["foreground"] ].width + l ];

                    if ( data > 0 ) {

                        if ( pof_x >= l * this.setting_minblocksize  && pof_x <= (l + 1) * this.setting_minblocksize  &&
                             pof_y >= k * this.setting_minblocksize  && pof_y <= (k + 1) * this.setting_minblocksize  ) {

                            if ( direction == 3  ) {
                                return pof_y - k * this.setting_minblocksize ;

                            } else if ( direction == 1 ) {

                                return ( k + 1 ) * this.setting_minblocksize - pof_y ;

                            } else if ( direction == 0  || direction == 2) {

                                return l;

                            }

                        }
                    }
                }
            }

        }


    }

    return 0;
}
Note that this function can also be used for other characters such as enemies for later tutorial.
Ok, now we have the collision detection function ready, we can apply the checking for all the actions as such Walking, Jumping and Falling.
var excess  = this.collide_with_wall( this.player.box_collider , 3 , this.player.fallingspeed  ) ;
if ( excess > 0 ) {
    this.player.y += this.player.fallingspeed - excess ;
    this.player.fallingspeed = 0;
    this.player.falling = 0;
    ...
} else {
    ...
}
The update_player_action method() now looks like this:
this.update_player_action = function() {

    this.update_box_collider();

    if ( this.player.falling > 0 ) {

        if ( this.player.fallingspeed > 0 ) {
            // Is falling down
            var excess  = this.collide_with_wall( this.player.box_collider , 3 , this.player.fallingspeed  ) ;
            if ( excess > 0 ) {
                this.player.y += this.player.fallingspeed - excess ;
                this.player.fallingspeed = 0;
                this.player.falling = 0;

            } else {
                this.player.fallingspeed    += this.setting_gravity;

                // Terminal velocity
                if ( this.player.upwardspeed > this.setting_minblocksize - 1.0 ) {
                    this.player.upwardspeed = this.setting_minblocksize - 1.0 ;
                }

                this.player.y               += this.player.fallingspeed  ;
            }
        } else {
            // Jumping up
            var excess  = this.collide_with_wall( this.player.box_collider , 1 , this.player.fallingspeed  ) ;
            if ( excess > 0 ) {
                // Knocking head
                this.player.fallingspeed = this.setting_gravity;
                this.player.y +=    this.player.fallingspeed - excess ;

            } else {
                this.player.fallingspeed    += this.setting_gravity;
                this.player.y               += this.player.fallingspeed  ;
            }
        }

    } else {

        // Not falling, check is there any floor holding the player beneath
        var excess  = this.collide_with_wall( this.player.box_collider , 3 , 0.8  ) ;
        if ( excess == 0  ) {
            this.player.falling         = 1 ;
            this.player.fallingspeed    = 0.8;
            this.player.tick            = 10;
        }
    }


    // Jumping
    if ( this.player.control_direction[1] == 1 ) {
        if ( this.player.falling == 0 ) {

            // Initiate velocity
            this.player.fallingspeed = -1.0 * this.setting_jump_height ;
            this.player.falling     = 1;
            this.player.y           -= 1;
            this.player.tick        = 0;
        }
    }


    // Walking
    this.player.walking = 0;
    if ( this.player.control_direction[0] == 1 ) {

        var excess = this.collide_with_wall( this.player.box_collider, 0 , this.player.falling > 0 ? - this.setting_jump_xdistance : - this.setting_walking_speed  ) ;

        if ( excess <= 0 ) {
            if ( this.player.falling > 0 ) {

                this.player.x -= this.setting_jump_xdistance;
            } else {
                this.player.x -=  this.setting_walking_speed;;
                this.player.walking = 1;

            }
        }
        this.player.direction = 0;


    } else if ( this.player.control_direction[2] == 1 ) {

        var excess = this.collide_with_wall( this.player.box_collider , 2 , this.player.falling > 0 ?  this.setting_jump_xdistance :  this.setting_walking_speed  ) ;
        if ( excess <= 0 ) {
            if ( this.player.falling > 0 ) {
                this.player.x += this.setting_jump_xdistance;
            } else {
                this.player.x += this.setting_walking_speed;
                this.player.walking = 1;
            }
        }
        this.player.direction = 1;

    }
}
Note that I have also added a cap to the max velocity known as terminal velocity when the character is falling from really high point to prevent unwanted problem when the velocity grows too large and can overshoot the point of hit test for collision detection.
Alright that's all for today folks, I ll talk about more intresting stuffs like Level Design in the next episode.
Tutorial part 06 Demo is here: Feel free to view the source if you are lost.
https://tensaix2j.github.io/dogewarrior_tutorial/index06.html
Congratulations! This post has been upvoted from the communal account, @minnowsupport, by tensaix2j from the Minnow Support Project. It's a witness project run by aggroed, ausbitbank, teamsteem, theprophet0, and someguy123. The goal is to help Steemit grow by supporting Minnows and creating a social network. Please find us in the Peace, Abundance, and Liberty Network (PALnet) Discord Channel. It's a completely public and open space to all members of the Steemit community who voluntarily choose to be there.
If you like what we're doing please upvote this comment so we can continue to build the community account that's supporting all members.
@tensaix2j got you a $2.14 @minnowbooster upgoat, nice! (Image: pixabay.com)
Want a boost? Click here to read more!
This is great, I've always wanted to create a game in JS. I'm going to start following this tutorial and see what I can make. Thanks! :D
Thank you too.