[Tutorial] Part 5 : How to create a HTML5 game using Tiled Map Editor, JS and Canvas
This is a continuation from the previous post ...
Part 5: Adding Controls for Character Actions
Today i m going to show you how to handle keyboard inputs to control character actions.
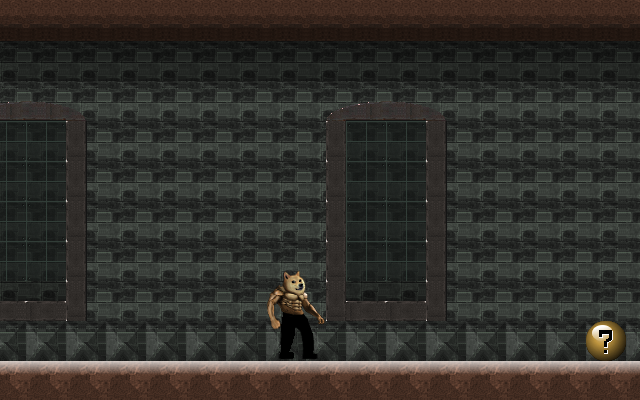
At the end of this tutorial, you should have something that looks like this
Before we start, let's adjust the camera object properties so that the main character is in the center of the screen.
this.camera.x = -this.canvas.width / 2;
this.camera.y = -this.canvas.height / 2;
You'll notice that the character still isn't positioned in the center. That's because the coordinate x,y in drawImage call always anchors on top left corner.
Centering the Pivot Point
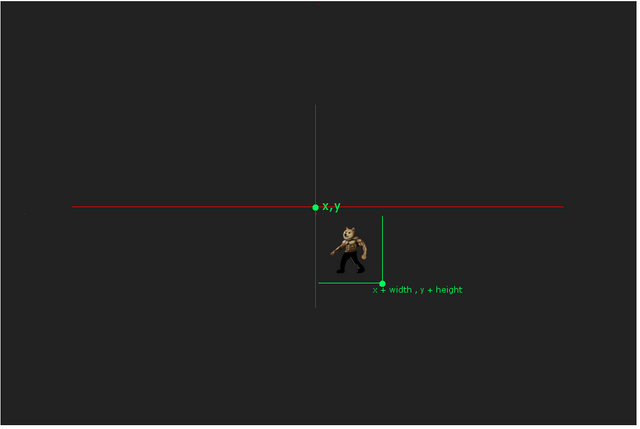
You can offset this by translating to the left by 0.5 * width and top by 0.5 * height of the sprite frame when performing the drawImage() call.
this.on_draw = function() {

    this.ctxt.clearRect( 0,0, this.canvas.width , this.canvas.height );

    // Draw Main Characters
    this.ctxt.drawImage( this.sprite_mainchar_body ,
                                this.player.width  * this.player.framex ,
                                this.player.height * this.player.framey ,
                                this.player.width ,
                                this.player.height ,
                           this.player.x - this.camera.x  - this.player.width / 2,
                           this.player.y - this.camera.y  - this.player.height / 2 ,
                           this.player.width ,
                           this.player.height );

    this.ctxt.drawImage( this.sprite_mainchar_head ,
                                this.player.width_head * this.player.framex_head,
                                this.player.height_head * this.player.framey_head,
                                this.player.width_head,
                                this.player.height_head,
                            this.player.x - this.camera.x + this.player.head_offsetx - this.player.width / 2 ,
                            this.player.y - this.camera.y + this.player.head_offsety - this.player.height / 2 ,
                            this.player.width_head,
                            this.player.height_head,
                            );
}
Now refresh your browser, the character should be in the center of the screen.
If your browser doesn't reflect the changes, you can force your browser to not cache the js by adding question mark to the src of your script tag in your html file.
<script src="dogewarrior.js?"></script>
Keyboard Input Events
Next up, we are going to bind keyboard events, mainly "keydown" and "keyup" event. For now, we are only going to deal with keyboard inputs. At later tutorial, i m going to show you how you can also add multi touch inputs for mobile devices.
this.bind_keyboard_events = function() {
    var dw = this;
    document.addEventListener("keydown" , function( evt ) {
        dw.on_keyDown( evt );
    }, false );
    document.addEventListener("keyup"   , function( evt ) {
        dw.on_keyUp( evt );
    }, false );
}

this.on_keyDown = function( evt ) {
}

this.on_keyUp = function( evt ) {

}
When a keyboard button is pressed, the event handler will be invoked with an evt object, which has a keyCode property which ties to some ASCII value. Javascript Char Code
since I wanted to support both Arrow keys and WASD keys, I mapped the WASD keycode into arrow keycode before handling them.
this.on_keyDown = function( evt ) {
    var keyCode = evt.which?evt.which:evt.keyCode;
    keyCode = this.wasd_to_arrow(keyCode);
}

this.on_keyUp = function( evt ) {
    var keyCode = evt.which?evt.which:evt.keyCode;
    keyCode = this.wasd_to_arrow(keyCode);
}

this.wasd_to_arrow = function( keyCode ) {

    var newKeyCode = keyCode ;
    if ( keyCode == 65 ) { newKeyCode = 37; }
    if ( keyCode == 68 ) { newKeyCode = 39; }
    if ( keyCode == 87 ) { newKeyCode = 38; }
    if ( keyCode == 83 ) { newKeyCode = 40; }
    return newKeyCode;
}
Now, instead of handling the position update directly in our on_keyDown() function, we update some variables which keep track of input states, and let the Gameloop's on_update() method to handle the position updates of the character.
The reasons for this is because:
- on_keyDown() function may be invoked at a rate much rapidly than our Gameloop's on_update() method, when the user presses the button down without lifting the finger.
- When you want to support multiple types of inputs, such as Mouse, Touchscreen etc, you want to have a common input interface to update the character position.
Input states
We'll use a simple array to keep track of the states of buttons pressed.
this.player.control_direction = [0,0,0,0];
This is to keep track of [ left, up, right ,down] input states.
When the button is pressed, we set it to 1 and when the button is released, we set it to 0 as such
this.on_keyDown = function( evt ) {
    var keyCode = evt.which?evt.which:evt.keyCode;
    keyCode = this.wasd_to_arrow(keyCode);

    if ( keyCode >= 37 && keyCode <= 40 ) {
        this.player.control_direction[ keyCode - 37 ] = 1 ;
    }
}

this.on_keyUp = function( evt ) {
    var keyCode = evt.which?evt.which:evt.keyCode;
    keyCode = this.wasd_to_arrow(keyCode);
    if ( keyCode >= 37 && keyCode <= 40 ) {
        this.player.control_direction[ keyCode - 37 ] = 0 ;
    }
}
On_Update function
For this tutorial, we need to add 2 update functions to on_update() method
- update_player_action()
- update_player_animation()
One is responsible for character position, velocity and acceleration etc and one is responsible to update the character's frame for action animations.
this.on_update = function() {
    this.update_player_action();
    this.update_player_animation();
}
Updating the player actions
First we need several constants for various settings
this.setting_walking_speed          = 4;
this.setting_walkcycle_interval     = 3;
this.setting_jump_height            = 22.0;
this.setting_gravity                = 1.1;
this.setting_jump_xdistance         = 6.0;
and we also need a few variables to keep track of character's action states
this.player.falling = 0;
this.player.walking = 0;
this.player.direction = 0;
Coding Walk Action
Walking is the easiest, which is simply modifying the .x property of player object. based on input states
    this.player.walking = 0;
    if ( this.player.control_direction[0] == 1 ) {

        this.player.x -=  this.setting_walking_speed;;
        this.player.walking = 1;
        this.player.direction = 0;

    } else if ( this.player.control_direction[2] == 1 ) {

        this.player.x += this.setting_walking_speed;
        this.player.walking = 1;
        this.player.direction = 1;
    }
Coding Jump Action
Jumping is a bit tedious because it involves gravity and acceleration/deceleration.
Basically the idea is that when you press jump, you supply enough initial upward velocity to the object.
Since the gravity is pointing downward, this initial velocity gets decreased by gravity across time.
At some point in time, as the upward velocity is being reduced until eventually it reaches 0 and starts to turn opposite direction.
The downward velocity will then keep gaining value as the gravity accelerates it downward.
    if ( this.player.control_direction[1] == 1 ) {
        if ( this.player.falling == 0 ) {
            // Initiate velocity
            this.player.fallingspeed = -1.0 * this.setting_jump_height ;
            this.player.falling     = 1;
            this.player.tick        = 0;
        }
    }
Since we have not implemented collision detection and we don't have a floor yet, we'll use y=0 line as our temporary ground. Also, take note that y is positive downward in canvas.
    if ( this.player.falling > 0 ) {

        if ( this.player.y > 0 ) {
            this.player.y = 0;
            this.player.falling = 0;

        } else {
            this.player.fallingspeed += this.setting_gravity;
            this.player.y +=    this.player.fallingspeed  ;
        }
    }
Animating Character by Updating the object's frameX and frameY properties
Now, we need to update the player's frameX and frameY so that the character can be animated to do those actions.
To animate walk cycle, since the action is on row 0 of our sprite sheet, set the frameY to 0, and cycle through frameX from 0 to 7 as such:
this.player.framey = 0;
this.player.framex  = (this.player.framex + 1 ) % 8 ;
You ll notice that the animation is playing too quickly. To add some delay to the animation,
we can add another state variable to the player object to keep track of time passed in term of frames ticked
this.player.tick = 0;
Then we only update the character frame when tick is greater than some number.
if ( this.player.tick >  this.setting_walkcycle_interval ) {
    this.player.framex  = (this.player.framex + 1 ) % 8 ;
    this.player.tick = 0;
}
...
Update the tick variable every frame ticked
this.player.tick += 1;
For reverse direction, because I simply flip the original sprite sheet horizontally, that means the animation goes from right to left.. so we increment 7 modulus 8 instead of 1
if ( this.player.tick > this.setting_walkcycle_interval ) {
    this.player.framex  = (this.player.framex + 7 ) % 8 ;
    this.player.tick = 0;
}
Animating head offset position
You'll notice the head position is some what not realistic because it is not bobbing up and down when walking.
Since we have separated the head from the body with 2 independent sprite sheets, we need to animate the head's offset positions in the code for Walking and Breathing animations to make the animation look better.
// Bobbing the head
this.player.head_offsetx = 61 + [  1, -2, -1, -2,  -1, -1 ,  0 ,-2  ][ this.player.framex ];
this.player.head_offsety = 35 + [  3,  1, -2,  1,  5,  0 , -2,  2   ][ this.player.framex ];
Do the same for the other direction too
// Bobbing the head
this.player.head_offsetx = 59 - [  1, -2, -1, -2,  -1, -1 ,  0 ,-2  ][ 7 - this.player.framex ];
this.player.head_offsety = 35 + [  3,  1, -2,  1,  5,  0 ,  -2,  2   ][ 7 - this.player.framex ];
That's all for walking animation.
Putting all these, we get our update_player_animation function that looks something like this:
this.update_player_animation = function() {

    // Walking frames
    if ( this.player.walking > 0 ) {
        if ( this.player.direction == 0 ) {
            this.player.framey = 0;
            this.player.framey_head = 0;
            this.player.framex_head = 0;

            if ( this.player.tick >  this.setting_walkcycle_interval ) {
                this.player.framex  = (this.player.framex + 1 ) % 8 ;
                this.player.tick = 0;
            }
            // Bobbing the head
            this.player.head_offsetx = 61 + [  1, -2, -1, -2,  -1, -1 ,  0 ,-2  ][ this.player.framex ];
            this.player.head_offsety = 35 + [  3,  1, -2,  1,  5,  0 , -2,  2   ][ this.player.framex ];
        } else {
            this.player.framey = 1;
            this.player.framey_head = 1;
            this.player.framex_head = 3;

            if ( this.player.tick > this.setting_walkcycle_interval ) {
                this.player.framex  = (this.player.framex + 7 ) % 8 ;
                this.player.tick = 0;
            }
            // Bobbing the head
            this.player.head_offsetx = 59 - [  1, -2, -1, -2,  -1, -1 ,  0 ,-2  ][ 7 - this.player.framex ];
            this.player.head_offsety = 35 + [  3,  1, -2,  1,  5,  0 ,  -2,  2   ][ 7 - this.player.framex ];
        }
    }

    // Jumping frames
    if ( this.player.falling > 0 ) {


        this.player.framey      = 4 + this.player.direction;
        this.player.framey_head = this.player.direction;
        this.player.framex_head = this.player.direction == 1 ? 3 : 0;

        if ( this.player.direction == 0 ) {
            this.player.head_offsetx = 59 ;
            if ( this.player.tick == 0 ) {
                this.player.framex  = 0;
            } else {
                if ( this.player.tick > this.setting_walkcycle_interval + 1 ) {
                    this.player.framex += 1 ;
                    if ( this.player.framex >= 3 ) {
                        this.player.framex = 3;
                    }
                    this.player.tick = 1;
                }
            }
        } else if ( this.player.direction == 1 ) {

            this.player.head_offsetx = 64 ;
            if ( this.player.tick == 0 ) {
                this.player.framex  = 3;
            } else {
                if ( this.player.tick > this.setting_walkcycle_interval + 1 ) {
                    this.player.framex -= 1 ;
                    if ( this.player.framex < 0 ) {
                        this.player.framex = 0;
                    }
                    this.player.tick = 1;
                }
            }
        }
        this.player.head_offsety = 33 ;
    }


    // Idling frames
    if ( this.player.walking == 0 && this.player.falling == 0 ) {

        this.player.framex = this.player.framex % 4;
        this.player.framey = 2  + this.player.direction ;

        if ( this.player.tick > 12 ) {

            if ( this.player.direction == 0 ) {
                this.player.framex  = (this.player.framex + 1 ) % 4 ;
            } else {
                this.player.framex  = ( this.player.framex + 3 ) % 4;
            }
            this.player.tick = 0;

        }

        if ( this.player.direction == 0 ) {
            this.player.head_offsetx = 61 + [ -1,  0,  0,  0   ][ this.player.framex] ;
            this.player.head_offsety = 34 + [  3,  2,  0,  2   ][ this.player.framex ];
        } else {
            this.player.head_offsetx = 59 + [  1,  0,  0,  0    ][ 3 - this.player.framex] ;
            this.player.head_offsety = 34 + [  3,  2,  0,  2    ][ 3 - this.player.framex ];
        }

    }
    this.player.tick += 1;
}
Alright, that's all for today.. You can view the demo of this tutorial here:
https://tensaix2j.github.io/dogewarrior_tutorial/index.html
or Play the actual game here:
https://tensaix2j.github.io/dogewarrior
We'll explore how to do Collision Detection and more on next episode.. stay tuned.
Congratulations @tensaix2j! You have completed some achievement on Steemit and have been rewarded with new badge(s) :
Click on any badge to view your own Board of Honor on SteemitBoard.
For more information about SteemitBoard, click here
If you no longer want to receive notifications, reply to this comment with the word
STOPAmazing post!
I wish to learn how to create games.
So I will follow you :)
Upvoted!
Thank you!
Congratulations @tensaix2j! You have completed some achievement on Steemit and have been rewarded with new badge(s) :
Click on any badge to view your own Board of Honor on SteemitBoard.
For more information about SteemitBoard, click here
If you no longer want to receive notifications, reply to this comment with the word
STOPCongratulations @tensaix2j! You have completed some achievement on Steemit and have been rewarded with new badge(s) :
Click on any badge to view your own Board of Honor on SteemitBoard.
For more information about SteemitBoard, click here
If you no longer want to receive notifications, reply to this comment with the word
STOP