DIY Greeting Card Making Contest: Inter-active card with combination of twisted easel and waterfall design
Hello and good day everyone! Here's my entry for the contest hosted by @mermaidvampire. A big gratitude to her for initiating this contest since paper crafting is one of my favorite hobby. And perfect timing, considering that this month is our anniversary with my hubby and I used to make greetings card as a simple offering in any occassion. My hubby used to make some cards too! Small things makes diffrence, simple card makes him smile and he really appreciate my simple present. Upon making this card, I made it discretly so he will not be suspecious what I am doing. It's a surprise! lol!

In this project, I chose vintage style which is our favorite mode. This is an inter-active card with the combinations of twisted easel card and waterfall card. The nice thing about easel is, you can let it stand or display. I chose brown color and add some embellishments. I made it simple, since this is a masculine card. So here's my working progress on how I made my anniversary card.
Materials:
brown card stock
design paper
scissor
pencil
double-sided tape
scoring board and trimmer
black fine liner
wood embellishmetnts
die-cut design
3D double-sided tape
The process:

- Cut a piece of 11 x 5-1/2" brown cardstock and 2 pieces of 5 x 5". Score from 5 -1/2" in a landscape position and score at the diagonal position of 5 - 1/2". Then fold each scored line. Score 1/2" in the other cardstock , fold and attach to the long cardstock. This may serve as the main card position. Once you are done, cut a designed paper to cover your brown cardstock but lesser the dimension in each. Another brown cardstock to be use for the second page with the waterfall holder which is the long strip, then cut 11 x 1", fold in the middle then score 1/2" , 1" , and 1-1/2".

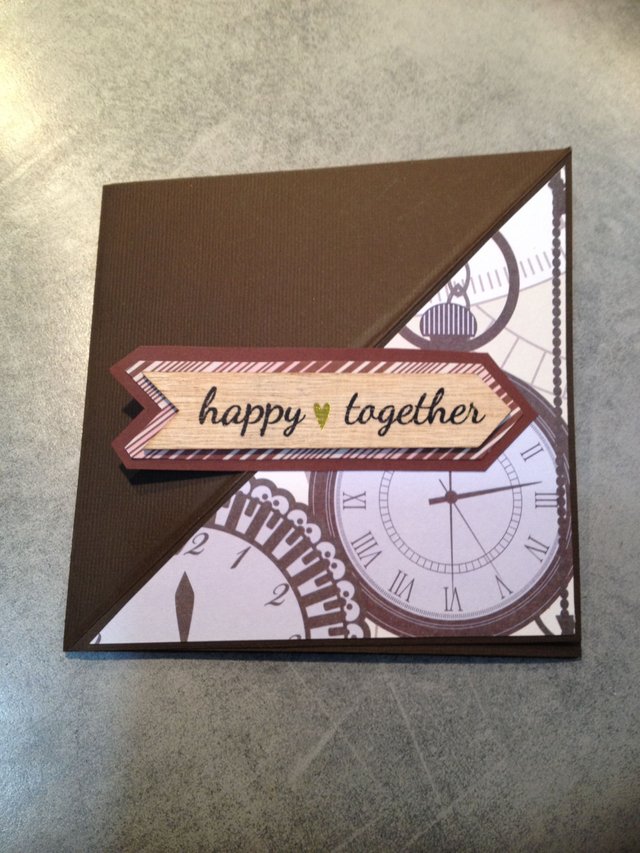
- All the cuttings are done, let's proceed to assemble the designed paper. This is the front page, stick your diagonal designed paper using double-sided tape or glue.
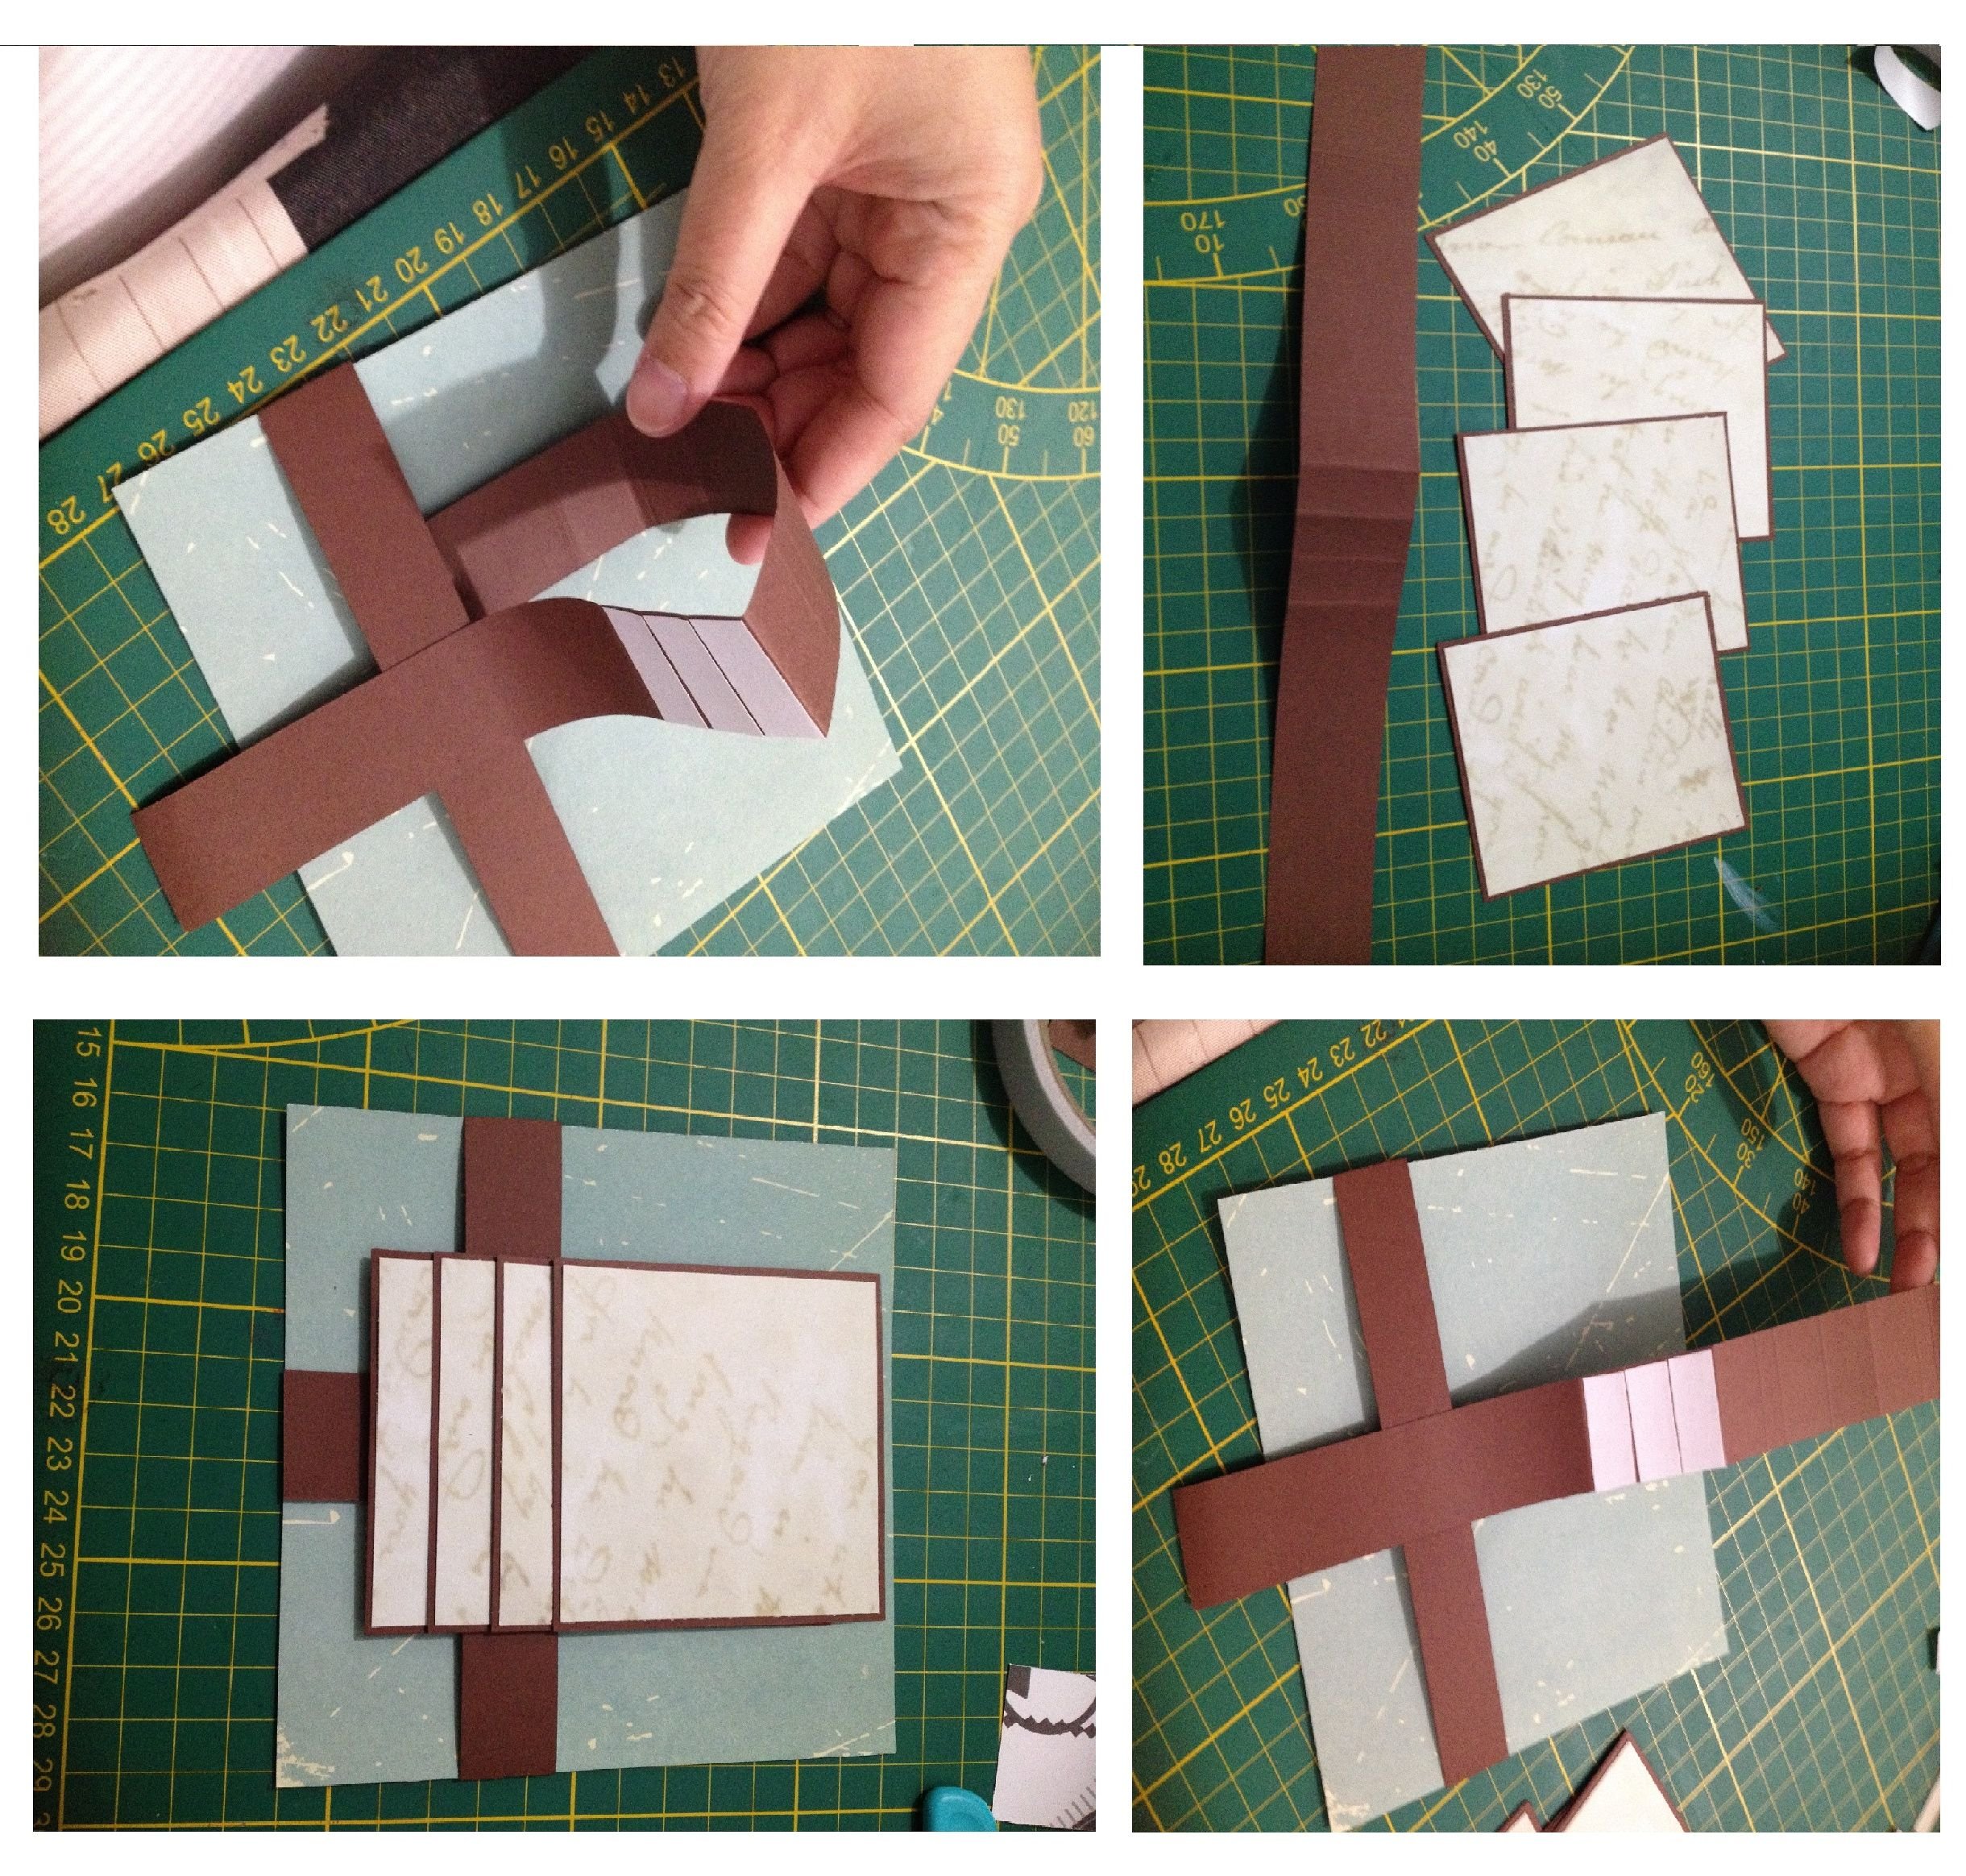

- For the second page, we will make a waterfall design. Prepare the 4 pieces of cardstock and designed paper, then stick or glue. Cut another strip of cardstock and glue it horizontally in the designed paper. Take the other long strip and glue all the 4 pieces of square. Be careful in sticking all the pieces and make sure that they are all align then glue again into the horizontal strip. You can add some designed paper depends on your choice. I added a "couple design" embellishments and stick in the middle of the square. Check carefully when you pull it down if all the 3 squares are easy to pull out. You can check in my previous post on how I made this waterfall style in this link here. Actually you can put some images but I don't have a printed photo for the moment.

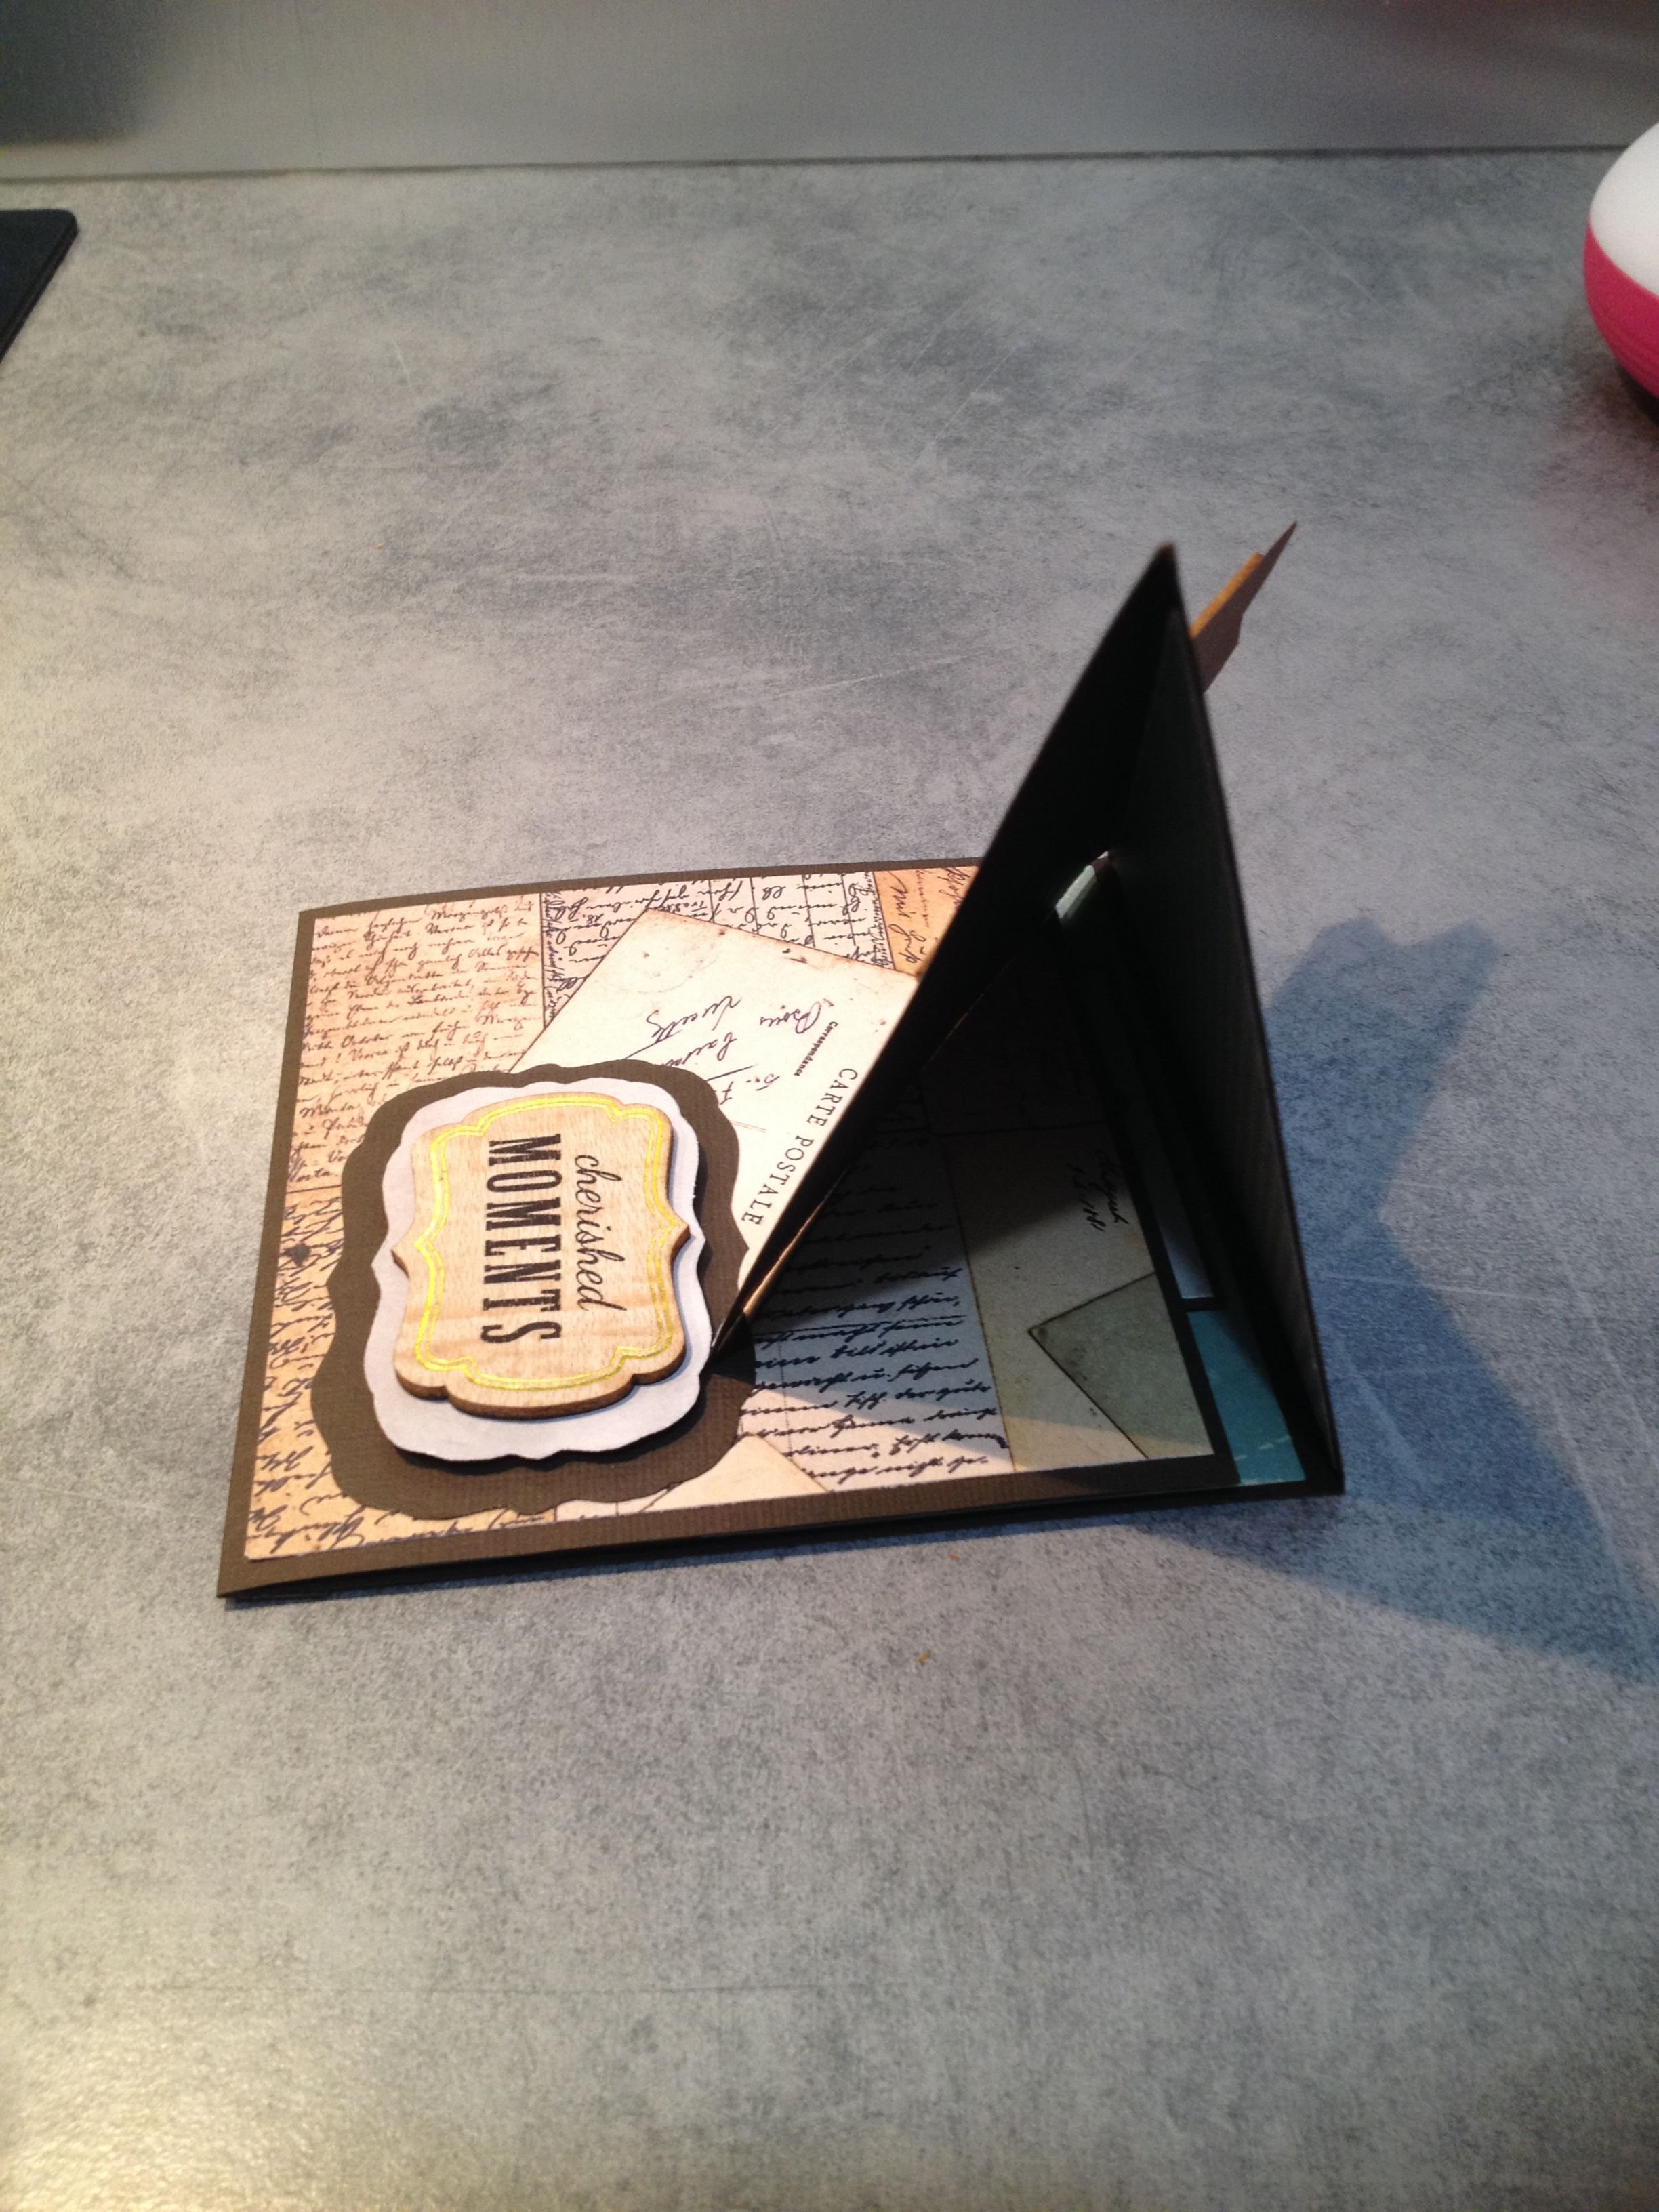
- For the last page, stick your designed paper, then add some embellishments . I used wood embellishments and my die-cut machine for the label. I stick the wood over the label. This may serve as your stopper when you display your cover page, so use 3D tape. The last page is done!

- Now, let's go back to the front page and add some embellishments. I added wood embellishment and stick it to a designed paper and cardstock, then stick at the center of the diagonal designed paper.
So here's the inside of the card:
front page - twisted easel
second page - waterfall
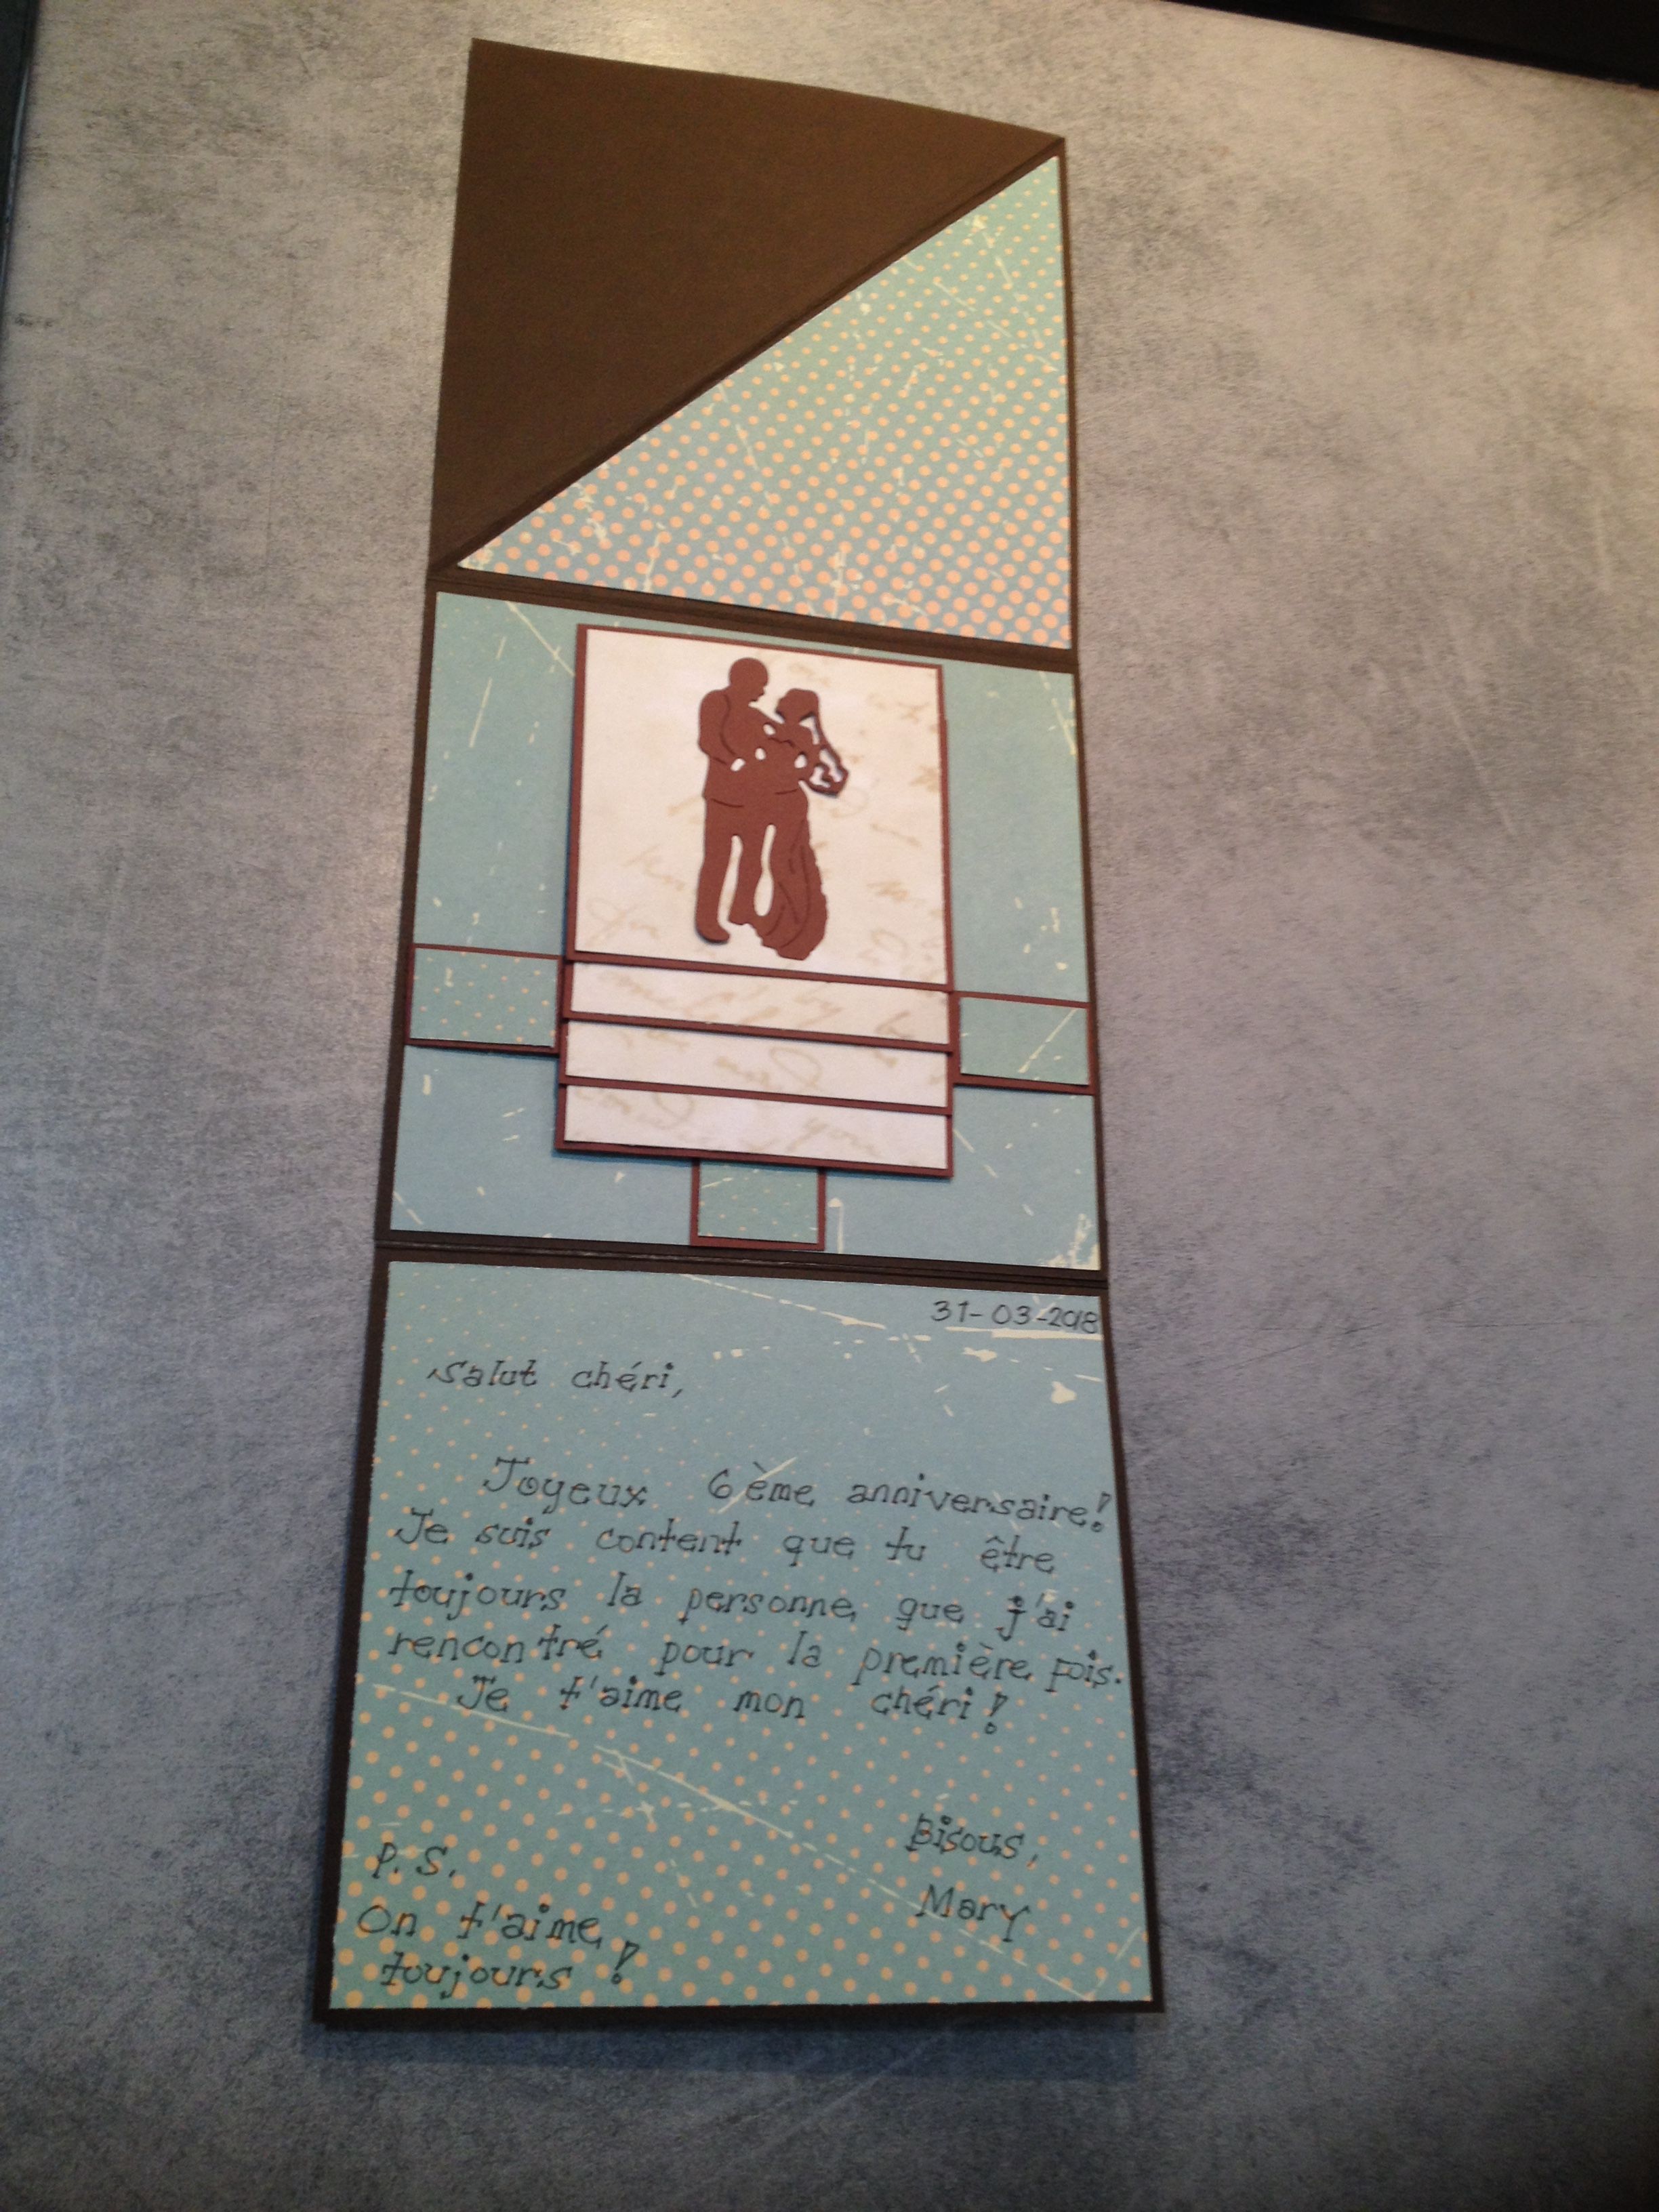
last page
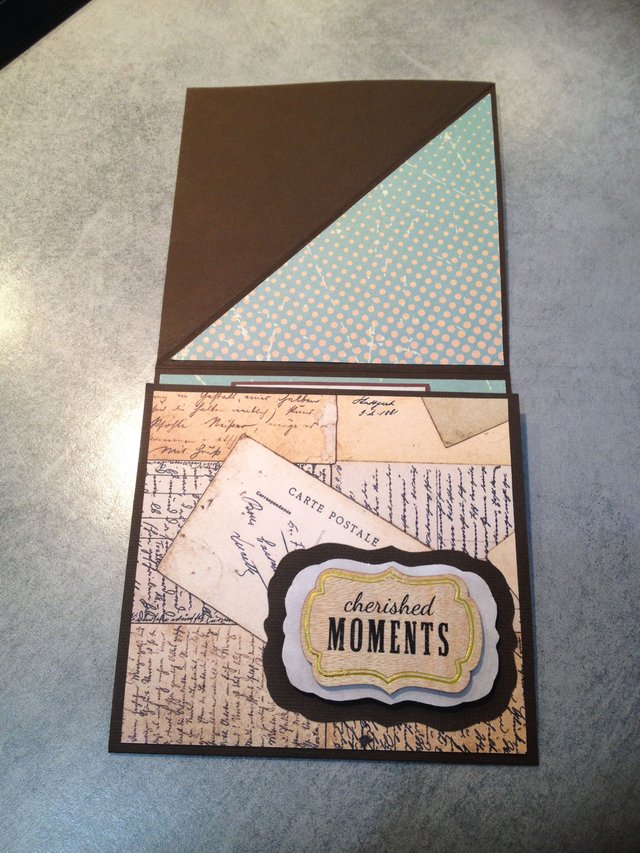


Finish product:

Hope you follow my instructions, keep calm and be creative!
Thanks for dropping by! Have a great day ahead and catch you next time!

full upvote from me for this! so nice sis! and the writing! although I can't read and understand that, it sounds so romantic!
Wow full upvote! Thank you sis hehehe
@tonie, you are a pro! Thanks for joining, I appreciate the support. Keep making craft and keep surprising loved ones with it. You might want to check out a crafting contest by @korinkrafting, amazing prizes awaits you here: https://steemit.com/kraftingscrap/@korinkrafting/the-world-is-your-oyster-1-scrapbook-contest-by-korinkrafting
Thanks @mermaidvampire... Yes I will support korin's contest :)
Exclusive 30 days free upvotes to your every new post. No need to send any kinds of steem or sbd its full free service. we have paid service too so please check them too. Active the free upvote service and learn more about it here : http://www.steemitfollowup.gq
Hey, wow, you dropped a phishing link in my awesome contestant's post?!?! Please know that you have been reported to witnesses. Stay away from Steemit, you don't belong here. Adios mofo!
Lol!! Thanks @mermaidvampire, he's already in luci's hand right now lol!!! Duh mayra tagam mga mangingilad hehehe
friend you get good art
@tonie I'm so impressed! Grabe ka ang galing mo! First time ko makita gawa mo sa slothicorn..you're very artistic pala..Ang ganda ng mga work of art mo..everything is your masterpieces
Salamat @cinderz kulang pa gani na sa practice lol! buka na kaau ako atay ba maulaw ta lol! salamat cind! ehehhehe
Can you be my guru? Such a splendid talent you have.
Thank you @superjongky! Practice lang ng pratice hehehhe
Wow!! 😍😍
Idol ko narin toh...
Super galing!!
❤❤❤❤
I want to be one of your students too..
Charmos lol! thank you @maylyn09... Let's help each other , paturo tau kay utube lol!!!
Your Post Has Been Featured on @Resteemable!
Feature any Steemit post using resteemit.com!
How It Works:
1. Take Any Steemit URL
2. Erase
https://3. Type
reGet Featured Instantly & Featured Posts are voted every 2.4hrs
Join the Curation Team Here | Vote Resteemable for Witness