DIY: Vintage scrapbook mini album - Tutorial with videos
Vintage travel scrapbook mini album
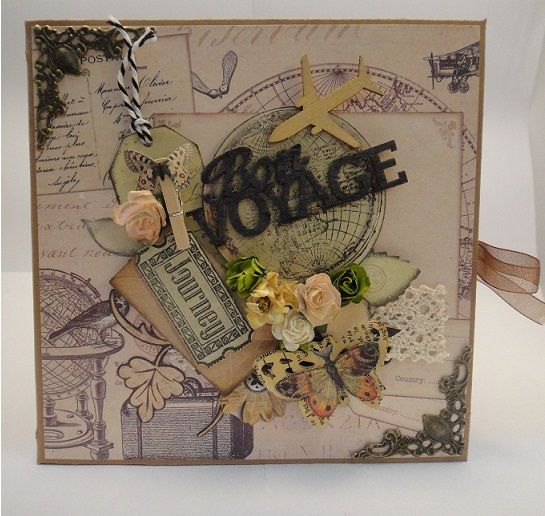

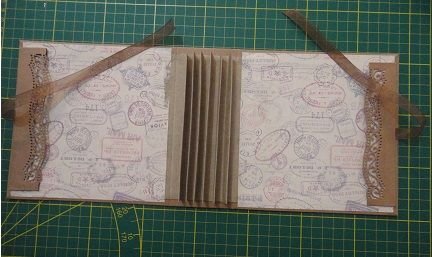
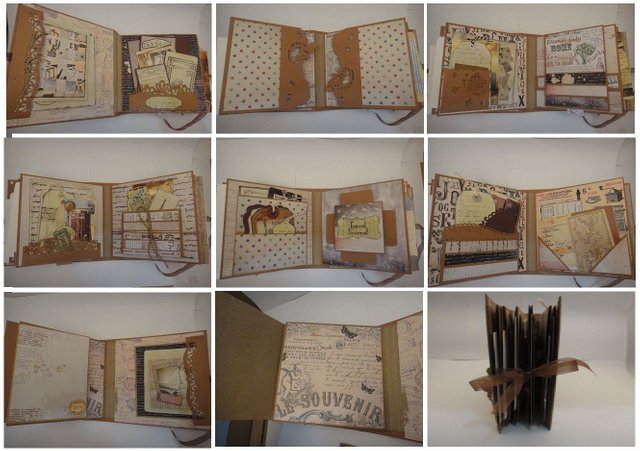
Here's my traditional scrapbook mini album review.
If you are interested with this project, please follow the instructions below and have fun! So let's get started!
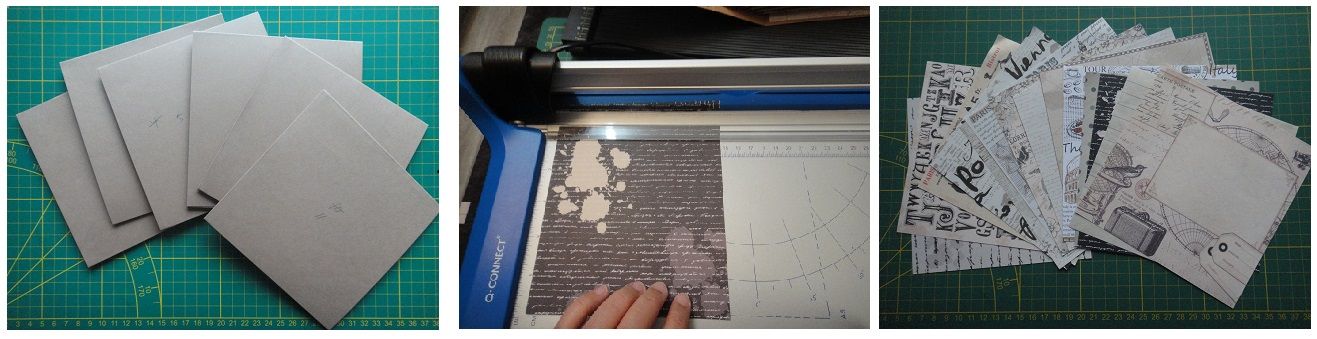
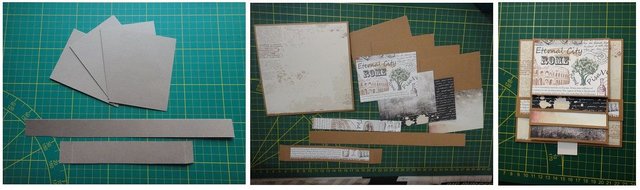
Materials:
- brown cardstock or bristol paper
- pattern or design paper
- cereal box
- trimming and scoring board with bone folder
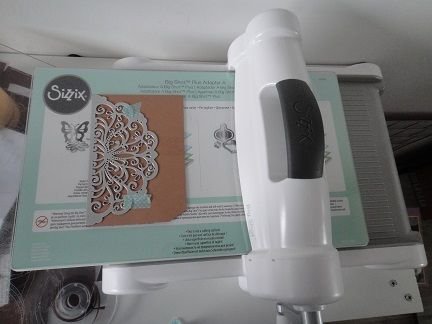
- die-cut machine
- stencil die-cut
- scissors
- ruler
- pencil and eraser
- design puncher ( corner puncher)
- stamp and black ink
- distress ink ( old paper)
- double sided-tape/foam tape
- glue
Embellishments:
- butterfly
- tags
- twine
- wooden clip and die-cut
- flowers
- 3d card
- brown ribbon
- wood die-cut
- lace
- metal ornaments
- leather sticker
Instructions:
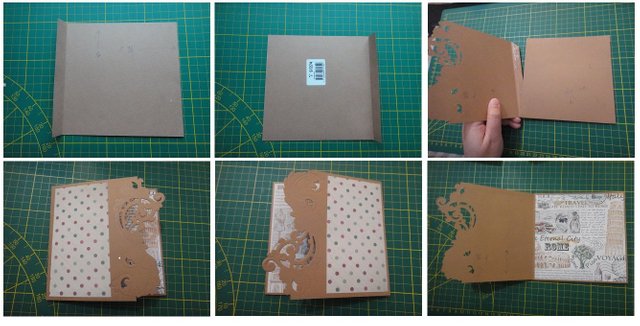
A.) THE COVER & SPINE
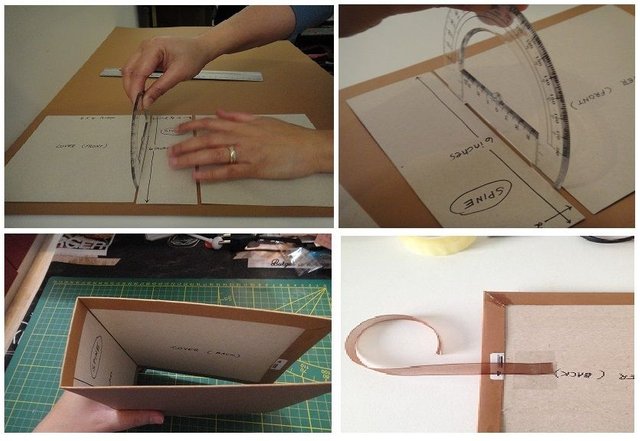
- Take your cereal box and cut 2 pieces of 6x6 inches for the cover, and 1 piece of 6 x 2 1/4 inches for the spine.
- In a brown cardstock, cut 1 piece of 17.5 x 8 cm.
- Arrange your cover and spine, leave a gap of 0.25 cm in between, then paste to your cardstock.
- Cut the 4 edges of cardstock aproximately 45°, score each side using bone folder or round tip knife to fold easily. Use strong glue or double sided-tape for the cover and let it dry.
- Cut 12 inches brown ribbon in a half. This may serve as your closure of your album. Paste it in the middle side of your cover, use scotch tape along with double sided-tape. If you are using a delicate pattern paper, make sure to cover the ribbon with cardstock to avoid peeling. Then do the same in the other side of your cover.
- Take 2 pieces of pattern paper and cover both side.
Tips:
To prevent damage or crack on the edge of your paper, please avoid too much pressure when scoring, and fold it gently. Spread the glue nicely in order to avoid a trace at the paper. When damage occur, you can use a small amout of glue to fix it.
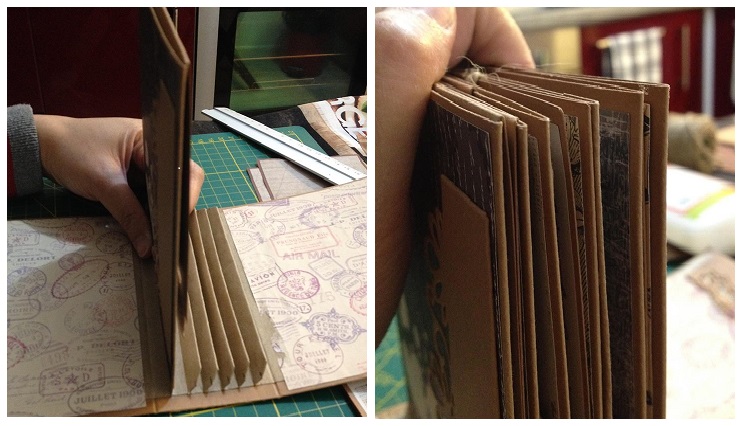
B.) HINGE
This hinge is a little bit difficile, but this one stay rigid specially when your pages are heavy .
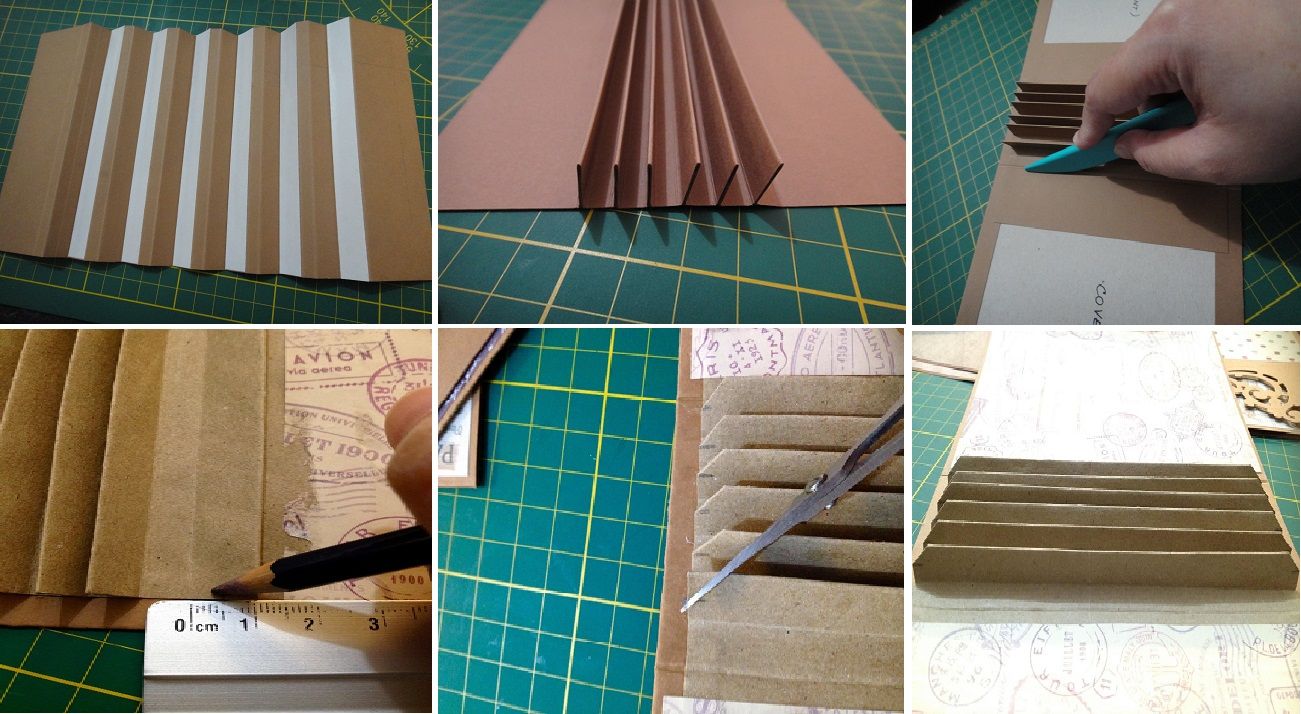
- Cut a piece of 5x11 inches. Score from 1 1/2, 2, 2 1/2, 2 3/4, 3 1/4, 3 3/4, 4 , 4 1/2, 5, 5 1/4, 5 3/4, 6 1/4, 6 1/2, 7, 7 1/2, 7 3/4, 8 1/4 and 8 3/4 inches.
- Fold between each 1 inch, back and fort. Once you are done, fold the other half inch, then form your hinge gently.
- At the back of your hinge, use glue or tape in all side.
If you find it difficult to follow the instructions, you can watch my video clip on how I made my hinge.
- After you're done with your hinge, paste it at the middle of the spine. Marked a pencil at the center of spine, where you can easily paste the hinge.
- Use bone folder in both side of your hinge, since there are gaps between each side, fold it gently to avoid crack. Let it dry.
- Mark each hinge with a pencil at the middle, then cut a small piece diagonal.
- Add some pocket in your internal cover and use die-cut design.
Tips:
Don't use hard paper for the hinge, it will be too sturdy when you insert your pages. If you dont have scoring board, other option is to use ruler and table knife or any round tool that may not damage your paper. Scoring may serve nice result when folding a cardstock, it will not leave any crack of the paper.
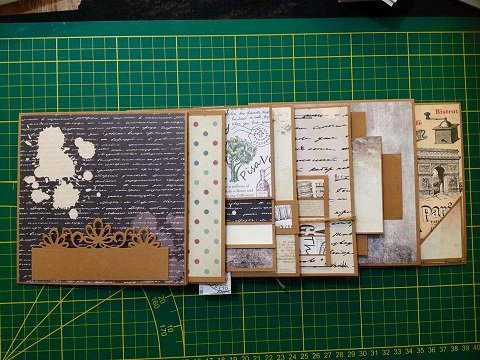
C.) PAGES
- Cut 6 pieces of cardstock at 14x15 cm. Score 1 inch alongside and 5 1/2 inches. Fold the two score line, and glue the 1 inch side to connect the other end of your paper. Both side of the pages are disclosed. Insert it to the hinge and add some cards in the other side.
- Mark a number in each page with a pencil, to recognize easily for the decoration.
- Cut 6 pieces of pattern paper at 13.5x13.5cm and cover all the pages with your desire pattern paper.
D.) POCKETS & FLAPS
For pockets, I used my die-cut machine to add some nice design.
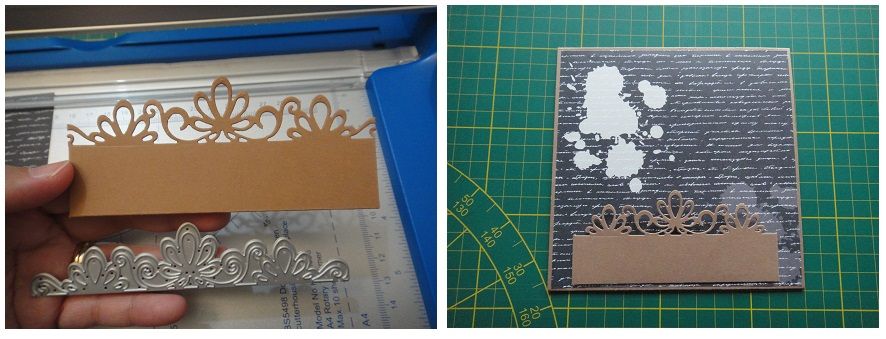
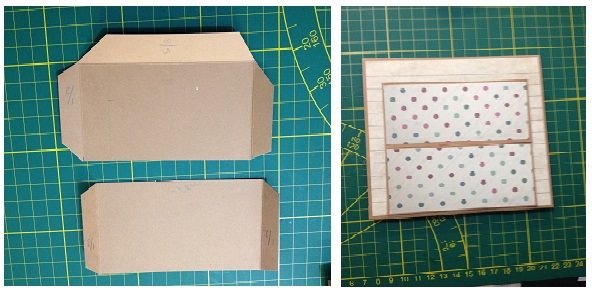
- First page - cut a piece of 13x6cm carstock, score at 1cm in each 3 sides and move it to your die-cut machine. Fold and stick it at the lower part of your page.
- Second page - cut 2 pieces of 15.5x13.5 cm. cardstock. Score one side at 1 cm., fold and move to your die-cut machine. It will be your flaps in both sides. Cut 2 pieces of pattern paper at 12.5x7cm and cover your flaps.

- Third page - cut a piece of 6.5x6.5cm cardstock. Score the 2 sides at 1cm and fold. Move it to your die-cut machine, and stick it the lower left side of your page.
For making a waterfall card, cut 4 pieces of cardstock at 10x7.5cm., cut 4 pieces of pattern paper at 9.5x7.2cm and glue. Cut a piece of cardstock at 16x2.5cm, score both side at 1cm, fold and stick it at the lower part of the page. Cover it with pattern paper cut at 13x2.2cm. Cut another piece of cardstock at 2.5x 25cm. Score at 1 5/8, 2 3/8, 3 1/8 and 3 7/8. Fold it, and stick it on the horizontal strip of your page. Get all your 4 pieces of cardstock and glue in each folded side of the vertical strip.
Here's a video clip of Waterfall tutorial.

- Fourth page - cut a piece of cardstock at 14x5cm, score 3 sides at 1cm and fold. Move to die-cut machine and stick it to the lower part of the page. Cut 2 pieces of cardstock at 15x 14cm, score one side at 1cm and fold. Add some twine for the closure. Cover it with pattern paper cut at 13.5x13.5cm. Do the same on the other, and stick the flaps at the top and buttom side of your page. Add a pocket at the lower of the flap. Cut a piece of cardstock at 10x7.5cm, fold it in a half. Cover it with pattern paper cut at 9x7cm.
- Fifth page - cut 1 cardstock at 13x7cm, score each side at 1cm, cover it with pattern paper cut at 12.7x6.8cm. Cut another piece of cardstock at 13x5.5cm, score each side at 1cm, fold and cover with pattern paper cut at 12.8x5.2 cm and stick it at the center of your left page.

For making a quadruple slider, cut 4 pieces of cardstock at 8x8 cm. Cover the 1 piece with pattern paper cut at 7.7x7.7cm. Cut 4pieces of cardstock at 8.5x5.5cm and punch each corner. Mark each sides at 1 cm, then cut 0.25cm in both sides of the interior part. Cut 2 strips of plastic. Insert the plastic and stick. For further tutorial, please check the video below.
Here's a clip for Quadruple slider tutorial.
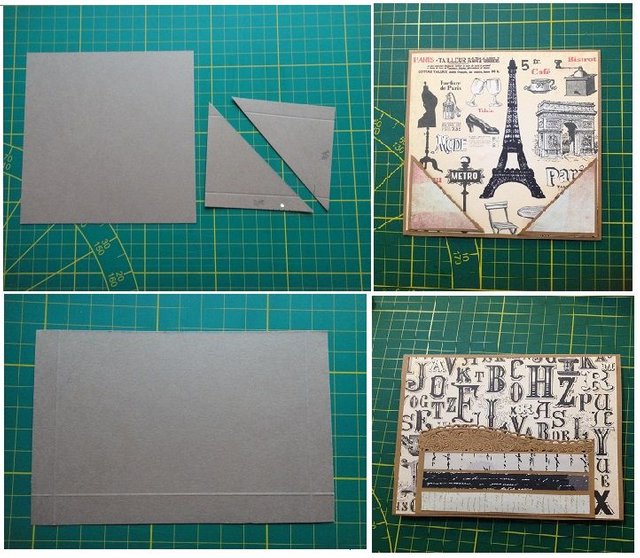
- Sixth page - cut a cardstock at 13x 9 cm, score 3 sides at 1cm, fold and move it to your machine. If you have some strips left over, you can use it to design and cover your pockets. Stick the pocket at the lower part of the page. Cut a cardtock at 7x7cm, cut it in diagonal, score 2 sides at 1 cm then fold. Cover it with pattern paper and stick each pieces at the lower right and left side of your page.

- And for the last page, cut a cardstock at 21x31.5cm fold it in a half and cover it with pattern paper cut at 20.8x32.3cm. Insert it in the last page.
 All your pages are done, now it's time to insert and stick it to your hinge. Make sure that all the pages are align with each other. Hold it still and let it dry.
E.) TAGS & INSERT CARDS

For tags - I used the price tags of clothes, stamp and glue some pattern paper. I made a diy tags too, cut it in my machine, add some twine, pattern paper and ink all parts of the paper and edges.
For insert card - I made a diy, stamp and ink with matching pattern paper and distress the paper, along with some strip for more artistic. Some insert cards are from 3d pattern. And include some ticket, stamp and ink.
Tips:
Always clean your stamp pad with wipes to prevent ink stain.
F.) COVER FRONT PAGE
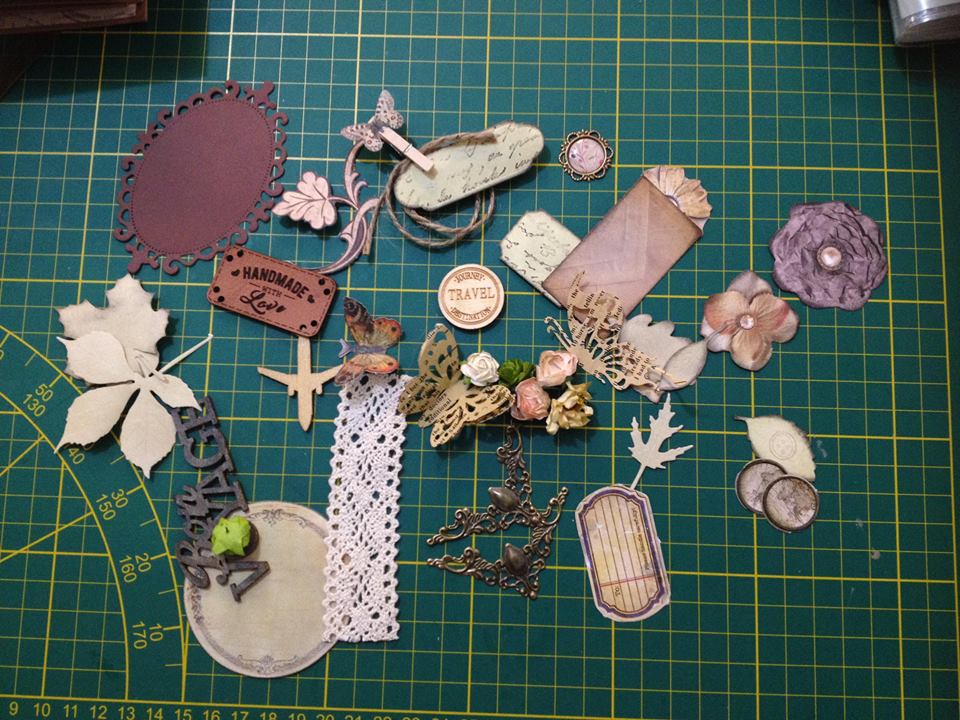
For the final touch, I grab some embellishments. It took me a while to decide what lay-out I'm going to create. For the corner, I added 2 pieces of metal embellishments, to look more vintage. Some embellishments like tags, stamp ticket, wooden die-cut, paper flowers, wood clip, small piece of envelope, a circle ink paper, butterfly,(from old page of a book), lace, banner, and metal ornaments.
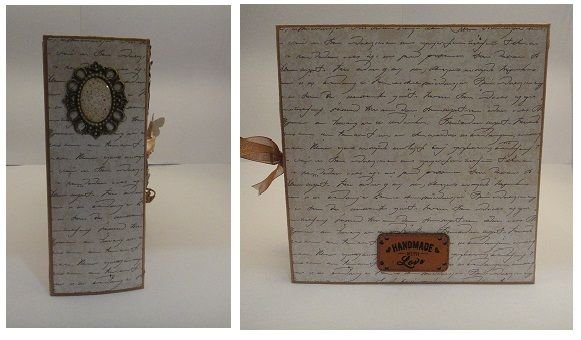
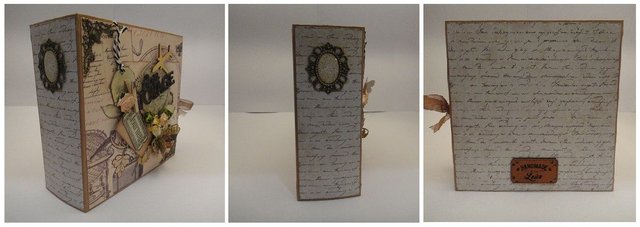
For the spine, I stick a metal rustic pendant, just for the design. At the back of the album, I stick a leather embellishments with a word "handmade with love".
It's done and ready to use! Well, I hope you like and figure it out. I'm willing to answer whatever your question if you are confuse with my tutorial, and please comment below if any suggestion regarding with this blog.
Thank you so much for dropping by! See you in my next blog! Have a great day!


I love it! Thank you for sharing this! I'll definitely be using this in the future. You are awesome!
Hello... Thank you! :)
You can ty this and offer it to your loveones or sell it... :)
superb sis! grabe napaka tedious talaga ng traditional scrapbook! fave ko ung may hinihila... ang ganda naman ng die-cut machine ... huhu gusto ko tuloy mag scrapbook!
Salamat sis.... long process kaau lol! labaw na cge ko stop ani ky bantay skng baby hehehe.. lingaw-lingaw nlng ni akoa sis hehehe ... gift ranang machine skoa hehehehe.. sis asa na imo digital scrapbook pra supportahan nato lol!
the details and instructions!! You should have your own show!
Thank you sir... But I think the instructions is confusing, I doubt hehehehe
Wow this is great! I wish this will be curied...
lol! Thank you sir, I'm not sure if this will be curied lol! magdilang anghel unta ka sir heheheh
Ang ganda naman..i always watch tutorials in youtube, i love DIY too..
Thanks, me too, before I started making album, I watched several times :)
You were featured on the #27 edition of steemitfamilyph's featured posts. Congratulations!
https://steemit.com/steemitfamilyph/@steemitfamilyph/daily-steemit-family-ph-featured-posts-27
Once again, thank you so much steemitfamilyph for supporting my post.... :)
Congratulations! This post has been upvoted from the communal account, @minnowsupport, by tonie from the Minnow Support Project. It's a witness project run by aggroed, ausbitbank, teamsteem, theprophet0, someguy123, neoxian, followbtcnews, and netuoso. The goal is to help Steemit grow by supporting Minnows. Please find us at the Peace, Abundance, and Liberty Network (PALnet) Discord Channel. It's a completely public and open space to all members of the Steemit community who voluntarily choose to be there.
If you would like to delegate to the Minnow Support Project you can do so by clicking on the following links: 50SP, 100SP, 250SP, 500SP, 1000SP, 5000SP.
Be sure to leave at least 50SP undelegated on your account.