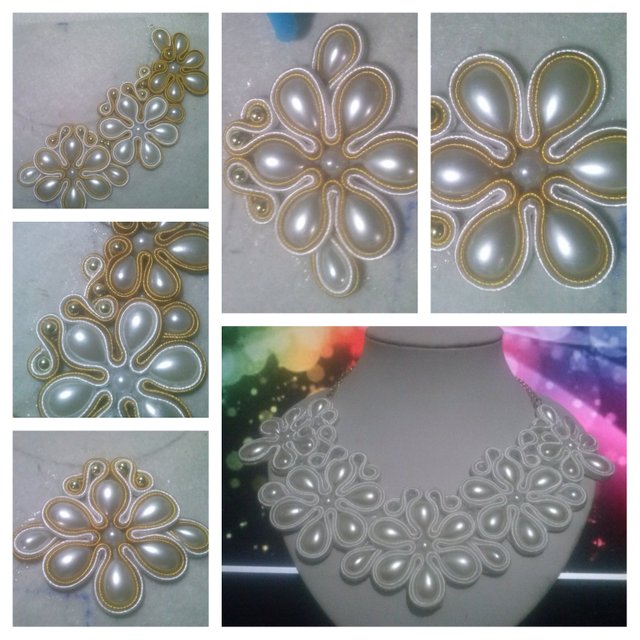
Dare to Learn with me! Step by step tutorial, Necklace or Choker made under the Soutache technique with my personal touch
Hello Hello, first of all I apologize for the delay in the publication had almost no material and unfortunately here in Venezuela to buy is difficult ... Well continuing this day I bring the first part of the tutorial of a beautiful and super original necklace try to create it from Detailed and easy way that is going to look majestic but even so it is very easy to manufacture are repetitive, simple steps. Remember my intention is to show you my work to teach you my ideas step by step with well explained detail so that you not only learn, but you have the bases to grow and create your own innovating ideas, enthusiastically designing love and much desire, many have read me before and as you know this more than my work is my passion I love it and I do it with love patience and the best full of enthusiasm for you. I really hope you like it and dare to try it.

Materials:
20 Half pearl drop shaped 1.8 cm
12 Half pearl in drop shape of 1.3 cm
5 Half 0.8 cm round pearl
2 Half round pearl of 1 cm
Liquid silicone
30 laminated balines or stones of your choice.
2 Bisuteria pins
Leather or thick fabric for the base
4 Hoops or rings
1 Brooch
28 cm of chain the thinnest possible
Thread of Soutache or Braid of Rayón the name varies according to the Dais.
Eyebrow tweezer or Pinza para watchmaking
Flat jewelery clip and round tip
Let us begin:

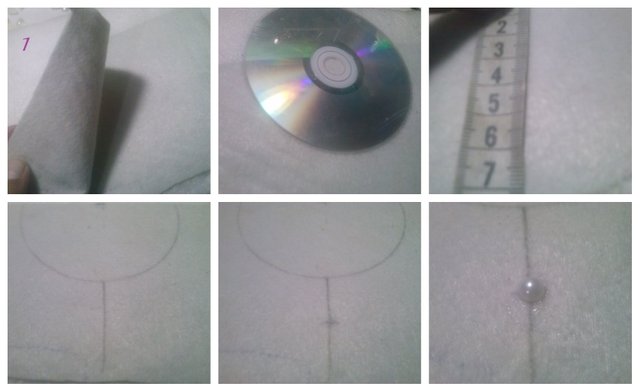
STEP 1: We will cut a piece of cloth or leather of 23 long * 14 cm high with the help of a CD we will make a semi circle in the fabric with pencil very clearly. when measuring will be 7.5 cm, then we will mark the center with the pencil downwards, and at the same time the center of this line. Then you put a little liquid silicone and stick a round 0.8 cm.
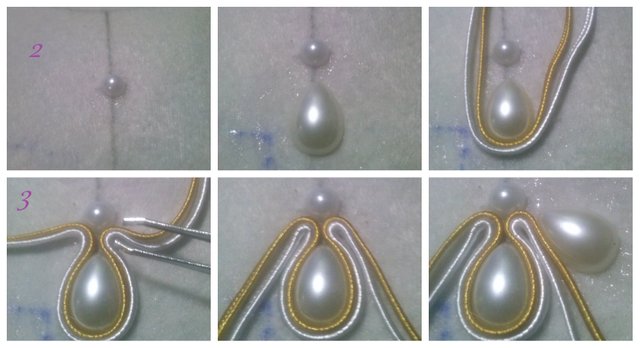
STEP 2: After gluing the half round pearl of 0.8 cm, we will glue on the bottom part a 1.8 cm drop shaped pearl at a distance of approximately 0.5 cm. Put liquid silicon around it and cut 2 threads of approximately 60 cm each one of the color of your choice. You will place a pointed tip and stick them right in the middle as I show you in the image.
STEP 3: With the help of an eyebrow tweezers or clip for jewelery you will bend the threads little by little, until it is well glued without space between the threads, we will place again silicon liquid and paste another half pearl in the shape of drop of 1.8 cm
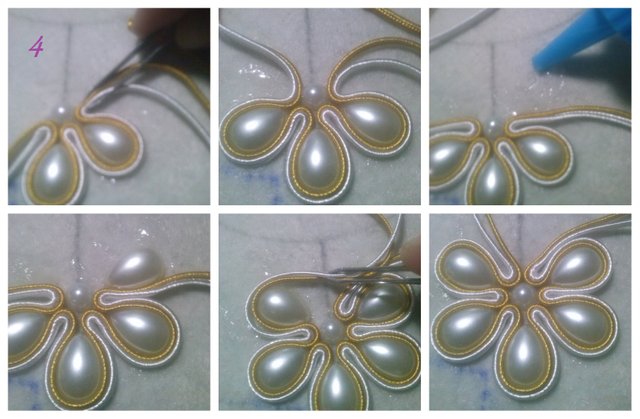
STEP 4: With the help of the clamp we will continue placing the 1.8 cm half-pearl sconces one next to the other as you see in the images little by little we will place liquid silicon and we will give shape to a beautiful flower of 6 petals just around the round piece that we placed at the beginning. Always with patience and helping with the clamp so as not to fill your hands with silicone and thus not dirty or damage the piece.
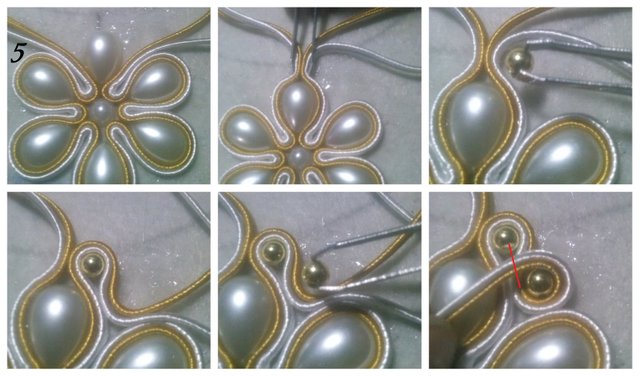
STEP 5: In this part we will place a little liquid silicon and paste the half pearl applique of 1.8 cm missing to complete this beautiful flower, with the help of the tweezers we tighten the threads so that they stick well, the thread above that we have left over will fold down and as I show you in the image you will stick a 0.4 mm balin, then we will put liquid silicon again and stick a second balin taking care not to dirty the top of the collar.
STEP 6: Carefully fold in the remaining thread is going to cut as I show you in the previous picture with a red line you will burn the tips with the help of a lighter and we are going to introduce them below the balines that we paste for Do not look and have a better finished collar. Now we are going to do the same procedure on the other side we will place liquid silicon with the help of the clamp we will stick the balin or stone of your choice will bend the thread down we will place another balin and we will bend the thread upwards to cover the balin will be cut and burn the tips and with care and help of the clip will introduce the threads under the pellets that you just pasted for a better finish, it will look like I show you in the image. Tip: do not discard the leftover threads later on we will use them. To continue, we will place liquid silicon on one side of the second wall as you see in the image.
Párrafo Aquí
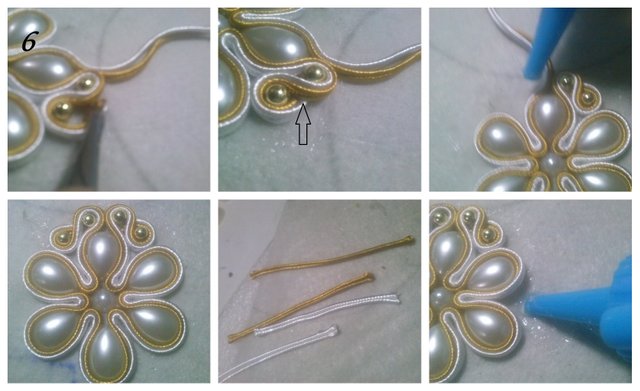
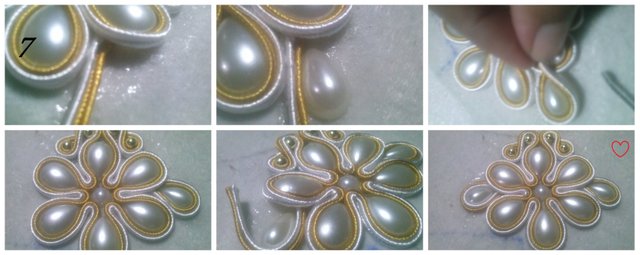
STEP 7: Lift a little the second applique we paste on the flower and introduce 2 wires previously burned their tips, stick a 1.3 cm medie pearl appliqué and cover it with the short thread the remaining thread burns the tips and insert them under the big appliqué as it was done with the first tips. We must repeat this process on both sides of the flower little by little taking care not to dirty the piece. So we will have ready the first flower of our beautiful necklace that as you will notice is easy and with repetitive steps.


You just planted 0.02 tree(s)!
Thanks to @marleyn
We have planted already 3516.46 trees
out of 1,000,000
Let's save and restore Abongphen Highland Forest
in Cameroonian village Kedjom-Keku!
Plant trees with @treeplanter and get paid for it!
My Steem Power = 19247.06
Thanks a lot!
@martin.mikes coordinator of @kedjom-keku
A+
I am going feature it in the next Xposed Curator's Rebound #41. You may find details about it Xposed Curator's Rebound
My hope is to bring your quality work here the exposure it deserves, and with it, hopefully some additional rewards.
Best wishes, @mirrors
Wonderful, thank you very much for this excellent news, It really is important for me, what I most want is to reach as many people as possible to teach with enthusiasm and full of creativity contributing original content, encouragement and desire to keep going every day learning together
You are welcome. It is a deserved feature. It takes a lot of creativity, and effort, and time to put up such a post which adds value to the community. These are the kind that deserve to be rewarded. I wish i could do more.
Keep up with such works, and in due time, regular recognition and reward will come your way.
This post was shared in the Curation Collective Discord community for curators, and upvoted and resteemed by the @c-squared community account after manual review.
How exciting, thank you very much makes me happy that you value my effort I am grateful
Very beautiful work! :)
thank you
Very intricate and delicate art! I love handmade crafts, and this tutorial is very well made, thank you for sharing!
I found this on the @c-squared blog, very great art curation team over there!
thank you
Congratulations @marleyn! You have completed the following achievement on Steemit and have been rewarded with new badge(s) :
Click on the badge to view your Board of Honor.
If you no longer want to receive notifications, reply to this comment with the word
STOPYou've received an upvote from @slothicorn! Click Here to Read our New Curation Policy And Updated Rules. (@justatouchfey)