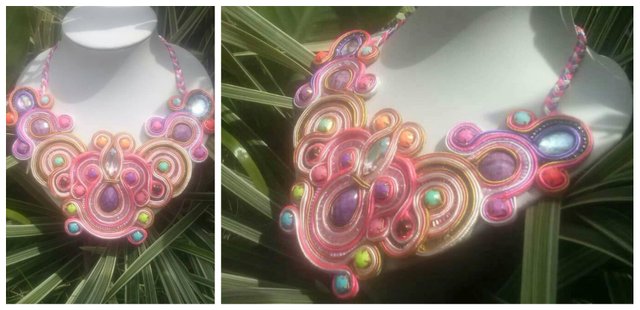
Dare to learn with me! Step by step tutorial, necklace and choker type handmade with soutache technique and my personal touch Part 1
Hello, Hello ... It is a great honor for me to greet you and be here again with you, unfortunately I moved away a few months since I did not have materials for the tutorials, but today I come to stay with all the energies to teach them a new model is that they would like it as much as I have liked to do it, Many have read me before and know my work that is more my passion I love to create, innovate and above all to teach and share it with this beautiful community, I see steemit as an open window to share and in turn learn from each other with quality post.
The necklace that I will explain next is a big bib necklace, all materials are easily accessible and you can get them in the haberdasheries, the tutorial I will divide it into 3 parts to explain each detail in the most explicit way so that everyone can learn even if you do not have any previous knowledge about costume jewelery

Materials:
Rhinestone chain 5 cm (22 stones)
Apply drop type 3 cm high * 2 cm wide color to your choice.
apply crimping type 2.5 cm high * 1.3 wide.
Canutillo match 5 assorted colors at your choice.
Small mostacilla 2 colors at your choice and 2 mm mostacillon
Soutache thread or color rayon braid of your choice, (I use 7 different colors)
2 round appliqués of 2 cm diameter
2 1.5 cm oval appliques
Thick fabric or leather for the base of the collar
1 clasp, 2 rings or rings, 2 terminals to hold the collar.
Jewelery tweezers, 1 watchmaker's tweezers or eyebrow tweezers, Liquid Silicon, Lighter.

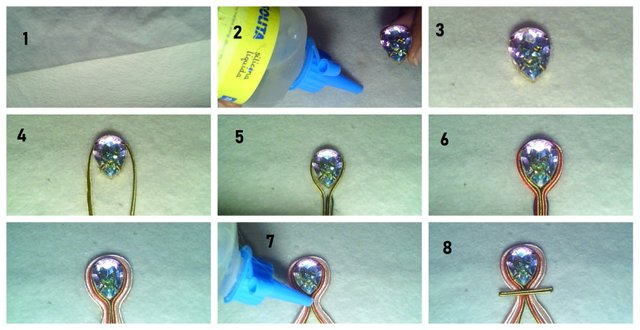
STEP 1: Cut a piece of leather or thick fabric 22 cm high * 23 cm wide.
STEP 2: From the bottom 4 cm upwards look for the center of the fabric and place liquid silicon
STEP 3: Carefully stick the large drop-shaped sconce as seen in image 3.
STEP 4.5 AND 6: We cut 4 threads of 32 cm each, the color of your choice, and we will place them around the drop-shaped appliqué with care, you can help of the eyebrow tweezers or watches so as not to dirty the thread and thus not damage your piece.
Step 7, 8: After sticking the 4 threads, we will place a little liquid silicon on them just where they join at the top and we will stick a thread of about 2.5 cm.
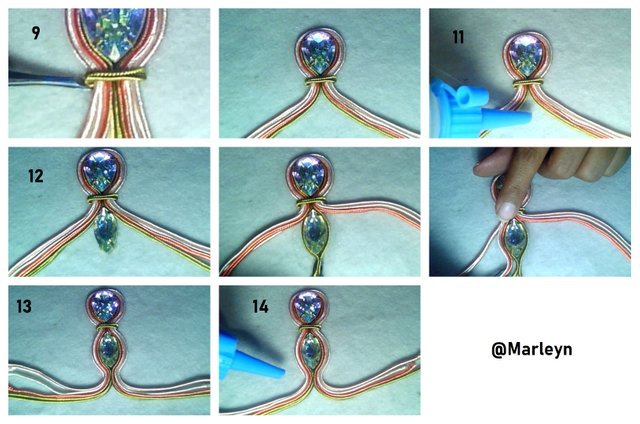
STEP 9/10: The thread that we paste in step 7/8 with the help of the clamp we will introduce it below the threads to which we paste it, then separate the threads in 2 equal parts will be 4 strands on each side
Step 11/12 and 13: We place stick on the previously separated threads, there we will stick the 2.5 cm tear drop applique, we will spread liquid silicon around it and we proceed to stick the threads around this piece joining all the threads at the tip, avoiding empty spaces.
ASO 14: Once again we separated the threads in two, you should notice that on each side there are 4 threads, just at the tip on the outside you will be placed liquid silicon as you see in the image 14 P
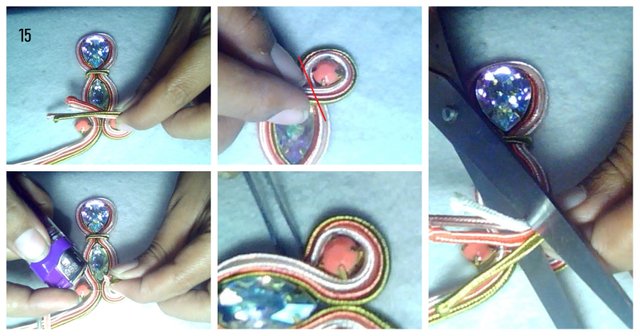
STEP 15: Where the drop applique ends on the outside we are going to stick 2 pieces of 5 mm rhinestones, we bend the threads in the newly stuck piece, completely covering the strass slab , we mark where we are going to cut, we proceed to cut the threads and without releasing them we burn the ends of them, with the help of the eyebrow tweezers we introduce them below the thread previously glued to give a better finish to our piece.

STEP 16 and 17: At this stage it should look like this, we will place liquid silicon all around the wall in the form of a drop that we paste to start and with the help of a clamp we will glue one by one Our stones in this stage I am using 2 mm mostacillon as seen in the images.
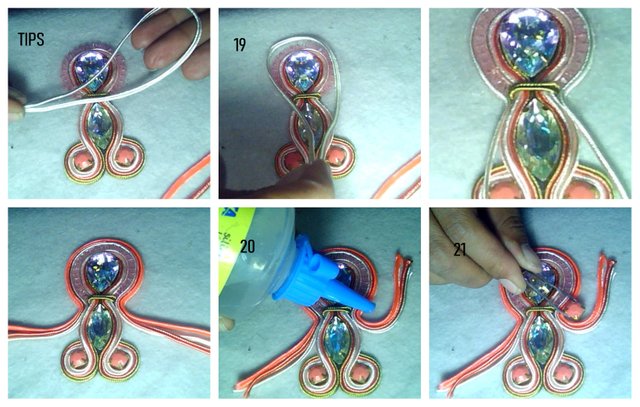


TIPS: You can help with a needle to fix the nuggets so that they all stick together in the same way. With patience and love everything is easier 😅😊😀
STEP 18: Now more liquid silicon is going to be placed around the mostacillon that we pasted in the previous step.
TIPS: So that we always stick in the middle of the thread and we do not have one side bigger than another we can join both ends and at the moment of sticking that is right in the middle of the threads .
STEP 19: Continuing with the tip and previous step we are going to stick 3 threads each about 14 cm around the stones previously stuck.
STEP 20 AND 21: We will bend the threads outwards just where the stones stuck in step 16 and 17 end. Put some liquid silicon on and stick a 5-inch strass stone on each side mm.
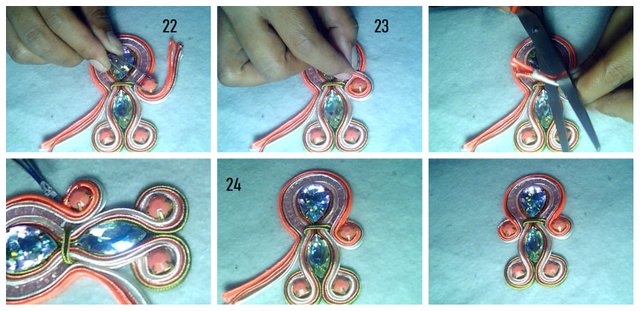
STEP 22, 23 and 24: After gluing the 5 mm strass, we put liquid silicone around the rhinestones and we fold the threads lining our piece we mark where we are going to cut without letting go the threads burn the tips and with the help of the clip we introduce the tips below the other threads so you will have a cleaner finish, you must do the same procedure on both sides of the collar. It should stay like the last image.
STEP 25: Having finished the previous step we will place more liquid silicon around the strass and with the help of the clamp we will paste more mostacillon, this process must be done from both sides as you I show in the first 3 images.
STEP 26: At the end of sticking the stones, we put liquid silicon around it and we will stick 2 threads each about 10 cm this process should be done on both sides of the necklace.
STEP 27: As you see in image 27 we will place a little liquid silicon and we will stick another strass siding lining the same with the thread, when we finish folding it inwards mark where we are going to cut, we cut we burn the tips and with the help of the tweezers we introduce it below the previously stuck threads.
STEP 28: At the end of the previous steps on both sides of the collar it will look like I show you in images 28 and 29, in this part we put liquid silicon on the outside of the previously stuck threads and with the help of the clamp or needle for beads we begin to stick one by one the split beads so that all are glued in the same way repeat the process on the other side of the necklace.
STEP 30: When you finish gluing the canutillos of both sides, we return to spread more liquid silicon around the combs and above these we will stick 2 threads of 10 cm approximately each one as you see in the following images. performs this process on both sides of the collar
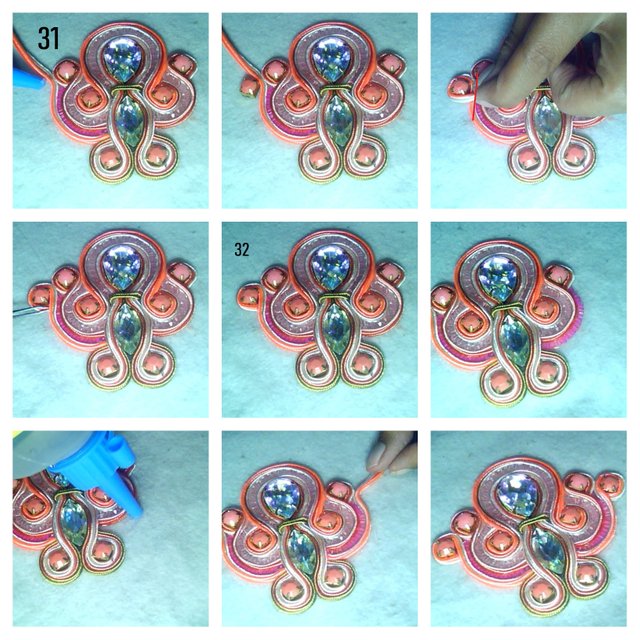
STEP 31: Just above the previous strass is going to stick another sconce as I show you in the image 31, we do the same steps above lining the strass wall with the thread we mark where it goes to cut the threads, cut, burn and introduce them from below. Repeat this process on the other side of the necklace. So we have the center of the necklace ready ...
Hello @marleyn! I welcome you to #needleworkmonday! Every Monday we get together to share our work, patterns, tips and shortcuts and just have a good time! Please use the #needlework tag without the word Monday attached on all other days and the #needleworkmonday tag on Monday’s only.
Your work is very beautiful and I appreciate the detailed step by step process. That’s one thing we encourage is to share the process of our work so we can take others along the journey with us.
I look forward to seeing more of your work. Here is the link to our Discord server. When you enter please tag the mod needleworkers so that we can direct you to the right section.
This is @crosheille for the @needleworkmonday community! 😊
Thank you very much for the support and welcome makes me happy to share what I learned with others as well as learn from you is a beautiful community I hope you like my work will continue to improve every day, your work is also great. (Sorry if I have mistakes in English I still study it) 😀😅
Dear @marleyn jeezz what a great tutorial blog. I would love to try but this is to much time I dont have😉 please join @needleworkmonday and use that tag for Free it Will get you much more deserved and needed exposure. We are All crafters and needle lovers for diy so come join tge Discord too.
Gr.
Britt
Thanks for the support and for reading me, it makes me happy that you take me into consideration I will be happy to use the label. please indicate me the address of discord?
Contact @crosheille or @muscara they know everything and we would love to have you needling with us 😉
Thanks @brittandjosie! 😉
Thanks, I will do it
Excellent walkthrough and the necklace looks great - thanks for sharing
Thanks to you for the support.
Wow you make really good walk troughs on how you make those. Thank you for sharing.
Thanks to you for the support and for reading me.
Wow! Lovely work. I love the step by step process.
Thanks, I'm glad you like
This is such an impressive art. I liked the way you describe the overall process.
@Tamala, do you like boutique jewels?
Thanks, I try to do it with details so everyone can learn
Congratulations @marleyn! You have completed the following achievement on the Steem blockchain and have been rewarded with new badge(s) :
Click here to view your Board
If you no longer want to receive notifications, reply to this comment with the word
STOPDo not miss the last post from @steemitboard:
Your post was upvoted by the @art-venture account after manual review and included in Art-Venture magazine. The upvote and support of Art-venture magazine would greatly appreciated!
How good!!! This is great, thanks.