Cardboard Box Transformation: How I Transformed a Box into an Awesome Playhouse!

Cardboard Box Transformation: How I Transformed a Box into an Awesome Playhouse!
Brought to you by: @kraytive

I was a 90's kid.
This means that I wore jelly shoes with neon pink and teal color-blocked tee-shirts, had a massive army of Beanie Babies, and fought daily with my brother and sister over the one no-skip Walkman that the three of us shared. We had no internet in our home, and no smart phones. "High-Tech" was a phrase we used when we got a new TV that didn't require us to adjust the antennas to tune into a channel we wanted to watch. Back then, we didn't have all of the cool technological toys that children nowadays play with, but we did have our imagination... And let me tell you, I had quite the imagination and dreams when I was young. Specifically, cardboard box dreams.
What? You might be asking. Cardboard box dreams? What does that mean?
Hear me out for a second. When we were kids, a cardboard box could be turned into anything with our imaginations. An undersea submarine? No problem. A rocket ship? Sure thing. A super-secret-no-siblings-allowed-clubhouse? You got it, kid! All I needed was some markers, glue, and paper, and I would make that box become whatever I could dream up. It sounds so silly, but a large cardboard box would keep us occupied for hours.
So, when a big package showed up at our doorstep, our eyes would bulge out of our heads. We didn't care about what was inside the box, it was the box itself that mattered. I remember getting a refrigerator-sized box once, and I thought I had stumbled into a cardboard Garden of Eden... Pure joy.
Fast forward twenty-something years. Imagine my surprise when my very own child develops an odd obsession with cardboard boxes. All of a sudden my very own cardboard box dreams are reignited and all I want to do is make a badass box playhouse for my kid! Okay, okay, fine... I'll admit it was partially for myself too... Here's how I did it!

(Psst... It's us again!)
Planning:
At the start of every project, I break out a clean sheet of paper and fill it with ideas that I like. I'll try to get some inspiration from Pinterest or Instagram first, then I'll write chicken-scratch notes, draw quick sketches, and just jot down an overall brainstorm for the project. The planning paper is not meant to be perfect, just meant to get the ideas out of this brain of mine. By the time I'm finished, it usually looks like a pencil got into a war with the paper, and the paper lost.
Here were my planning questions for this project:
1. What size box do I have/want to make a playhouse?
The larger the box, the better. I had a heavy-duty 25" x 25" x 29" box laying around that my son, Knox, was already climbing all over. Just remember that the larger the box, the more materials you will need to decorate it and it could potentially cost more money.
2. How durable do I want this cardboard playhouse to be?
Knox is almost two years old, which means he enjoys destroying everything in his path. Because of this, and because he is growing so quickly, I didn't foresee that he would be using this playhouse for the next 5 years. With that being said, I was okay with using less durable materials (construction paper, school glue, etc.) rather than more durable materials like wood to decorate the box because I don't mind if he destroys it. I mean, come on, it is still only cardboard!
3. What materials do I already have that I can use?
For this project, it was really important for me to spend time, and not money. My goal was to spend less than $10, and I only spent $6 overall! I spent quite a while digging through my craft drawers and the garage and taking note of stuff that I could use instead of going to the store. I found a ton of neutral-colored construction paper, glue sticks, tape, paint, and additional cardboard hidden around our house. I wrote out a list of what I had on my planning paper and found ways to incorporate what was on the list!
Here is an example planning paper for this project! I actually completed this project back in March of 2019 so my original planning paper is long gone. Usually they are much, much messier and don't make a lot of sense:

Gathering Supplies and Materials:
It all started with a box... I gathered the materials I had around the house and organized them on a tall table that my son couldn't reach. It's all fun and games until baby finds the permanent marker and wants to color Mommy's couch, so better to be safe than sorry! Keep your materials organized!

Materials I Used:
- 25" x 25" x 29" Cardboard Box
- Black Construction Paper
- Gray Construction Paper
- White Construction Paper
- Glue Sticks
- Hot Glue Gun/Hot Glue Sticks
- Gray Paint
- Paint Brush
- Knife
- Scissors
- Thick Tape
- Marker/Pen
- Drawer Pull
- Additional Cardboard
- Contact Paper (Purchased 3 rolls for $3 at Dollar Tree)
- Cabinet Liner (Purchased 3 rolls for $3 at Dollar Tree)
The Making of the Box:
First, I removed all of the existing tape from the box, and opened all of the folds. I wanted to cut three windows on the left side of the playhouse, but needed to cut out the inner folds of the box first. When it was time to eventually cut the windows out, I only wanted to cut through one layer of cardboard. I used a sharp knife to cut out two of the inner folds (opposite edges, East and West) on only one side of the box, and set the pieces I cut aside for future use. Then, I folded the remaining two folds (North and South) and taped them in the middle. Below is a picture of the 'East' side fold that I cut off on the dashed line, and I repeated the same for the 'West' side fold. I kept all four folds attached on the other open side of the box, don't mess with that side yet!

In the photo below, you can see how I taped the 'North' and 'South' folds together from the previous step. Please note that I used painter's tape. If I could do this project again, duct tape would be the way to go! Unfortunately, painter's tape was all I had available for this project and I made it work! I taped the edges of the box for the window side to get rid of gaps and close the wall on that side. After that, I used a nice big marker and traced the edges of some books to draw out three window shapes.

I measured the windows to make sure they were just right, and got ready to cut them out with my giant knife. I had to wait until Knox was taking a nap to do this part, because he wanted to "help" with the cutting and... No, just no.

Bam! Windows were cut and we were ready to move on to the other side of the box! I had already cut a rectangle-shaped door in the front of the box with three cuts, leaving one side of the door attached.

Flip the box to the other end, where there are still four folds. I wanted to make a cute little "patio" area on this side, so I straightened out three out of the four walls (North, East, and South) and folded in the remaining wall (West). I used tape on all of the edges to hold them in place.

Now that the walls of the playhouse were framed, it was time to start on the details. I wanted the walls to have a brick-like texture, so I took gray construction paper and cut it into small, same-size rectangles that I would use for "bricks."

After the brick shapes were cut, I spaced them evenly and used a glue stick to attach them to the exterior walls of the playhouse. The color of these didn't matter, because I was only using them for texture.

I glued the pieces on all of the exterior walls until the top halves were completely filled.
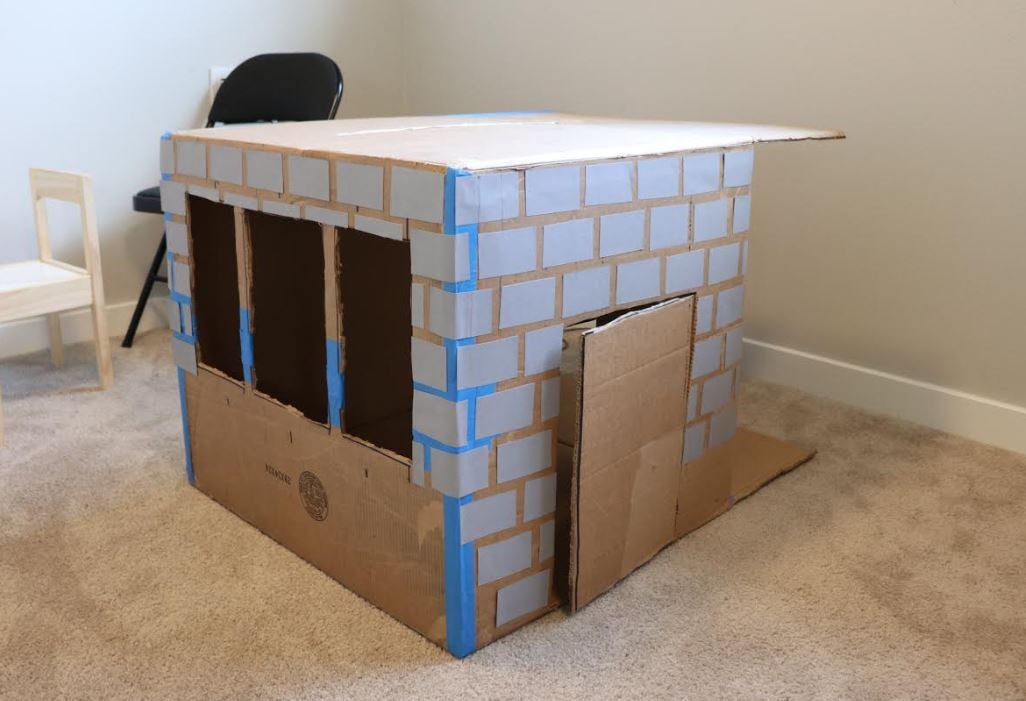
Next, I moved the playhouse into the garage and painted it with the same leftover gray paint that we used for our DIY Planter Project. This paint raised some of the paper brick pieces, so I added more glue if needed and extra coats of paint to flatten them out. The end result gives the appearance of a brick-like texture, which I thought was pretty rad!

After the paint had dried, I brought the playhouse back inside and started working on the roof. I used the leftover cardboard pieces I cut off from the folds at the beginning and some extra pieces of cardboard to build the roof frame. I needed the roof frame to match the length and width of the flat top of the playhouse, and wanted the highest point of the roof to be 6" tall, so I calculated and drew out the measurements on the leftover pieces of cardboard with a marker. I used straight lines to get the triangle shapes to match and used a knife to cut out the matching pieces. After all of the pieces were cut, I joined the pieces together with hot glue and tape.

Next, I used hot glue to put a layer of construction paper over the entire frame until it was completely covered. I used hot glue to attach the roof to the top of the playhouse.

Next, I began to add more details. First, I cut gray construction paper into 2" x 6" strips and glued them vertically on the roof wall and the lower portion of the playhouse.
Next, I folded white construction paper into 1" strips and to make the white trim, and hot glued the trim along the main edges of the playhouse and around the windows and door.

The only materials I had to purchase were the cabinet liner that I used for the floor, door, and details, and the contact paper that I used for the interior walls. I found both at the Dollar Tree! I loved the cabinet liner because it looked like wood and it added a soft layer of foam for Knox to crawl on. I cut it apart and used hot glue to attach it to the floor and the door, used thinner strips for the roof details, rectangles for the door details, and cut a larger rectangle for an address plaque. I attached the contact paper to the interior walls with hot glue as well.
On the exterior, I folded black construction paper into planter boxes and glued them onto the front with hot glue. I attached a black drawer pull for a doorknob with more hot glue. For the roof, I folded pieces of black paper and overlapped them to give the roof a ribbed-steel panel look.
I used the cardboard rolls from the cabinet liner and wrapped them in white paper to make the white post in the "patio" area and used hot glue to attach it to the roof and the floor.
Lastly, I plucked some lavender leaves from a plant in my backyard and hot-glued them together to make the miniature wreath and planter filling for the front of the playhouse. Couldn't help myself. Apparently Knox couldn't help himself either, because shortly after I took the following pictures, he was trying to eat the plants straight off of the playhouse.

Either way, I am still so thrilled about how it turned out!

Take note, friends, that to my dismay Knox was much more interested in the box when it was just a plain old box. Now that it is an extravagant, beautified box, Knox would rather play with a bag of baby wipes or some carpet lint. His words, not mine. Either way, I very much enjoyed working on this project and spending the quality time with my kiddo. If you have a kid that loves boxes, this may be a great project for you to complete together! If you don't have a kid and you like boxes, well... You do you, and I believe in you and your cardboard box dreams! Until next time.
Have a kraytive day!
~
Haha, how funny this post is and how serious you are in storytelling and demonstrating a rather to prove a point that many of the steemiens here might had got some kick in the ass to forget the present and just travel few decades back to cherish those memories of childhood.
The term like antenna shifting, especially when there was some favorite games and sports feel like happened yesterday. I am not sure whether it is right to term the kids at this century are lucky or not as they have every possible luxury at their disposal, instead of a toy bicycle they have toy cars and jeep, at the age of 2 years or so they learns what is steering, how to make a horn, or how to open a dikki etc, and sadly most parents were so eager to provide everything at their disposal to the kids, look into the two photgraphs attached to know what we gave to kids for entertaining at the baby stage.
Anyhow your post reminded me of those times and it looks good in the way you neatly explained how to make it properly with detailed steps. As a fellow steemies, really appreciates this and also the DIYtags.
I am also remembring about the paper plane which we used to make it with paper from note books, Also the paper boats, Hope you remember those too.
Any how, Thanks for this post, Have a good day. Cheers.
Posted using Partiko Android
Highly rEsteemed!
Hello @kraytive, thank you for sharing this creative work! We just stopped by to say that you've been upvoted by the @creativecrypto magazine. The Creative Crypto is all about art on the blockchain and learning from creatives like you. Looking forward to crossing paths again soon. Steem on!
Wow! I am honored, and so glad you stopped by! Thank you @creativecrypto! Keep Steemin On!
Hi kraytive,
Visit curiesteem.com or join the Curie Discord community to learn more.
Congratulations @kraytive! You have completed the following achievement on the Steem blockchain and have been rewarded with new badge(s) :
You can view your badges on your Steem Board and compare to others on the Steem Ranking
If you no longer want to receive notifications, reply to this comment with the word
STOPTo support your work, I also upvoted your post!
Vote for @Steemitboard as a witness to get one more award and increased upvotes!
ehy cara @kraytive , hai fatto davvero un ottimo lavoro !! e capisco la tua piccola frustrazione nell'apprendere che tuo figlio (come tutti i bambini) preferisce la semplice scatola vuota alla tua lunga e seria preparazione !! sai perché? perché sono liberi di sperimentare e immaginare qualsiasi cosa con la loro immaginazione. come quando costruiscono qualcosa con il tuo aiuto e poi distruggono tutto in un secondo, e tu grideresti nella disperazione ... ma per loro è solo divertente, costruiscono e distruggono, e poi ricostruiscono. siamo gli adulti che vogliono cose ben definite, pulite e chiare. perché la nostra immaginazione è stata limitata nel tempo. ma non tuo, che puoi ancora immaginare cose belle con scatole magiche !! è bello che anche da grande hai questa passione !!
congratulazioni per il tuo voto curioso e sono sicuro che molti genitori steemiani stanno già costruendo molte case in giro !!! .-))
Ciao @road2horizon, grazie per il tuo meraviglioso commento. Capisco quello che stai dicendo, i bambini adorano le scatole semplici perché possono immaginarle diventare qualsiasi cosa. Mi sono divertito così tanto a fare questo progetto con mio figlio, e gli è piaciuto molto aiutare con alcuni compiti. Non vedo l'ora di lavorare su più progetti con lui mentre cresce ...
Sono molto grato che tu abbia letto il mio post e spero che la tua giornata sia piena di gioia!
WOW! You've done such a great job! I would not say that it's made out of a cardbox. Great, just great. I think I'm a little older than you but I also grew up in the 90th. So I remember the time with that high tech tv's, lol :) We also played with left over materials or simply with what we could find at home. We also built shelters from blankets and brought all our supplies there to survive the night (in the living room of course). We made so much mess, lol.
Thank you for sharing your tutorial and I hope that Knox will find the beauty of the house soon :)
Thank you for your encouraging comment @delishtreats! Yes, the good old blanket fort days. I remember them well, and messes make the best memories.
Thank you so much, and now he has started saying "Knock Knock," crawling through the door, out the patio side, and in a full circle to say "Knock Knock" again, over and over and over. I think the playhouse has finally won him over!