Beautiful DIY Garden Boxes: How We Did It Ourselves!
Beautiful DIY Garden Boxes: How We Did It Ourselves!
Brought to you by: @kraytive

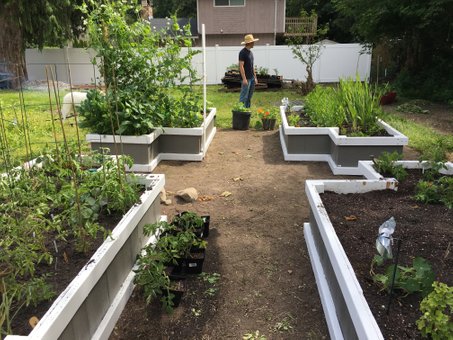
When my husband and I first moved to Washington State almost two years ago, we were in awe of how many of our neighbors grew little gardens in their backyards! Not long after moving in, we found ourselves dreaming of growing a little garden of our own. But, there was one little problem: we dreaded having to spend a lot of money for one of those fancy-schmancy raised garden beds. After a lot of planning and researching, we decided to build our own from free or inexpensive materials. While we spent a little bit here and there, we saved SO MUCH money by going the ‘Do It Yourself’ route, and the planters we built held much more sentimental value for us once we were finally done. Side note-- it took us a long time to complete them, but it became a project we loved (and continue to love) spending quality time on together! Here’s how we did it…

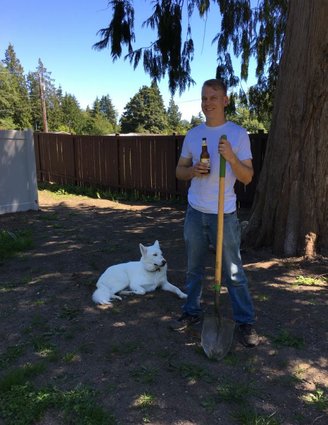
(Oh, look, it's us!)
Planning:
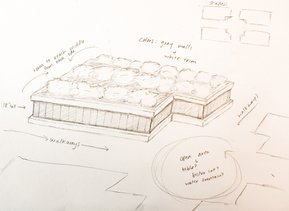
First, we planned it out. I’m very much a dreamer with billions and billions of ideas in my head, and my husband, Tanner, is the more practical one out of the two of us. So as I’m initially ranting about my five-story garden-mansion complete with bird baths, fountains, and bumblebee houses, Tanner interjects with a ‘Woah, Missus, slow it down! Let’s keep it simple!” And he was right. Our garden boxes are very simple, yet they have turned out more practical and beautiful than I could have imagined. We love minimalism and I wanted a space where we could sit together and enjoy the growth of the garden, so we kept this in mind while planning. I looked up planters on Pinterest and Google until we found styles we both loved. We took a pencil to paper, and drew it out!
There are a few things to keep in mind during the planning process:
- How much space do you have/want for garden boxes?
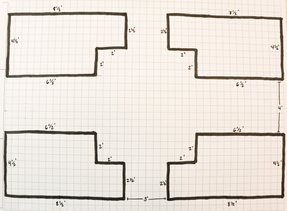
We had a 20’ x 13’ area where we wanted to build, so I drew out a 20’ x 13’ scale to size box on graph paper so I could plan the shapes of my boxes. I printed out some printable graph paper from google and got started!
- How tall do you want your garden boxes?
Everywhere we saw, we could only find 12” tall boxes, but let’s be honest… I don’t want to bend over that far! We wanted ours to be slightly taller so roots had more room to grow down into the soil. We chose to make our boxes 18” tall, knowing fully well that we would potentially need to spend a bit more on garden soil to fill them.
- What shapes appeal to you or the shape of your yard?
We wanted an open area between all of our planters that we could eventually put a little bistro set to relax at. Square/rectangle planters would be easier for us to build than round planters. Also, I didn’t want to have to reach too far to get to the middle of each planter. Rectangle shapes worked best for what we wanted!
Here are a few of the drawings we created while brainstorming the questions above:
Gathering Supplies and Materials:
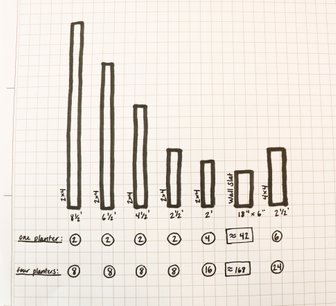
When Tanner and I agreed on our design, we took to researching what materials we would need. This meant quite a few trips to window shop at Home Depot, Craigslist/Online Marketplace searches for free items, and using what we already had around our yard and house. We were extremely fortunate to have a fence surrounding our backyard that was falling apart and needed replacement (trying to be optimistic here!) so we decided to re-purpose the old fence to make our planters. We also searched Craigslist for “free wood pieces” here and there. We ended up purchasing 2 x 4’s and 4 x 4’s from Home Depot because we wanted new, stable pieces for the frame. I am weird and I love crunching numbers, so I used our sketch and a tape measure to calculate exactly how much lumber we needed for all of our planters. Note – Every planter is unique and different. Below are approximations of what we used for one planter, and we built four planters all together. This is just an example of what worked for us!
Materials for One Planter:
- (2) 2’ x 4’ x 8.5’ Lumber Pieces
- (2) 2’ x 4’ x 6.5’ Lumber Pieces
- (2) 2’ x 4’ x 4.5’ Lumber Pieces
- (2) 2’ x 4’ x 2.5’ Lumber Pieces
- (4) 2’ x 4’ x 2’ Lumber Pieces
- (6) 4’ x 4’ x 2.5’ Lumber Posts
- Approximately (42) 6” x 1.5” Slats
- Approximately (40) 2” Screws
- Approximately (168) 1” Screws
- Wood Glue
- Carpenter Square
- Tape Measure
- Concrete (this is based on personal preference)
- Saw (to cut lumber if needed)
- Drill
- Shovel
- String
- Exterior Primer
- Exterior Paint
- Paint Brushes and Rollers
- Painter’s Tape
- Tarp
- Sandpaper
- Landscaping Spray Paint
- Approximately 8.5 - 9 Cubic Feet of Drain Rock (Approximately 1/3 Cubic Yard)
- Approximately 40 - 43 Cubic Feet of Garden Soil (Approximately 1.5 Cubic Yards)
Building:
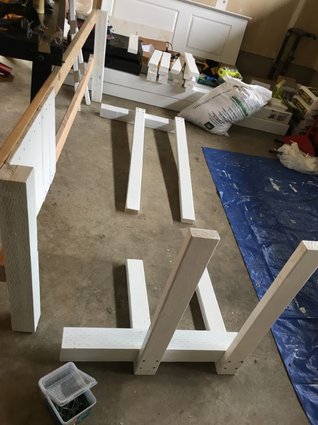
After we knew what we needed, the next step was to gather and prep our materials. For the walls of our planter, we decided to use planks from the fence we were tearing down. A lot of it was dry-rotted, so using a circular saw (please be safe with this one!) we cut out the best pieces into 18” slats. We sanded off the outer layer of old paint, wiped each piece with a damp rag to get the dust off, and used a white exterior primer to prime all sides and prevent future water damage. We painted at least two coats of primer on each piece! We laid out a tarp and fit as many pieces of wood on it as we could. We also cut 2 x 4 pieces for the frame, and 4 x 4 pieces as posts to eventually dig the planter into the ground. Probably a bit overkill to use 6 posts for each planter, but I ain’t mad! The most important thing here is PRIME, PRIME, PRIME! Water damage is not your friend!
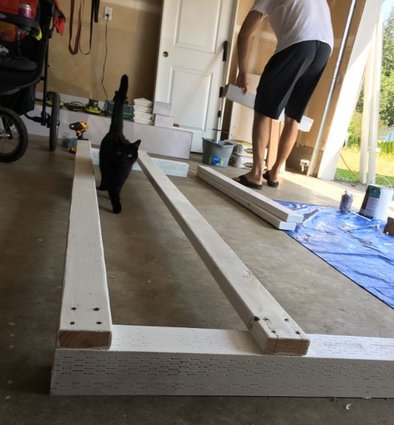
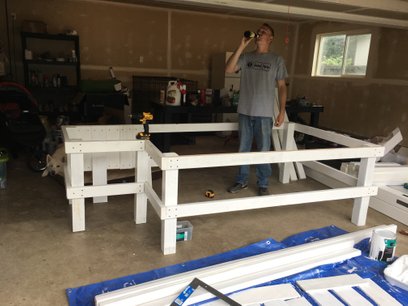
Now for the moment of this project when communication skills with your partner will be tested! After all of the pieces were primed and dry, we maintained a 90 degree angle with a carpenter square and lots of TEAMWORK to drill the frame together. We drilled the 2 x 4 pieces of lumber into the 4 x 4 posts first to start each planter wall. Make sure you use longer screws (we were satisfied with 2” screws) and use 2-4 screws at each joint where lumber is being held together. One of us put a small bit of wood glue and held the pieces (along with the carpenter square, keeping the 90 degree angle is important) in place, while the other drilled. We had our measuring tape handy this entire time to keep double checking that the measurements were exact and each upper and lower 2 x 4 were exactly 18" apart. We had to use our strong muscles to push/pull pieces, and at times force them together when we were closing the frame because sometimes lumber can be a little warped, but it all worked out!
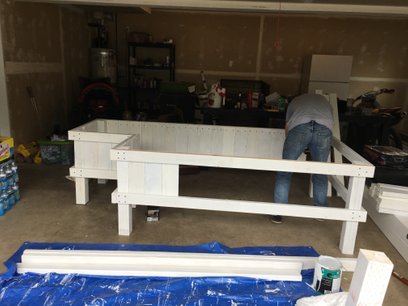
The skeleton of the frame was done. Next, we were ready to screw in the wall pieces we made from the old fence slats…. We used shorter, 1” screws to drill these wall slats in and spread a squiggly line of wood glue on each piece to eliminate gaps. We put the glue on the inside of the frame, lined up each 18” slat, and used 2 screws on top and 2 screws on bottom to attach each wall slat. Remember to screw from the inside of the planter so the screws don’t show on the outside! On the corners, we had to cut some slats a specific width to fit properly, and glued them in.
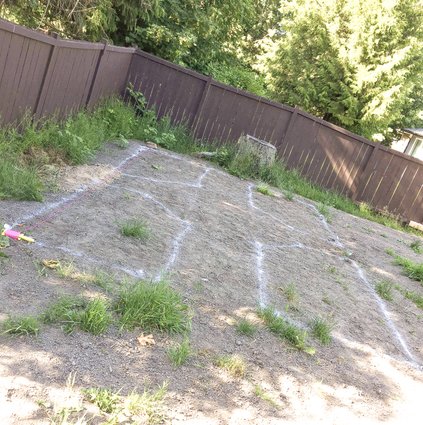
Placement:
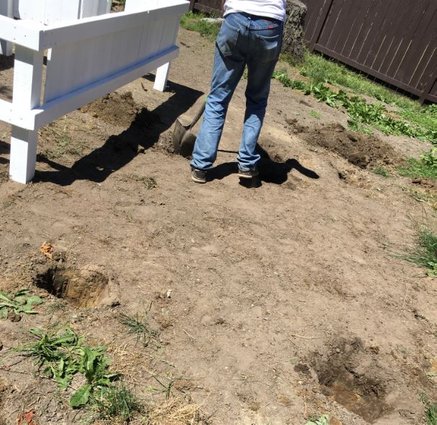
And all of a sudden, we had a very heavy planter that we needed to carry from our garage to our pre-determined garden spot outside. It was super fun carrying it, and when I say it was fun, I’m definitely lying. If you can build your planter close to where you are putting it, do it! We had to build ours in our garage because it was raining so much (welcome to Washington), but we ended up with stronger biceps because of the distance we had to carry those darn things. At the garden location, we decided to use a temporary spray paint to draw out the placement of our planters. We double checked that our planter perimeter was measured at even distances within our property line and dug six holes for the longer planter posts to fit into. We decided to pour concrete into each of these holes, so good luck to our future selves if we ever want to remove the planters! They aren’t going anywhere!
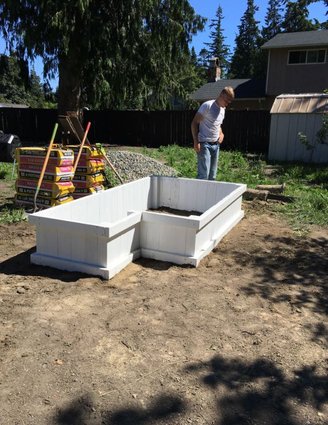
We set up taught, pink, construction string around the perimeter of the entire garden area, using the first planter as the cornerstone to make sure the remaining 3 planters were placed in line with one another. This part took a lot of re-digging and shifting planters to get them just right! We also used a rock rake to make sure the ground below the planters was level, and filled little dips and holes as needed.
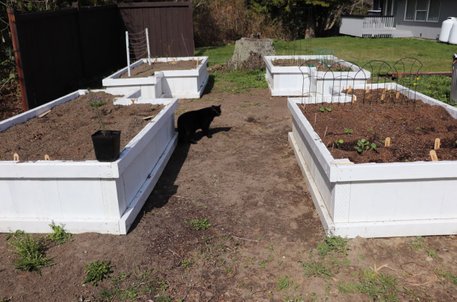
Finally, our first garden box was in the ground!
Filling the Garden Boxes:
Okay, so here’s the thing about raised planters: proper drainage is important. If it rains, you don’t want to end up with a giant mushy mud pond where your plants are supposed to be. We picked up some free gravel and drain rock from Craigslist and ended up purchasing a bit more, and put approximately 3-4” of this rock and gravel at the bottom of each planter box. This gives extra water a bit more space and places to go so it doesn’t drown out your plants. We did not line the bottom with landscaping paper or cardboard, because we wanted our planters to be able to drain well in the rainy months.
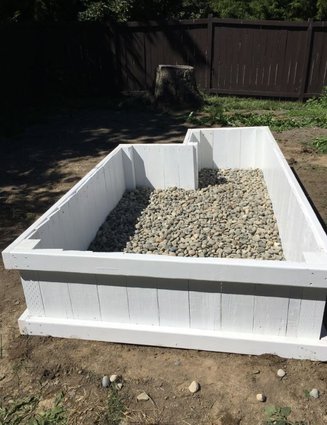
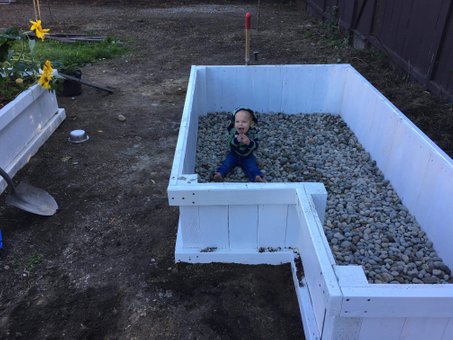
We liked the larger drain rock for this project, knowing it would be tougher for weeds or critters to dig through it.
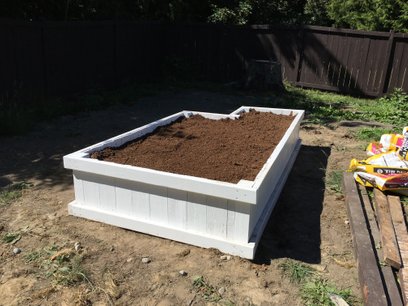

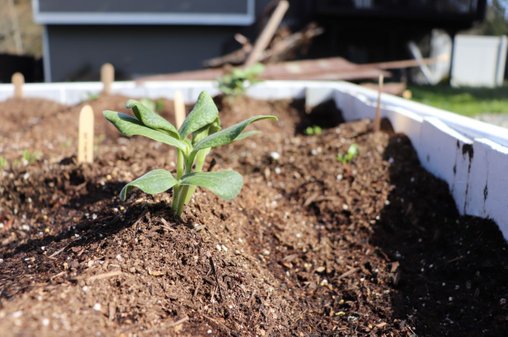
Next, we purchased garden soil. Initially we bought bags of soil from a plant nursery, but in the long run it was cheaper for us to head to a local rock and gravel place and pick up medium-grade garden soil by the truckload (some places will even deliver!).
The higher the boxes, the more soil you will need, and the soil is probably the most expensive part of the garden. We decided to use a medium-grade soil, and add in extra nutrients depending on what we were planting in each box.

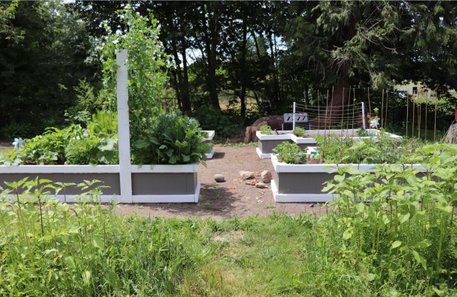
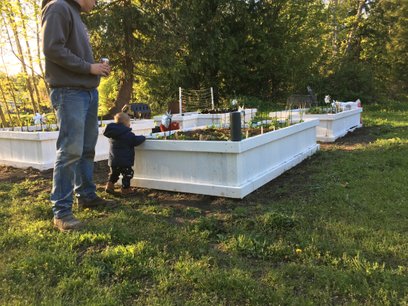
The last thing we did was brush off any extra dirt and add final coats of exterior paint. For our planters, we used white for the trim, and a dark gray for the walls. We taped off the trim with painter’s tape and painted the gray walls first, then removed the tape and touched up the white trim with a satin finish exterior paint. When we were done, we had 4 awesome planter boxes… And the research of what to plant in them lit a fire in my soul.
Building your own planter boxes is fulfilling and exciting, so if you decide to build your own, please let me know how it goes and share your final project photos with me! If you share your gardening adventures with me, I just may be so excited that I fall out of my chair.
Have a kraytive day!
~ 
Highly rEsteemed!
Hats off to you, @frankbacon!

Hey there @kraytive, welcome to STEEM. If you join @schoolofminnows, you can receive votes for free.
1. Your post will appear in post-promotion on the discord.
2. Your posts will also get featured on the school of minnows account on steem
https://steemit.com/@schoolofminnows
3. You get votes from other members.
4. The whole thing is FREE.
To join follow this link:
https://steem.host/connect/steempunks
Katie, wow! This information is amazing. Beautiful! Thank you for showing us all how to have a beautiful garden like yours!
Thank you for reading, I hope you enjoyed it! Growing a garden is one of my greatest joys! Lots of love to you!
Jezzzz Miss Katie, ur 1st post on Steemit and u hit this one right out of the park. Like Carson use to say on the old Tonight Show “Everything you’ve ever wanted to know about how to build and install Planter Boxes!” Can’t wait for ur next post. All I can say is KEEP IT GOING!!!!
Posted using Partiko iOS
Thank you for the encouragement! I am still deciding what project to post next... Stay tuned!
https://steemit.com/dtube/@lyndsaybowes/uq8n77gck7s
Sci-F!
Lovely! i'm looking forward to have my own garden and be able to mimik your project...
by the way, your handwrite signature is also realy nice
Congratulations @kraytive! You have completed the following achievement on the Steem blockchain and have been rewarded with new badge(s) :
You can view your badges on your Steem Board and compare to others on the Steem Ranking
If you no longer want to receive notifications, reply to this comment with the word
STOPVote for @Steemitboard as a witness to get one more award and increased upvotes!
They look great! I've been a carpenter in the PNW for decades, and would like to advise you that 2" screws attaching 2x4 to 4x4 is weak. I'd recommend adding 4" x 5/16" lag bolts to each place where your rails attach to your posts. At least use 3.5" deck screws if they begin to become loose after moisture affects them.
In order to avoid that last bit, moisture penetrating the joints and affecting the fasteners, I'd get two or three tubes of really good caulk, like ISO Quad (It's very waterproof, finishes smooth, and takes paint well) or something similar, and carefully seal the top and sides of every joint with posts. Make sure to leave no gaps at all where you caulk. I'd leave the bottom of those joints open so that moisture that gets into the joint can drain out. Gravity is your friend on the way out, but your enemy on the way in. I'd also make sure to completely seal with caulk every fastener, and particularly the lag bolts and cracks in the wood, so that no water can intrude and soften the wood in the hole. Using 2" screws to fasten 2x4 lumber only provides a half inch of penetration into the posts, and it doesn't take much to loosen such short screws. Make sure to inspect and recaulk yearly, as cracks in the caulk or paint can allow water in and it's a lot easier to take a few minutes and recaulk where needed than to replace posts or rails if you don't maintain them. Capping your posts also really prolongs their life.
Keep a close eye on the seal between the concrete and the posts, as even a tiny gap will let water in, and if water is able to stand between the concrete and the posts (in the hole in the concrete), they can rot very quickly. This is why I prefer gravel to set posts in, as it is just as strong in compression as concrete, but does not let water stand against the posts and drains well. Also, making the holes a foot deeper than necessary and filling that space with gravel helps a lot. If there seems to be gaps, even very small ones, you might caulk there too, in the hopes of keeping most of the water out.
I assume you're aware that your old fence boards probably won't last very long in constant contact with moist soil, so also commend you on recycling used lumber for such a short term job. The paint will help a lot, but you won't be able to maintain that paint without digging up your garden, so you can expect to replace them in a few years, especially since the fence was already in poor condition. I have lined the interior of raised beds with plastic sheeting, but that doesn't help much because where the plastic is in contact with the boards, it keeps a film of water there, and I suspect that moist dirt might actually be preferable =p
I've seen folks use hardware cloth, a wire mesh of 1/4" made of steel and galvanized, to underlie their raised beds in order to keep out moles and gophers. If it becomes a problem in the future, it's something you can consider. Gravel doesn't really stop them, and they can tear up a garden bed from the inside out.
May you get many years of enjoyment from your beautiful garden beds.
Thanks!