2D Casual Mobile Game Tutorial – Step by Step with Flame and Flutter (Part 1 of 5)
Have you ever wanted to develop video games? You’ve come to the right place. This is an on-going tutorial series on how to create your own 2D casual mobile game.
This tutorial is a continuation of the previous part which is an introduction to game development targeted towards developers of any level. In this part, we will aim to write a playable whack-a-mole style game.

The game will be called Langaw (our local word for house fly). The mission is to kill as many langaws as you can before they get to the pile of trash. You must protect the pile of trash from the flies because you know, why not.
The player controls are simple taps (please don’t use a mallet on your phone, this isn’t real whack-a-mole). In this part, we still wouldn’t use any image files for our graphics so flies appear as a green square. When the fly is tapped, its color turns to red and falls down to the bottom of the screen.
There’s a demo video at the end of this tutorial.
If you find something confusing at any step, please feel free to send me an email or join my Discord server.
Here’s the whole series:
- Introduction to game development
- Set up a playable game (you are here)
- Graphics and animation
- Screens/views and dialog boxes
- Scoring, storage, and sound
- Finishing up and packaging
Prerequisites
If you’ve been following the series and did the introduction part, you should be set up and good to go.
Just in case, here’s what you need: First, this article assumes that you already are a developer and have a good grasp of software development’s concept. In addition, you should have a decent (up-to-date) computer that can run an IDE (or your favorite text editor) and compile at the same time. The ability to run an emulator alongside your IDE is preferable.
Just like the previous part, we will only be focusing on the Android side of development even though Flutter apps can be compiled for iOS too.
Your computer must have the following software and SDKs installed.
Microsoft Visual Studio Code – Any IDE or text editor will work if you know what you’re doing. If you’re a total beginner, stick to VS Code. Don’t forget to download and install the Dart and Flutter plugins if you’re using VS Code.
Android SDK – The Android SDK comes bundled with Android Studio so just install the whole thing for easy setup. If you want just the SDK, scroll down to the “Command line tools only” section of the download page.
Android SDK – The Android SDK comes bundled with Android Studio so just install the whole thing for easy setup. If you want just the SDK, scroll down to the “Command line tools only” section of the download page.
Let’s Start Building
But first, let’s establish some things to make this article as easy to follow. First of all, I won’t be explaining in as much detail as I did previously for the concepts, steps, and code that were discussed in the previous part. I’ll explain as best as I could without being derailed from the goal of actually making a playable game. With that said, I really recommend reading the previous part.
The files will be referred to using a relative dot notation. For example, if your project is in /home/awesomegamedev/project, ./lib/main.dart means that it’s referring to a file in /home/awesomegamedev/project/lib/main.dart.
Similarly on Windows, if you have a project in D:\Projects\SampleGame, ./lib/main.dart refers to the file in D:\Projects\SampleGame\lib\main.dart.
Flutter uses the Dart language. We’ll be using Flutter 1.2 which uses Dart 2. In Dart 2, some keywords and annotations like @override and new are optional so we won’t be using those.
All the code for this tutorial is available for viewing and download on this GitHub repository.
Step 1. Create a Flame/Flutter game.
As mentioned above we will be creating a game called Langaw. You can use any other name you want, but as you follow along, don’t forget to change all references of langaw to the one you used.
Create the project
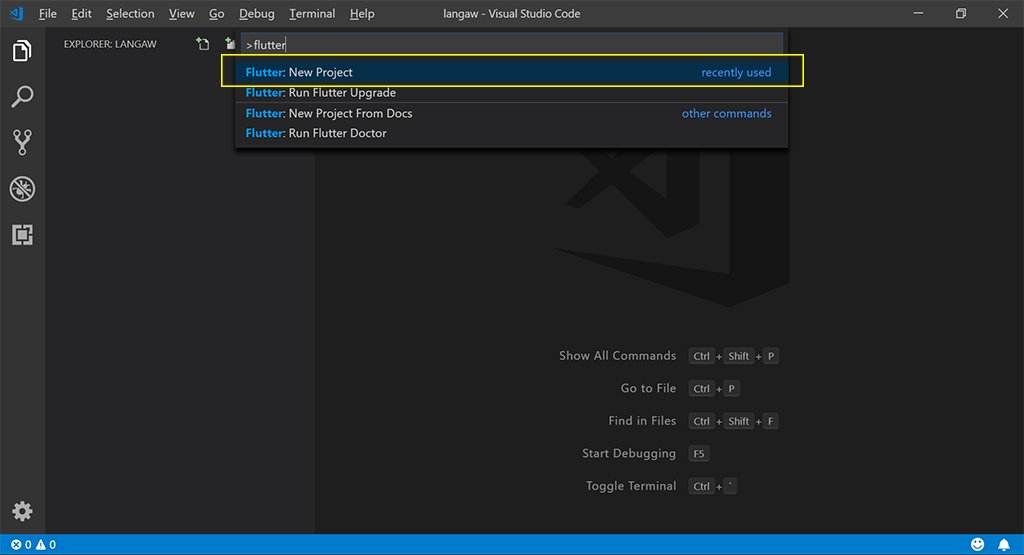
The Flutter plugin for VS Code has a command for creating Flutter apps. Just press Ctrl + Shift + P on any VS Code screen and type “flutter”. From the drop-down menu you can click on Flutter: New Project, type in the name of the project (we’ll use langaw for the tutorial, but you can use any), and choose the location you want to put your project in.
Alternatively, you can initialize your project outside VS Code. Just open up a terminal (or command line interface if you call it that), navigate to your projects folder, and type flutter create langaw, like so:
$ flutter create langaw
Again, you can use any name for your project other than langaw, just make sure to use your own word in place of langaw everywhere in this tutorial.
Once the command finishes up, you can now open it in VS Code and proceed from there.
Code cleanup
Like the previous part of this tutorial series, we won’t be doing testing (test-driven development) since it introduces a scope on its own that is bigger than this whole series. So we’ll delete the ./test directory along with all its content (a single file named widget_test.dart).

Finally, get rid of all the code that Flutter’s setup came with. Open up the file ./lib/main.dart and remove all the lines below the void main declaration. After that edit the main function declaration itself so it’s empty.
import 'package:flutter/material.dart';

void main() {}
The whole file should look like this:

We left the import statement for Flutter’s material library since we need it to access the runApp function later.
The Flame plugin
Next, we need to install the Flame plugin. The Flame plugin is a dart package and adding dart packages to your project can be done by simply adding a line to the ./pubspec.yaml file.
So let’s do just that, open up ./pubspec.yaml and add flame: ^0.10.2 below the line that says cupertino_icons: ^0.1.2.
This step is optional, but if you want you can clean up ./pubspec.yaml a bit by deleting all comments (lines that start with #).
After that the file should look like this (given that you removed the comments):

After adding the packages to ./pubspec.yaml, you should run flutter packages get in a terminal to make sure that the Flame plugin is downloaded to your computer like so:
$ flutter packages get
Alternatively, you can use VS Code’s command for this. Press Ctrl + Shift + P, type “flutter” and click Flutter: Get Packages.

Note: In VS Code, with the Flutter and Dart plugins, every time you edit and save ./pubspec.yaml, this command is automatically run so you don’t have to worry about it. But to be safe, just run it. It only takes a few seconds (depending on your internet connection).
Game Initialization
Then we need to make our app behave like a game by keeping portrait even if the phone is laid on its side. Also, we need to tell the operating system that our game should be run full screen. No notification bar on top or buttons at the bottom.
We do this using the Util class from Flame’s util library. Back on the ./lib/main.dart file, import the util library with the following code. Let’s also import Flutter’s services library while we’re at it. This will give us access to the DeviceOrientation class that we need so we can specify the orientation later. Import statements should go to the top of the file.
import 'package:flame/util.dart';
import 'package:flutter/services.dart';
Then we convert the main function into an asynchronous one so we can await long-running processes. Just insert the keyword async between () and {} in the main function line. Then add the following line of code inside the main function:
Util flameUtil = Util();
await flameUtil.fullScreen();
await flameUtil.setOrientation(DeviceOrientation.portraitUp);
The main file should look like this:

Note: As far as I know, import statements can be entered in any order. I like them alphabetically arranged that’s why the screenshot shows a different order.
Our game doesn’t really do anything right now, but I encourage you to try to run it anyway. If you’re able to run it without errors either on an emulator or an actual device, then you’re on the right track.
You can run the game from within VS Code by pressing F5. You can also run it from a terminal using the following command (while in the project directory):
$ flutter run
An empty screen like the screenshot below is fine. As long as you don’t see any errors.

If you encounter an error. Review the files that we’ve been editing so far and make sure you’ve followed properly. Also, error hints are pretty helpful so take this chance to practice your debugging skills.
View the code at this step on GitHub.
Step 2. Set up a game class with a game loop
We need a game class that has game loop logic in it. The game loop will be the meat of our game. It controls all non-player input logic.
Game class
So go ahead and create a file named ./lib/langaw-game.dart. In this file let’s write the following code:
import 'dart:ui';
import 'package:flame/game.dart';

class LangawGame extends Game {
  Size screenSize;

  void render(Canvas canvas) {}

  void update(double t) {}

  void resize(Size size) {}
}
Quick breakdown: We need access to Canvas and Size classes so we import Dart’s ui package. We also need to utilize Flame’s existing code for game loop scaffolding so we import Flame’s game library. Then, we create a class that extends Flame’s Game class (where all the game loop juice is). This class has three methods all overriding Game‘s methods of the same name. We also have one instance variable named screenSize which will hold the size of the screen.
Note: This is personal preference but I find it clean to have one file for each class. This isn’t necessary especially if you’re writing software that’s too large with lots of classes. We’re building a small game so let’s keep things clean with a one class per file rule.
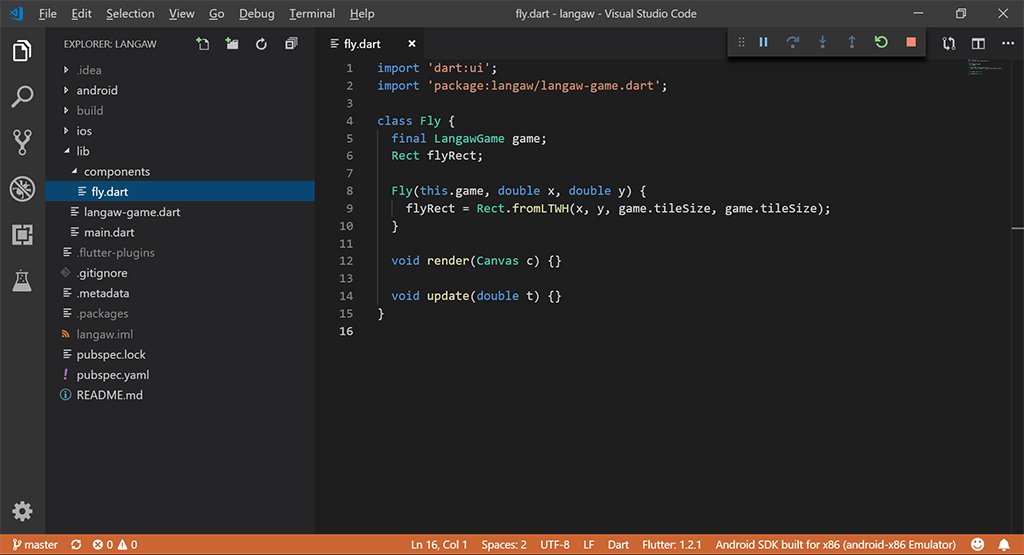
The class file should look like this:

Linking and running the game class
Now let’s link the game class to the main function so when the game is run it actually starts an instance of our LangawGame class. Let’s go back to ./lib/main.dart and import our newly created class file.
import 'package:langaw/langaw-game.dart';
Then, let’s create an instance of our game class and call the runApp function. The runApp function requires a Widget so we pass our LangawGame instance’s widget property.
LangawGame game = LangawGame();
runApp(game.widget);
Finally, ./lib/main.dart should look like this:

Screen dimensions
Let’s go back and edit our game class (./lib/langaw-game.dart). Let’s prepare it for drawing (and later movement of objects) by determining the dimensions of the screen.
Certain events cause Flutter to recalculate the size of the Canvas that it exposes to the application (in our case the game). One such event happens once when we run our game. Other things could trigger a recalculation like flipping a phone on its side making the width and height properties swap. The game we’re making only supports portrait mode so we don’t have to worry about that.
Some phones support multiple resolutions though and players can change their resolution while playing the game. Let’s prepare for that by making sure we do the recalculation on our own every time Flutter notifies us that the canvas has resized via the resize method.
The canvas, by the way, is where you draw the game objects including backgrounds, enemies, and user interface.
Let’s put the following code inside the resize method:
screenSize = size;
What this does is simply store the new size passed by Flutter into the screenSize instance variable so we can access it later in different parts of our game loop. We need to remember the size of the screen when drawing the background, for example.
Now the game class file should look like this:

Drawing the background
Time to draw on the screen (canvas, actually, which is what gets drawn to the screen when we’re done). First, we draw the background.
To make the background a little less boring, we won’t be using plain old white or black, no. We’ll be using FlatUIColors.com‘s Fuel Town (#576574) from their Canadian palette. You can use any color you like. Just be careful though, when used as background, some colors emit too much glare that actually hurts on the eyes (#ff0000 red for example).
Put this block of code inside the render method:
Rect bgRect = Rect.fromLTWH(0, 0, screenSize.width, screenSize.height);
Paint bgPaint = Paint();
bgPaint.color = Color(0xff576574);
canvas.drawRect(bgRect, bgPaint);
Quick breakdown: A rectangle (Rect class instance bgRect) with the same size as the screen is created. A paint object (Paint class instance bgPaint) is created and then a color (in this case #576574 Fuel Town) is assigned to it. Then the rectangle is drawn on the canvas using canvas’ drawRect method supplying bgRect for sizing and bgPaint for color.
With that code, the render method should now look like this:

And when you run the game, you should see something like this:

Supporting phones of different sizes
Before we create our first game component, there’s one issue with game development that we want to clear out first.
Phone sizes.
According to this post on Quartz, as of 2015 there were 24,000 unique Android devices. It’s 2019 already (as of writing), we can all assume that this number has blown up to ridiculous proportions by now.
Games we write may not be played on all of those thousands of devices. But what if it does get played on all phone models?
Even if it doesn’t get played by almost all those phone models I can assure you that it will get played on a couple of devices each with their own unique resolutions and aspect ratios.
Let me introduce aspect ratio, it’s the ratio between the width and height of the device. Or height and width. They’re switchable since you can actually rotate your phone on its side so height becomes width and width becomes height.
There are dozens (if not more) of different aspect ratios for screens of the phones available on the market today. Some examples include 3:2, 4:3, 8:5, 5:3, 16:9, and even as long as 18.5:9 like the one on my phone. The most common by far is 16:9. So let’s use this as a base.
Since we’re running portrait mode, we’ll actually be using 9:16 as a base. No, we won’t always treat the screen to always be 9:16 but instead we’ll focus on one dimension and use that as a base. Let’s use the width which is 9. That makes our sizing basis 9:x.
Converting the examples for common aspect ratios above, they become: 9:13.5, 9:12, 9:14.4, 9:15, 9:16, and 9:18.5; respectively and with their widths and heights swapped.
This way we only have to worry about the width of the portrait phone which is always going to be nine tiles wide. The shorter or taller the phone is, the less or more space for the flies to fly around.
More importantly, no matter what size and aspect ratio of the phone the players play the game on, the flies always have the same size. Put side by side, nine flies are required to fill the entire width of the screen.
Coding the tiling system
To have a re-usable tile size, we must add another instance variable to our game class. Add the following line just below the screenSize definition line.
double tileSize;
This instance variable will hold the value of the width of the screen divided by nine. It’s an instance variable so that we can access it from anywhere in our game class (and later from child components).
Another reason that this is an instance variable is that it holds the value from the last time it was calculated. We don’t need to calculate the tile size from the screen width every time we need it. The calculation only needs to happen once. Once every time the screen changes size to be precise. So let’s slip in the following line of code into the resize method right after storing the screen’s size.
tileSize = screenSize.width / 9;
The game class should now look like this:

View the code at this step on GitHub.
Step 3. Create a fly component
We are now ready to create our first game component. What is a component, you ask?
Components, sometimes called objects or game objects, are objects that do something in the game. Examples are the main character, enemies, the land or terrain, the map, parts of the UI, bullets, and many more. Some components are usually coupled with sprites (graphics) for example an enemy component has a certain sprite that it draws on its location so that the player knows where that enemy is.
Not all components are for position and drawing though. Some components do not have a position and do not draw a sprite on the screen and are simply there for a different function. These components are called controllers. Controllers control the behavior of the game while not having a direct visible representation on the screen.
An example would be an enemy spawner. The controller is just there (virtually) waiting for the time to spawn an enemy component. When that time comes the controller creates an enemy object and submits it to the game loop. The game loop then takes that new enemy object and updates and renders it accordingly.
Why use components?
As mentioned earlier and in the previous part of this series, the game loop is the heart or the meat of the game. There won’t be a game without it. What are components for then?
Think of a big title game you’ve played, with so many things happening at once imagine the code it will take if everything is written in one file, in our case in the game class (./lib/langaw-game.dart). We would have thousands of lines of code and that greatly reduces the maintainability of our code.
One other thing is that, with components, we can utilize the object-oriented nature of the language we’re using. Therefore we can build classes with encapsulated data that the game loop will not need to care about but is useful for that particular component. That’s what classes are for anyway.
Think of components as mini game loops or sub-parts of a game loop. Even better, components of a game loop. They too have their update and render methods.
Now that that’s out of the way, let’s actually create a component.
Our very first component
We need a place to store our components so let’s make a new folder under ./lib and name it components. Inside that folder, let’s create a new file named fly.dart.
Open up the newly created component file (./lib/components/fly.dart) and let’s write the component class for it. Type in the block of code below.
import 'dart:ui';

class Fly {
  void render(Canvas c) {}

  void update(double t) {}
}
Let’s break it down: First we import dart’s ui package so that we can access the Canvas class. Just like in the main game class file.
Then we declare a class named Fly with two methods: update and render.
Very much like the game loop.
This is because the game loop calls these methods when it’s this component’s turn to update and render.
Position and dimensions
The fly component should be able to remember where it is and how big it is so let’s create instance variables for this.
We could do a double x;, double y;, double width;, and double height; to remember the dimensions, but that’s four variables. Surely there’s something better.
We have so many options when it comes to data types that has an x/y or width/height values: Dart ui‘s Size and Offset classes, Dart math‘s Point class, and Flame’s Position class. But using these we still need two variables. One for the x/y pair and another for the width/height pair. We can still do better with just one variable.
Remember Rect from when we drew the background? By the time an instance is constructed (via the fromLTWH factory), you’re supposed to define it’s Left (or x), Top (or y), Width and Height.
The only downside is that Rect instances are immutable. Meaning you can’t change any of its properties (like top, or left) by directly setting a value. But it doesn’t matter since we can use the Rect instance’s shift and translate methods to move the rectangle around.
Let’s add this instance variable now and let’s call it flyRect. Remember that instance variables are declared inside the class, just below the class definition line.
Rect flyRect;
Then we need to have a reference to the game class so we can access the properties like screenSize. So we need to import it first:
import 'package:langaw/langaw-game.dart';
Next, let’s add another instance variable that will serve as the link/reference to the parent game class. Write the following line just above the flyRect definition:
final LangawGame game;
Note: Final variables are like constants in their scope. Their values are frozen. Since our fly only lives inside one game class throughout its lifetime, we don’t need the parent game to be dynamic.
One last thing, we need to initialize these instance variables’ values. We need to write a constructor for this class.
Constructors are methods that run when we create an instance of a class. It only runs once so it’s best used for initialization. Write the following block of code just below the instance variables declaration.
Fly(this.game, double x, double y) {
  flyRect = Rect.fromLTWH(x, y, game.tileSize, game.tileSize);
}
The breakdown: Here we define a constructor method using the class name as the method name.
This constructor accepts three parameters. The first parameter (this.game) assigns the value of whatever is passed into the game property. The next two variables (x and y) will be the initial position of the newly constructed instance.
Inside the body of the constructor, we assign a new rectangle to flyRect using the x and y for Left and Top and then game.tileSize for Width and Height since our flies will just be squares for now.
The class file should now look like this:
Draw the fly (square, well rectangle)
Even though we won’t see the result until next step, let’s just write the code that will render the fly on the screen when they’re added to the game class instance.
We know that drawing rectangles require a rectangle (which we already have) and a Paint object. To avoid re-initializing the Paint object inside the render method, let’s store it in an instance variable.
Add the following line of code below the flyRect definition:
Paint flyPaint;
Then let’s initialize flyPaint in the constructor (just below the flyRect initialization). Again using a color from FlatUIColors.com (Pure Apple #6ab04c from the Aussie palette).
flyPaint = Paint();
flyPaint.color = Color(0xff6ab04c);
Now we’re ready to render. Write the following line of code inside the render method:
c.drawRect(flyRect, flyPaint);
That’s it! When an instance of this class is created and it’s render method is called, a green (Pure Apple green) square should be drawn on the screen based on the values in flyRect.
The Fly class file should now look like this:

View the code at this step on GitHub.
Step 4. Spawn a fly
Before we can go around summoning flies from nothing at our whim, we must discuss some technical block and how to overcome it. When our game runs, it has no idea how big the screen is. The game thinks it’s running at a 0 x 0 screen. This is why we rely on the resize method to let the game know how big the screen is.
If you go back and open ./lib/langaw-game.dart, you’ll see that by the time the render method runs, screenSize is already set. This is because methods are called in this order:
- The class instance is created (the constructor runs, we don’t have one so this is skipped).
- Flutter now calls our resize method and the screenSize is set.
- The game loop starts
- Game loop: update is called.
- Game loop: render is called.
- The game loop ends. Go back back to #3
This is both good and bad (and has a hidden ugly). Ideally we want the initialization code to be inside of; or to be run from the constructor. The initialization code is where we prepare and create objects and it should only run once.
The Good: The resize method is run almost immediately after the object is created. So we can use the resize method to launch our initialization code. Yeah… no! Because…
The Bad: The resize method can be called again by Flutter when the phone changes resolution or some event on the phone triggers a screen resize (like rotating from portrait to landscape). If we put our initialization code inside resize, it could be run multiple times. Again, initialization code should only run once. Imagine having one main character, you flip your phone upside down (180 degrees), the resize method is triggered and it runs the initialization code again, creating another main character. What a mess!
The Ugly: We can go around this and still use resize as the launcher for our initialization code. We could declare a boolean instance variable that could be named something like isInitialized that has a default value of false. In the resize function we can check if isInitialized is false. If it is, we run the initialization code and flip the value to true.
But that seems hack-y to me and introduces an unnecessary variable that goes stale. The solution comes from a utility function provided by Flame.
Waiting for the size while initializing
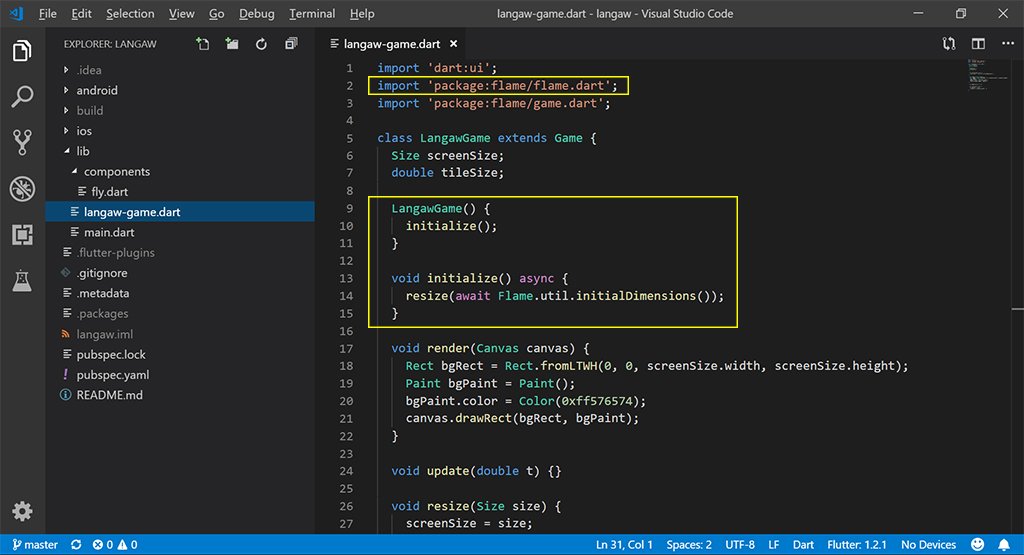
While having ./lib/langaw-game.dart open, let’s write two methods inside the LangawGame class: the constructor and a method named initialize.
The constructor class will contain just one line: calling the initialize method.
We’re going to use an asynchronous function to wait for the screen size so let’s make the initialize method asynchronous using the async keyword.
This is also why our initialization code can’t be directly inside the constructor and has to be placed on a separate method. Dart constructors can’t be asynchronous.
Insert the following block of code into the class, just below the instance variable declarations:
LangawGame() {
  initialize();
}

void initialize() async {}
Next we need to call Flame util’s initialDimensions function so let’s import the flame library. Insert the following line of code at the top of the file either at the top or bottom of the other import lines.
import 'package:flame/flame.dart';
Then inside the initialize method we write the following line of code:
resize(await Flame.util.initialDimensions());
Code breakdown for this one-liner: This line might be confusing for beginners, so let me explain. Like in arithmetic (or anywhere in math where calculations are involved), expressions are solved from the inside of parenthesis first.
Our resize method accepts one parameter of type Size. Flame util‘s initialDimensions function returns a Future<Size>, so we await for that Future to complete and we get a Size.
Once we have a value that is a Size, we plug that in to resize.
We could directly plug the value into screenSize, but we will have to recalculate thetileSize. In addition, we will have other things to calculate later so it’s better to keep them in theresize` method and we just call that to recalculate everything.
With that, we now have a game file that looks like this:
Preparing for the flies
We’re ready for our flies. Remember about controllers? The type of components that do not have a visual or positional representation. In our game’s case, the spawning logic is a bit simple so we won’t need a separate component for it and our spawning controller will be embedded in the game class file.
In order for the game class to access and create instances of the Fly class, we must first import it. Insert the following line in the imports area (top of the file):
import 'package:langaw/components/fly.dart';
In Dart, there are no arrays, but we have access to List which is pretty much the same as an array but better. Let’s add an instance variable called flies:
List<Fly> flies;
Right now that instance variable has a null value, so let’s assign an actual list to it on the initialize method (let’s put it at the top so it’s initialized first thing):
flies = List<Fly>();
Let’s take a look at the file to make sure everything is synchronized:

Even though we don’t have flies yet, let’s make sure that if we add some into the game, they get rendered and updated. To do this we must cycle through all flies using List‘s forEach method and call the corresponding method on both update and render.
This is also why we must initialize the flies variable as early as we can. Because you can’t call forEach on a null variable.
Remember that the order of the objects you call render on directly affects how the game looks on the screen. The order of the flies themselves is irrelevant. What’s important is the background is drawn behind the flies, so let’s put the following code inside the render method after the background is drawn:
flies.forEach((Fly fly) => fly.render(canvas));
This line below goes inside the update method:
flies.forEach((Fly fly) => fly.update(t));
Breakdown: If you are confused about the forEach lines, it’s understandable. Let me explain some things. When you call the forEach method, it requires a function as a parameter. It then calls that function for each of the items in the list passing the item in the current iteration as the parameter.
The function must follow a specific format. It should accept a single parameter which has the same type as each item on the List forEach was called on. In this case the Fly class.
Anonymous functions are written as () {}. Parameters go inside the parenthesis and since we need a function that accepts a single parameter (of the Fly type), we write the function as (Fly fly) {}. Our body just consists of calling a single function on the parameter passed by forEach so we can write it as (Fly fly) { fly.render(canvas); }.
In Dart, if your function body only has one line you can use the fat arrow notation, further compacting the function making it suitable for one line anonymous function declarations. Instead of braces, you can expose the single-line body of the function by putting a fat arrow (=>) in front of it like so: (Fly fly) => fly.render(canvas). It’s the same with the update counterpart.
Finally, the file should look like this:

Summon a fly
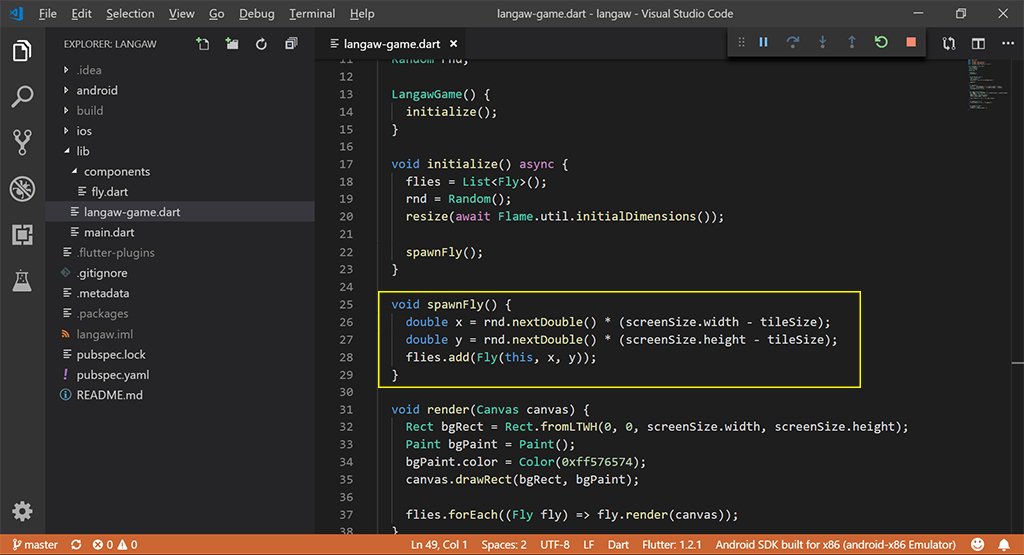
Our game will eventually summon flies regularly so let’s prepare a summon method that can be reused. Summon is a bit overkill, so let’s just call it spawnFly.
Add this method inside the game class:
void spawnFly() {
  flies.add(Fly(this, 50, 50));
}
Method breakdown: Starting from the inside (of the parenthesis), we create a new instance of the Fly class. As you may remember, the Fly class’ constructor requires three parameters: an instance of LangawGame, an X initial position, and a Y initial position.
For the LangawGame instance, we’ll use the current instance we’re operating on so we just pass this. For the initial position, let’s just pass in a hard-coded 50, 50.
Now we can call this method inside the initialize method so let’s do just that. Insert the following line of code to the initialize method after the screen dimensions are determined (resize has been called):
spawnFly();
With that, the file should now look like this:

It’s time to run the game to see the fruit of our efforts, go ahead and you should see something like this:

Before we go to the next step. Let’s add some excitement to the spawning process. Let’s randomize the initial position.
We would need the Random class from Dart’s math package so let’s import that (put at the top of the file):
import 'dart:math';
Then let’s create another instance variable of type Random named rnd. We do this so it becomes reusable and we won’t have to create a new instance of Random every time we need something random.
Let’s add the instance variable:
Random rnd;
Then let’s initialize this instance variable inside the initialize method:
rnd = Random();
The file should look like this:

Note: The instance of the game class itself is also passed into the Fly class so we can also access the rnd variable from in there for later.
Let’s edit the spawning method so the X and Y positions are randomized. Random has a method called nextDouble that returns a double that is anything between 0 (inclusive) and 1 (exclusive).
What we’ll do is call this method and multiply it by the width of the screen minus the width of the fly, since the “position” of the fly is in its upper-left corner, and assign it to the initial X. We’ll do the same with the initial Y but using the screen’s height minus the height of the fly.
The fly is a square so it’s width and height are the same. But most importantly, they’re both equal to tileSize. So to get the max value we want, we’ll just subtract tileSize to either the width or the height of the screen.
Let’s insert the following lines just before adding a new Fly to the flies list.
double x = rnd.nextDouble() * (screenSize.width - tileSize);
double y = rnd.nextDouble() * (screenSize.height - tileSize);
Note: When copying and pasting lines of code that look similar with minor variations, it’s easy to miss editing the appropriate changes/differences. In game development, there will be lots of scenarios where you need to copy blocks of code that look similar with easy to miss differences. So make sure you take time to understand and double check the code you’re writing.
Then let’s feed those x and y variables as the initial position when we’re creating the new instance of the Fly class.
flies.add(Fly(this, x, y));
The spawnFly method should now look like this:
On each run of the game, you’ll see a “fly” at a random position. Here are three different runs side by side.

View the code at this step on GitHub.
Step 5. Dropping flies
To start dropping flies, our game needs to accept input from the player. First, let’s discuss what’s going to happen when you tap a fly. The “fly” should turn red in color and drop to the bottom of the screen. When it gets out of the view we destroy that instance so the phone won’t waste CPU resources trying to update it.
Accepting taps
This part of the code has been discussed in the previous part so I won’t be diving into too much detail. The first thing is to have a handler function in the game class. We’ll be handling onTapDown events which accepts a TapDownDetails as a parameter. We need Flutter’s gesture library for this, so in ./lib/langaw-game.dart add the following line to import the gestures library.
import 'package:flutter/gestures.dart';
Then add the actual method inside the class, below the resize method would be fine.
void onTapDown(TapDownDetails d) {}
The file should look like this (wow, our file is getting longer now):


Let’s quickly jump to ./lib/main.dart and import Flutter’s gestures library there too.
import 'package:flutter/gestures.dart';
Then create a gesture recognizer, link its onTapDown property to the game class’ onTapDown handler, and register the recognizer using Flame utility’s addGestureRecognizer method.
TapGestureRecognizer tapper = TapGestureRecognizer();
tapper.onTapDown = game.onTapDown;
flameUtil.addGestureRecognizer(tapper);
The main file should now look like this:

We’ll be doing a lot of jumping around so let’s open up ./lib/components/fly.dart while we’re at it. In here, we’ll add an event handler that will only be triggered if this Fly instance is tapped.
We don’t need to know the details (like the position of the tap). We’re just gonna have to trust the game class that if this handler is called, this Fly instance has been tapped.
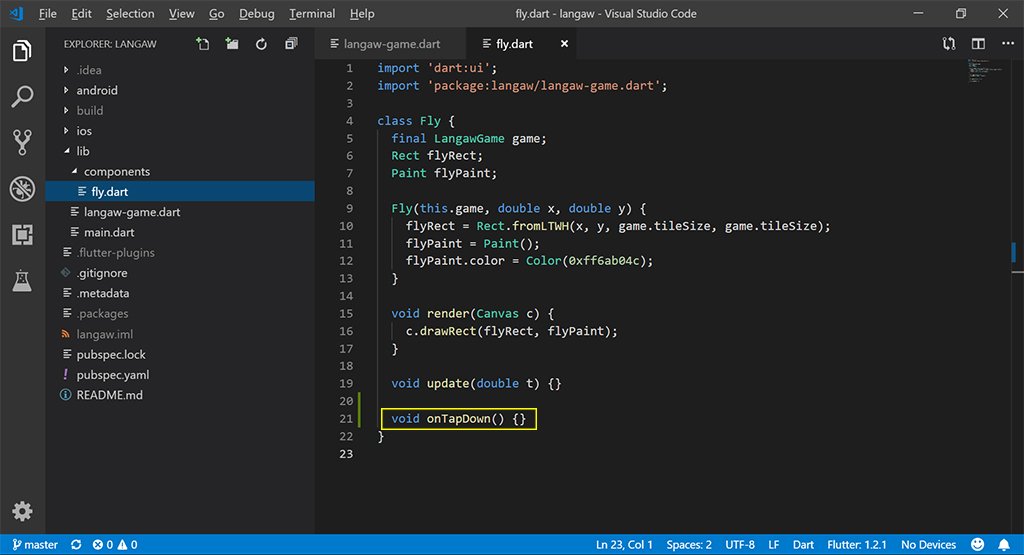
Add the following event handler just below the update method:
void onTapDown() {}
The file should look like this:
Now we jump back to ./lib/langaw-game.dart. Inside the tap down handler, we need to cycle through all existing flies and check if the tap position is inside the fly’s bounding rectangle.
The Rect class has a useful method called contains. This method accepts an Offset as a parameter, it returns true if the Offset passed is inside the bounds of the Rect it is called on. It returns false otherwise.
With the TapDownDetails instance (d) given to us in the handler, we’re in luck! Because the tap position is stored in a property called globalPosition which is an Offset.
This way we can just pass the globalPosition property to the fly’s Rect‘s contains method and we’ll know if the tap hit the fly.
That being said, add the following block of code to the onTapDown handler:
flies.forEach((Fly fly) {
  if (fly.flyRect.contains(d.globalPosition)) {
    fly.onTapDown();
  }
});
Breakdown: The block of code above cycles through all Fly instances inside flies. Much like the logic used inrenderandupdatemethods, we pass in a function that is run for each instance ofFlycurrently inflies`.
The Fly class has an instance variable called flyRect which is a Rect therefore has a contains method. We check if the globalPosition of the passed TapDownDetails is inside the rectangle using the contains method.
If it’s inside, we’re sure that the instance of Fly at the current iteration of forEach is hit, so we notify that fly that he’s been tapped by calling its onTapDown handler.
The game class’ onTapDown handler should now look like this:

Getting a fly squished
It’s time to handle taps on the flies. Open up ./lib/components/fly.dart.
The first thing we’re going to change is the color. When rendering the fly, we use a Paint object called flyPaint. It has a color property and it’s assigned to Pure Apple color if the fly is not tapped yet. If we change this color, it should reflect the next time render is called (which, at 60 frames per second, seems instant from a human’s point of view).
The goal is to change it to red. We’ll use FlatUIColor.com Chinese palette‘s Watermelon (#ff4757) as our “red”.
Put this line inside the Fly class’ onTapDown handler:
flyPaint.color = Color(0xffff4757);
Try running the game and you should see that the green “fly” turns red when you tap on it.
At this point, you should have a file that looks like this:

Drop the fly
When flies die, they tend to fall due to gravity and not stay up in the air. To do this we must use the other part of the game loop that we’ve been ignoring so far.
The update method is for all the code that changes anything in the game that is not triggered by player input. At this point, the fly’s update method is already called by the game loop’s update method as you can see in ./lib/langaw-game.dart line 42.
Animating the fly to make it look like it’s falling is one such logic that needs to be in update. We can’t just put the animation in there though, because the fly should only fall if it is dead. Let’s define an instance variable that will hold this information.
Create an instance variable in ./lib/components/fly.dart using the line below:
bool isDead = false;
Now we need to edit the Fly class’ update method. We check if the fly is dead, if it is we change its bounding rectangle adding a certain value to its top property to make it move downward.
Note: The Fly‘s bounding rectangle is actually a Rect which is immutable, therefore has properties that are also immutable. Immutable or final properties can’t be changed, so we need to rebuild the Rect using its shift or translate methods.
Then on the onTapDown handler, we need to flip the value to true since tapping on the fly kills it:
isDead = true;
To make the falling animation, add the following block of code to the update method:
if (isDead) {
  flyRect = flyRect.translate(0, game.tileSize * 12 * t);
}
Let’s break it down: Every time update is called (which is about 60 times per second), the fly checks if its isDead property has a value of true. If it’s true, we build a new Rect from the existing bounding rectangle by calling its translate method. Then we assign this newly created Rect instance back to flyRect.
For the values, we leave the X part 0 since we don’t want the fly moving to the left or to the right. As for the Y, let me introduce to you this variable double t.
This variable should actually be called timeDelta but the scaffolding code named it t so let’s just use that (you could change it if you want though). I’ll be referring it to “time delta” or change in time from this point.
When we say 60 frames per second, it’s like saying each frame takes a span of time equivalent to 16.666666666... milliseconds. Calculations could be done based on this fixed and static number.
But the world isn’t perfect and that just isn’t the case.
The device running the game isn’t just running the game, it also runs the operating system and most probably other apps as well in the background. Those apps could be doing something that could take up more or less time in each cycle. The CPU tries to give all running processes an equal amount of attention but some take more some take less.
This is where the time delta variable is useful. It contains the amount of time that passed since the last time update was run. The value is in seconds.
Using this value, we could calculate the amount of movement that should happen. Let’s just say that the game is running, for some reason, at a constant perfect speed of one frame per second, so the value of time delta would be exactly 1. If you intend to move an object at the speed of ten tiles per second, you would add (or subtract) 10 (multiplied by the value of the tile size) multiplied by 1 (value of time delta) to the dimension you want the object to move. This will give you a movement of ten tiles per second.
Now let’s say the game is running at a constant perfect speed of four frames per second. The time delta would always be .25. Using the same speed (ten tiles per second) of movement, we move the object 10 x tile size x .25 (equal to 2.5 x tile size) per frame. Given that there are four frames per second, the movement is still ten tiles per second (2.5 x 4 = 10).
Applying that logic with the formula game.tileSize * 12 * t, no matter what time delta’s value is, we still get a constant movement of 12 game.tileSizes worth of movement per second.
Note: To come up with the value of 12, I used a highly complicated scientific process called “whatever comes to mind”. I chose it at random, tested it and it looked pretty good. You can experiment on this speed value if you want, make the fly fall slower or faster.
Finally, the file should now look like this:

Spawn more
One fly isn’t that exciting. To have a truly playable game, we need more to spawn on the screen every time one fly dies.
Add the following code inside the onTapDown handler:
game.spawnFly();
With that, the onTapDown handler should now look like this:

We almost have a completely playable game!
But we have a problem: when a fly drops, it keeps dropping (adding value to its Y coordinate) for all eternity (or until you terminate the game process). Add more flies and soon you’ll have a data overflow error.
Sure, modern phones are more than capable of handling situations like this but it’s still not a good development practice.
To fix this, we have to add some logic that will remove any flies that have fallen off the screen. First, let’s add another instance variable called isOffScreen.
bool isOffScreen = false;
Then inside the update method, add the following block after moving the fly:
if (flyRect.top > game.screenSize.height) {
  isOffScreen = true;
}
Breakdown: We check if this instance’s rectangle’s top is greater than the screen height. If it is, flip the value of isOffScreen to true.
Note: You probably have noticed this already, but the origin (0, 0) of the screen’s Cartesian plane is on the upper-left corner and the positive Y direction is downward. Making the top of the screen have a Y value of 0 and the bottom for the screen have a Y value equal to the screen height.
Now the Fly class file should look like this:

Finally, we need to destroy fly instances that have their isOffScreen property set to true.
This task can be done with one line by using Dart List‘s removeWhere method. It’s similar to forEach but it expects a method that returns a boolean value. Luckily, isOffScreen is a boolean value so we just return that.
Add this line inside the update method of ./lib/langaw-game.dart:
flies.removeWhere((Fly fly) => fly.isOffScreen);
Breakdown: We create an anonymous function that gets a Fly as a parameter, it then immediately returns the isOffScreen property of the Fly instance it got as a parameter.
This anonymous function is then passed as the parameter to the flies list’s removeWhere method which runs the passed method for each Fly instance in the list, removing the instance if the function returns true.
The file should now look like this:

View the code at this step on GitHub.
Testing the Game!
Time to see the fruits of our efforts. Go ahead and run the game right now, you should have a playable game similar to this video:
Conclusion
After that rather lengthy tutorial, we now have another game. This time it’s more interactive than the product of the previous part of this tutorial series.
By creating another game from scratch, the concept of the game loop should be more familiar now. We’ve also been introduced to the functionality of the other part of the game loop called update.
I hope you enjoyed creating your game. Don’t hesitate to experiment with the values like speed and color to make your game unique and more exciting.
Feel free to drop a question in the comments section below if you have any. You can also send me an email or join my Discord channel.
What’s Next?
In the next part, we’ll coat our objects with actual graphics and do more animations. See you there!
Oj me Flyin' Dutchman, felt like I was learning a new language all over again. But that's just because of the overwhelming size of the post (which it probably most likely has to be for something that code-wise is complex but over all is a major component of the game that makes all other components operational yet is dependent on them). I probably wouldn't have minded if this post had "pure coding" and then an example case, yet with coding as it has been these two "hard and fast lines" tend to blur a pecking lot. So I am rather grateful to see both the coding (so massive to my eyes, puts to shame that class for something as operationally simple as this) and an example case running side-by-side.
For the readers overwhelmed: are there different coding programmes out there that are equally, less and/or more complex than the coding programme used here? Yes, two cases would be C++ and C# - two very different programmes due to the coding language at hand despite being developed by the same essence at hand: coding.
To return back to the post, I admit that I was basically scratching myself (this is what happens when you don't take something seriously and run into professional/serious versions of what you do) but finding my answers either later in the post or just a few sentences afterwards. Thankfully I know that reading like I would running is such a great help for a lot of reasons :p - But of course I ain't complaining here nor does any post need revising, I felt like being snarky and to say this post does a good amount of the work to cover any mental follies in my head. Of course I assume the rest of any semi-related qs to myself. (I shall keep this private because I rather just wait for the other posts before then submitting my qs if I felt something went unexplained or barely got the love it needed to be fully explored.)
In other news in relationship to gaming: I recently found out the first author of surfing (in relationship to Counter Strike 1.6, Source and Global Offensive for those not in the know). Name's Mariowned. Glad to know a bit of gaming trivia everyday, makes me wanna go back to those surfing maps now~
Thanks again the essay. Here's my upvote (for what it's worth, literally).
I may have failed to mention that this is a tutorial series for beginners on game development. Later articles would have less and less explanation for previously explained concepts. Though more are introduced and I like to explain everything in as much detail as I could.
See you in the next one!
"The next one" just dropped btw https://jap.alekhin.io/game-graphics-and-animation-tutorial-flame-flutter-part-2
I shall read it and drop a simple upvote, later coming back to give a bigger upvote as well. Feeling sick here, so no big comment :c
This post has been manually selected, curated and upvoted by CI mod staff team. Supporting all posts that are in high quality and don’t get enough recognition.
This post was submitted for curation by: @theironfelix
This post was voted: 100%
Congratulations @japalekhin! You have completed the following achievement on the Steem blockchain and have been rewarded with new badge(s) :
Click here to view your Board
If you no longer want to receive notifications, reply to this comment with the word
STOPTo support your work, I also upvoted your post!
Do not miss the last post from @steemitboard:
Vote for @Steemitboard as a witness and get one more award and increased upvotes!