How to Manually Enhance Your Photos and Bring Them to Life! [PHOTOSHOP TUTORIAL Beginner +]
A picture can and is easily the first impression someone will have of your online presence, so taking good photos is a great first step. -But what happens if you use the proper lighting but come away with an image that feels somewhat bland? In this tutorial I will be showing you how easy it is to be able to boost an image to leave a lasting impression. This can be done with app editors in a one-click fashion, but with Photoshop, a user can have a stronger control on how exactly a photo turns out! Slap on filters don't always do a photo justice.
- Difficulty: Beginner +
- Layers: 3
- Time: <15 Minutes

Why "Boost" an Image?
To be honest, I was going through my photos from a date I had the other day, and was actually working on different photos in my camera roll. At first the following photo did in fact look fine, but after editing it, I realized how gray the whole thing looked. If I spend a little extra time on my images, they would transform the impressions that I leave behind.

Original Photo. Good, but not good enough!

Step 1
Load your image to modify in the editor, and click the little lock to unlock your image. (By default, Photoshop locks the first layer you load as a background, so it cannot be changed) If you want to rename your layer you can, I leave mine as "layer 0".
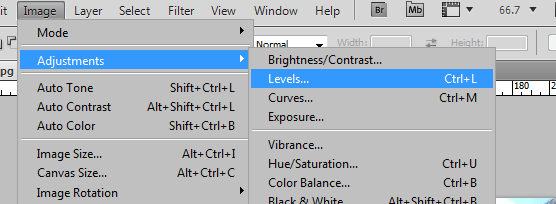
Step 2
We start with a modification to this image by doing what's called a level adjustment. Go to the main ribbon, Image> adjustments> levels...

Step 3
When you click on levels, it will bring up this window. The little tabs are exactly as they appear, black on left, gray in middle, and white on right. If the black and white is not already at the ends move the sliders so that they are! What these mean is that "this is where the color black is", "this is where the color white is", and the gray one represents the middle point of your image between black and white.

Step 4
Move the middle slider (gray) towards the white. Surprise! You would think the image would get lighter moving it closer to the white, but what is actually happening is that the center colors of the image are being expanded into the darker range. Since there is now more space between black and gray, that's where most of the color is going.

Step 5
Move the white slider a little bit to the left. The first motion to expand the dark range, gives the photo depth, but I want to make it brighter, without going too heavy on the contrast and having the image look "clearly edited". You will notice that the gray slider you moved in the previous step will move with the white slider to keep the ratio between the gray and white. I am redefining the edge of where the whitest part of the image is, and everything beyond that is now washed out of the picture.

Step 6
Now we are going to create a curve mask for our layer. Click the little black & white circle at the bottom of the layer, and select "curves..." from the list of mask options. Think of a mask like a filter layer, changing this part affects the image, but doesn't change the level editing we just did.

Step 7
When you click on "curves" this window will pop up. A good way to think about how curves works, is that it's similar to using a music equalizer. When you make one part of the image more dominant, the other parts will become more subtle.

Step 8
Try playing around with diffent areas on the curve. You could max it out all the way like I did here, but it will make the image no longer look natural. You can achieve some nice effects by playing with the curve.

Step 9
Try to go just a little bit brighter than you would find acceptable, we will be bringing down the color again coming up. I use the curve layer to represent highlights better.

Step 10
Select the "layer 0" or the orginal image. Right click and select to "duplicate the layer"

Step 11
Drag the "layer 0 copy" you just made to the top, so that it appears as the first one in the list. It will look like everything you did with the curves are gone. The goal here is to add another "filter" to balance out the photo. This is why we went brighter on the curves.

Step 12
With the copied layer selected, bring the opacity layer down some. I went all the way to 51%, but you may want to do more or less depending on your preference. Doing this allows you to have better control on how strong or subtle you want your highlighting to be.

The completed photo! Hard to tell if it looks better?

Here is the actual difference. At first glance my original photo looked fine, but up against my edited image, it looks blander... grayer... Bringing a photo to life should be an adventure, and not a chore to do. After trying this a few times on your own photos, hopefully you can gain a set of eyes that see past automatic filters and into the forgotten art of Photoshopping!
4/30
If you liked this tutorial, please be sure to check out my previous guides here!
Happy Editing! ^_^

For some reasons both the original and the retouched on are very beautiful picture. :P
^/////^ uh... well... thank you very much @teamsteem! I feel a little vain editing an image of myself. Selfies are also a dying art form!
Wow , this is what I've been waiting to see from you lately, now you make it here dear.
Fulfilling promises is one of the greatest thing that ones can make to light way. Now you're doing it.
I hope in some days I should be able to fulfill my promises too.
Much love
Heya @bollutech,
Thank you for checking back in! I did promise some Photoshop tutorials, so it does feel good to be delivering on my word. I am still catching up though, so here's to more content :3
Trying to get back to full speed, so these baby steps gotta start getting bigger. I know you will come through on your promises as well, as long as you do your best the rest will follow.
The love is real! ♡
@shello
Thanks for saying this into my head dear
Follow and upvote pls follow back
I will not. Please do not ask for follows!
As u wish 😊
This design and art very nice..great photography..thanks for sharing this post..best of luck.
Thank you @sharminkona, Im glad you enjoyed this little tut c:
welcome!
babe