CONSTRUCTION AND MODELING OF THE DRESS INSPIRED BY JAPANESE DESIGNERS
Hi,
Today I am posting a tutorial about how to model a dress pattern by altering a basic dress pattern. The dress is designed by me and the dress is really hard to construct, but I tried my best to explain it step by step. Hope you like it and don't get lost.
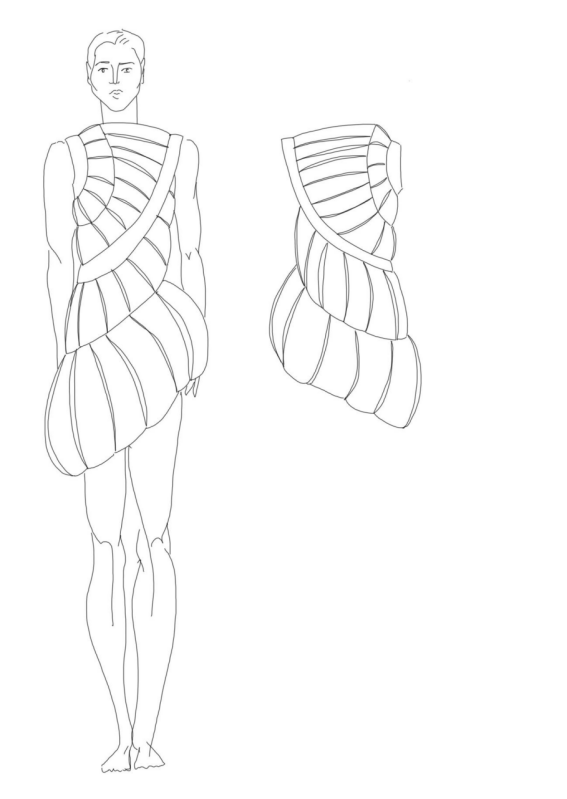
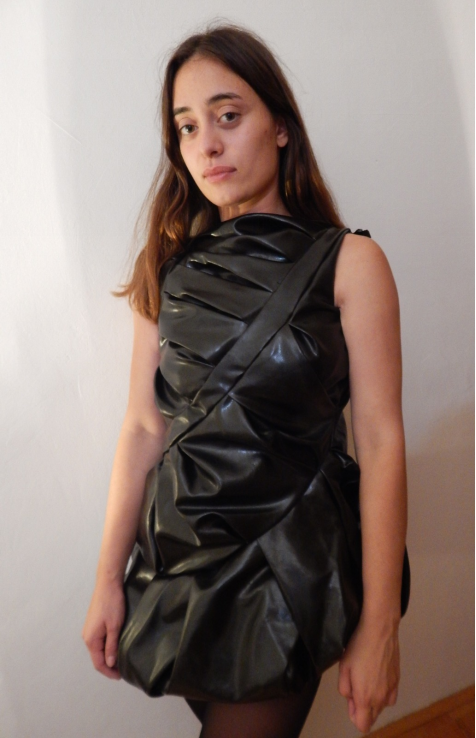
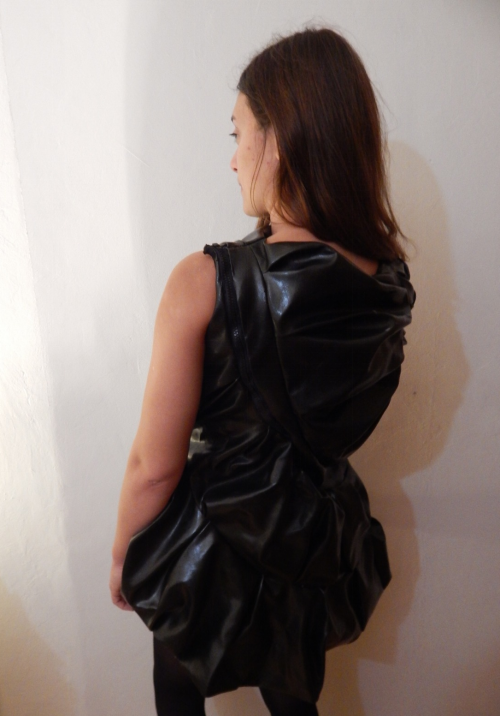
SKETCH OF THE MODEL
CONSTRUCTION OF THE DRESS
In order to model the selected dress pattern, it is first necessary to construct a basic dress pattern.
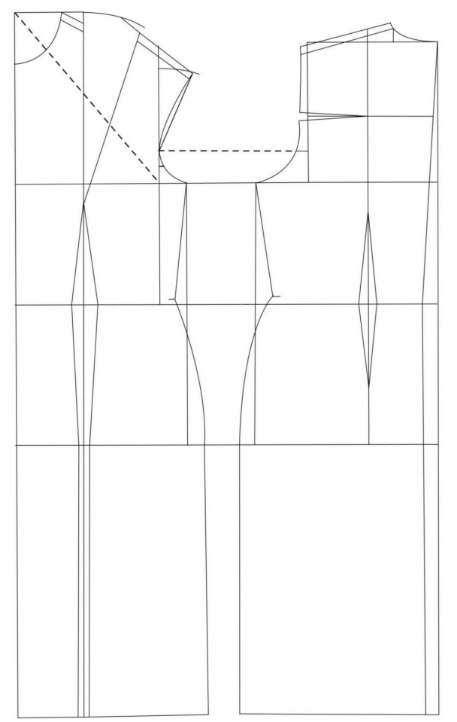
MODELING THE DRESS PATTERN
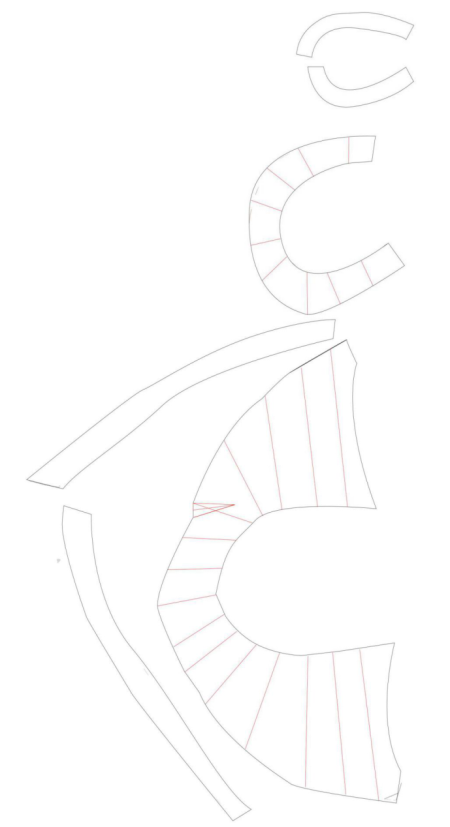
After the basic pattern is constructed, modeling follows. The front and the back of the dress are made up out of 7 cut-outs, with some fronts sewn together with the backs at the shoulder or side seams. This is due to the smaller number of connecting points that we would have to hide under the fold. Front and rear parts, respectively joined back and front parts under the names PD2, PD3, PD5, PD6; SD2, SD3, SD5, SD6 are expanded by being cut and the addition for the folds is added between the cuts. The folds are folded from the outside inwards.
Because the dress is not symmetrical, the "halves" of the dress are first joined to show the entire front and back. After that, contours are marked, where the dress is cut with the fact that if the contour lines cross the darts, the lines are "straightened out", and then the curve continues. To save time, most contour lines go through the tops of the darts so that they are not removed but added to the folds, which expands the dress in an area where the dress expands even further, which is the goal with this model.
STEP 1
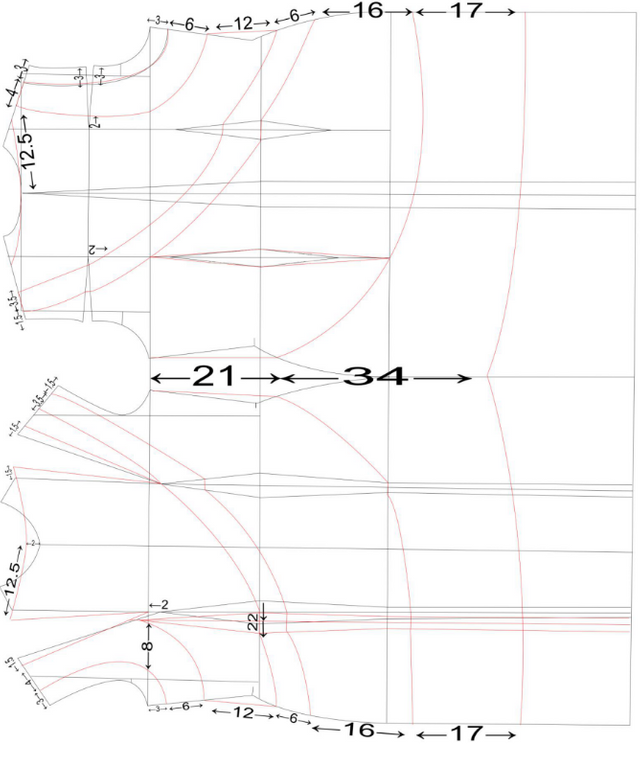
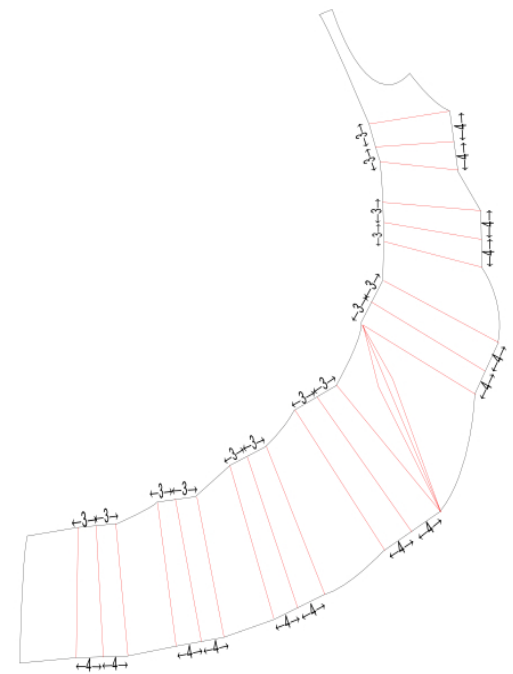
Outline the contours, that is, the cutting points on the base cut. In the front part of the right dart is extended 2 centimeters above. The tip of the right dart is now connected to the chest line. With the dart coming down from the shoulder to the chest, 1.5 cm of the dart is subtracted and shifted towards the neckline to give a "longer" neckline.
The front of the dress with the contours outlined.
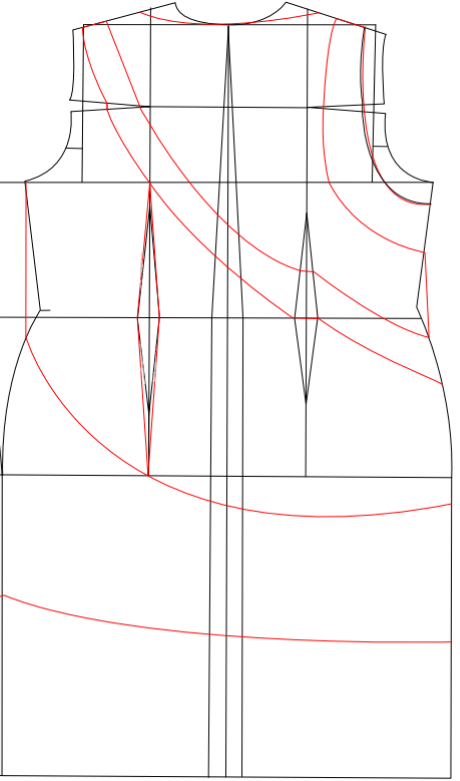
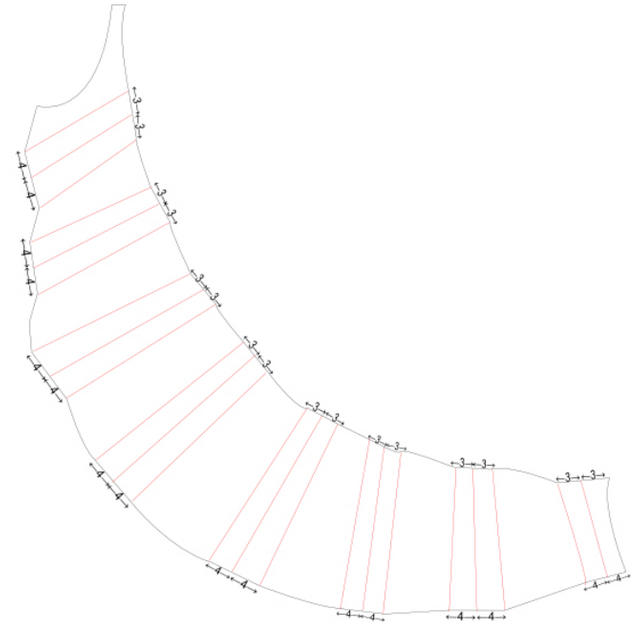
The back of the dress with the contours outlined.
PART 2

Separate front parts that will fit in the area where the darts are located.
The front parts are separated and connected in the area of the darts, that is, the "transferred" darts
Separate back pieces that connect in the area where the darts are located
The back parts are separated and connected in the area of the darts, that is, the "transferred" darts
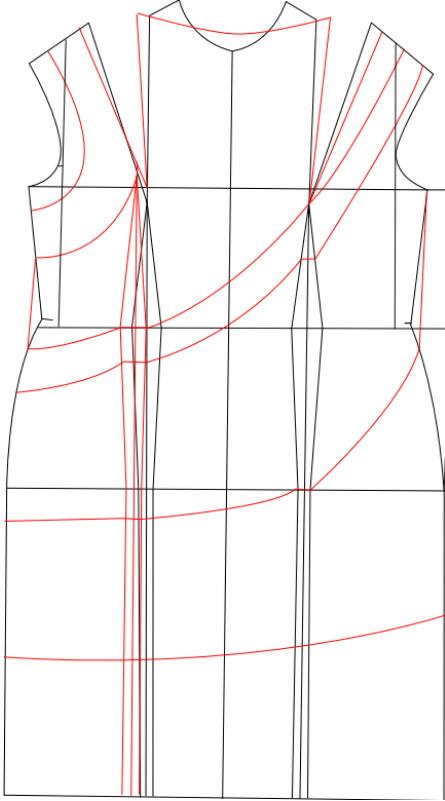
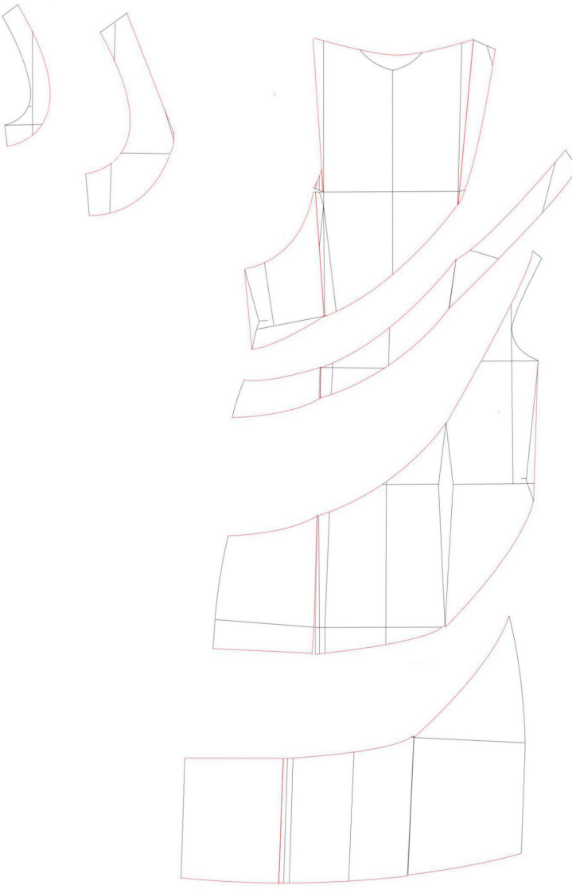
STEP 3
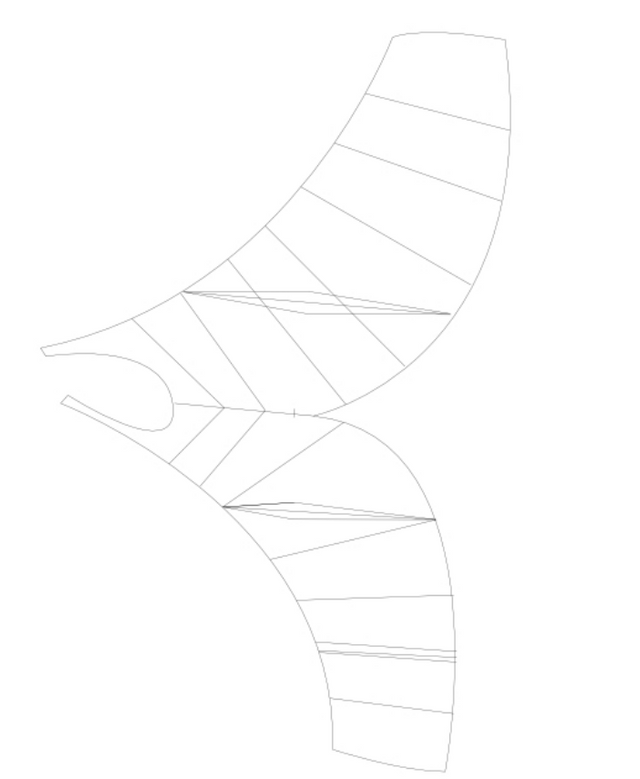
Cut parts PD2 and SD2 are connected and the cutting is marked where the area for folds will be added. Cut parts PD3 and SD3 are connected and the cutting is marked where the area for the folds will be added. Cutting points are indicated by red lines.
PD5 and SD5 connected in the area below the sleeve, in this case only for symmetry during sewing
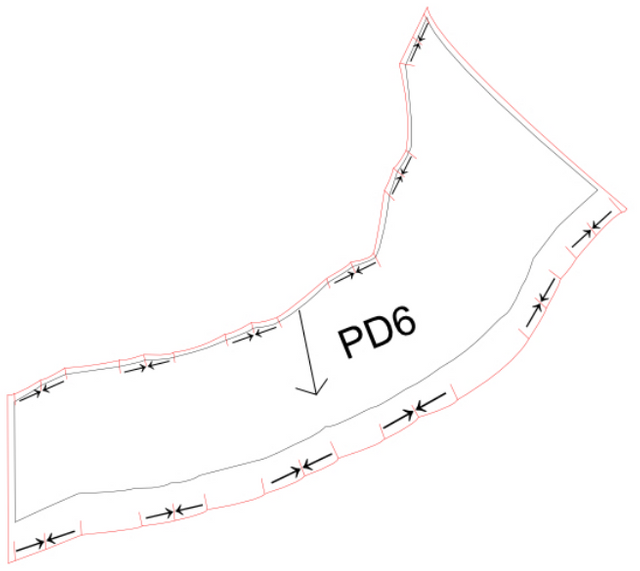
PD6 and SD6 are connected and the cutting lines are highlighted in red. PD6 and SD6 will be separated after adding the space for the folds.
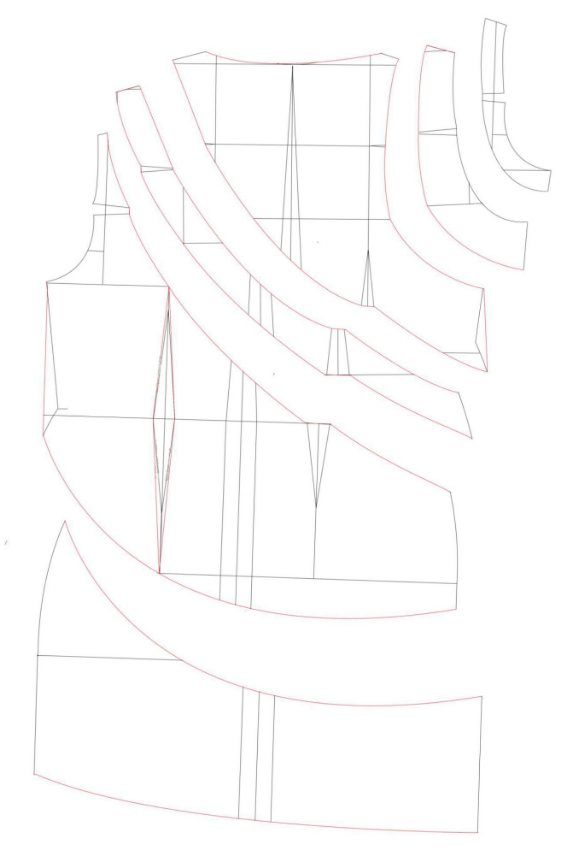
STEP 4

PD2 and SD2 are joined in the area below the sleeve and are cut along the marked “red” lines and additions to the folds. In the inner "smaller cut" 1 + 1 cm or 2 cm were added in between marked spaces, and in the outer "longer cut" 2 + 2 cm,4 cm respectively were added to the spaces.
The PD3 and SD3 are joined in the area below the sleeve and are cut along the marked “red” lines and the space is added for the folds. In the inner "smaller cut" 2 + 2 cm and 4 cm respectively were added in between the marked spaces, and in the outer "longer cut" 3 + 3 cm,6 cm respectively were added to the spaces. The dart from step 3 has been used here for the interstitial space for the folds, that is, it is calculated in the sum.
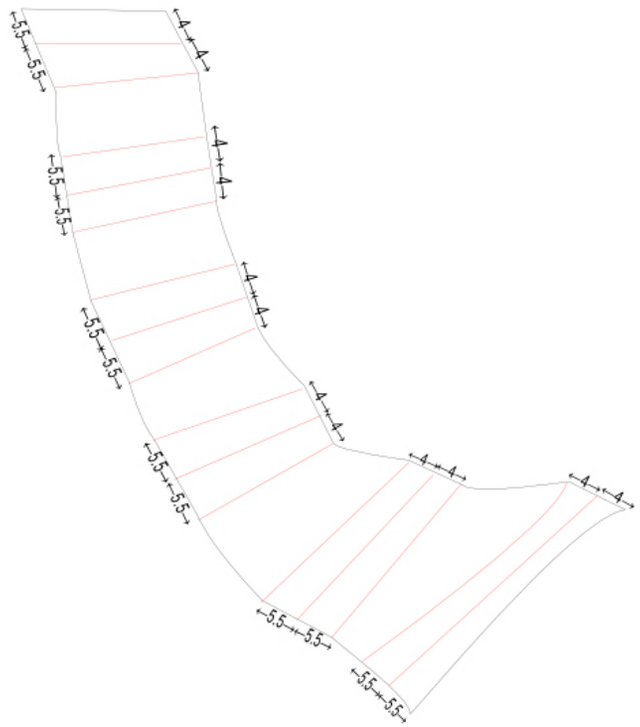
The PD5 was cut along the marked “red” lines and space for folds was added. In the inner "smaller cut" 3 + 3 cm or 6 cm were added to the spaces, and in the outer "longer cut" 4 + 4 cm, 8 cm respectively were added in between the marked lines. The dart in this cut is not "folded" into the fold, since the pattern part is cut at the tips of the dart and will be sewn at the top with the cut piece PD4 that adheres to the body and does not expand like this part. The stitching in this cut section extends the dress. That is, it will not be quilted but will be added for the purpose of expansion, which is the goal with this pattern part.
The SD5 was cut along the marked "red" lines and space for the folds was added. In the inner "smaller cut" 3 + 3 cm or 6 cm were added to the spaces, and in the outer "longer cut" 4 + 4 cm, 8 cm respectively were added between the marked lines. The space between the folds that will be joined to the front in the flank area is rounded to create a fold that fits more flat like the others in this pattern part when fused to the front.
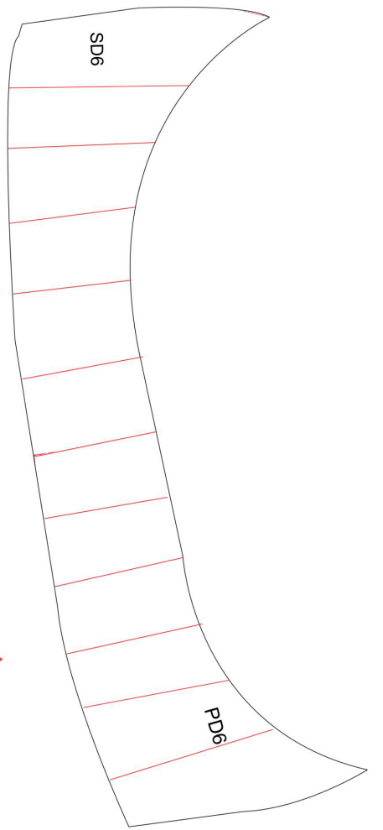
The PD6 was cut along the marked “red” lines and space for the folds was added in between the lines. In the inner "smaller cut" 4 + 4 cm or 8 cm were added in between the marked lines, and in the outer "longer cut" 5.5 + 5.5 cm or 11 cm were added in between the lines. The space between the folds that will be joined with the in the flank area is rounded to create a fold that fits more flat like the others in this pattern part when joined to the back.
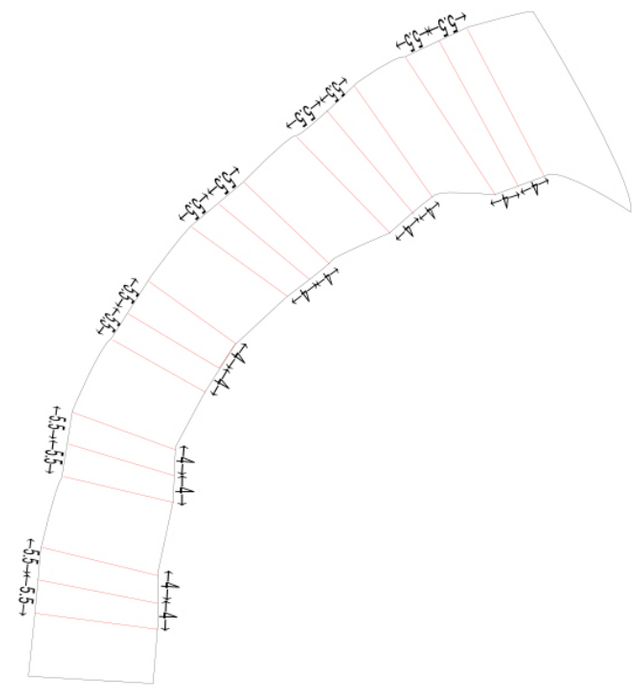
The SD6 was cut along the marked "red" lines and the space for the folds was added. In the inner "smaller cut" 4 + 4 cm or 8 cm was added in between the spaces, and in the outer "longer cut" 5.5 + 5.5 cm, 11 cm respectively was added in between the spaces.
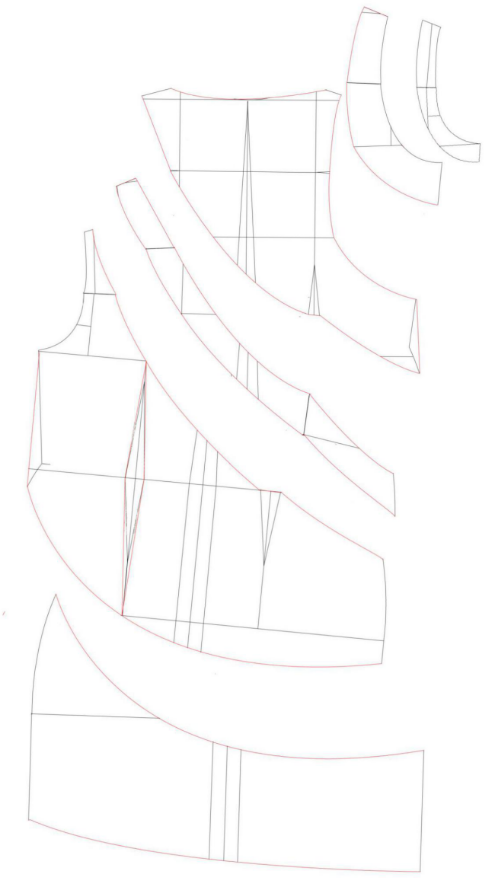
STEP 5
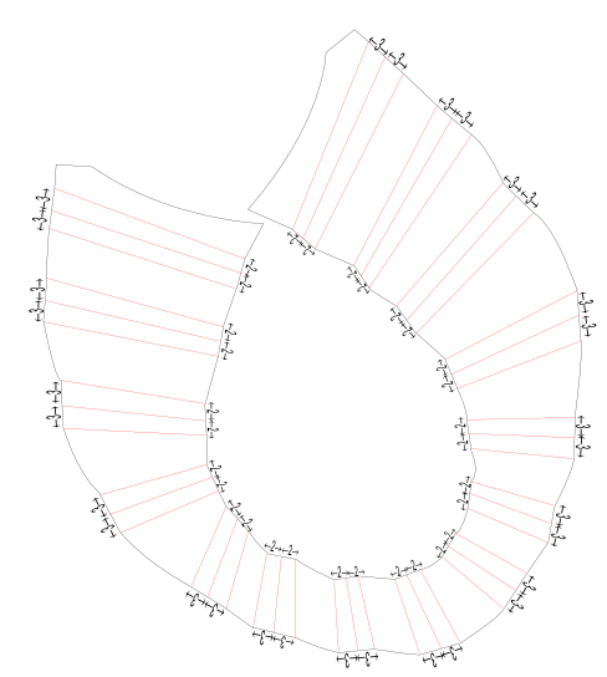
Adding 1 cm around all the patterns, direction of putting the pattern on the fabric, direction of joining the folds
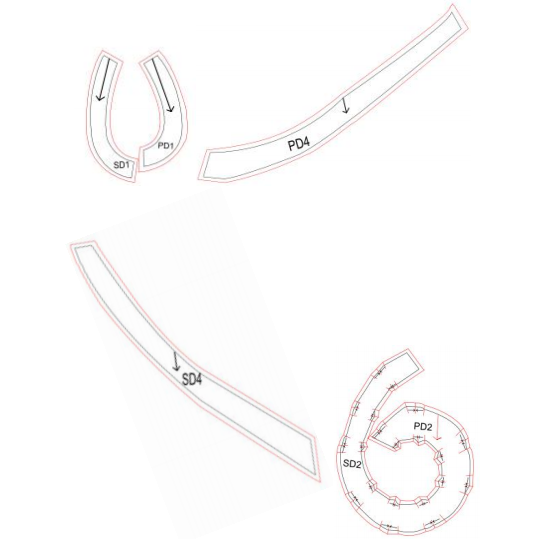
Trimmings added for stitches (1cm), the heading line basis for the fabric and direction for joining folds on the pattern parts PD1, SD1, PD2SD2, PD4, SD4.
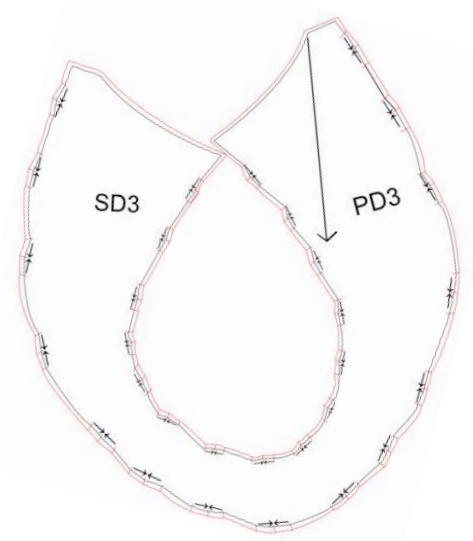
Trimmings added for stitches (1cm), the heading line basis for the fabric and direction for joining the folds on the pattern part part PD3SD3.
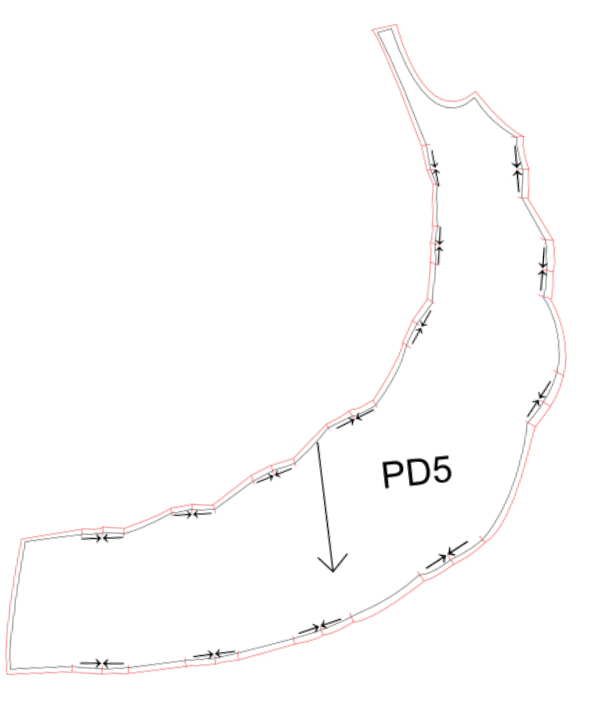
Trimmings added for stitches (1cm), the heading line basis for the fabric and direction for joining the folds on the pattern part PD5.
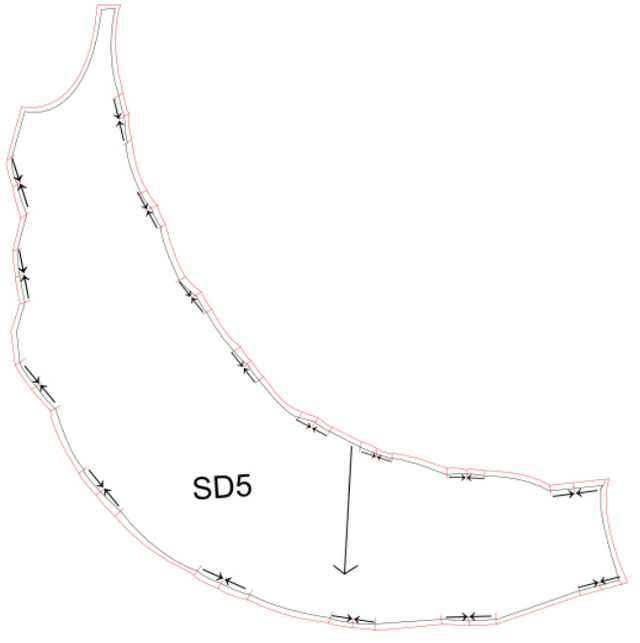
Trimmings added for stitches (1cm), the heading line basis for the fabric and direction for joining the folds on the pattern part SD5.
Trimmings added for stitches (1cm), the heading line basis for the fabric and direction for joining the folds on the pattern part PD6. 5cm was added to the hem for the hem, and 5cm was removed from the lining to pull the hem of the dress towards the inside, as in the sketched model.

Trimmings added for stitches (1cm), the heading line basis for the fabric and direction for joining the folds on the pattern part SD6. 5cm was added to the hem for the hem, and 5cm was removed from the lining to pull the hem of the dress towards the inside, as in the sketched model.
THE FINAL DRESS

So, there you have it! The dress is really hard to construct, so if you are a beginner I don't recommend this for starting. However, people who know how to alter dress patterns, please leave a comment and let me know what you think. I will be more than happy to replay if you have any confusions.
Spreading the love,
Emma Stephanie
xxx
Beautiful, Thank you for the breakdown of the pattern. It is just like Origami. Resteemed
Congratulations @esgaunt! You have completed the following achievement on the Steem blockchain and have been rewarded with new badge(s) :
You can view your badges on your Steem Board and compare to others on the Steem Ranking
If you no longer want to receive notifications, reply to this comment with the word
STOPDo not miss the last post from @steemitboard:
Vote for @Steemitboard as a witness to get one more award and increased upvotes!
Really interesting dress design and a great presentation! BTW thanks for confirming ownership of your content on instagram :)
This post was shared in the Curation Collective Discord community for curators, and upvoted and resteemed by the @c-squared community account after manual review.
@c-squared runs a community witness. Please consider using one of your witness votes on us here
Hey @esgaunt! We've manually upvoted this post. On behalf of the steem ecosystem and Build-it.io, we deeply appreciate the time and effort you put towards this exceptional masterpiece.
As a matter of interest, there's a tribe on the steem platform known as Build-it that accommodates all DIY, How-to tutorials, and lifehacks respectively.
That being said, your DIY/how-to tutorials get rewarded with the tribe's token known as Build upon posting via our website or at least one of the recommended tags; #diy, #how-to, #build-it, #build, and #doityourself. Our curation account @build-it.curator will curate every valid and reasonable posts/projects.
Chat with us on our discord and telegram channels Discord, Telegram
This project is run and supported by our witness @gulfwaves.net. If you think we're adding value to the steem platform, your witness vote will be appreciated! Click here to vote for us