Let's Build: Bonsai Rock Landscape [Bonsai]
On Sunday, we had a very interactive #bonsai meeting. I got to work one-on-one with a master #rock #landscape designer. Many of us in the club are very enthusiastic, and enjoy trying new things, and today was no exception. We would be building a #saikei (bonsai #landscape) out of rock and #clay, using some industrial techniques, and using inexpensive materials.
This post is a walk-through of the first phase of this landscape building process.
Every photo in this post is 100% original, taken from my mobile smartphone, on site.
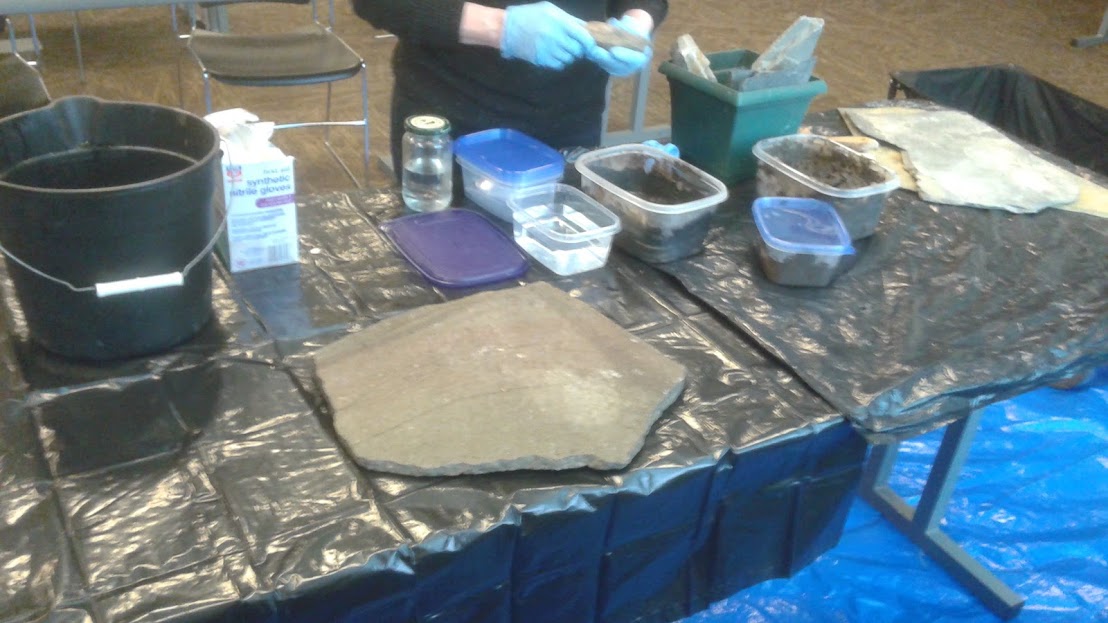
Here is the #flagstone I selected to be the foundation. Everything will be built on top of this.
Many people at the meeting were concerned because we would not be drilling any drainage holes into the #stone.
Instead, we would be using the natural slope of the stone to allow water to run off the sides.
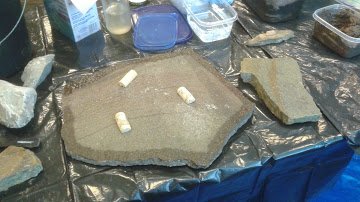
Three corks that were cut lengthwise, were placed on my stone. She also dabbed a liquid around the perimeter of the flagstone.
The liquid would become invisible when it dries. She said its purpose was to repel water and prevent the clay from sticking along the sides, to keep a clean rock edge.
The corks were for drainage. At the time I didn't understand how this would work.
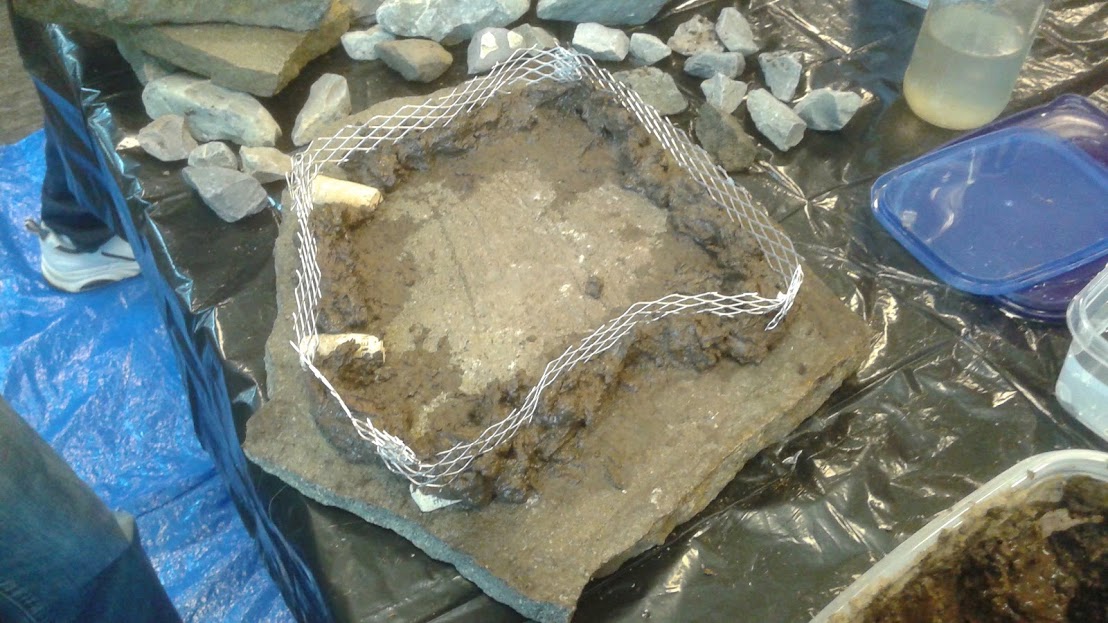
This metal frame material was very flexible, and also very sharp. She had me put on some rubber gloves to protect my hands from being cut, but mainly to keep my skin clean.
Since the metal pieces came in four sections, we folded the ends to connect it end-to-end like lego pieces, to create a full ring.
The corks were placed along the lower side of the slope, with the metal ring stretched over it.
She encouraged me to open up my metal ring as wide as possible around my stone, but I decided otherwise. This stone was so heavy, I really needed to keep a palm width area open on both sides so I could get a grip to lift it up. Otherwise, I would never be able to get it in and out of my car without making a huge mess trying to carry it with all the wet mud and stone loose on it.
At this point, I had to ask some questions, because I really did not know what I was doing. I started placing rocks inside, not knowing how the trees were supposed to be layered inside.
The drawing below shows the order that the layers will be built on top of the flagstone at the bottom.
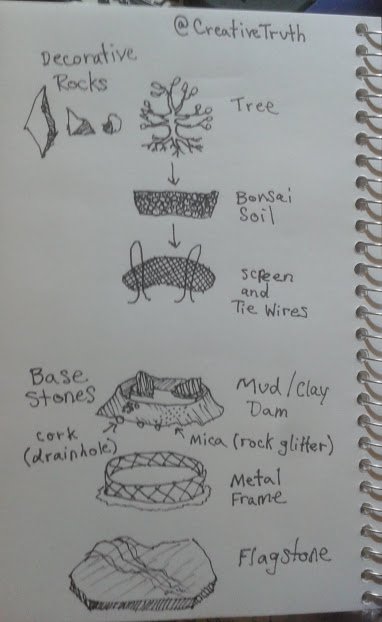
The metal frame is built on top to form a ring.
Around the metal frame, we would be building a Mud Dam, a unique method our expert developed for making Saikei.
Stones can be placed inside the Mud Dam to add stability and strength to it, or for decorative purposes. The mud walls need to be much higher than the metal frame so that enough bonsai soil can fill the inside area like a basin for the bonsai trees to grow into. Too shallow, and the trees won't have enough roots to survive.
Later on (not featured in this post), we will place a screen material to guide some wires through. The wires will fasten the trees down, so they stay attached to the screen. This allows the trees, and screen, to be removable if the trees ever need to be root pruned, while the rest of Mud Dam can remain in-tact.
After the trees are fastened down to the screen and placed inside the Mud Dam, the bonsai soil will be filled up to the level of the mud walls, and more decorative rocks can be added on top. The weight of the decorative rocks will help prevent the trees from tipping over. Optionally, rocks can be placed between the roots of the trees to form a Root-Over-Rock bonsai scene.
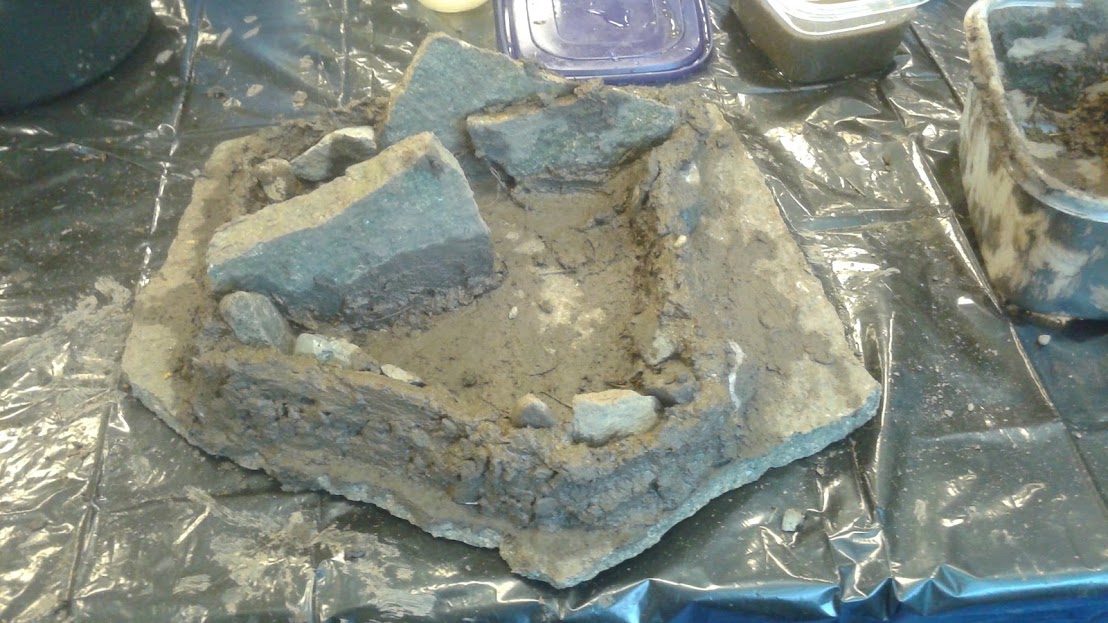
Here is what my mud walls looked like after working on them for a while. I used all the mud she gave me.
There is actually a heavy clay content in this soil, which makes it easier to build with. She even mixed in a dye to the clay to make sure it would match the type of stones I was using, because normally the clay is lighter in color. I think the clay will also look lighter after it dries.
My strategy was to add some rocks inside and around the perimeter to help hold the ring stretched into the shape I wanted.
Another member offered to help me break apart another piece of flagstone, so I could use it to form cliff walls. I think that will make a nice back-splash behind the trees when it rains, and I know trees roots benefit from rain water that runs down along a flat vertical surface. After studying plant and tree roots in my garden, I believe roots tend to grow close to moving water because it is more nutritious than stagnant water.
On the outside, I smooshed some gravel stones into the front of the wall for texture. On the back side, we used a brush to apply some glittery mica. I dabbed the mica along a diagonal stripe on the back to make it look like a vein of mica rock strata. We also painted a darker colored clay above and below the vein of mica, to add some contrast.

This Mud Dam was made by the expert. She said her strategy was to start making some slopes coming down from the walls, to make it look more like a hill shape.

The walls are not high enough yet, she explained to us. It was just over an inch deep, and not enough to grow a tree in.
She was going to let it cure, and harden for a few days before any extra height was added on top of the clay. Right now the clay was so soft, it was a bit like jelly consistency.
I really like the rocks she chose to incorporate into her design. These rocks have more of a shale slab look to them than mine, making it look like time has already weathered them down or torn them from a mountain slide.
Her big rock in the center is chosen to be used for a Root-Over-Rock design, and it will also provide enough weight needed to keep the base screen from being pulled out.
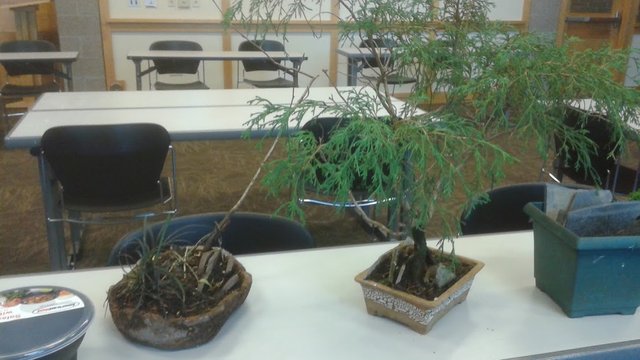
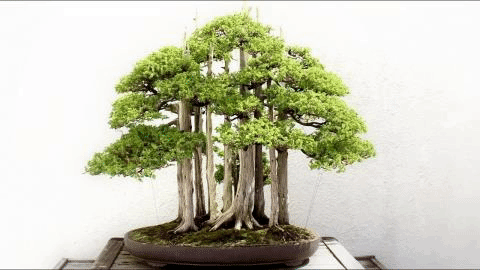
These were her trees that she brought for some added inspiration while we worked.
The trees themselves were not very exciting to look at. What lies beneath the trees is what made them captivating.
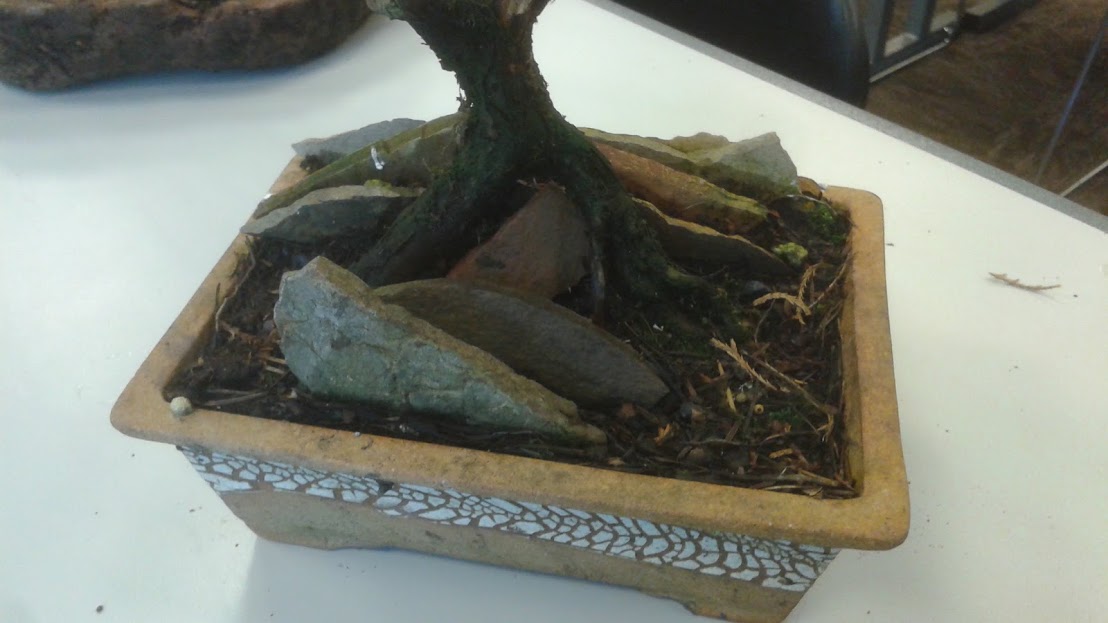
Root-Over-Rock design using shale slabs.
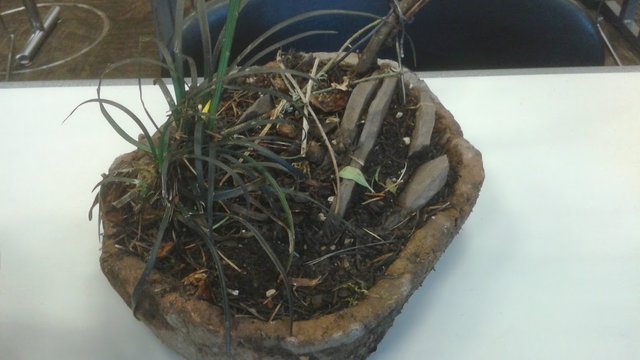
In this design, the rocks are buried very deeply. The grass and the rock design provides contrasting interest. The natural clay pot is made to look like it blends in too.
That's about it for my day playing in the mud.
So, does this rock landscape thing look like something you might try at home one day?
I know I would have been lost without some guidance and encouragement.
When I get some time to finish the second phase of this project, I'll post some updates. I have a couple Chinese Elm cuttings I wanted to plant into my Mud Dam, but I could not believe I had three other members at the Bonsai Club all eyeing my cuttings as if they were made out of money! Maybe I will give them away after all, and instead go with my original idea of only growing new seedlings this spring inside this landscape piece.
@imagendevoz also wrote a fresh post on Chinese Elm I think many people might enjoy. He goes into detail on how to germinate the seeds to grow this lovely tree. You'll see why it is so popular for bonsai growers when you see the photo.
Check it out here.
#TeamBonsai
Bonsai enthusiasts.
Growing together.
We really want to support each other, and any other enthusiasts who enjoy posting and curating bonsai-related articles.
May your inspiration for tomorrow, grow, and grow!

Thank you very much for your sharing to us valuable and complete article about phase of bonsai landscape building process, i like your post and have upvote and resteem your post to more than 1500 my follower in order to make more people know how to make bonsai landscape building, greeting friendship from me @abialfatih in aceh indonesia and always success for you @creativetruth
very good post my friend .. please help me once my friend yes
Sir, there was another guy on steemit.com who was very passionate about Bonsai tree. I told him about you.
Thank you.
Looks like you posted again about tribal living, this time Indonesia. I'll have to check that one out. Sounds interesting.
Thank you very much for your sharing to us valuable and complete article about phase of bonsai landscape building process, i like your post and have upvote and resteem your post to more than 1500 my follower in order to make more people know how to make bonsai landscape building, greeting friendship from me @abialfatih in aceh indonesia and always success for you @creativetruth
You have built a most wonderful tree and draw inspiration from nature. I draw the most wonderful inspiration from your natural artwork and have created an exact rendition of your bonsai in your honour..
Here is the post https://steemit.com/blog/@pricasso/another-ode-to-creativetruth
Yours always
Pricasso
Very creative, in your own unique style.
I am Pricasso most wonderful artist and I thank you for the most wonderful comment.
Yours Always
Pricasso
WOW this was amazing. I have to add that I love it when people say you need drainage holes on an open flat stone. Great piece, consider it re-steemed. PS. Thanks for helping us all grow the bonsai community #TeamBonsai for the win.
Hopefully it turns out decent. I'm going to try to build up my walls a little higher, since she gave me some more clay mud to work with.
I'd love to get my hands on a proper open flat stone. Right now I'm mostly focusing on growing my other ficus for the huge pot I've got. Please share more once the project is complete. I've never thought about creating my own 'landscape' from scratch. I do however enjoy using large stones from the ocean or forests. Some are shaped just right so you can plant in them. I've got a tall one right now with a decently shaped 'pool' at the top, and have a plant growing in there at the moment. The goal is to have the roots grow down alongside the stone. I'll post some more on this in the next couple of months.
Wow that sounds hard to do. You've got a lot of cool projects going on with your trees.
It is difficult yes. If the 'pool' isn't deep enough the tree dies. If it rains heavily the ground gets washed off. Just have to see how it works out and keep an eye on the bonsai.
That is indeed the principle of hydroponics. But I think it will be a lot easier for me to start learning and growing the bonsai way than to keep aiming for hydro systems which I won't build at least for a couple of years. I really like the idea of watching a tree's growth from a bonsai strategy/point of view, and building such a nice landscape as its medium looks really good actually. I also believe it has given you the perfect understanding of a tree's needs and even though you're starting from scratch, that experience is going to be of big help when it comes to later years, decades as all of your bonsai keep adapting, you will always have the best plans for them (at least on paper lol). Can't wait to keep learning from your updates and very well put insights. As always, thank you for showing us such a cool work and your thoughts into every post you make. It's something I can look up to!