Study with Catwoman Teresa #2: Drawing with Photoshop 跟著貓女這樣做#2:一步一步示範簡單用Photoshop畫出一塊立體的Cheese by @catwomanteresa
This article was written by @catwomanteresa / 本文由 @catwomanteresa 撰写提交
About the authour / 关于作者:
Follow the author @catwomanteresa to find the other great articles from him/her.
请关注/追随作者查看他/她的其它优质文章。
Original text/原文如下:
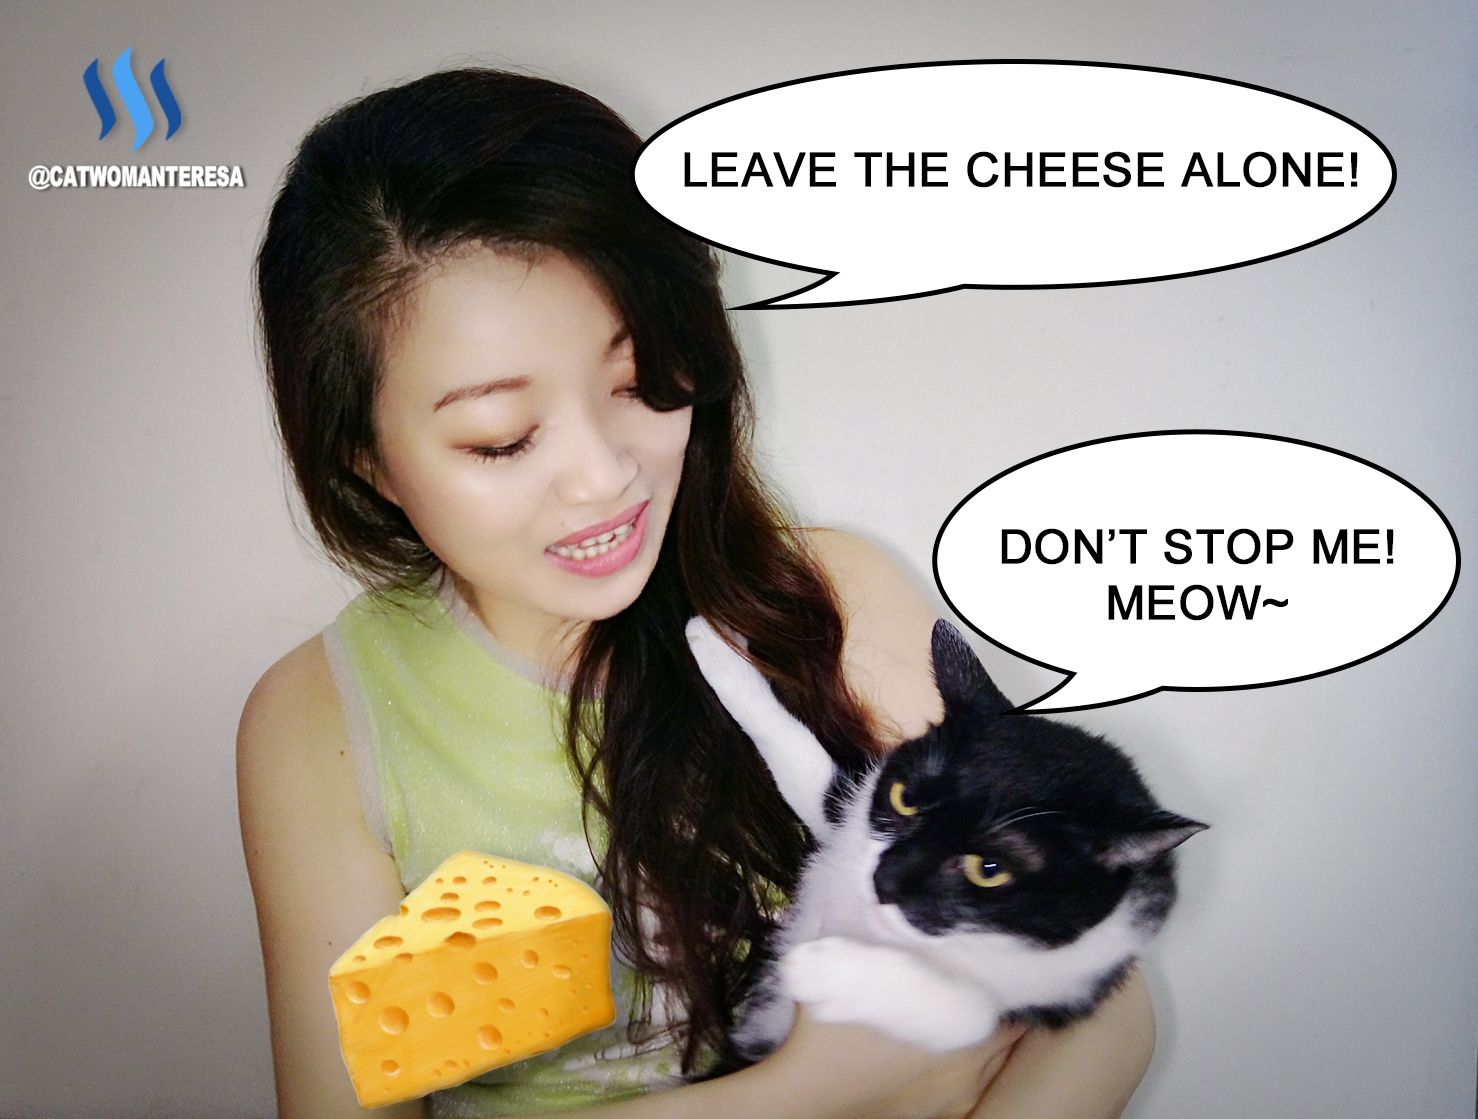
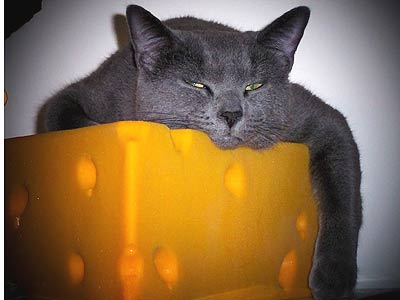
A couple of days ago, I draw a cheese in Photoshop and composite with a video about Er-Mao. If you haven't seen this video, please check here.
Today I will share with you how I draw this cheese step by step. Hope that you will find out it's not difficult to draw in Photoshop.
 親愛的Steemit朋友們,
幾天前,為了參加 @jubi 舉辦的「谷歌點名」活動,配合活動的主題「精彩瞬間」,我把內容鎖定在二毛來到長毛家之後,所帶給我們的快樂時光。
我將二毛的影片,加上了自己畫的圖,製作成一段可愛的動畫,還沒看過那段影片的請看這裡。
今天就跟大家分享,我如何用Photoshop畫出那塊勾引二毛的邪惡起司。經過我的示範,你們會發現畫畫一點都不困難喔!
The best benefit to draw in photoshop is that you can draw in different layer. So it's easier to correct your painting if you draw anything wrong.
用Photoshop畫圖的最大好處就是Photoshop可以分層,所以修改的彈性會比較大。不明白嗎?那就繼續看下去吧!
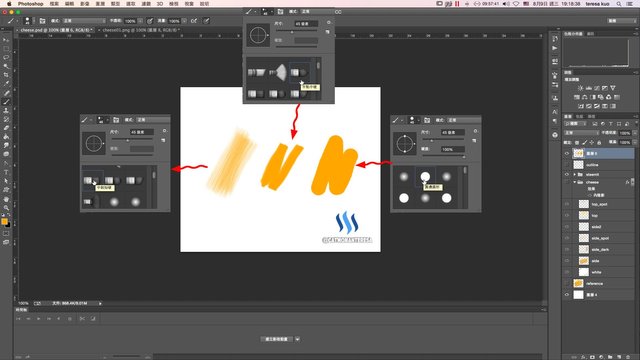
Here are the brushes we will use in this painting.
Most of the time we will use the left brush. It's somewhat similar to a flat brush with a distinct brush stroke. I use this brush to imitate the stroke of oil painting.
The brush in the middle is a dense brush, mainly used in areas that need to emphasize.
On the right is the simplest circular brush. You can paint a flat surface without any strokes. I use this brush as an eraser so that I can easily control where the excess parts I want to erase.
先來看一下這次使用到的畫筆。
最左邊的畫筆是這次使用率最多的,有點類似平塗的畫筆,帶有明顯的筆觸。使用這個畫筆主要是希望利用這個筆觸模擬類似油畫的筆觸。
中間的畫筆是毛量比較密實的畫筆,主要是使用在需要局部加重的部位。
最右邊的是最單純的圓形畫筆,好處是畫上去是完全平面,沒有任何筆觸,我使用這個畫筆來做橡皮擦,能夠確實掌握我想要擦掉的多餘部分。

First, create a white layer as canvas.
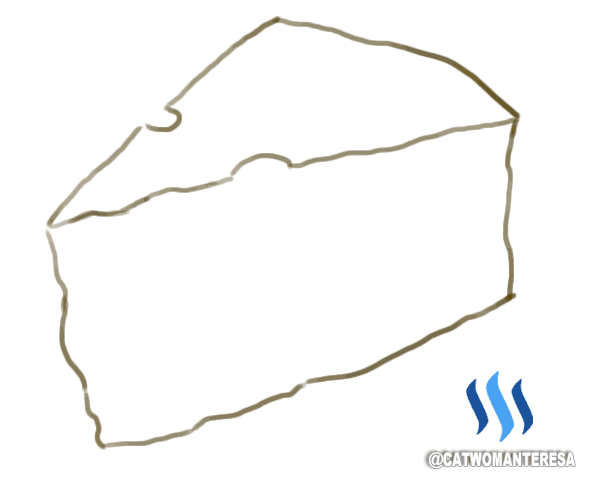
Add another layer, roughly outline the shape of the Cheese. Don't worry too much about whether the lines are beautiful because it's just for reference lines.
The advantage of layering is that as long as the layer of reference line is off, you won't be able to see the lines.
STEP 1⃣️:首先創建一層白色的圖層,就如畫圖的畫布一樣做為底層。
STEP 2⃣️:接下來增加另一層,大略將Cheese的形狀勾勒出來。這裡不用太在意線條是否漂亮,因為這只是做為參考線用的。
分層的好處就在這裡,到時候只要將畫了參考線的這一層關掉,就看不到線條了。

Paint the side of the cheese on new layer. Use the brush with distinct stroke on the left. The technique is all painted in the same direction.
You can see from the picture, because of the distinct brush strokes, repeated stack will naturally form different tone level, which can express slightly undulating texture of cheese .
STEP 3⃣️:在新的一層塗上側面的顏色,使用的畫筆是最左邊帶有明顯筆觸的畫筆,上色的小技巧是全部塗同一個方向。大家從圖上可以看得出來,畫筆因為有刷毛的筆觸,重複堆疊就會自然形成深淺不一的層次,跟好可以展現Cheese不平滑略微起伏的質感。
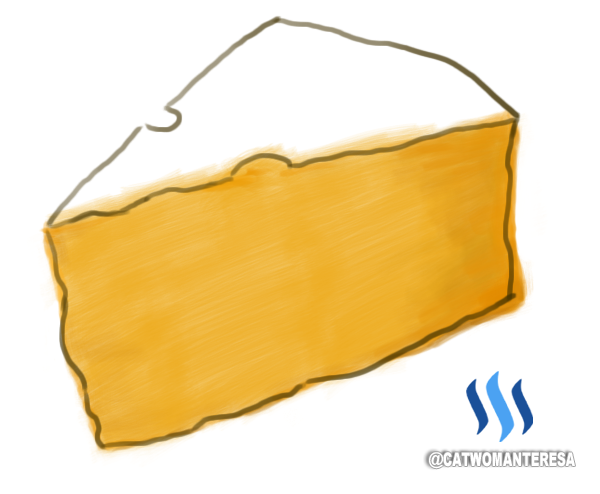
Create a new layer and use a slightly deeper color to draw the dark area.
STEP 4⃣️:建一個新的圖層,選擇一個比剛剛略深的顏色,畫出側面的暗部。
Create a new layer, use a light color painting on top surface of the cheese. Color the same way just as you paint the side of the cheese. Don't try to paint in too many different directions. Keep the neat strokes.
STEP 5⃣️:建一個新圖層,將較淺的顏色畫在Cheese的上層,也就是迎光面。上色的方式跟剛剛畫側面的時候一樣,不要方向不同的亂塗,盡量保持整齊的筆觸。
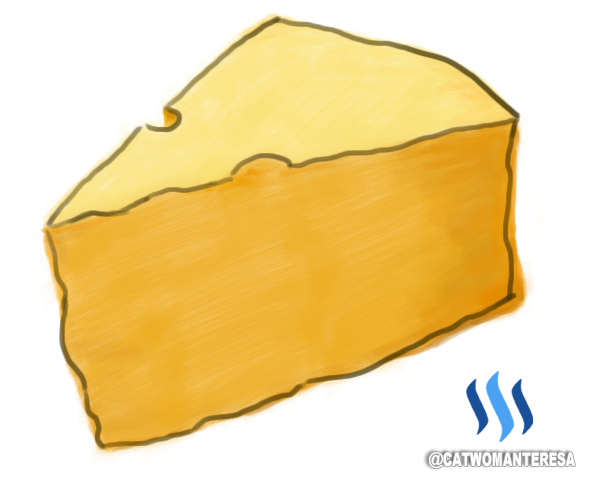
Paint the opposite side of the cheese.
STEP 6⃣️:畫上另一個側面
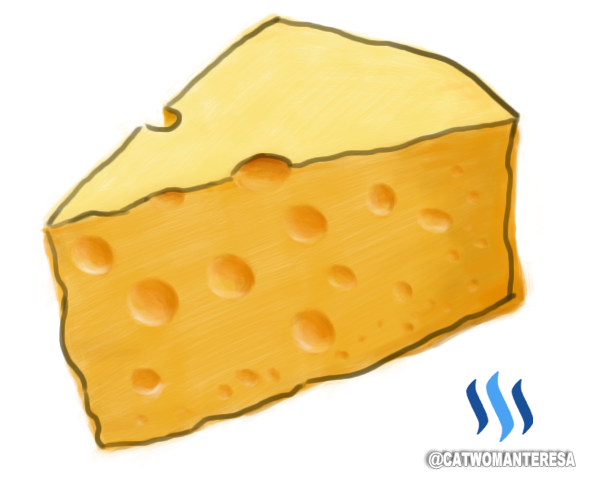
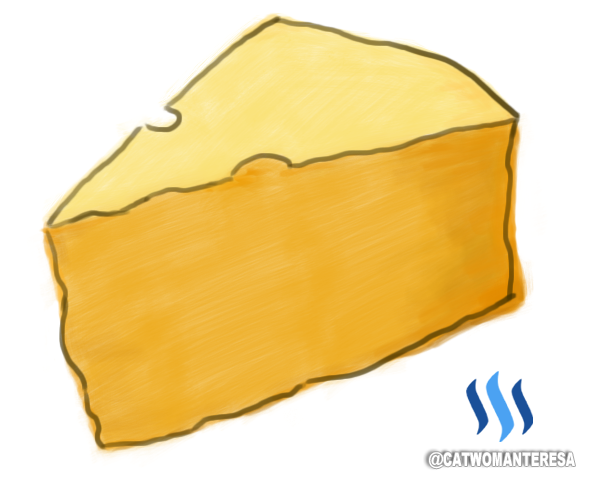
Add a new layer, randomly paint different size of irregular circles on the side of the cheese. The edge doesn't need to be too sharp so that it will be more like soft surface of the cheese.
Choose a deeper color to paint dark surface on the right of the circle in order to create a concave effect.
Choose a yellow color close to white to paint some bright surface on the left of the circle, making the concave effect even more three-dimensional.
I forget to add new layer here, so the concave hole are painted in the same layer. You can add several layers when you draw the holes so that you can change more flexible.
STEP 7⃣️:增加一個新層,在側面隨意畫上大大小小的圓形,形狀不用太規則,圓形的邊緣也不要太銳利,呈現的感覺才會比較像Cheese軟軟的質感。
STEP 8⃣️:選擇比圓形更深一點的顏色,在圓形的右邊加上一些暗面,製造凹進去的效果。
STEP 9⃣️:選擇接近白色的黃色,在圓形的左邊加上一些亮面,讓凹進去的效果更立體。
這裡我忘記分層了,所以Cheese上面的凹洞都畫在同一層上,大家在畫的時候可以在這裡多分幾層,萬一畫錯了比較好修改。
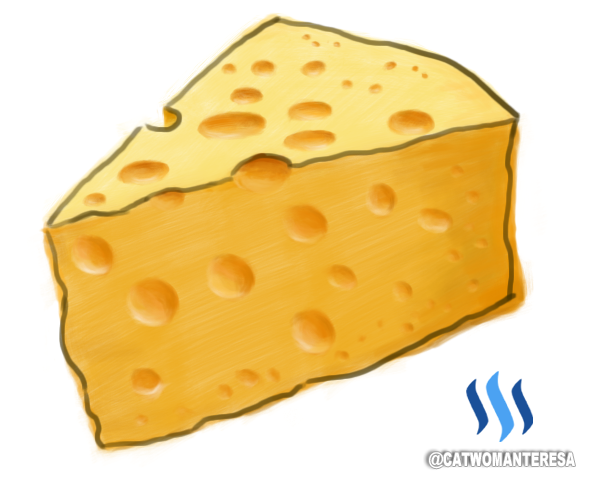
Add a new layer to draw the concave hole on top surface of the cheese using the same method.
STEP 🔟:增加新的圖層,利用剛才畫圓形凹洞的同樣手法,將亮面的凹洞畫上。
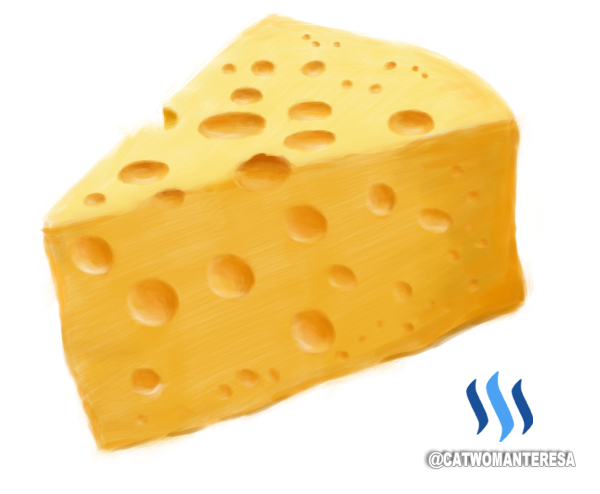
Turn off the layer of reference line. Magic! A beautiful painted cheese appears.
You can retouch some dark line on the edge of the cheese to make it more three-dimensional.
If you want to composite the cheese with a picture, you need to erase the exceed part of the white color.
We also need some little steps to make the edge of the cheese more natural.
STEP 1⃣️1⃣️:將參考線那一層關掉。噠啦!神奇的事情發生了!立體的Cheese就出現了!
STEP 1⃣️2⃣️:用中間的畫筆在Cheese的邊緣稍微加上幾筆深色的線條,增加一些立體感。
如果只是要在白紙上畫個Cheese,那麼到這個步驟就完成了。
STEP 1⃣️3⃣️:如果是要跟別的影像或圖片合成,那就要去掉多餘的白色背景。最簡單的方式就是將多餘的部分用橡皮擦擦掉。
除此之外,跟實景合成時,手繪的Cheese會感覺有點單薄,所以我們還需要一點小小的步驟,讓合成實景時Cheese的邊緣感覺不要那麼不自然。
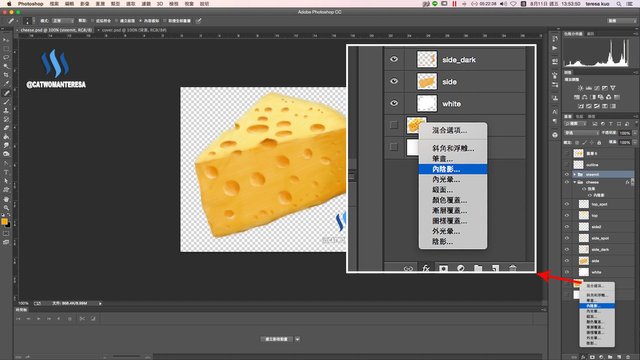
Group together all the layer except reference line and add an inside shadow effect so that the edge of cheese will looks thicker.
Add the shadow effect to create the relative relationship between the Cheese and the actual scene.
With these two steps, the cheese looks a bit more realistic when it composites with photo or video.
STEP 1⃣️4⃣️:將所有的圖層合到一個群組,然後針對這個群組加上右下角的特效中「內陰影」的效果,調整到需要的數值,這時候Cheese的邊緣看起來就會有一點立體的厚度。
同樣的步驟加上在特效中的「陰影」,製造Cheese跟實景之間的相對關係。有了這兩個步驟,跟實景合成時看起來就會比較寫實一點了。

The final painting is like this. You can see the first photo for the compositing effect.
最後的成品就像這樣。
合成的效果就像第一張照片我和二毛合成cheese的效果。
You can look at the GIF of the entire Cheese steps:
大家可以看一下整個Cheese完成步驟的GIF動畫:
After the analysis of steps and the small tips, do you think it is not so difficult to draw with Photoshop?
If you want to draw well, the most important thing is to practice frequently. Following the steps I show you if you are interested.
經過步驟的分析和一些小技巧的提醒,大家是否覺得用Photoshop畫圖沒有那麼困難呢?
畫圖想要畫得好,最重要還是勤加練習,有興趣不妨動手試一試喔!
Thanks for reading.
If you would like to learn more about me, please read my self-intro.

Welcome to leave comment, upvote, resteem, and follow me. See you next time~
歡迎留言跟我聊天,我們下次見! 
如果你想要更了解我,請看我的自我介紹


© Copyright 所有照片與文字皆为原創 All photos taken by author. All rights reserved.
Author @catwomanteresa, Posted By @someone

Very interesting post - thank you
I am glad you like it. Thank you.
Next drawing
You got the idea!

Amazingly beautiful.
I like it very much.
You are a true adventurer.
I really admire you.
Even though you are a woman like me, but it will not hinder your adventurous spirit.
I am as a woman very proud of you.
I will always wait for your next posting.
Thank you for posting you who have entertained me.
I'm like your post...
I am so flattered! Thank you so much! I hope you enjoy at Steemit, too.

A great imagination.
I am very comforted.
I have not seen anything like this before ..
When I see your post makes me laugh and amused.
I'm glad to see it.
You have an incredible imagination.
If I can advise you, do not waste your talent.
Maybe with that talent you will become a successful person.
I really like people who have special talents.
Thank you for entertaining me with your post.
A great imagination.
When I see your post makes me laugh and amused.
I'm glad to see it.
You have an incredible imagination.
If I can advise you, do not waste your talent.
Maybe with that talent you will become a successful person.
I really like people who have special talents.
Thank you for entertaining me with your post.
Great photoshop works!!
Thank you
Finished work looks really authentic. Nice step by step tutorial.
Thanks. I hope it really helps.
Cool tutorial, @catwomanteresa!
I am going to try this using Inkscape since I don't have Photoshop. I love how you incorporated your sense of humor, too. Informative and cute post! Upvoted & followed :)
(Thank you @ace108 for posting your cjk top pending post payout which led me here!)
Thank you very much.
Great work i will be like you when i grow up
Thank you
someone的優質文章也越來越多元化了~
是啊!感謝 @someone