Original artwork- watercolor + drawing. Step-by-step tutorial with a GIF
Hello My Dear Friends!
Recently, during those warm days of winter (here in Warsaw, at least), I was having an impression of an imminent spring. The warm, energizing wind and a blooming hyacinth on my desk made me daydream about the aura of spring. I put some of this lively energy into the artwork below.
As you can see, this postcard from Shiny Forest is colourful. I'm not sure if that's an Easter Bunny on the right, but he certainly has something to do with the spring vibes :) This art is also a kind of a breakthrough for me, as it's something relatively new on my blog. As I said in one of my recent posts, I got lots of inspiration from many befriended artists here on Steemit, and I really wanted to try out some new things myself. And that's why I I combined watercolor with stippling :)
I must say, it was quite a time-consuming process to finish this piece. The addition of colour required me to proceed with caution while stippling, as the whole drawing could easily end up being awful and tacky if I overdid it with some special effects. I was also doing such piece for the very first time, so I had to stop a lot and think about what would be a good strategy for my next steps. Hopefully you'll like the final effect of my struggle :)

Watercolor, pen and ink on paper, 30 x 40 cm
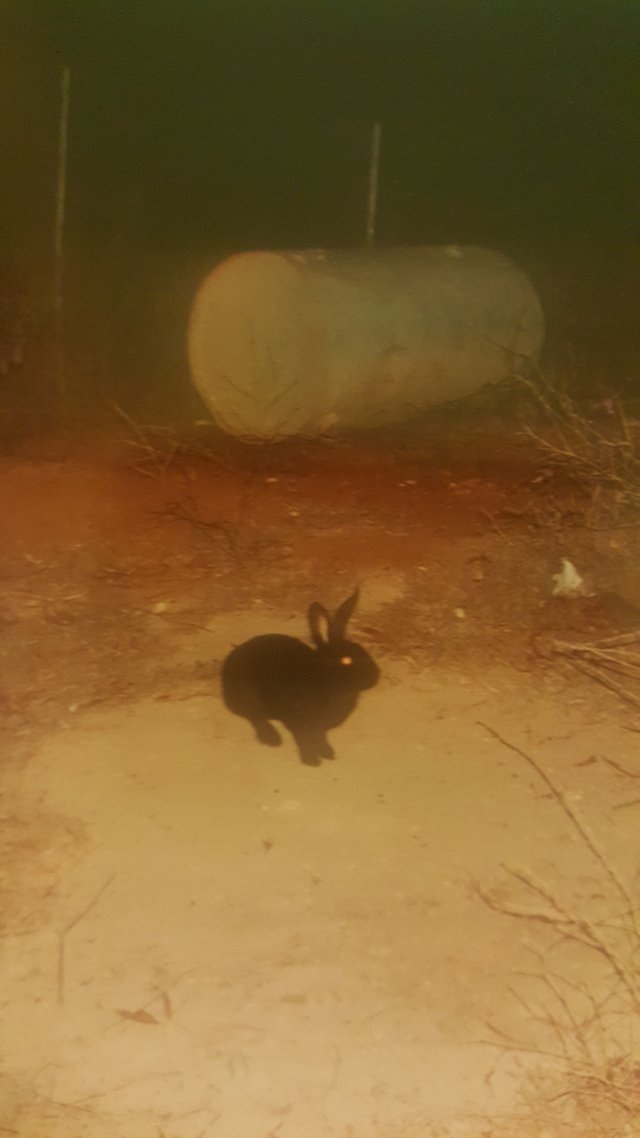
The rabbit was loosely based on some very old and intriguing photo I've found in Grandma's photo album:
Photo of a photo made with my Samsung Galaxy :)
This photo has a lot of magic and mystery in it, I love it! It reminds me a bit of my favourite illustrator, Sam Weber, and his dark, nocturnal pieces.
And now, without any further ado, here's the list of materials while working on this art and the step by step explanation of the progress. Enjoy, My Friends!
MATERIALS:
- Cold press, 300 g/m2 watercolor paper- unfortunately I cannot give you any more specific info about it, because I lost the block cover a long time ago;
- Sharp pencil;
- White Nights watercolours;
- Masking fluid;
- A 241 pure squirrel Restaurohouse brush - big and flat;
- A 24 Pure Squirrel Kolibri brush- medium size;
- Pen;
- 0.1 and 0.3 markers.
Materials used. Photo taken with my Samsung Galaxy and overshadowed by my body
Sidenote: on the left you can see a forest in a jar project of mine. They're quite a big fad now in Poland, and I needed to have one myself. They're essentially forest plants- moss, poison ivy, fern and others, placed in some elegant fashion in a jar big enough to contain them :)
PROGRESS STEP BY STEP:
First thing in my case is always a sketch, and a quite an accurate one, so that putting watercolour on it won't produce any doubts as to where to put which colour.
TIP 1: I use a sharp pencil and I try to sketch delicately, so that the lines won't be very visible after I put some watercolor on it. I've drawn with soft and dark pencils before, they didn't go well with watercolor, besides, I wanted to give this art some distinct pen outlines- another reason to keep it clean.
What I did afterwards, was basically:
- I put a masking liquid on both stars, on three little balls of light, and on rabbit's eye, to keep those places white and uncovered by watercolor. It's always a tricky, messy step for me;
- I wet the whole paper by spraying water on it (I use a little refillable spray bottle);
- And I put first layer of colour with a big flat brush. I make some big global strokes. The colours are mixed indigo and green on the background, and mixed sepia and neutral black on the trees.
After the paper dried, I was able to get rid of the masking liquid. That's also a tricky process, I had many cases of paper torn at this stage. We're not very much compatible, me and the masking liquid, I guess. After I managed to not destroy the whole piece by my fight with oh so rebellious mask, I could put another layer of paint on objects, like plants and rabbit. This time I didn't wet the paper and I used more pigment (emerald green, indigo, green, yellow green and neutral black), and in effect the colours are more vivid.
TIP 2: If you're impatient like I am, it's good to use a hair dryer to make paper dry faster.
And then, after all paint dried, I created black outlines with a pen. It's always my initial step in shading.
I started with scattered stippling, to be able to assess the general look of this combination and what to do next with it.
I went full for the sky first. I wanted to obtain an effect of whirling, by changing the direction of the dotted lines and spaces between them often. I also did some minor shading to the plants.
This art required a lot of work and time to get it's final form. I was deepening shading by adding more and more dots and lines and sort of building up the darkness. It was a very gradual process.
When my shading got bold enough, I could go onto the next stage and add the dark outlines in the background, to create some depth. I wanted my art to have a bit distorted perspective (I'm into it), and I wanted the plant in the background to support this impression.
I repeated this stage with the rest of the drawing. I added some dense stippling around the dark outlines, so that it would look more natural and... smooth :)
The last element that needed some polishing was Mr Rabbit, who had to be stippled with a series of very fine dots. And then I was finally finished :)
The GIF shows the progression of my artwork. There are more steps incorporated in this animation than I described above, because I like my GIFs to be very detailed :)
How do you like this new experimental trend of mine, guys? Do you like this combination of painting and drawing?
I have some more new ideas and projects to come, which makes me very happy.
Steemit is wonderful at giving me powerful boosts of motivation to try new things and learn skills, and I'm very grateful for that. Thank you guys for sharing your ideas and inspiring me to action!
It's very cool of you to stop by! I hope you enjoyed this post, please let me know what you think! And as always...


That photo is wonderfully creepy.
I've always loved stippling (done well), myself. It's nice seeing a look inside the process.
Thanks for the great tutorial! It turned out nicely.
Thanks @intspekt :)
So good! I love the textures in the shading.
Thank you @erb! I've seen your spherical book project, it really means a lot to receive support from a pro artist like yourself! Made me smile :) And yeah, I've been thoroughly exploring different textures obtained with stippling. Before there was an era of linocuts :) We' ll see what technique will be next.
Thanks again friend!
Love,
Klaudia
Very good information I will share information to my blog
Hi @saifulsabri, thank you for your kind support! All the best, Klaudia
Equally I beg your support as well @shinyforest
I see you're quite new to Steemit. It's best to post quality content @saifulsabri. Asking for upvotes etc. may get you in trouble.
I will post a part of my welcoming message for you with tips:
I wish I was told several things when I was new here, like you are now. My experience is, that:
Good luck!
Thanks for his good information tips
whoa, love that dreamy style of yours. Great work there. Surprising to see the change when textures were added.
Thank you @kimzwarch, yeah, I was curious myself how will the final effect look, it wasn't so easy to predict I must tell you. I'm very glad you liked it! All the best,
Klaudia
Most welcome.
Ehm....that was a crazy transformation? Love it!
Haha, right? I'm surprised myself ;) Thank you for your kind support, @cryptonik! :)
See you around Steemit!
All the best,
Klaudia
I love what you did with watercolors! I will need to try this technique myself :)
Thank you @marinaart :D
Excellent work. I love the stippling.
Thank you @christianyocte, I appreciate your kind words. I'm crazy about stippling, it's my stippling era now ;)
Love your style! This is very artistic and dreamy! I really like how you treat the sky and ground with the dots and lines <3 It gives a strange and surreal touch to the finished picture <3
upvotes
Hi @veryspider, the love is mutual! Soo glad that we've found each other on Steemit. Approval of such a talented pro like yourself is something that really makes me believe in myself. Thank you :) and yeah, I love how stippling can produce all these unexpected effects, I'm still exploring this technique.
See you around Steemit, my friend :)
All the best,
Klaudia
What a beautiful post! thx for shared :D
Hi @basileonardo! Welcome to Steemit. Thank you for your kind words.
I see you're an artist yourself.
You know, when I joined Steemit I didn't know much what to do and how to success.
I will post my welcoming message on your blog. It has tips for you :)
All the best,
Klaudia
I already saw it, thanks again :D
I love taking a walk through your magical forest 😁