Stairway to ...

Dies ist eine Geschichte, die man “stufenweise” erzählen könnte, aber ihr Anfang liegt schon so weit zurück, daß ich mich nur noch an wenige Einzelheiten des ersten Teils erinnern kann.
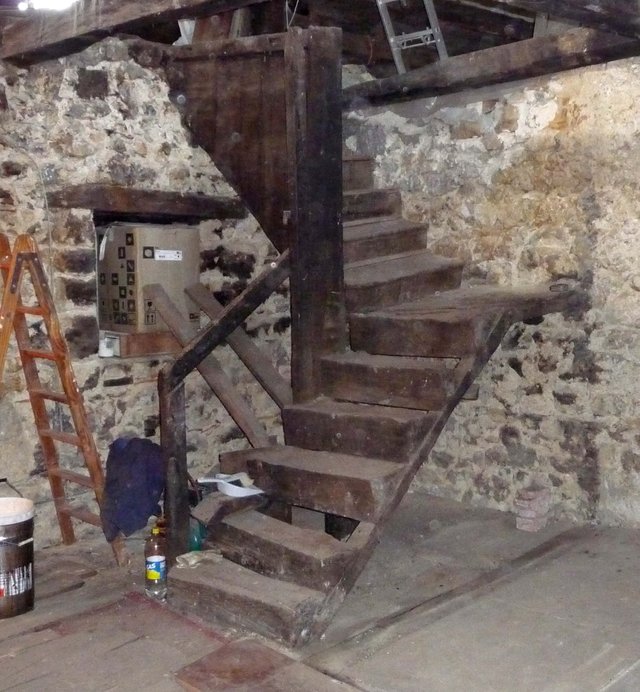
Die Treppe, um die es hier geht, steht nun kurz vor ihrer Vollendung und führt nicht, wie Led Zeppelin meinten, zum Himmel und ebensowenig, nach Andeutung von Sweet, zu den Sternen; nein, sie führt ganz normal in die oberen Stockwerke unseres Hauses. Was sie zu etwas Besonderem macht, ist die Tatsache, daß sie aus meiner Hand stammt und dadurch einen gewissen künstlerischen Touch bekommen hat.
Es sollte vorausgeschickt werden, daß das Holz für die Tritte des ersten Teils der Treppe von zwei Balken stammt, die Teil der Dachstruktur waren, als wir dieses Haus kauften. Das Dach wurde 2008 erneuert und so standen mir, neben zwei großen Haufen Brennholz, zwei ca. acht Meter lange, nicht wirklich gleichmäßige Eichenbalken zur Verfügung, die ich in etwas über einen Meter lange Stücke zerschnitt. Diese ließ ich von einem Schreiner zu jeweils zwei Bohlen verarbeiten, die nur auf zwei angrenzenden Seiten gehobelt waren - das erleichterte mir, die Bohlen paarweise zu schönen, großen Tritten zu verleimen und dennoch deren Unterseite in einer gepflegten Unregelmäßigkeit zu bewahren.
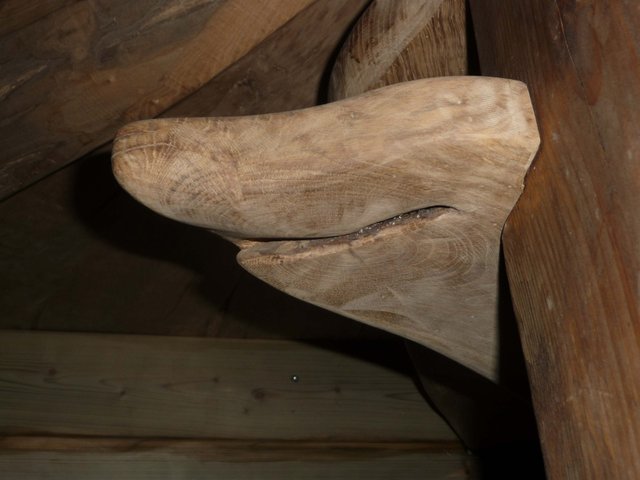
Auch an der Oberseite mancher Tritte sind noch “Überreste” von Verzapfungen an den ehemaligen Dachbalken zu finden:
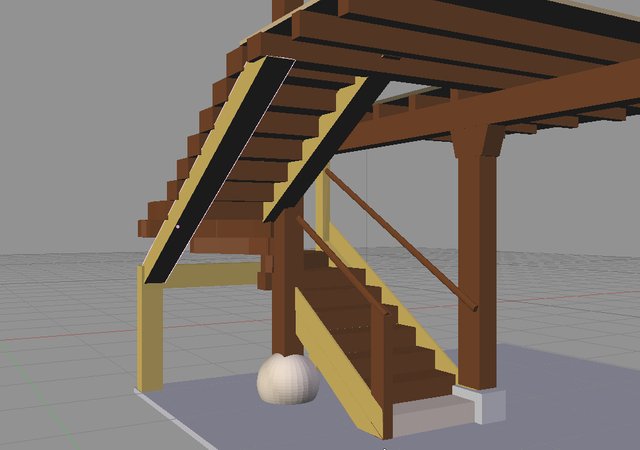
Bevor es an den Unterbau ging, machte ich mir mit dem Programm “Blender” einen Entwurf in 3D, wie die Treppe schematisch aussehen sollte.
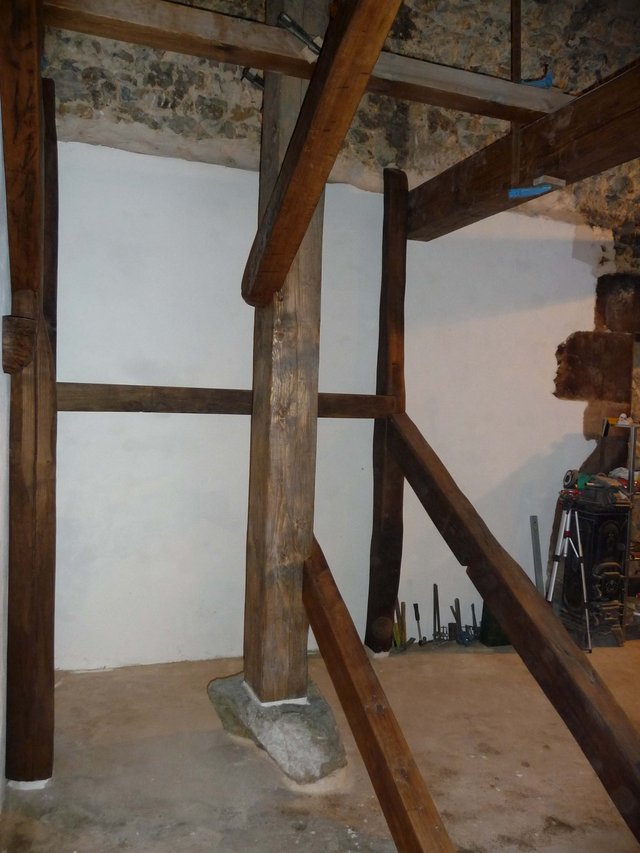
Dann ging es los. Den großen, senkrechten Balken am Wendepunkt befestigte ich mit Schraubzwingen und kleineren Balken an seiner Stelle, bis er von den ihn berührenden Stufen und Wangenbalken gehalten würde. Die ersten, vom Boden ausgehenden Balken waren bald soweit, dann der Unterbau für den Treppenabsatz bei der neunten Stufe, anschließend die Wangenbalken vom Absatz ausgehend bis zum Boden des ersten Stocks.
Die Stufen selber waren etwas langwieriger herzustellen, denn nicht nur ihre Unterseite, sondern auch die Wangenbalken waren so schön ungleichmäßig, daß man kaum ein Maß vernünftig nehmen konnte. Also war jede Stufe ein dauerndes Hinprobieren, (weiter) Anzeichnen und (weiter) wegschneiden oder -schleifen, bis irgendwann die Bohle gut an ihre Stelle passte und auch der Keil an jeder Seite genau die richtige Form und Größe hatte.
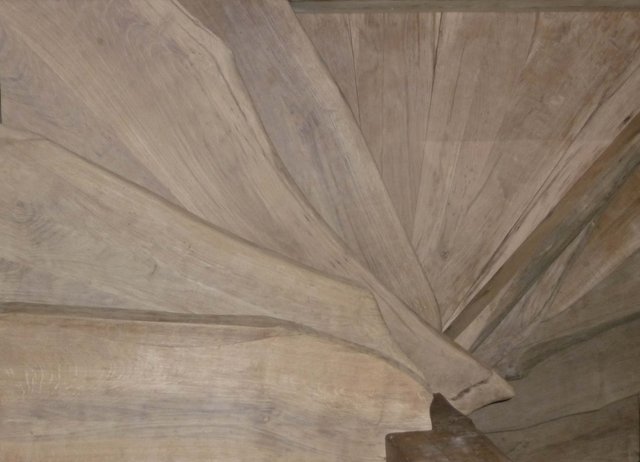
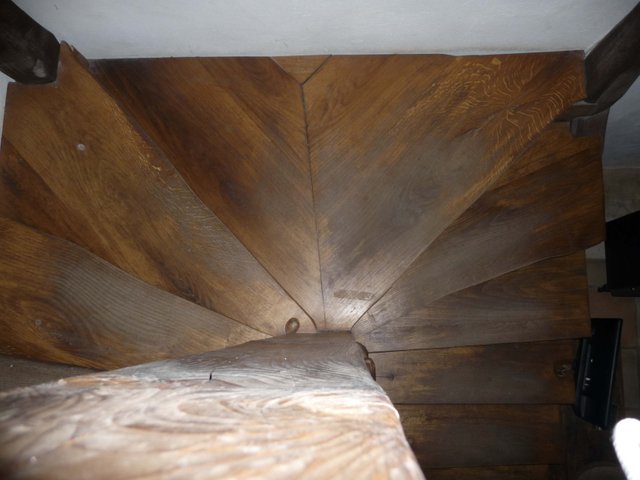
Der Treppenabsatz besteht aus zwei großen Dreiecken, die aus mehreren Bohlen zusammengesetzt sind und an der Wandseite ließ ich mittig ein kleines Dreieck frei, in das zum Schluß ein Stück mit meiner Signatur eingesetzt wurde. Ja, diese Teile waren leider für mich zu groß, um sie verleimen zu können und so sind da ziemlich große Fugen verblieben, aber es liegt alles gut und sicher auf.
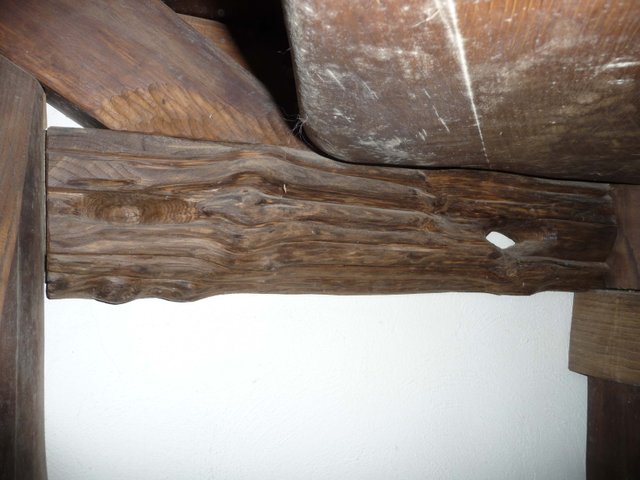
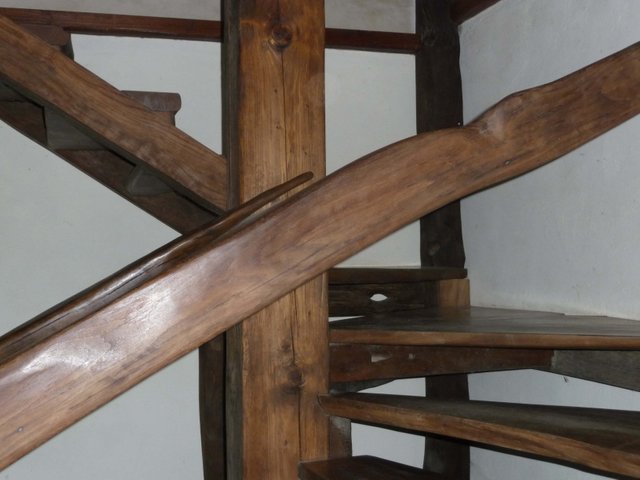
Der Handlauf besteht aus dem Holz eines kleineren Balkens, der einen der ehemaligen Deckenbalken des Erdgeschosses an einer Stelle stützte, wo irgendwann, vor langer Zeit, ein Spaßvogel auf einer Länge von ca. einem Meter gut die Hälfte dieses Balkens diagonal, zwischen zwei gegenüberliegenden Kanten, herausgeschnitten hatte - vermutlich, um eine Stufe der früheren Treppe vom ersten zum zweiten Stock zu ersetzen; diese bestanden aus massiven Holzelementen von dreieckigem Querschnitt.
Nachdem der erste Stock erreicht war, trat eine lange Pause ein. Verständlich - es gibt hier dauernd so viel zu tun, da müssen weniger dringende Angelegenheiten regelmäßig zurückstehen. In diesem Fall schlappe sieben Jahre, und selbst dann kam die Sache nicht so schnell wieder in Gang wie erwartet.
Das Holz für die Tritte der zweiten Treppenhälfte stammt von einer Eiche, die mir in unserem Wald schon Jahre zuvor als abgestorben aufgefallen war.
Die Aktion, den Baum zu fällen, zu zerstückeln, die Teile mit einem langen Seil am SUV aus dem Wald zu zerren und sie später ins Sägewerk zu bringen, gäbe Stoff für einen eigenen Post her, aber davon habe ich nicht einmal Fotos… jedenfalls kam ich auf diese Weise zu einem ansehnlichen Stoß Bohlen.

Für das zweite Treppensegment änderte ich meine Vorgehensweise: anstatt die Tritte mittels Keilen hauptsächlich auf die Wangenbalken aufzulegen, schnitt ich schon im Vorfeld Fugen in die Balken, in die die Tritte eingeschoben werden sollten. Die unteren beiden Wangenbalken und auch die erste Stufe waren bald gemacht, dann kam es wieder zu einer Pause von etwa einem Jahr. Dann weitere fünf Stufen und die nächste Pause von ein paar Monaten. Zwei Stufen, Pause: die Tritte waren etwas kürzer geraten als vorgesehen und die bereits vorhandenen Aussparungen in dem Trägerbalken der Südwestecke würden ungenutzt bleiben, wenn ich so weitermachte. Also ließ ich die neunte Stufe zu einem -nicht vorgesehen gewesenen- Treppenabsatz anwachsen, um überflüssigen Platz aufzubrauchen und die zehnte Stufe an ihrer “richtigen” Stelle unterbringen zu können.
Die folgenden Stufen erschienen ohne nennenswerte Pausen und sind inzwischen alle vorhanden, auch wenn zwei nachbearbeitet und alle noch feingeschliffen und gestrichen werden müssen.
Wann das Geländer des oberen Teils soweit ist, kann ich nicht sagen, aber vielleicht gibt es zur endgültigen Fertigstellung der Treppe nochmal einen Post ;-)

Esta es una historia que se podría contar “escalonadamente”, pero su principio se encuentra ya tan lejos en el pasado que solo me acuerdo de pocos detalles.
A la escalera de la que se trata le queda muy poco para estar terminada y no lleva, como decían Led Zeppelin, al cielo ni tampoco, según indicaban Sweet, a las estrellas; no, simplemente lleva a los pisos superiores de nuestra casa. Lo que hace de ella algo especial es el hecho de que la he creado con mis propias manos, y así es como adquiere cierto toque artístico.
Quisiera decir de entrada que la madera para las huellas de la primera parte de la escalera, procede de dos vigas que fueron parte de la estructura del tejado cuando compramos ésta casa. El tejado se renovó en 2008 y de éste modo disponía de (aparte de dos buenos montones de leña) dos vigas de roble de unos ocho metros de largo, que no eran realmente regulares y que corté en cachos de algo mas de un metro de largo. Le pedí a un carpintero cortar esos cachos en dos tablones cada uno y que los cepillara en dos caras limítrofes - esto me facilitaría encolarlos por parejas para que formaran unas hermosas y amplias huellas, conservando su irregularidad original en la cara inferior.
También quedan “restos” de encajes de las antiguas vigas de tejado, en la superficie de algunas huellas.
Antes de empezar con la estructura portante, elaboré un boceto en 3D con el programa “Blender”, del esquema de la escalera.
Luego empecé. Mantuve la viga grande vertical -en el centro de giro- con ayuda de prensillas y viguetas en su sitio, hasta que las huellas y vigas que lo tocaban lo irían a sujetar. Las primeras vigas, que arrancaban desde el suelo, pronto estaban hechas, luego la estructura portante para el descansillo en el noveno escalón, y a continuación las vigas laterales que llegaban desde el descansillo hasta el suelo del primer piso.
Las huellas ya eran un poco mas tediosas de elaborar, ya que no solo su cara inferior, sino también las vigas eran tan maravillosamente irregulares que apenas se podía coger una medida de forma razonable. De modo que cada escalón se “esculpió” en un “presentar, marcar y cortar o lijar un poco” casi sin fin, hasta que cada tablón encajara bien en su sitio y también la cuña en cada lado tuviera exactamente la forma y el tamaño justos.
El descansillo consiste en dos triangulos grandes, que están compuestos por varios tablones, y centrado en el lado de la pared, dejé libre un pequeño triángulo, donde al final iba a colocar una pieza con mi firma. Sí, estas piezas me resultaban grandes para poderlas encolar, así que quedaron juntas bastante grandes, pero todo está bien apoyado y seguro.
El pasamanos está hecho con la madera de una viga pequeña que sujetaba una de las anteriores vigas del techo en un punto donde algún gracioso, hace mucho tiempo, había sacado un cacho de aproximadamente un metro de largo, y de mas de la mitad del grosor de la viga, cortándola en diagonal, es decir entre dos cantos opuestos - posiblemente para reemplazar un escalón de la antigua escalera del primer al segundo piso; esos estaban formados por elementos macizos de madera de sección triangular.
Después de alcanzar el primer piso, se hizo una larga pausa. Entendible - aquí siempre hay tanto que hacer que los asuntos menos urgentes tienen que pasar a un segundo plano con regularidad. En este caso nada menos que siete años, y aún así, la cosa se volvió a poner en marcha con menos agilidad de la esperada.
La madera para las huellas del segundo tramo de la escalera procede de un roble, que había llamado mi atención en nuestro bosque ya años antes, por haberse secado. La movida de talar el árbol, trocearlo, sacar los trozos del bosque arrastrándolos con una soga muy larga enganchada al 4x4, y luego llevarlos al aserradero, daría material para un post aparte, pero no tengo ni fotos de ello … el caso es que así conseguí una hermosa pila de tablones.
Para el segundo tramo de la escalera cambié mi forma de proceder: en lugar de colocar las huellas con ayuda de cuñas principalmente encima de las vigas, corté ranuras en las vigas antes de colocarlas, en las que las huellas iban a introducirse deslizándolas. Las dos vigas de abajo y también el primer escalón pronto estaban hechos, luego se hizo otra pausa de mas o menos un año. Luego cinco escalones mas y la siguiente pausa de varios meses. Dos escalones, pausa: las huellas me habían salido mas cortas de lo previsto, y los huecos en la viga vertical de la esquina suroeste iban a quedar vacíos si seguía así. De modo que hice crecer el escalón número nueve hasta que se transformó en descansillo -que no había estado planeado- para gastar espacio sobrante y poder colocar el escalón número diez en su sitio “correcto”.
Los siguientes escalones aparecieron sin retrasos dignos de mencionar y entretanto ya están todos, aunque dos necesitan un repaso y a todos les falta el lijado fino y el barnizado.
Para cuando vaya a estar lista la barandilla, no lo sabría decir, pero quizá prepare otro post cuando la escalera esté finalizada del todo ;-)


This is a story that could be told “step by step”, but its beginning lies already so far in the past, that I only remember a few details of the beginning.
The stairway to be described here is soon to be completed and, unlike Led Zeppelin once said, it does not lead to heaven - nor to the stars, as Sweet indicated; it simply leads to the upper floors of our house. What makes it special is the fact that it was all made by me, and thus I believe it has a certain artistic touch.
Let me start by mentioning that the wood used for the steps of the first part of the staircase came from two beams that were part of the original roof structure of the house. When the roof was refurbished in 2008, it provided us with not only two big piles of firewood, but with two rather irregular beams of about eight meters in length. These I proceeded to cut into pieces of a little more than one meter in length. Subsequently, I had a carpenter transform these pieces into two thick planks each, that were planed only on two sides. This made it easier for me to glue the planks into pairs, which resulted in beautiful wide steps, while at their bottom face remained nicely uneven. Also, on the upper side, some steps maintain the joints of the former roof beams.
Before beginning with the supporting structure, I made a 3D-sketch with a program called “Blender”, which provided a schematic of what the staircase was going to look.
As I began, the large vertical beam in the turning point was maintained with screw clamps and small beams in its place, until it would be fixed by the steps and beams that touched it. Soon the first beams, reaching upward from the ground, were ready, then the structure under the half-landing at the level of the ninth step, continuing with the stringer beams from the half-landing up to the floor level of the first floor.
The steps themselves took a little longer to be made, because not only their bottom face, but also the the stringer beams are so marvellously uneven that hardly any measure could reasonably be taken. Therefore, each step was made through a never-ending series of having a go, marking (again) and cutting or sanding away a bit (again), until the moment arrived that the plank fitted into its place and also the wedges on either side had the correct size and shape.
The half-landing is made up of two big triangles that are composed of several planks, and on the wall side I left a small triangle free, where a piece of wood with my signature was placed at the end. I have to admit that these parts were too big for me to glue together, leaving some rather wide joints. However, it is all secure and well structurally supported.
For the banisters I used the wood of a smaller beam, which had been supporting a former ceiling beam of the ground floor. Near one end, some joker had cut out a bit more than half of the ceiling beam's cross-section on a little more than one meter of length. He probably needed to replace a step of the ancient stairs from the first to the second floor; these steps consisted of massive wooden elements of triangular cross-section.
After arriving at the first floor, a long pause began. It’s understandable - here, there is always so much to do that less urgent issues have to step back continuously. In this case seven years right away, and even after that the thing did not get running again as smoothly as expected.
The wood for the steps of the second half of the stairs come from an oak tree that I had eyed years ago in our forest, short before it died and dried out. Felling the tree, cutting it and transporting it out of the forest with a long rope tied to a truck for transfer to a sawmill, provided enough material for an extra post. I wish I had taken photos of what I just related … Anyhow, the result was to have a really nice pile of thick oak planks.
For the second segment of the stairs I changed my way of proceeding: instead of mainly laying the steps upon the stringer beams with the help of wedges, I pre-cut grooves into the beams, where the steps should be slided later. The lower two stringer beams and the first step did not take too long, then came another pause of about a year. Then five more steps and another pause of several months. Two steps, pause: the steps had turned out shorter than planned and the spaces prepared in the supporting beam at the southwest corner would stay unused if I continued like this. So I let the ninth step grow until it became a half-landing that wasn’t planned, in order to eat up space so that I could put the tenth step at its “correct” place.
The following steps finally appeared without any pauses worth mentioning and now they are all there. Although two need some adjusting and they all need to be fine-sanded and painted.
When will the banisters of the upper part be done, I cannot tell, but maybe the definitive finishing of the stairs is celebrated with another post ;-)
Congratulations @rudomis! You have completed the following achievement on the Steem blockchain and have been rewarded with new badge(s) :
You can view your badges on your Steem Board and compare to others on the Steem Ranking
If you no longer want to receive notifications, reply to this comment with the word
STOPTo support your work, I also upvoted your post!
Do not miss the last post from @steemitboard:
Vote for @Steemitboard as a witness to get one more award and increased upvotes!
HaHa! Gut Ding will Weile haben. Gute Geschichte.
Ich ziehe meinen Hut vor allen handwerklichen Fähigkeiten. Eine Treppe zu bauen, ist eine ambitionierte Sache, vor allem aus so stabilem Material. Der Handlauf sieht wunderschön und geschmeidig aus, es ist sicher auch ein handschmeichelndes Gefühl, da entlang zu streichen.
Holz ist ein tolles Material, vor allem riecht es so gut. Wie praktisch, dass du eine Eiche in der Nähe hattest, die dir so viele wertvolle Bohlen beschert hat.
Grüße!
Vielen Dank für das Lob! In der Tat ist der Handlauf ein Stück, das man einfach anfassen MUSS. Die Stufen sind dafür etwas weit unten, aber sie ziehen die Hände auch an ;-)
Ihr müsst irgendwann mal hierher kommen und das alles "live" sehen.
Viele Grüße!
Congratulations @rudomis! You received a personal award!
You can view your badges on your Steem Board and compare to others on the Steem Ranking
Vote for @Steemitboard as a witness to get one more award and increased upvotes!
Congratulations @rudomis! You received a personal award!
You can view your badges on your Steem Board and compare to others on the Steem Ranking
Do not miss the last post from @steemitboard:
Vote for @Steemitboard as a witness to get one more award and increased upvotes!
@rudomis, thank you for supporting @steemitboard as a witness.
Click on the badge to view your Board of Honor.
Once again, thanks for your support!
Do not miss the last post from @steemitboard: