How to paint the ruin miniature base #2
In the last post I showed you how to sculpt the ruin miniature base and now is time to paint it and add some more materials to it. If you missed on how to get to this stage, here you can check out how to build this miniature from scratch.
We finished the post at the stage where we had the base spray painted fully in black and then gave it a second coat of white spray paint to give a natural light. I like using both sprays on most of my miniatures not only to give me an easy guideline for shadows and highlights but because a lot of the paints have a totally different finish after drying on top of a white coat and a black one. So depending on what I want to achieve I use white, black or both.

The materials you will need

I use mostly Games Workshop and Vallejo paints but have some other brands that occasionally take part in my paint jobs. Brushes I use are from the Winsor and Newton Series 7 and range from number 2 to number 0. For this paint job you don't need a fancy brush though. For the basing I used an old bigger one that holds more paint so I can easily apply the base colours fast. A cheap synthetic brush will do. A little piece of sponge and something to hold it with like a small hobby pliers or you can use a pinset instead.
Here's a list of the paints I used:
- Mournfang Brown - GW
- Deathclaw Brown - GW (think this is the old name for Scrag Brown)
- Castellan Green - GW
- Seraphim Sepia - GW shade
- Abbadon Black - GW
- Stormvermin Fur - GW
- Zandri Dust - GW
- Ulthuan Grey - GW
- Ivory White - Vallejo
- Dark Sea Blue - Vallejo
First coats onto the miniature

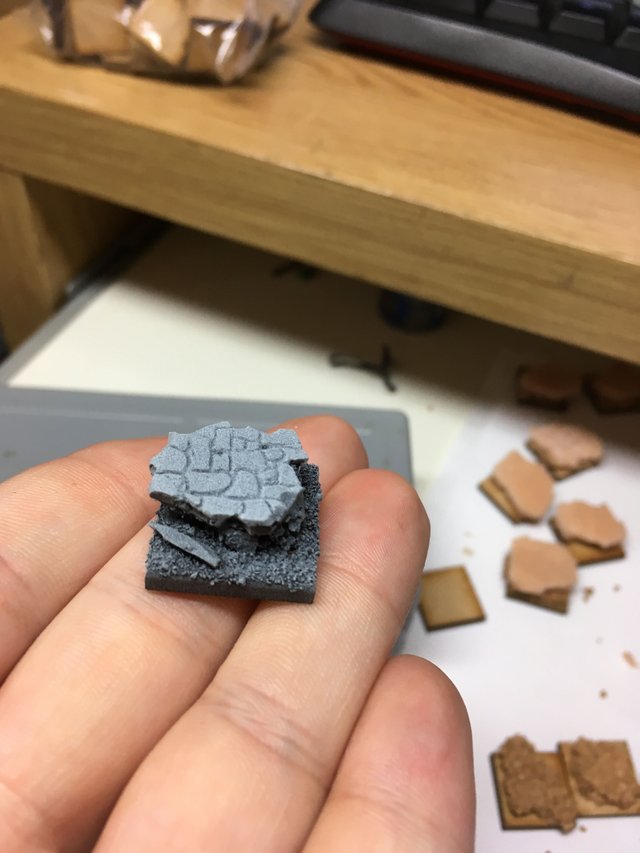
Firstly I made a mix of Zandri dust with little Stormvirmin Fur to achieve the base colour for the stone tiles. I apply it thinly, usually go over the tiles twice or three times until the paint is evenly spread. Next thing I did was to apply the Mournfang Brown onto the rest of the miniature - the gravel and dirt. Finally I painted the sides of the base in black to cover the white from the spray. This is the easier part of the painting process and prepares the miniature for the more detailed work.
Applying shadows and highlights
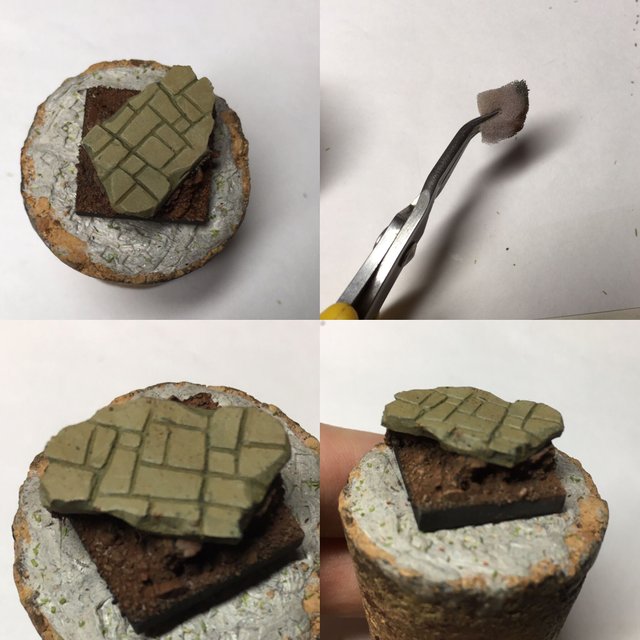
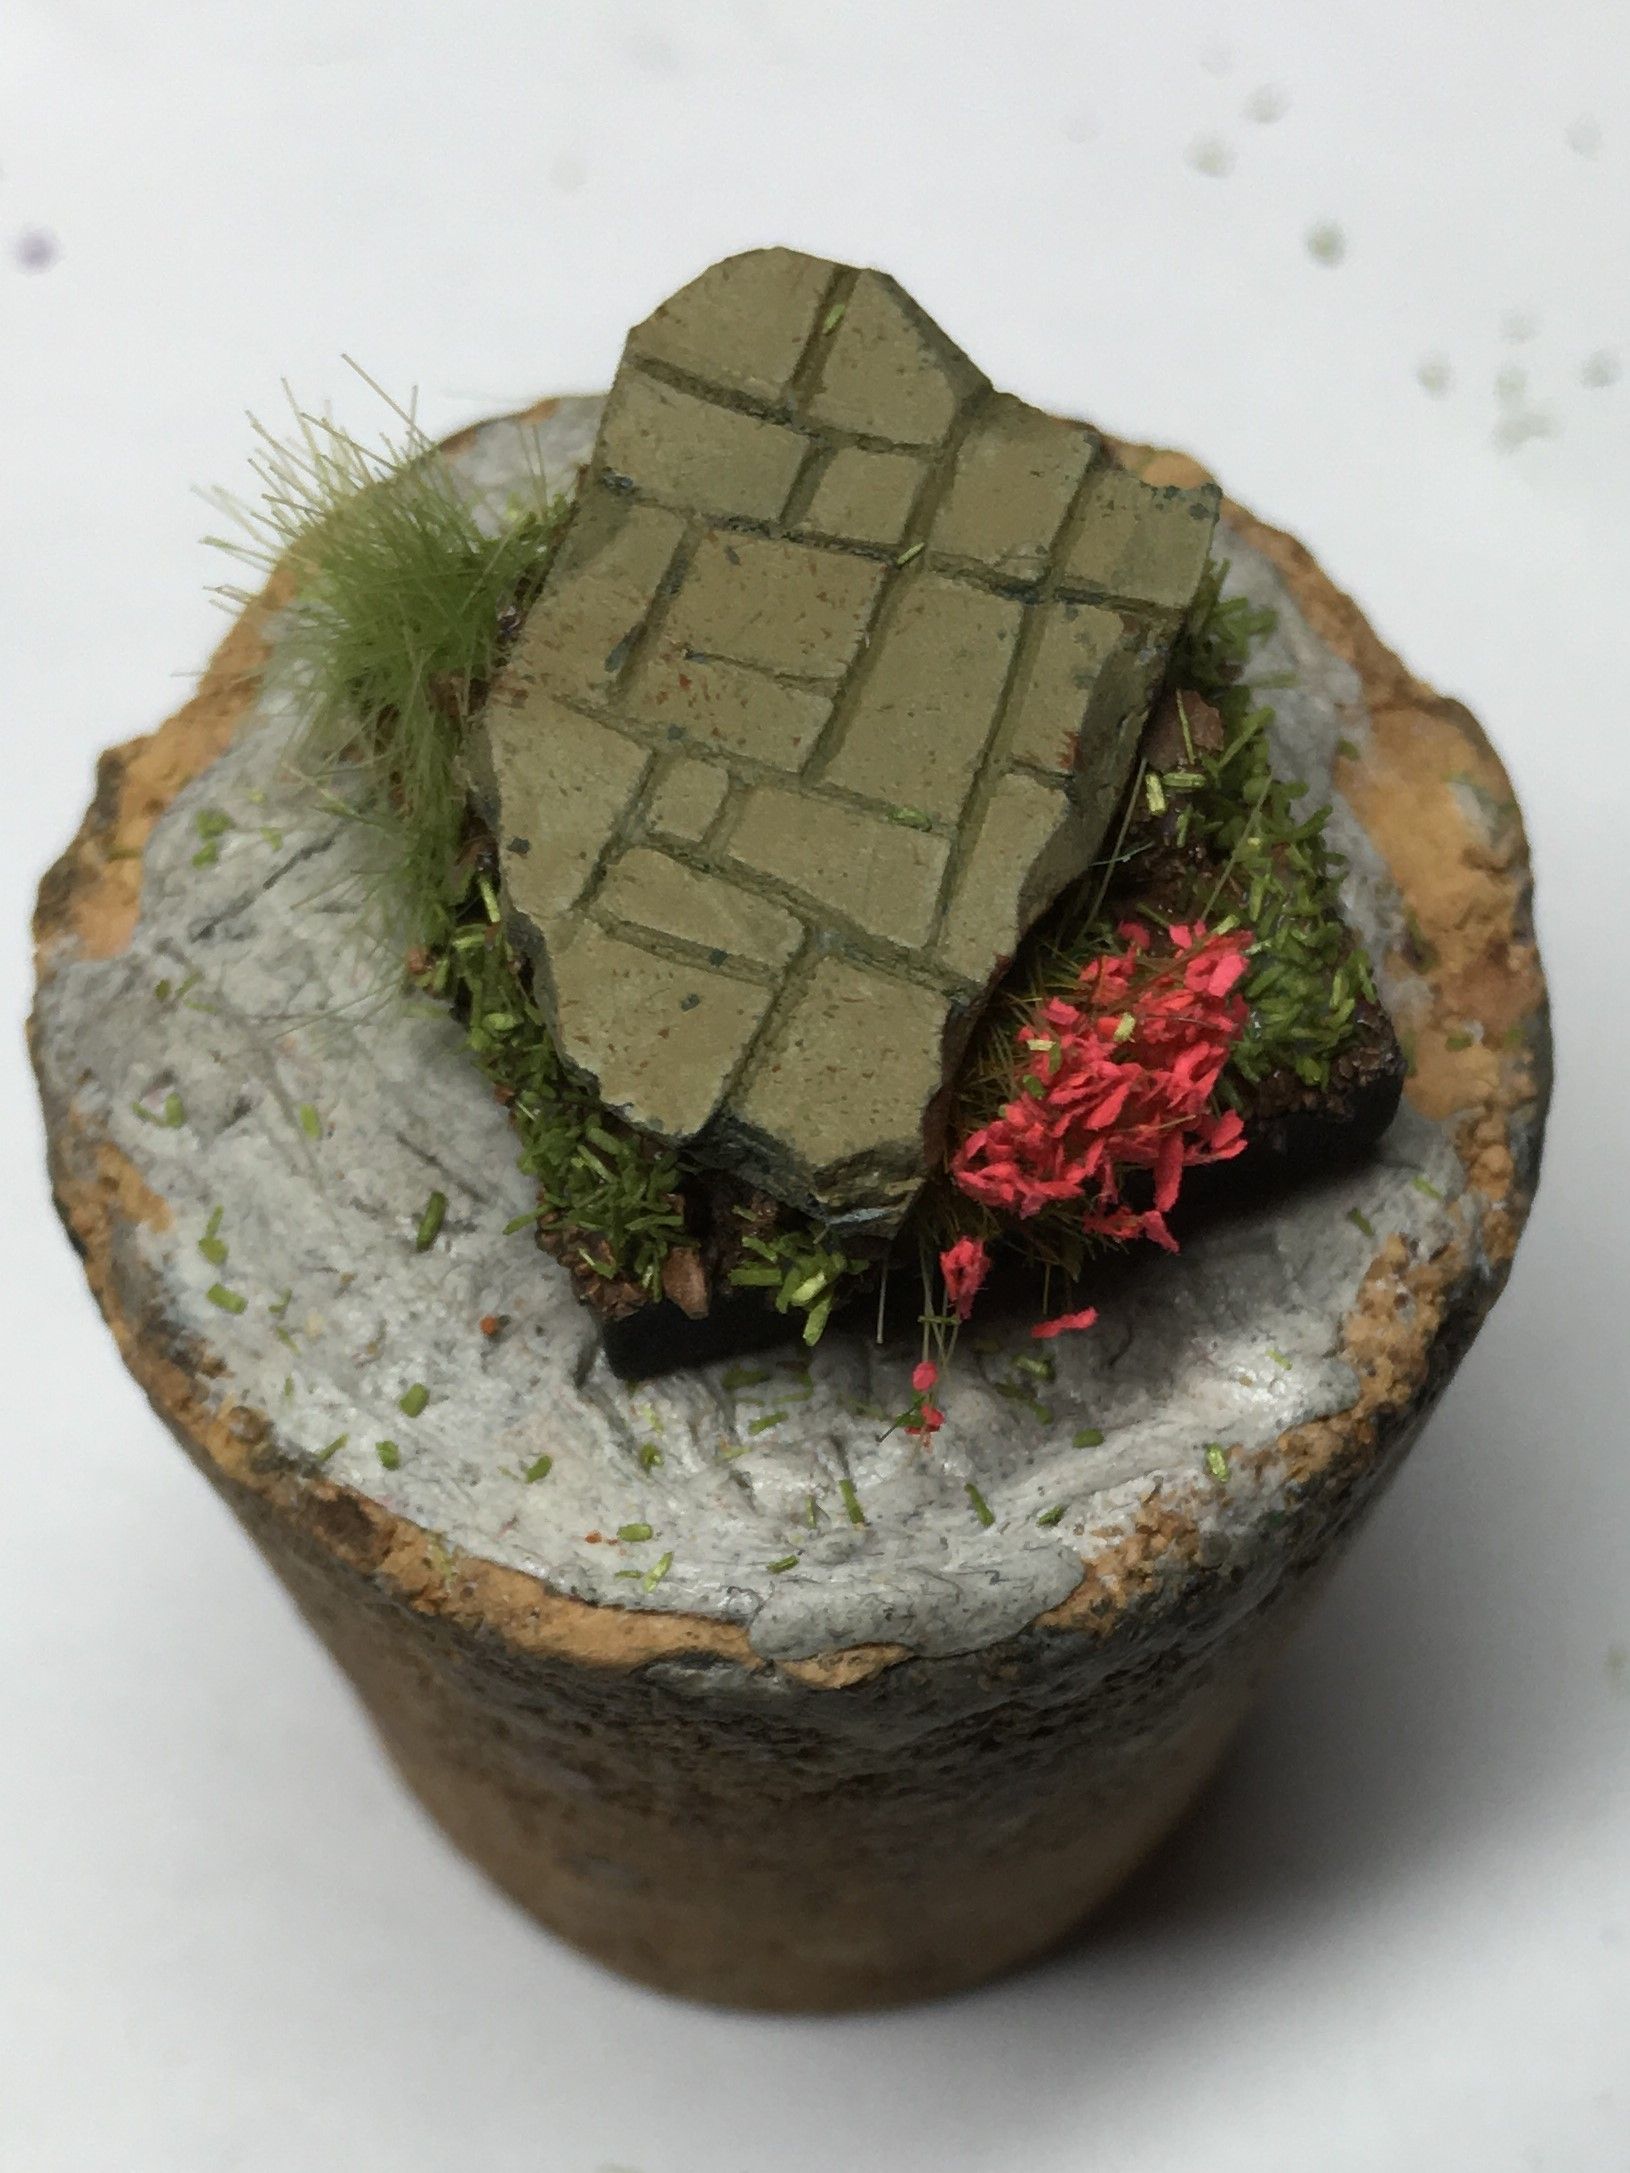
I rarely use washes and specially ink washes but for bases I make an exception. For the gravel and dirt I almost always use a wash and in this case I applied some Seraphim Sepia all over the parts we initially covered with Mournfang Brown. When this dries it will darken the whole area it is applied to and will pool naturally in the recesses giving more depth in the shadows. I also paint the recesses of the tiles with a mix of Mournfang Brown and Castellan Green with the green being dominant over the 2 colours (The paint is applied very thin). I mixed some Dark Sea Blue to the base colour for the stones and applied very thin coats around the shadows on the sides of the tiles. I then outline the tiles, mixing pure white to the base colour and giving some highlights to the edges of each tile. Finally I use the little sponge to apply some dirty effects on top of the stones. I mixed the brown the green and some Dark Sea Blue and apply it on the sponge. I dry most of the paint off the sponge on a tissue before applying it onto the stones. When you do that you get these little dots as an effect that are random and uneven so it gives it more natural look. After the Ink wash dries I dry brush some lighter brown tones on top of the dirt and gravel and then give it another dry brush coat with some very light grey.(Dry brushing is a technique that requires you to dry most of the paint off your brush before applying it to the miniature and it gives a dusty look around the edges. Use an old, preferably flat brush for this.)
Finishing the base adding synthetic grass and flowers
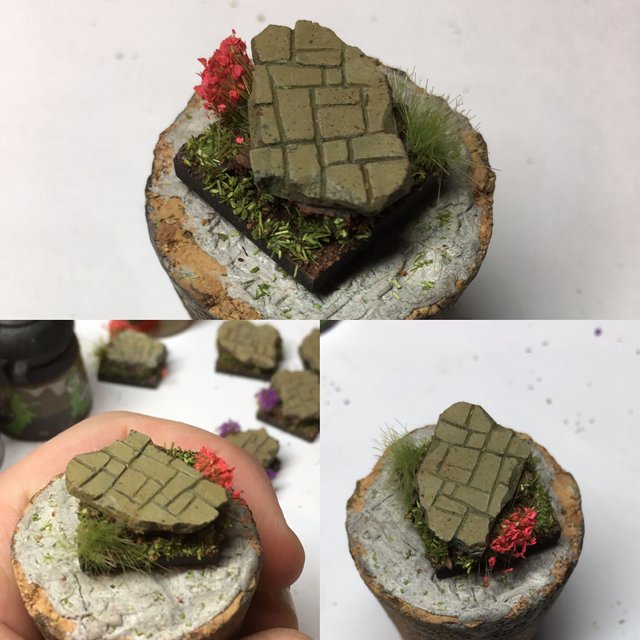
This is a fairly easy step. All you need is some PVE glue and an old brush that has seen better days to spread it around random parts of the base. Have a general idea where you want to put the bigger tufts. Then apply the PVE glue around the dirt and gravel parts of the base and spread it with an old brush. I used Army painters Jungle Tuft, Army Painters Grass Green (synthetic grass) and Green Stuff World's Red flowers. Glue the bigger ones first and then sprinkle the synthetic grass all over the rest of the miniature. Wait for it to dry and blow the excessive material away. There you go you have your first Ruin Miniature base done! Now I have around 50 more to finish.. :)


I hope you liked the little tutorial I made. I think the next few ones will be with basic painting techniques and preparations so it is easier for me to refer people to them at the beginning of a post instead of explaining everything every single time. Yet again if you enjoyed the read don't forget to follow for more, upvote for some support and comment if you have any questions or thoughts on the tutorial. Have a great week and see you around!
This post recieved a vote from @minnowpond. For more information click https://steemit.com/steemit/@minnowpond/boost-your-rewards-with-minnowpond
This post recieved a vote from @minnowpond. For more information click https://steemit.com/steemit/@minnowpond/boost-your-rewards-with-minnowpond
@george-topalov got you a $1.66 @minnowbooster upgoat, nice! (Image: pixabay.com)
Want a boost? Click here to read more!
That's some of my Necromunda scenery :)

looks pretty good! :]
This post has received a 1.06 % upvote from @booster thanks to: @george-topalov.
Everything is in ruins!!
Congratulations @george-topalov! You have completed some achievement on Steemit and have been rewarded with new badge(s) :
Click on any badge to view your own Board of Honor on SteemitBoard.
For more information about SteemitBoard, click here
If you no longer want to receive notifications, reply to this comment with the word
STOP