TUTORIAL: Undervolting: Simple Tweaking of your laptop to enhance performance and endurance

This is just a short and simple post to explain the concept of Undervolting, which is an enormously useful tool for extending the battery life of your laptop. In a counter-intuitive way, by getting your CPU (Central Processing Unit) to run on lower power and more efficiently, you might actually getting better performance from your laptop as a side effect of getting longer battery endurance and quieter running due to lower temperatures.

Overclocking
Many people (or am I projecting my own assumed knowledge onto others) would be familiar with the concept of overclocking. Definitely gamers (of the PC gamer variety, otherwise known as the good kind of gamer!) would be familiar with this concept. This is where you run your CPU (Central Processing Unit) and GPU (Graphical Processing Unit) faster and hotter than the stock values that are set by Intel, Nvidia or AMD.
I’m not going to go into this aspect of tweaking your CPU/GPU in this post as it is definitely a thing that DON’T want to be doing in a laptop. Basically, the concept of overclocking your hardware involves feeding it more power, which allows it to run at faster speeds. However, this has the side effect of producing much more waste heat which needs to be siphoned off. This technique of overclocking is really an art as much as a science, and there are tweakers all around the work who work at trying to get the maximum performance out of their hardware, competing for the prestige of having the best and fastest examples of any particular CPU/GPU model.
Now, in a desktop, you will have more than enough space to fit customised cooling solutions to wick off the waste heat. However, in a laptop, you are heavily constrained by the smaller chassis which does not allow for any sort of modification. Often, the chassis is engineered with highly restrictive thermal constraints in mind and so it is not a great idea to push these limits at the risk of damaging your machine.
Just as an aside, it is not really a great idea to do any sort of crypto mining on a laptop for the same reasons. Mining crypto is heavily CPU and GPU intensive, and laptops are NOT designed to be running at full tilt for long periods of time.
Constraints to performance

For a computer, there are going to be two main limiting factors to the performance of your CPU/GPU that need to be balanced against each other for maximum performance and efficiency. These factors are:
- Power Constraints
- Thermal Constraints
Power Constraints
The constraint on power boils down to how much power your power supply (that sounds clunky, a bit along the lines of “wood chuck could cut wood…!”) can output at a stable and reliable voltage.
For a desktop computer, power is never really a problem. You can always attach a more powerful, stable and efficient power supply. Thus, the limiting factor on this shifts to the actual physical limits on the specific chip that you are trying to optimise.
In a laptop, the battery can only output a finite amount of power, so power is definitely constrained. You can drain the battery faster for higher performance, but that isn’t a really great solution, as the gains would be much less beneficial than the loss of the longer endurance for the battery. Even if you are connected to power from the wall, most laptop AC/DC adaptor bricks are not rated for very high power outputs and so you risk doing some serious damage there.
Thermal Constraints
Again, in a decent desktop case, unless you are doing some serious extreme overclocking you aren’t going to run into many thermal constraint issues. Nothing that a decent amount of fans, efficient cable management and in more extreme cases, a liquid coolant solution can’t fix.
Now, in a laptop chassis, thermal constraints are a much larger issue. The limited space for fans and coolant solutions, in addition to the general close physical proximity of all the components means that controlling your temperatures is going to be a much bigger problem here.
Undervolting for your CPU
For this post, I’m going to talk about undervolting for your CPU, and leave the GPU part for a different day. For most people (unless you are pushing your GPU hard), this is where you are going to get the biggest bang for your buck, in terms of increased battery life and the possibility for better performance. It is possible to “underclock” your GPU to run at higher speeds at lower voltages (technically, I would call this an overclock!), but it is a little bit more involved. In addition, I will be talking only about Intel CPUs, as I only have a single AMD laptop in my possession that I can’t remember the process for.
As components in the laptop heat up, some throttling of the speeds of the components is going to start happening. So, in a way that might sound a bit counter-intuitive, you are likely to get more performance out of your laptop by feeding it less power (thus putting out less waste heat and thus avoiding the thermal throttling of your CPU).
Power delivery to your CPU is determined by two factors (P=IV), the current (I) and the Voltage (V). The Voltage is the easiest to deal with and change, and so that is the input factor that we are going to play around with.
Underclocking is also a relatively safe thing to play around with. Feeding your CPU less power is at worst going to cause it to just stop and reboot, after which the settings should revert back to the default voltages as set by the manufacturer. In contrast, overclocking is potentially quite disastrous to your hardware, as feeding too much power into the system can cause it to melt or catch fire.
Tools

You are going to need some tools (software) for this little tweak. You have a choice of two software utilities for changing your settings, Intel XTU (Extreme Tuning Utility) and Throttlestop.
Although Intel XTU has a higher performance overhead and some bugs which can cause it to revert to default settings, I prefer it and this post will be based on the steps required for Intel XTU. There is no particular reason for sticking to XTU, other than it is what I’m familiar with!
In addition to this, you will need a couple of stress testing tools like Prime95, although, one advantage of XTU is that there are stress testers built into the software already.
Lastly, it is nice to have a monitoring tool like HWINFO to help get a feel for temperature readings.
Method
Exploration

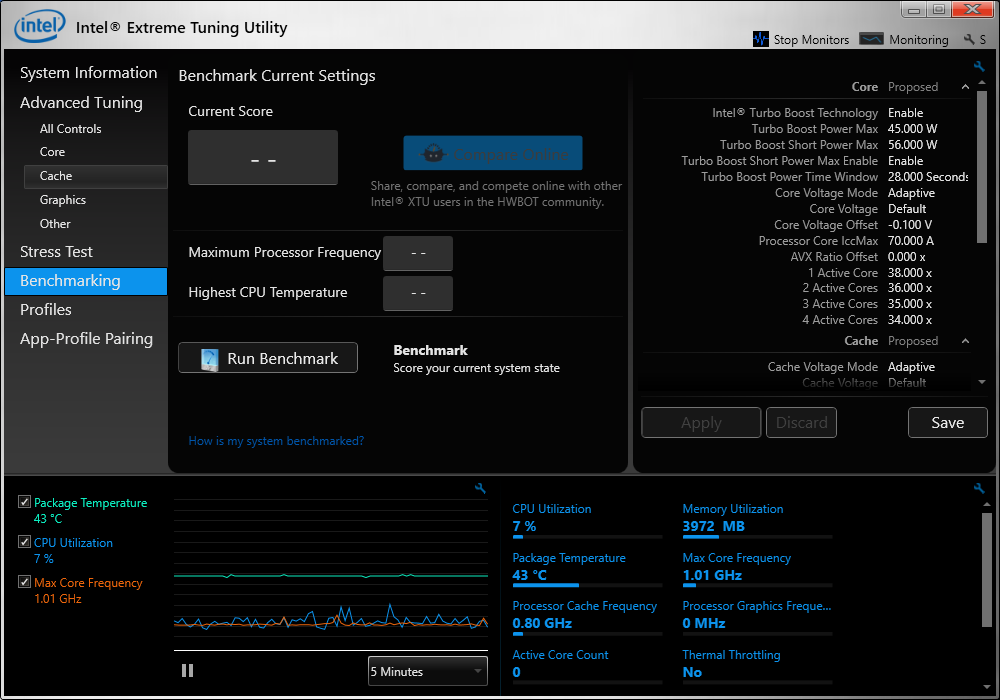
The first things that you will need to do are pretty mundane, unpack and install the Intel XTU exe. Fire up Intel XTU, you will be asked by Windows UAC if it is okay for Intel XTU to make changes to your system. Obviously, this is the intended consequence of using this program, so make sure you say “Yes”!

This is the screen that will greet you when the program loads. It is perhaps pretty intimidating for the novice user, but it is only a listing of the various capabilities and qualities of your particular Intel CPU/iGPU and motherboard combination. It is pretty interesting reading if you are curious about all the different abilities of all the different SKU types, but not really necessary for the scope of this tutorial! However, it might be useful to take note of your particular “Brand String”, as this can give you a bit of a shortcut to tweaking your CPU later.
On the left hand menu, you can drop down to the good stuff. Clicking on the “Advanced Controls” tab brings you to all the little things that you can tweak with this program (after you agree to the warning!). DON’T touch anything (but it is okay if you did….), just have a little look around if you are interested! Instead go straight to the Profiles.

At the moment, you should have only a “default” profile. If you accidentally bumped some settings in the previous now is the time to select the default profile, then tap “show values” and then “Apply”. That will bring you back to the original settings if you had accidentally bumped and applied settings in the previous page. Another thing I like to do here is to safe another profile of the default settings, which I cunningly name “zero” Feel free to do this, or not, or at least to choose a more inventive name for the extra default settings of the CPU.
If you are a numbers nerd, or want to see some quantitative results for your efforts, feel free to run a benchmark test at the default values. I usually run HWINFO at the same time so that I have also some temperature diagnostics. I do it each time for a new machine, but I don’t really remember the results after I have found some optimal tuning values.
Tweaking
Now comes the fun part, the actual tweaking of the CPU! Keep in mind that you will want to do this I a pretty methodical and steady manner, but it isn’t something that requires you to be sitting in front of your laptop all the time. But it does mean that your laptop will be not usable for cat video watching duties (or Steeming) whilst you are tweaking and stress testing.
The values that we are going to be adjusting (downwards) are the Voltage Offset (Core, Cache, Graphics and Graphics media) values. This is currently set to a value where it is guaranteed that the silicon is getting at least enough power to complete any task required. Needless to say, this is often a bit more power than the lower floor of what is needed (which will differ from SKU to SKU and is also dependent on the individual chip). So, what we are going to do is to slowly drop the offsets (one at a time) until we hit the floor and the computer shuts down and resets to the default settings.
Now is a good time to look up what others have discovered before you. Most SKU’s (“Brand String”) will have a roughly similar lower floor (which means you can save some time by skipping to about 75% of that value) with the rest of the floor being dependant on the silicon lottery (your individual chip performance).

The method for tweaking is pretty simple and repetitive. Go to the Core settings and make sure that you are moving the “VOLTAGE OFFSET” and NOT the VOLTAGE setting. From the default (or the internet provided one) setting, drop the OFFSET by -10 mV (two steps) and click on the yellow “APPLY”. This will set all the dynamic voltages supplied to your CPU core down by 10 milliVolts.
Now go to the Stress test tab, and select all of the stress tests (you don’t need to have all of them, only the one that is appropriate to the setting that you have changed, but it doesn’t hurt) with a time of about 30 or 60 minutes. When you are first starting the tweaking, you can just do a short 10 minutes, but as you approach the limit (for my machine it was around -120 mV) you want to be more sure, so have a longer stress time. You can also use more specialised testers like Prime95, but for a casual user, this tester is more than adequate.
If your computer didn’t shut down or reboot, then that means that the offset voltage was still supplying adequate power for the CPU Core. Rinse and repeat, drop the offset and stress test, going by small increments each time. At some point, your computer will reboot or shut down, meaning you’ve found your lower limit. After restarting your computer and starting up Intel XPU again, put the setting to be about 80-90% of the failing setting, to give yourself a bit of headroom (floor-room).
So, with this simple procedure, you’ve successfully undervolted your CPU Core, which means it is consuming less power for the same work! Now, you need to do the same for the other 3 offset settings (Cache, Graphics and Graphics media), remembering to go slowly, tweaking only one setting at a time and then stress testing for stability.
Also, don’t forget to save a new profile with your new undervolted settings, so that it is easy to get to in the event that Intel XTU resets itself (which it does…).

Usage
The most annoying thing about Intel XTU is that it doesn’t fire up automatically when you boot up your computer. So, it is something that you do have to launch manually each time you boot into Windows (if you want the performance boost, sometimes if you are just doing a quick thing, it isn’t worth it!), I will do this if I am gaming (maximum performance and heat minimisation) or on a long trip (battery preservation).
Also, sometimes it will revert back to the default settings. Annoying, but easy to fix. Just go to Profiles, select your undervolt profile, show values and APPLY!
I find that by applying undervolts to my CPU and iGPU results in some pretty decent gains in battery endurance time. However, most importantly, when I am gaming, it has a roughly 10-15 C difference in temperature readings, which means I’m getting better performance (no thermal throttling) and not wearing out my components as much. So, wins all around for no cost, just a little bit of time to fine tune your components.
Keep in mind that, this is only for underclocking INTEL CPUs and iGPUs and it is not for dedicated Graphics Cards. You will get the most out of this for laptops, on a desktop, you are highly unlikely to be running into power/temperature problems, and if you are there is something else that is seriously wrong!

Upgoats by ryivhnn
Account banner by jimramones


The classical music community at #classical-music and Discord. Follow our community accounts @classical-music and @classical-radio. Community Logo by ivan.atman

Join us @steemitbloggers
Animation By @zord189

.gif)
WOW! just WOW!
great post and so detailed!! Thank You for writing this!!
No problem! It's fun to write about something that you can get totally nerdy about
This is such a helpful article! Thanks so much....and I hope you have time to write one for AMD. GRIN.
I'll try and get one done in the next week... I have to remember where I stashed an AMD laptop/chip. Best to double check the instructions before I post it!
Never heard of undervolting :D that's pretty cool. Nice post and super detailed. Thanks
It's just like tuning a car or any other sort of thing! I have no idea about those things, but this stuff I do know about!
I have heard both the terms but never rreally looked into them, thanks for the clear descriptions and tutorials
No problem! It is worthwhile to get that extra bit of performance and efficiency out of the stock equipment!
Yes thats a good point
This is a very good guide to how to do this. And you are right it can help a lot
Thanks! There's nothing better than squeezing out the best from your stuff!
Wow! I had no idea you could do that, and I've been working on a laptop for almost two decades. While this is really cool, I think I'll pass.
Hopefully not the same laptop for two decades!
There is a lot of taking and fiddling around, both in software and hardware that you can do to get that little bit extra!
Ha ha. No not the same laptop. I buy a new one every two or three years.
I take it you got carried away.
Ha ha, Yes very much so.... When you get nerdy and write about something that is fun!
Congratulations! This post has been chosen as one of the daily Whistle Stops for The STEEM Engine!
You can see your post's place along the track here: The Daily Whistle Stops, Issue 272 (10/05/18)
Thanks for the support!
Double-whammy these days.
Right out of the box, CPU performance is already degraded because of, or from patching against, the Spectre/Meltdown vulnerabilities.
I rarely overclock anymore and am happy with stock speeds, burst rates and Wraith Coolers (again stock) of my Ryzens.
Excellent article.
Namaste, JaiChai
Yeah, those vulnerabilities sucked... Although, I have to say, I don't notice too much impact on day to day computing... Even while gaming. On the other hand, I'm not tracking any stats or fps so I wouldn't know if I was taking a hit!
I don't bother with overcooking either, as stock is plenty good enough these days at the mid to high end. However, undervolts are definitely worth it in a laptop, when a game is running you can start to bump in the thermal constraints!
Not that I'd do this (especially since I use a Mac) but this was an interesting read! Who knew there are people out there competing for bragging rights?!
Ha! It's just like cars or anything else... Tweaking and tuning to get the best performance stats!
Lol!