Create Your Own Radio Station - MyDiyFm
This article is intended for instructional & educational
purposes only. All liability for the use of this
information rests solely on those that act on it. The
author claims no responsibility, explicit or implied,
nor warrants performance whatsoever, and cannot be
held liable for its use in a manor that violates
any law, regardless of jurisdiction.
Outline
- Overview
- Project Features
- Project Requirements & Materials
- Selecting an FM Transmitter
- Building an Inexpensive J-Pole Antenna
- Software Installation
- Securing Access to Your Pi
- How to Schedule Broadcast Content
Overview
This article describes the steps to create a DIY (Do It Yourself) radio station using an inexpensive Raspberry Pi3 micro computer. It handles broadcast scheduling and produces the audio content to drive a transmitter. The practical range of the radio station is determined by the transmitter power and antenna characteristics. The radio station is totally automated, and will run 24x7x365 without intervention if no content changes are required.
The skills required to complete this project are fairly simple, and won't be difficult for the typical hobbyist familiar with the Raspberry Pi3 computer. It can easily be accomplished in a day, unless your Internet access is very slow. It's even easier if you use a purchased antenna, or use a simple whip antenna that comes with many transmitters.
This project requires very few additions to a standard, off-the-self Raspberry Pi3 micro computer. The micro SD-card may be as small as 8GB. The operating system (OS) used is Raspbian, migrated from Debian 9 (code named "Stretch"). The scheduler is written in version 3 of the Python programming language which is included with the Raspbian OS. Only 4 additional OS packages (mpc, mpd, festival and tmux) and 4 python3 modules (soundcloud, BeautifulSoup, requests and html5lib) are required. A setup.bash install script handles most of the installation details.
The scheduler program is comprised of approximately 350 lines of python3 code. The scheduler is a text based console program which is run from a terminal. Tmux is used to allow a user to attach and detach from the scheduler which runs continuously. The setup script configures the Pi to launch tmux and the scheduler whenever the system is powered on. No login is required. Access to monitor the scheduler and change broadcast programming is possible using ssh (or VNC if the Pi's X Window system is not disabled).
The scheduler loads a .schd text file that determines the broadcast content for an entire week. It describes the start time (1 second accuracy) and other parameters for every single item of content. A sample 1 week schedule is provided for select shows on the LRN-FM, Genesis and TFR networks, and announces a station ID message on the hour every hour, followed by FPP Radio News and a randomly selected Lens of Liberty 1 minute spot prior to the network content. The sample schedule file has around 360 lines of schedule text.
A running log of broadcasts and a countdown timer for the currently active broadcast is displayed on the console and in a log file.
Project Features
- Runs on Raspberry Pi v3
- Uses mpd and mpc to play URLs and files
- Uses festival text to speech to play date, time and user text
- Pulls fresh FPP news reports from soundcloud daily
- Detects dead air and plays a random MP3 file selected from archive dir
- Schedule file completely controls program content to 1 second accuracy
An entire week's programming is read from .schd file and repeats weekly - NETWORK field of schedule may be LENS, MP3, NEWS, PROG, TIME and TTS.
See the mydiyfm.schd file for the format of these actions. In brief,
use LENS to play a randomly selected "Lens of Liberty" file,
MP3 to play any MP3 file, NEWS to play the most recent FPP news,
TIME to announce the current date and time, TTS to read text and PROG
to pronounce the comment field, usually the name of programmed show. - Prints current program on console and timer until next scheduled item
- Logs schedule progress to a separate log file
Selecting an FM Transmitter
The transmitter choices available depend on your goals for the station. If you only want to broadcast inside your home or car you can use a low power (less than 1 watt, typically 100mw) FM transmitter with no external antenna. If you want to "get out" further you will need more power and some type of external antenna. The height you put your antenna off the ground is also a major factor on how far your signal will reach.
Amazon.com is a good source for low power FM transmitters between 1 watt and 15 watts. Expect to pay a minimum of $50USD for low end transmitter with .5 - 5 watts of power. A 15 watt transmitter is available from Amazon.com for less than $200USD and includes a built in SWR (Standing Wave Ratio) meter, very useful for fine tuning your antenna to maximize power to the airwaves. Brands to look for include: Signstek, Retekess, FM-User, C-Crane, CZH / CZE and RangeMaster to name but a few.
Building an Inexpensive J-Pole Antenna
If you need an external antenna, consider building your own. There are several simple designs you can use. If a whip antenna is not adequate, you could build a J-Pole antenna which would handle almost any amount of power you are likely to throw at it. Keep in mind you'll also want to use quality RG8 or RG58U coax cable to connect your transmitter to the antenna. You may also require an adaptor, depending on the connector your transmitter uses and if it matches those on your coax cable. BNC or F connectors are the most common, and PL259s are common for coax.
We will briefly describe the construction of a J-Pole antenna, made from 1/2" stiff copper tubing. The dimemsions of each section and the spacing required depend on the frequency your transmitter will run at. Here is a diagram of a J-Pole antenna:

One thing to note is how "weird" RF energy (Radio Frequency) can be. If you placed an ohm meter between the center conductor and shield of the coax it would show a dead short circuit. However, the transmitter tuned to the correct frequency connected to that coax would see a resistance of about 50 ohms, if the antenna and coax are well tuned to the transmitter's frequency. The final output stage of your transmitter is capacitively coupled to the output connector, so only the RF energy is provided, which eliminates the DC component. Therefore a "short circuit" to DC is not a problem.
Be aware that if your transmitter does not have a built-in SWR (Standing Wave Ratio) meter to measure reflected RF energy you can use almost any SWR meter. Don't concern yourself with the rated frequency of the SWR meter, almost all of them are very simple in their construction and operate on a very large range of frequencies. If the transmitter, coax and antenna have a perfectly matched impedance, the SWR is 1:1. That is almost never possible to achieve. The typical SWR should fall in the range of 1.3 to 1.6. The higher the number the worse the impedance match is. Basically it means you're loosing some of your efficiency due to reflected RF energy that doesn't make it to the antenna because of the mismatched impedances.
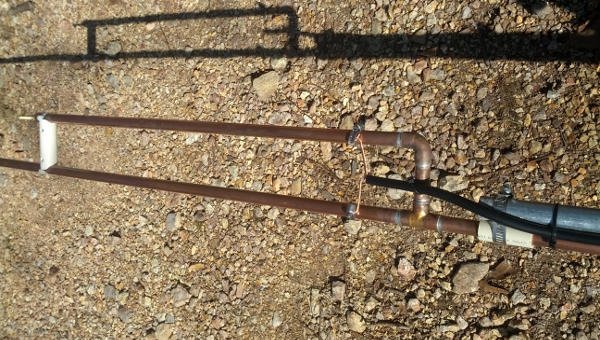
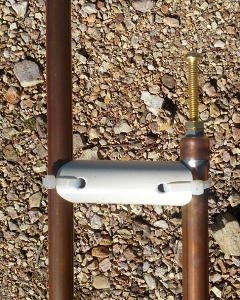
The J-Pole antenna construction is not too difficult. You will need a small torch to solder the pieces together, a pipe cutter or hacksaw to cut the copper sections to the proper lengths, a drill and 5/16" bit to drill a hole to attach the brass adjustment screws to the end caps. The antenna can be fine-tuned by adjusting the length these brass screws protrude from the end caps. I suggest you cut the copper lengths 1.5" shorter than the calculated lengths, allowing the final length to be adjustable by screwing the adjustment screws in or out. You have a 3" range to work with. Note that the distance between the 2 sections is fixed and should be cut as accurately as possible, metal-to-metal not center-to-center according to the dimensions provided by the J-Pole calculator (http://www.hamuniverse.com/jpole.html or https://kb3kai.com/j-pole-calculator). There are many websites you could use, just google "J-Pole calculator". Another website that may be useful is https://www.jpole-antenna.com/tag/calculator/ which discusses the J-Pole and Slim Jim variant, as well as HAAT (Height Above Average Terrain).
Here are 2 pictures I found online showing an actual J-Pole antenna with the coax connection and brass tuners:
Software Installation
- Installing Raspbian OS
If you have not yet installed an OS onto a SD-card go to https://www.raspberrypi.org/downloads/noobs/ and download the NOOBS installer. I recommend you use the NOOBS Lite version which is very small to download and will provide the same options as the full NOOBS version. If you are downloading from work, a library or other location than where you will be using the Pi, or if your Internet connection is not so good you can download the full version from a faster location. The only difference between NOOBS and NOOBS Lite is whether the Raspbian OS is present in the download image. The Lite version is very lightweight, less than 100KB, where the full version is around 4GB. From start to finish both will take about the same amount of time. You'll feel like progress comes faster with the Lite version tho. It won't take very long to download that and get your Pi up and running, tho it will take some time for NOOBS Lite to download Raspbian after you select it from the list of OSs.
There plenty of youtube videos and getting started guides for the Raspberry Pi, for example this one: https://www.raspberrypi.org/learning/software-guide/quickstart/. Some type of guide was most likely provided along with your Pi. Pick whichever approach you like that's easiest for you.
Once you have Raspbian installed and rebooted, and you are looking at the Raspbian desktop on your monitor, you can begin the installation of MyDiyFM. The first step is to download the setup.bash script. The setup.bash script will handle most of the remaining downloads and installation of MyDiyFM. To download the setup.bash script run the following commands in a terminal while logged into the Raspbian desktop with the default "pi" account:
curl -s https://pastebin.com/raw/1kbH94cM | tr -d '\r' > setup.bash
chmod 755 setup.bash
I suggest you open the setup.bash script with a text editor and review it. That isn't necessary, but it is well commented and will acquaint you with the installation details. When you are ready, run the setup.bash script as root with:
sudo ./setup.bash
The last thing the setup script does is present the final instructions from the README.txt file. After you finish those remaining steps and have rebooted, you should begin hearing the radio station audio if you have headphones or a speaker plugged into the audio jack. You will use that audio output to drive your transmitter.
Congratulations! You have successfully installed MyDiyFM!!!
Securing Access to Your Pi
Security is one of the most overlooked and important aspects of running computers in todays world. Depending on how you plan to operate and use your radio station, you have a number of choices, some of which are described below. There are many details to consider in securing access to your Pi. I recommend you google these topics and learn how to "lock down" your system by minimizing the ways connections to it can me made. By only allowing essential services and open ports, you significantly reduce your vulnerabilities to hackers and attackers.
- Headless Operation
In this configuration, the X-Window GUI (Graphical User Interface) is disabled and connection to the Pi is by ssh. You manage the system by logging in accros the network from another computer (using the ssh command in a terminal on Mac & Linux and separate applications like Putty on Windows). You don't need a keyboard or monitor connected to the Pi, you only need a network connection, and that can be either a wired or wireless connection. You need to know the IP address of your Pi to connect to it. If your network uses DHCP to assign IP addresses you should have your router reserve a specific IP address so you can easily connect to your Pi. If your router is not capable of address reservation you need to find another way to learn which IP address is assigned to your Pi by DHCP, otherwise headless operation may not be practical for you.
The final steps from the README.txt file explain how to disable automatic login of the pi account and how to enable ssh. It does not however cover how to disable the GUI. You can revisit the initial option selections you made and change any of them by running: sudo raspi-config and changing what you wish. To disable the GUI (the Raspbian Desktop) run raspi-config and select "Boot Options", then CLI/Desktop and disable it. You should verify you can connect via ssh by running the following command on another computer on the same network:
ssh mydiyfm@< IP address of your Pi > for example: ssh [email protected]
If successful you will be prompted for the password for the mydiyfm account. Use the password you provided at the end of the setup.bash installation script.
Once you verified ssh access is working, you can tighten security even further by editing /etc/ssh/sshd_config and changing the ssh port from the default / standard value of 22, to some other number greater than 1024 and less than 64534. You should also consider creating a public key pair, and perhaps even disabling password authentication. Google that and you will find many web pages that describe how. You may not want to disable password authentication if you opt to use VNC as described below.
Remote Access to the Raspbian Desktop using VNC
Raspbian includes a VNC server as part of its standard installation. In this configuration you connect to the Raspbian desktop by using a VNC client program on another computer such as RealVNC. You can even disable remote access to the VNC server (by specifying localhost as its address) and have ssh port forward a connection through a TCP/IP "tunnel". Using a VNC client is just like you were looking at a monitor connected directly to your Pi. To do that you connect to the Pi using different ssh command options, which "forwards" your Pi's VNC port to your client system, then you point your VNC client to the forwarded port on your local client system. You may find the info here worth your time to read: https://www.raspberrypi.org/documentation/remote-access/vnc/ or https://help.edovia.com/hc/en-us/articles/115005376088-Configuring-a-Raspberry-Pi-for-Remote-Access.Tunnel VNC Through SSH
You will need to do some online research to find a way to change the RealVNC server's address and port on your Pi. Ideally you will set the IP address to localhost, which prevents any external connections to the VNC server. Very safe but not usable, unless you forward the VNC port through an ssh tunnel. Assuming your VNC port is 5901, you can forward the port through ssh with the -L option:
ssh mydiyfm@< IP address of your Pi > -L 5901:127.0.0.1:5701
Provide the mydiyfm account password or the passphrase of your ssh key pair to authenticate your ssh session. After successfully connecting, the remote port for VNC on the Pi will be forwarded to you local machine at port 5701. You can now connect your RealVNC client to 127.0.0.1:5701, which tunnels through ssh to connect to VNC server on the Pi.
You should note that by disabling the Pi's GUI and running in the "headless" mode described above will free significant resources such as memory on the Pi. Since the scheduler is a text based program, you don't actually need the overhead of the GUI, and your Pi will perform better and cooler.
How to Schedule Broadcast Content
As mentioned earlier, the mydiyfm radio station is programmed by a simple text file, mydiyfm.schd. It contains all the information for a weeks worth of content. The general format of each line is:
------Field 1-----------Field 2 ---------------Field 3--------------Field 4-------Field 5----------Field 6----->
DAY OF WEEK | START-TIME | END-TIME (unused) | FILE/URL | NETWORK | ITEM COMMENT
Now lets look at some lines from the sample schedule file:
M-F 000000 0000 /home/mydiyfm/stationID.txt TTS Station id message
M-F 000010 0000 ------------Unused-Field---------- TIME Local time
M-F 000022 0000 ------------Unused-Field---------- NEWS FPP Radio News
M-F 000522 0000 ------------Unused-Field---------- LENS Lens of Liberty
M-F 000625 0000 http://s2.voscast.com:7392 LRN-FM Daily Podcasts
These lines set the programming starting at midnight for all weekdays. Notice the end time is always 0000, and that no changes take place after 6 minutes and 25 seconds past the hour. Field 2 sets the start time, formated as 2 digits each for the hour, minute, and second (HHMMSS). Program content is only terminated by a following schedule item and field 3 is never used. Field 5 dictates the function of the line, either the name of the network the content relates to or a function such as announcing the time and date.
Here is a description of what each line does.
M-F 000000 0000 /home/mydiyfm/stationID.txt TTS Station id message
The first line says that at midnight Monday through Friday read the file specified by the contents of field 4 using the festival TTS (Text To Speech) program. The comment for this line indicates this is a station ID message. Note that a full pathname is required. You will hear nothing for 10 seconds if the pathname of the file cannot be read or the OS access permissions prohibit the mydiyfm account from being able to read the file. This item is given 10 seconds to complete before the next item starts.
M-F 000010 0000 ----------Unused-Field---------- TIME Local time
Next, starting at 10 seconds past the hour the current time and date are announced. Field 4 is unused but note that something must fill that space. Each line is split at whitespace boundaries so each field can be accessed. All text starting with field 6 and all that follow it until the end of the line are combined into a single value. Field 6 and all that follow are nothing more than comments, used for display purposes and for logging. Note that if PROG appears in the NETWORK field 5, the contents of field 6 and all beyond are announced with the festival TTS. This is useful for example, if you wish to announce the the next schedule item, or as a convenient way to announce a small amount of text without the need to create a file for it.
M-F 000022 0000 ----------Unused-Field---------- NEWS FPP Radio News
Starting at 22 seconds past the hour FPP Radio News is played. These are 5 minute news spots updated once a day and downloaded from SoundCloud. Every hour Soundcloud is checked for a new mp3 file, and the last file downloaded is cached. A slight delay may occur when a new FPP file is downloaded.
M-F 000522 0000 ----------Unused-Field---------- LENS Lens of Liberty
Following the FPP Radio News at 5 minutes and 22 seconds past the hour, every weeknight a Lens of Liberty 1 minute spot is played. These files are downloaded all at once when mydiyfm is installed, and whenever LENS appears in field 5 one of the roughly 100 files are selected at random to play.
M-F 000625 0000 http://s2.voscast.com:7392 LRN-FM Daily Podcasts
The last item for the midnight hour is the primary program content. In this case it is sourced from the LRN-FM network and begins at exactly 6 minutes and 25 seconds past the hour. The tricky part is obtaining the URL you need which the mpc player will recognize. It may require you use the "view source" in your web browser and examine the raw HTML to find. Some trial and error experimentation may be required to obtain the correct URL. On the GCN network for example they use 6 different URLs, plus, from time to time they change their "flow" in the URL. You may note the code has provisions to detect when that changes and to compensate for it automatically, however those changes are incomplete. If you hear see "Dead air!" in the log whenever a GCN program is scheduled you may want to manually check if they haven't changed the flow value. If so you'll need to use a global find and replace to change "flow01" with "flow02" or vise-versa in the GCN URLs.
Whenever dead air is detected you will see "Dead Air!" on the output and a random file from the archive is played. You can put any audio file mpc can play in the archive folder and one of them will be selected at random to play whenever dead air is detected. Several files are downloaded from The Corbett Report by the setup.bash script. I suggest you keep the files short, say 15 minutes or less. After the archive file has been played an attempt to replay the originally scheduled program will be attempted. If successful, normal program content will be resumed. If not another archive file will be played. This pattern will repeat as long as dead air is detected, which may be due to a loss of the Internet or a network fault of some kind.
- Schedule Overrides
Occasionally you may want to alter a particular program, or "override" the schedule. For example, lets say you want to follow LRN-FM's weekday schedule every day except Friday at 9PM. You simply designate your alternate content by adding your override to the schedule file so it appears before the segment being overridden. It can be placed anywhere in the file, but it makes sense to put the overrides at the top, especially if they are temporary. To add the Friday night override I just described, add this line to the top of the mydiyfm.schd file:
FRI 210625 0000 http://flow01.gcnlive.com:80/channel5-hi.mp3 GCN Costa Report
There is no need to comment out the item being overridden, as long as the start times match. The reason for that is because the override will always be scheduled first, and the time for the overridden item will have already past by after the override is completed, so it will not be played.
Overrides are particularly useful for temporary changes or changes to weekday programs for a specific day of the week.
Congratulations @pirate-parties! You have completed the following achievement on the Steem blockchain and have been rewarded with new badge(s) :
Click here to view your Board
If you no longer want to receive notifications, reply to this comment with the word
STOPDo not miss the last post from @steemitboard:
Hello @pirate-parties! This is a friendly reminder that you have 3000 Partiko Points unclaimed in your Partiko account!
Partiko is a fast and beautiful mobile app for Steem, and it’s the most popular Steem mobile app out there! Download Partiko using the link below and login using SteemConnect to claim your 3000 Partiko points! You can easily convert them into Steem token!
https://partiko.app/referral/partiko
Congratulations @pirate-parties! You received a personal award!
Click here to view your Board
Do not miss the last post from @steemitboard:
Vote for @Steemitboard as a witness and get one more award and increased upvotes!