Metal in your toothbrush and my macrophotography setup

Did you know your toothbrush has metal parts? I didn't. Was quite surprised to see these details when zooming in on the toothbrush.
To be honest, I have no idea how toothbrushes are made. Maybe I should check the 'How It Is Made' series on TV, it is probably in one of their episodes.
Camera

In a reply to one of the images in this 'toothbrush'-serie, I was asked to tell a bit more about my setup. Keep in mind I am an amateur, still learning by trial and error. Spending money on a hobby is no problem, but I like to do that gradually. It is a precaution, to not end up with expensive equipment catching dust on a shelf.
Equipment
What I started with (Canon IXUS 950 IS)

Canon
This camera is 9 years old and to my knowledge can only be bought second hand nowadays. It is compact, very easy to carry around and creates amazing images.
The camera has a macro-mode. In this mode the camera decides what settings to use for shutterspeed, aperture and so on. You just point and click. I noticed, while browsing old images, some of these images were pretty good, but I wanted more.
Checking the manual showed there was another mode, the digital macro mode. In this mode you can change the settings yourself. Images can be taken as close as 2 cm away from your object. This resulted in even better images, not all of course, but being so close showed details I had never seen before, in my own images. Like this one:
But I wanted more.
What I started with (Canon EOS 550D)

Canon
With this camera, being more equiped for playing around with different settings, I hoped to get better results. Unfortunately, I didn't. The lens that came with the kit is just not great for macrophotography, it is an allround lens.
After some searching on the internet I found the 'reverse lens'-method. My equipment setup changed to this:

Because the lensopening, that is usually attached to the camera body, is now exposed I only use this indoors. My 'studio' looks like this:

The small tent came with 2 lamps, for professional shoots they are probably worthless but for me they are good enough for now. Background, now white, can easily be changed to red, blue or black.
The shortest distance between lens and object is about 5 cm. Some nice details are visible. Still a few problems. One was, keeping focus, because every adjustment on settings or just pressing the release button moved the camera and put things out of focus. Another was, the workflow. To get the images into the computer , the memory card had to be removed from the camera and inserted into the computer, or the whole camera had to be placed next to the computer in order to be able to connect it using a USB cable.
Some images look great in the preview window of the camera but once displayed on computer screen look a lot less great. Having to go back and forth with either the memory card or the cable got annoying pretty quicky.
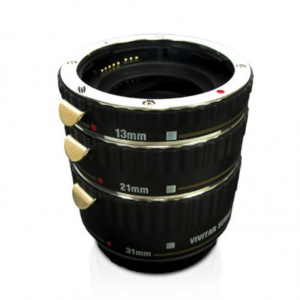
A third thing was, I still wanted more, I wanted to take the camera outside. To tackle that problem I bought extension rings. Extension rings are placed between your camera body and your lens. There is no lens or anything inside those extension rings. They just extend.
Also, pick the ones with contacts. You can spot the metal dots on the inside of the ring in the image. These contacts will keep the communication between your lens and the camera body alive.
The ones I bought have metal parts, this increases their robustness.
)
Setup with all extension rings applied to the camera looks like this:


It is now possible to get as close as 1 cm away from the object. Even more details, but of course smaller part of the object in view. That is a problem from time to time. Sometimes I want a specific part of the object in the shot. It takes some time to find the best result, either by moving the object and the camera farther away from eachother or remove one of the extension rings. That is still trial and error area.
Remote Shooting
The last problem to solve, for now, was the going back and forth with the memory card. The solution is, remote shooting. With remote shooting you control the camera using your computer, and images are directly saved to your computer. The Canon Ixus 950 IS unfortunately seems to miss this feature, but luckily it is present on the Canon EOS 550D.
To get remote shooting to work, you need
- a camera with remote shooting feature
- a (USB) cable to connect the camera to the computer
- software to control the camera
Check the user manual of the camera to find out whether or not your camera is capable of remote shooting. Or search the internet.

Software
Some photo editing software programs let you capture images directly from your camera, but they will most likely not have all the possible settings available. Therefore it is better to use the utility the camera manufacturer supplies first, to optimize the shot, then switch to your photo editing software and capture the image.
Canon has EOS Utility to enable you to use remote shooting. This software is on the CD that came with your camera. Check the Canon website for updates.
After installing the software, and connecting the cables, turn on your camera. This screen wil pop up:

- Select Camera settings/Remote shooting.
This will result in the following screen with camera settings:
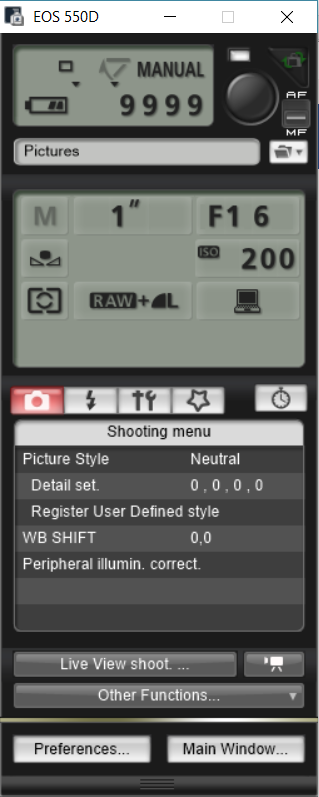
- At the bottom, select Live View shoot
You will hear the camera click, and the next screen pops up:

You have a much larger preview window now. It is easier to determine what will be in focus in your image.
At this point the computer completely controls the camera. When you walk up to your camera you will notice nothing you do will work. That is kind of a problem. I want to set up the camera to at least have the part I want to capture in view. Luckily there is function for that.
In the settings screen on the computer, where you selected Live View shoot, there is a section that has your aperture and iso and so on. In that section there is also a button with an icon of a computer.
- Double click that icon and select the icon with computer and camera
Now you can control your camera directly and remotely.
There are a lot of functions in this software utility. It is best to check the manual of the software to understand, and find, all functions. It is a very powerful tool.
The Result
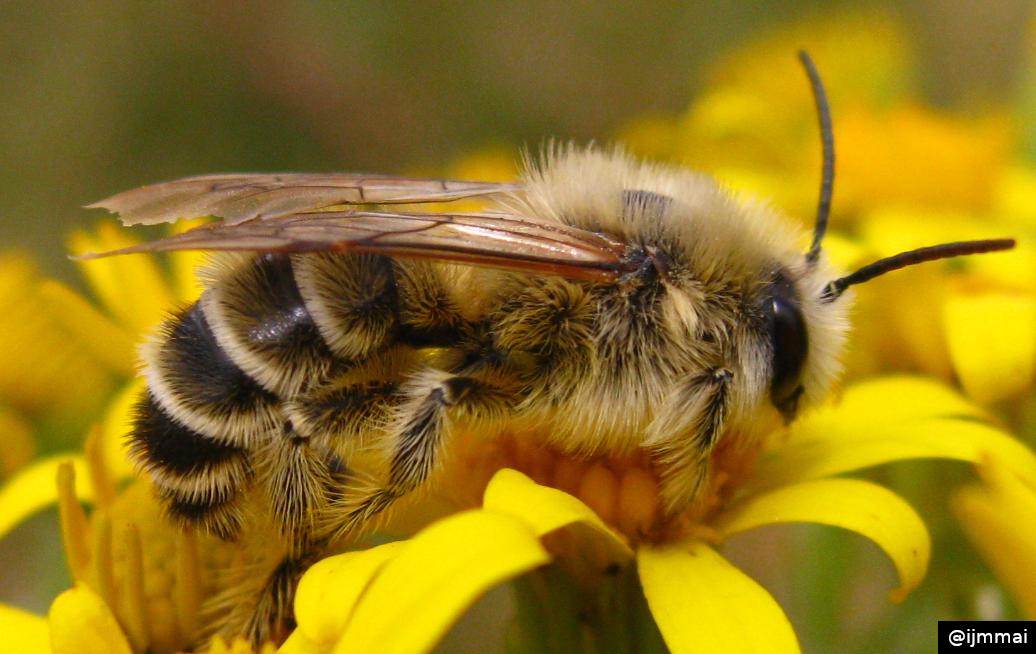
The image below shows the clostest I could get to the walnut:

For the images below I used my iPhone. They are not great, but are used to just show the setup.


I hope this is helpful to anyone. Like I said I am an amateur, still a lot to learn, but if you have a question, let me know and I will try to help you out.
You have a minor misspelling in the following sentence:
It should be therefore instead of therefor.You are right. Can you imagine I looked that one up yesterday because I wondered about correct spelling, using it in another post. Old habits die hard.
I know you are a bot, wanted to let you know anyway :)
Nice post. Upvote and follow done. Keep it up.
Thank you. Do you do anything photography related, or 'just' crypto information. I know that is a lot of work itself already.
I have less idea regarding photography. But I do research on new potential ICO. You can check out my blogs.
That is what I did already and found out you are post are all crypto related. Browsing old posts is a bit slow, so I thought I'd ask :)
Thanks for your reply.
Welcome friend.
Thank you @ijmmai for joining Photochain's photography contest. We appreciate your support and will reward you for each entry.
This contribution earned you 10 XP and 20 photons.
Don't forget to comment on other #photochaincommunity contributions to increase your XP multiplier and earn even more!
To receive the reward contact @runicar on Discord with your Ethereum wallet.
More info can be found at the contest announcement post.
Read more about Photochain on this post.
Visit photochain.io.
Try out the demo.
Thank you for your contribution to the Photocircle tag!
Cheers,
@photocircle Team
Learn about this photo curation project by clicking >here
To stop receiving comments then reply
!STOP!